
7 minute read
HOFSTRA UNIVERSITY


Chrome River User Manual
To add a delegate, click on the User Icon then Account Settings
Advertisement

Click Delegate Settings, click + Add New Delegates.
Begin typing the employees’ name and it will appear in the dropdown menu. Click on the delegates’ name.
You may remove delegate access at any point by simply clicking the X next to the delegate’s name.
Chrome River User Manual
Download the Chrome River SNAP APP for IOS & Android
Before creating an expense report, it is important to note how to upload and manage receipts.
Employees and their delegates have two options for uploading receipts to Chrome River. Each is detailed below.
The University strongly encourages use of the Chrome River SNAP APP , as it allows employees to take a picture of a receipt as soon as it is received. This is very useful for employees, ensuring they will have the proper documentation for reimbursement and avoid lost receipts.
The Chrome River SNAP APP allows employees to upload receipts immediately upon incurring an expense. Receipts shall be automatically uploaded to the user’s Receipt Gallery for use in Chrome River. The APP provides access to entering additional information such as receipt amount and purpose of the expense.
To download the Chrome River SNAP APP on your mobile phone: o iPhone Users: Go to your “App Store” and search for “Chrome River SNAP” application. It is free to download. o Android Users: Go to “Play Store” and search for “Chrome River SNAP” application. It is free to download.
Chrome River SNAP APP
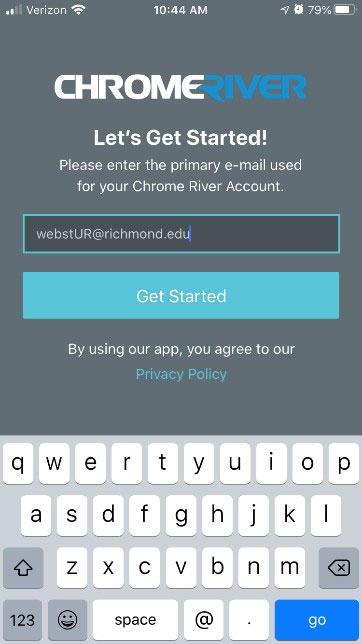
Once you have installed the SNAP APP, open it, and you will be asked to enter the primary email address used on your Chrome River account, which is your hofstra.edu address. Enter and tap Get Started
Enter your email address - an email with a verification code will be sent to this address. Enter the code in the APP and tap Verify. Note: you must provide the APP access to your camera.
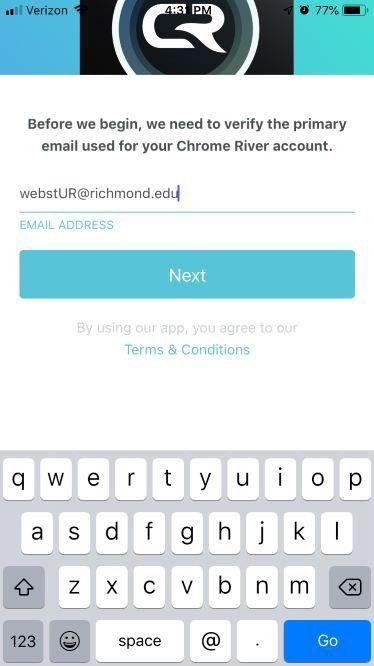
Now you’re ready to begin creating and submitting reports!

Chrome River User Manual
Uploading and Managing Receipts using the SNAP APP
Uploading using the SNAP APP o Open the APP and your camera will be ready to snap a picture of your receipt. Once you do so, you will be given the opportunity to add more information and/or upload the receipt. o All receipts captured through SNAP will be available to you in the Receipt Gallery, which can be accessed through the eWallet. In the eWallet, click receipts then click Receipt Gallery for a copy of your uploaded receipt.
Manual upload from documents scanned and saved to your computer. See instructions further below. (link)
Creating an Expense Report (previously used a Hofstra Check Requisition or Travel Expense Report) o An Expense Form is required for each receipt or expense item. An Expense Form can be created for each event, or events can be combined into a single report.
Please Note: In Chrome River, an Expense Report is NOT the same as an Expense Form.
An Expense Report is like the University’s current Check Request Form used to process reimbursements. It allows you to group and organize expenses quickly.
One Expense Report consists of one or more Expense Forms o An Expense Form is required for each receipt or expense (mileage, per diem).
Receipt Expense Form(s)Expense Report
Receipts must be added to each Expense Form using one of the following methods.
1. Uploading receipt images to Receipt Gallery in Chrome River by email (see instructions on page 22)
2. Accessing receipt images previously uploaded using the Chrome River App (“CR SNAP”) (see instructions on page 16)
3. Attach receipts directly from your desktop (see instructions on page 23).
Chrome River Expense Reports will be used for travel reimbursements, non-travel reimbursements, cash advance issuance, and cash advance settlements.
To create an Expense Report, the following steps must be taken. Each step will be discussed in further detail below.
Chrome River User Manual Page 17 of 71
Chrome River User Manual
o On the Expenses Header on the Dashboard Click +Create to open a new Expense Report

The Expense Report will open as shown below. See below description for each field required.
The following fields will be displayed on the Expense Report:
Report Name – Enter a detail description, unique report name (i.e., Ellucian Conference in Chicago 10/28/22-10/31/2022)
Start Date – Enter the start date of trip
End Date – Enter the end date of trip
Note: Start and End dates are important because all receipts must be dated within these dates
Business Purpose – As required by the IRS and University policy, provide a detailed explanation of the business purpose for the expense submitted, including who, what, where, and why, as appropriate. The Business Purpose entered on the Main Expense Report form (i.e., the basic Check Requisition). For each itemized expense you will be able to populate a more detailed business purpose. As required by the IRS and University policy on “Business Travel & Entertainment”, the Statement of Business Purpose should include the nature of the business, the individuals participating, and everyone’s business affiliation.
Chrome River User Manual
Report Type – Select the Report Type. It is essential to select the correct Report Type to ensure proper review and approval routing, and proper use of budget codes (preprogrammed for your convenience). Should you have any questions regarding the Report Type, please contact the Budget Office.
o Athletic Team Travel o Business Meals o Business Travel o Cash Advance Issuance o Cash Advance Settlement o Conferences/ Professional Development o Faculty Travel o Recruiting o Other Travel (Expense)Type – o Select Domestic or International o Is this an expense for a grant or designated fund? – Select yes or no
After completing this section of the Expense Report, click Save at the top right of the screen.
A new screen will appear to allow you to Add Expenses. A unique Chrome River Expense Report number will also be assigned and will appear at the bottom left-hand corner of the screen.

Chrome River User Manual
Step 2 - Adding Expenses
After completing the Expense Report header, the Add Expenses screen should appear. (If it does not, click the + button at the top of the report summary to the left.)
The Add Expenses screen provides three methods to add expenses:


Expenses can be added manually through the Create New button,
Expenses can be added from the eWallet, or
Expenses can be added from the Receipt Gallery
A green dot next to an expense category in the eWallet (cash advance/offline) or Receipt Gallery indicates there are unused items or receipts available for use.
Chrome River User Manual
Create New Expense
Selecting the Create New link allows the user to manually add direct expenses to the Expense Report using tiles. After clicking the link, you will be presented with an expense tile mosaic, as shown below.


Note: Any tile with a small down arrow at the bottom is a parent tile with additional “child” tiles nested under it. Clicking on the parent tile will display the children tiles (see example below). For example, Ground Transportation is a parent tile, with several tiles options to select.
Click the appropriate tile for the expense you are adding. Each tile is mapped to a budget account expense code. The tile selected will correspond with the account code that is recorded in Banner.
NOTE: A parent tile cannot be added to an Expense Report, but any tiles within the category may be.
Chrome River User Manual
After selecting the expense tile, you will be asked to complete the corresponding Expense Form Each expense tile has a corresponding Expense Form. The Expense Form collects information relating to the expense and will vary depending on the tile selected.
The form will require specific information that will be used by Chrome River to process expenses and may be used to perform behind the scenes calculations.
Date
When manually adding a receipt, the date will default to the current day’s date. You will need to update using the receipt date.
Amount Spent
Manually enter the amount spent.
Business Purpose
Each expense on an Expense Report requires a clear and detailed business purpose.
A business purpose must document the expense as necessary, reasonable, and an appropriate expense for the University.
The Expense Report business purpose carries over to each individual Expense form. However, you may edit the business purpose for specific expenses to add clarity.
Merchant (if applicable)
You will be asked to populate the Merchant. The Merchant is the vendor that the employee paid the expense to. If the employee stayed at the Hilton Atlanta, then the Merchant would be “Hilton Atlanta”.
Fund/Org
Chrome River has been set up to default to each employee’s home Fund/Org department. You will have the option to change the Fund/Org easily through a drop-down menu.
Attendees (if applicable)
You will be asked to add attendees and indicate if they are internal, a Hofstra employee, or external. You will be able to add attendees by typing the name of the individual. For internal attendees, a drop menu will provide a list of University employees and their title as you start typing. For external attendees, you will be prompted to add their name, title, and company.
Receipts (Attachments)
Except for a few expense types, including mileage and per diems, you will be required to attach receipt in the section indicating Attachments. Receipts can be attached from your Receipt Gallery or uploaded from your computer by clicking the Upload button on the top right-hand corner under the Receipt Gallery.

Chrome River User Manual
Note: Chrome River uses optical character recognition (OCR) which attempts to extract data from the receipt image and populate into the expense form where applicable. To ensure timely processing of your request, it is essential that you verify the accuracy of any data that auto-fills from a receipt image and make corrections where appropriate.
Alternative Ways to Upload Receipts to Receipt Gallery
Emailing Receipts to Receipt Gallery
To email a receipt to your Receipt Gallery, simply attach the images or files to an email message and send the message to receipt@ca1.chromeriver.com

Please note that once you have emailed the receipts, you will receive a confirmation email once the receipt is received by Chrome River and available for use in Chrome River. This may take a few minutes.
While your Hofstra email account has been set up, if you are sending the message from a personal email address, please ensure that you have set up the email as an Alternative Email in your Personal Settings.
Please note the University highly encourages the use of Hofstra email rather than a personal email address. For more information, see Add an Alternate Email.
If you enter the expense amount in the subject line of the email, that amount will populate in the Spent field for the expense in Chrome River. Additionally, you can enter a description of the receipt in the body of the email, and it will be added to the Description field.
If you are serving as a delegate for another employee and need to submit a receipt for that employee, you will need to enter the expense owner’s email address in the subject line of the email to have it show up in their Receipt Gallery and eWallet.


