7 minute read
MAINTENANCE1202

Engine
Checking Engine Oil Level: Tier 2 Engine John Deere 4045TF270 (SN AC02633 and up) up)” on page5 for engine oil grade requirements.
IMPORTANT:See “Fluid Capacities/Lubricants: John Deere 4045TF270 (SN AC02633 and up)” on page5 for engine oil grade. To prevent damage to the engine, only use the engine oils specified, or oils of equivalent quality and grade.
To check the engine oil, the machine must be on a level surface and the engine turned off.
1.Run the engine until it is at operating temperature, then turn the engine off.
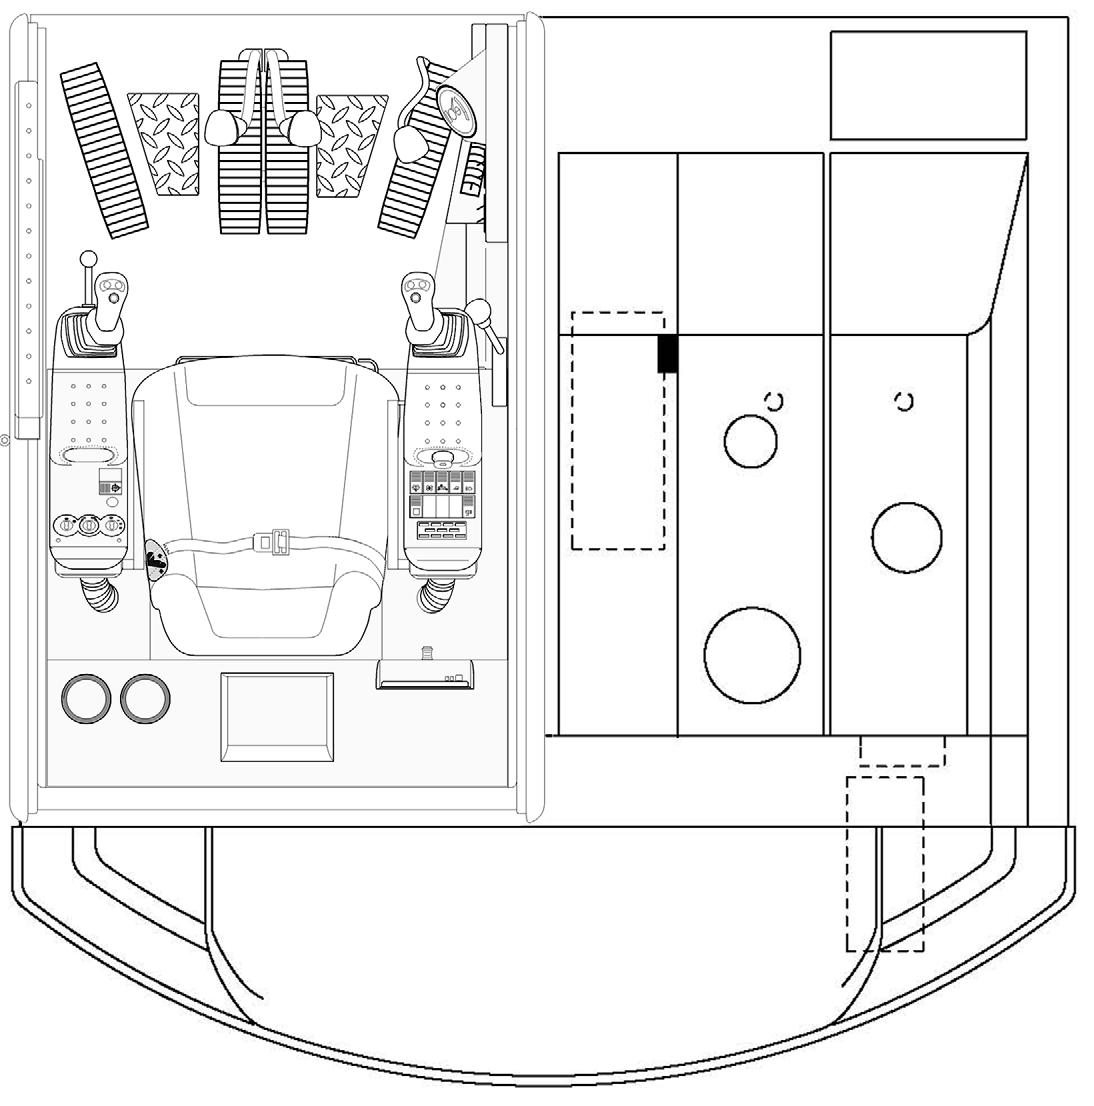
2.Pull the engine cover latch handle (located at the left side of the operator’s seat) and raise the engine cover. See Figure 5-2.
7.Install oil filler cap.
3.Pull out the dipstick located in the middle of the engine. See Figure 5-3.

4.Wipe the dipstick with a clean, lint-free towel.
5.Insert the dipstick until it stops, pull out the dipstick and read the oil level.
IMPORTANT:The marks on the dipstick indicate the minimum and maximum oil levels. You must add oil if the oil level is below “minimum.” Do not add oil above the “maximum” level.
6.Add oil if required. Remove the oil filler cap from the engine and add fresh, clean engine oil. See “Specifications” on page3 for engine oil quantity and “Fluid Capacities/Lubricants: John Deere 4045TF270 (SN AC02633 and
Checking Engine Oil Level: Tier 1 Engine Yanmar 4TNE106T-NS (SN AB00473-AB03158)
IMPORTANT:See the lubricant list for engine oil grade. Only use engine oil specified, or equivalent quality and grade, or damage to the engine could occur.
To check the engine oil, the machine must be on a level surface and the engine turned off.
1.Run the engine until it is at operating temperature, then turn the engine off.
2.Pull the engine cover latch lever (located next the right side of the operator’s seat) and raise the engine cover.
3.Check the engine oil level using the dipstick located at rear of the engine (Figure 5-4).
4.Add oil if required.
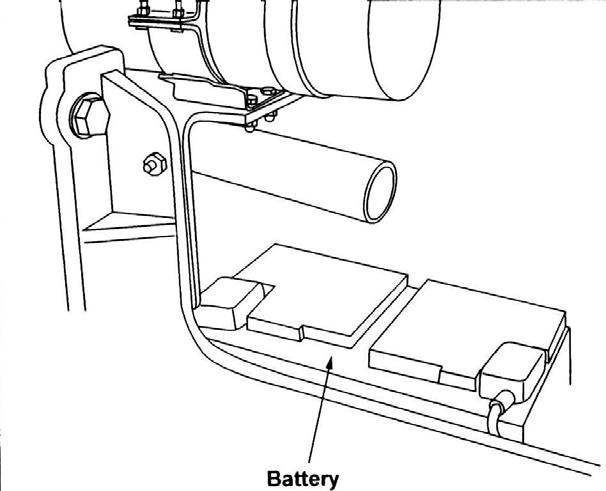
Figure 5-4 Oil Fill and Filter Locations
NOTE: The marks on the dipstick indicate the minimum and maximum oil levels.
Changing Engine Oil and Filter: Tier 2 Engine John Deere 4045TF270
(SN AC02633 and up)
1.Position the machine on a level surface. Run the engine until it is at operating temperature, then turn off the engine.
2.Pull the engine cover latch handle (located on the left side of the operator’s seat) and raise the engine cover. See Figure 5-2.

3.Position a waste oil collection container underneath the engine oil pan.
IMPORTANT:Dispose of waste engine oil according to environmental laws or take to a recycling center for proper disposal. DO NOT pour waste engine oil onto the ground or down a drain.
4.Remove the drain plug from the oil pan and allow the oil to drain into the waste oil collection container.
5.Remove the oil filter, using a filter wrench as necessary.
6.Clean the filter housing surface. Put a film of clean oil on the filter gasket. Install the new filter with gasket and hand tighten.
7.Install the drain plug.
8.Remove the oil filler cap from the engine. See Figure 5-3. Raise the dipstick slightly to allow any trapped air to escape.
9.Pour in new oil. See “Specifications” on page3 for engine oil quantity and “Fluid Capacities/Lubricants: John Deere 4045TF270 (SN AC02633 and up)” on page5 for engine oil grade requirements. Crankcase capacity is 16.9 qts. (16 L) without a filter change and 18 qts. (17 L) with a filter change.
10.Complete steps 3 through 7 of “Checking Engine Oil Level: Tier 2 Engine John Deere 4045TF270 (SN AC02633 and up)” on page60.
11.Start the engine and let it run for several minutes. Watch the engine oil pressure indicator (red) on the fuel gauge (to identify the engine oil pressure indicator, see “Instrument Panel, Switches and Indicators (SN AB01968 and up)” on page33, ref 6). The indicator should turn off after several seconds. If it does not, shut off the engine, determine the cause, and fix the problem before restarting the engine.
12.Stop the engine and check for leaks at the oil filter and oil drain plug.
13.Complete steps 3 through 7 of “Checking Engine Oil Level: Tier 2 Engine John Deere 4045TF270 (SN AC02633 and up)” on page60.
Changing Engine Oil and Filter: Tier 1 Engine Yanmar 4TNE106T-NS (SN AB00473-AB03158)
1.Place the machine on a level surface. Run the engine until it is at operating temperature, then turn the engine off.
2.Pull the engine cover latch handle (located on the left side of the operator’s seat) and raise the engine cover.
3.Position waste oil collection container under engine oil pan.
4.Remove the drain plug from the oil pan and allow oil to drain into waste oil collection container.
5.Remove the oil filter, using a filter wrench as necessary.
6.Clean the filter housing surface. Put a film of clean oil on the filter gasket. Install the new filter with gasket and hand tighten.
7.Reinstall the drain plug.
8.Remove the oil fill cap from the engine (Figure 5-4). Pour in new oil. Crankcase capacity is 6 qts. (5.7 L).
9.Reinstall oil filler cap.
10.Start the engine and let it run for several minutes. Watch the engine oil light on the control panel. The light should turn off after several seconds. If it does not, shut off engine and determine cause.
11.Stop the engine and check for leaks at the oil filter and oil drain plug.
12.Check the oil level again and add oil if necessary.
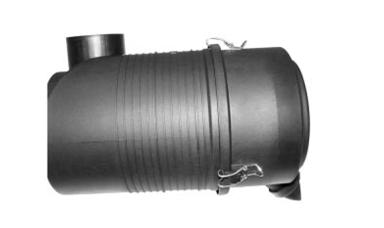
Air Cleaner (SN AC02633 and up)
IMPORTANT: Do not operate engine without the air cleaner components installed or damage to the engine could occur.
1.Lift the hydraulic tank cover to access the air cleaner. See Figure 5-5.

Figure 5-5 Air Cleaner Location Access
2.Unlatch and remove dust collector/cap (A) from the air cleaner. See Figure 5-6.
Figure 5-6 Dust Collector/Dust Cap
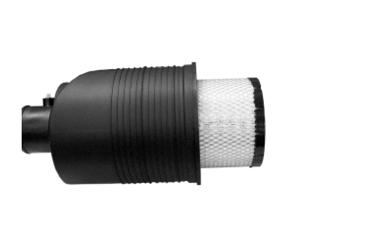
IMPORTANT: Always replace the air filter (B), if the air filter indicator lights up (red), or if the air filter is torn or contaminated at the sides. See Figure 5-7.
3.Move the end of air filter (B) gently to the left and right, and up and down. See Figure 5-7.
Figure 5-7 Air Filter
4.Pull air filter (B) out of the outlet pipe and out of the enclosure. See Figure 5-7.
IMPORTANT: Remove air filter (B) only if replacing it. Do not try to clean, wash, or use it again.
5.Thoroughly clean the inside of the filter housing and the outlet bore.
6.(Optional) To replace safety filter (C), gently pull out the filter element. See Figure 5-8.

IMPORTANT: Remove safety filter (C) only if replacing it. Do not try to clean, wash, or use it again. Usually, the safety filter needs replacement only if there is a hole in air filter (B).
8.Install a new air filter (B). Exert a little pressure with your hand at the outer edge of the filter. See Figure 5-7.
9.Apply and latch the dust collector/cap (A) to the air cleaner. See Figure 5-6.
IMPORTANT: Do not use the latches on the cap to force the filter into the air cleaner housing. Applying force may damage the filter and/ or housing.
IMPORTANT: Close the housing so that the dust collector valve points downward and the locking mechanism catches.
10.Close and secure the engine cover.
Air Cleaner (SN AB03158 and before)
1.The air cleaner is located under the engine cover. Pull the engine cover latch handle (located on the left side of the operator’s seat) and raise the engine cover.
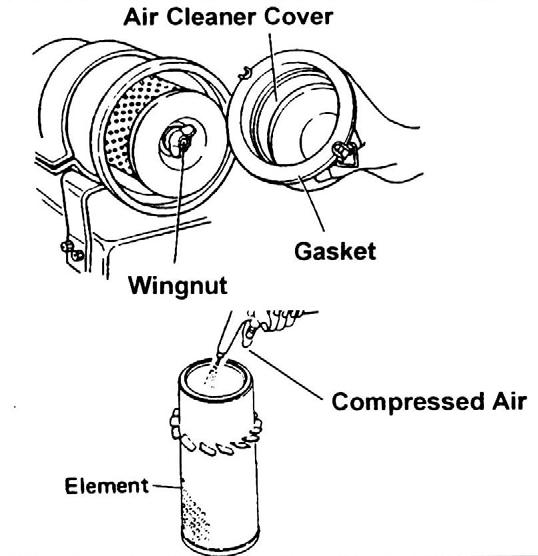
2.Turn the air cleaner cover bolt (Figure 5-9) to remove the air cleaner cover and gasket.
3.Remove the wingnut (Figure 5-9) and remove air cleaner element.
4.Clean air cleaner element with 30 psi (200 kPa) compressed air (Figure 5-9).
5.Reinstall air cleaner element, wingnut, gasket, and air cleaner cover. Tighten cover bolt.
6.Close and secure engine cover.
Figure 5-8 Safety Filter
7.(Optional) Install a new safety filter (C) immediately to prevent the penetration of dust into the air intake system. See Figure 5-8.
IMPORTANT: Do not knock the air or safety filters against a solid object to remove dust. The filters may become distorted and/or damaged.
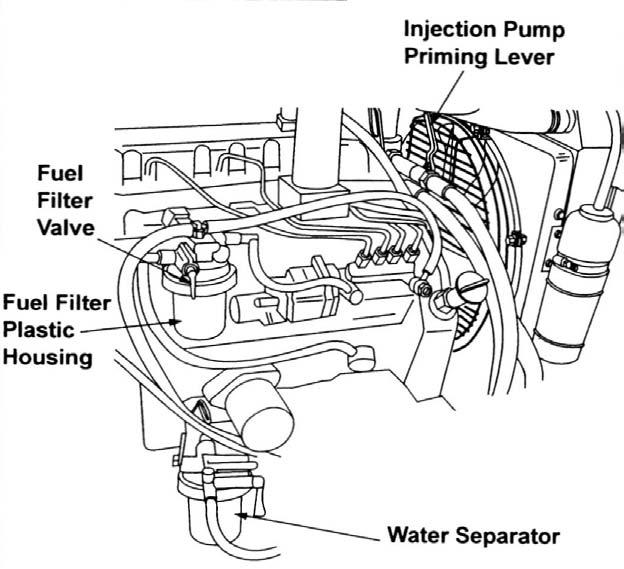
Fuel System
Filling the Fuel Tank: (SN AC02633 and up)
Warning
Stop and cool the engine before adding fuel. NO SMOKING! Failure to obey warnings can cause an explosion or fire.
The fuel level in the tank is indicated by the fuel gauge (1) on the console. See Figure 5-10.
Figure
Air Filter Service
IMPORTANT:Do not knock the element against a solid object to remove dust. The element may become distorted and damaged. Do not operate engine without the air cleaner element installed or damage to the engine could occur.
To fill the tank, remove the fuel filler cap (2) located on the right side of the machine. Fill using clean diesel fuel with a cetane rating between 40 and 50. Re-install the fuel filler cap. See Figure 511.


IMPORTANT: Do not completely drain the fuel tank while running the excavator. If this happens, air will enter the fuel system, and the fuel system will have to be bled. Always completely fill the tank with fuel at the end of the working day.
IMPORTANT: When using the machine in cold weather, be sure to use the proper fuel blend to prevent the fuel filters from “jelling” up. If this happens, the fuel filters will have to be replaced, and the fuel will have to be replaced with the proper fuel.
Warning
Always clean up spilled fuel and oil. Keep heat, flames, sparks and lit tobacco away from fuel and oil. Failure to use care around combustibles can cause explosion or fire, which can result in injury or death.
Filling the Fuel Tank: (SN AB03158 and before)
Warning
Stop and cool the engine before adding fuel. NO SMOKING! Failure to obey warnings can cause an explosion or fire.
The fuel level in the tank is indicated by the fuel gauge on the console (Figure 5-10).
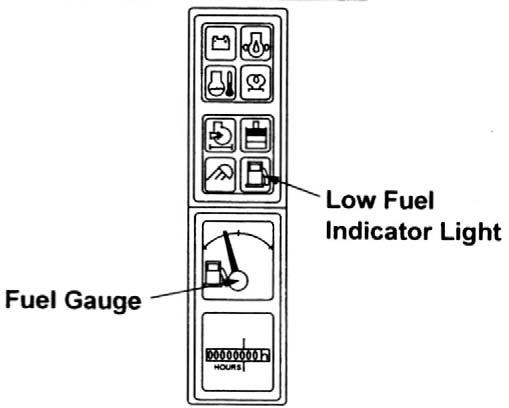
NOTE: When the fuel level reaches 2.5 gal. US (10 L) the low fuel indicator light (Figure 510) will come on to alert the operator.
To fill the tank, remove the fuel filler cap located on the right side of the machine. Fill using clean diesel fuel with a cetane rating over 45. Re-install fuel cap.
Figure 5-12 Fuel Gauge and Indicator Light
IMPORTANT:Never operate machine until fuel tank is completely empty. If this occurs, the fuel system will have to be bled of air. Always fill tank after use.
IMPORTANT: When using the machine in cold weather, make sure to use the proper fuel blend to prevent the fuel filters from “jelling” up. If this happens, the fuel filters will have to be replaced, and the fuel will have to be replaced with the proper fuel.
Warning
Always clean up spilled fuel and oil. Keep heat, flames, sparks and lighted tobacco away from fuel and oil. Failure to use care around com-bustibles can cause explosion or fire, which can result in injury or death.
The optional fuel delivery pump can be used to fill the fuel tank. Be sure that the pick-up hose is clean and will not introduce dirt into the fuel system. See Item 9, Figure 4-4 page31.
IMPORTANT: Make sure to turn off the fuel delivery pump after the fuel tank has been filled. Damage can occur to the pump if it is run for long periods without pumping fuel.