3 minute read
MAINTENANCE1202

Changing Hydraulic Oil: New Style
1.Position the excavator on a level surface.
Figure 5-34 Excavator Position for Checking and Changing Hydraulic Oil
2.Fully extend the bucket and boom, and retract arm as shown in Figure 5-34.
3.Lower the bucket and dozer blade to the ground. See Figure 5-34. Shut off the engine. Remove the ignition key and take it with you.
4.Slowly open the filler cap (1) to relieve pressure. Remove the cap and clean debris out of the strainer. See Figure 5-35.
7.Follow “Mandatory Safety Shutdown Procedure” on page11.
8.Crawl underneath the chassis between the tracks. See Figure 5-36.
9.Open the drain plug (3) and drain oil into a suitable container. Re-install drain plug and tighten securely. See Figure 5-37.
5.Remove the hydraulic oil tank cover (2). See Figure 5-35.


6.To access the hydraulic oil tank drain plug (3), rotate the cab to an angle of slightly less than 45°, as shown. See Figure 5-36.
Plug
IMPORTANT:Always dispose of hydraulic fluids according to environmental laws or take to a recycling center for proper disposal. DO NOT pour onto the ground or down a drain.
10.Remove bolts and filter cover (4). Remove and discard old filter (5). Install the new filter (5) into reservoir. See Figure 5-38.
11.Reinstall filter cover and bolts (4). See Figure 5-38.
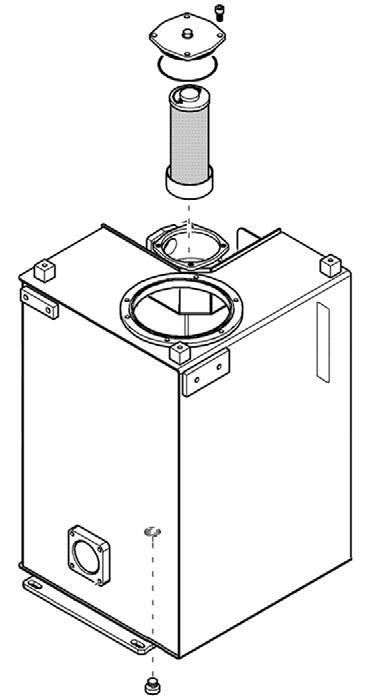
12.Reinstall the hydraulic oil tank cover (2). See Figure 5-35.
13.Fill tank with hydraulic oil until oil level is between red and black marks on sight gauge.
14.Re-install hydraulic oil filler cap and tighten securely.
15.Start engine and let it idle for a few minutes.
16.Rotate cab to normal position as shown. See Figure 5-39.
17.Cycle all front attachment hydraulic functions and check the hydraulic oil level. See “Checking Hydraulic Oil Level: New Style” on page74.

Changing Hydraulic Oil: Old Style
1.Position the machine on a level surface.
2.Fully extend the bucket and boom, and retract arm as shown in Figure 5-40. Lower bucket and dozer blade to the ground. Turn off the machine.
3.Slowly open the filler cap to relieve pressure. Remove cap and clean strainer of any debris.
4.Remove the hydraulic reservoir cover as shown. See Figure 5-40.
5.Open the drain plug and drain oil into a suitable container. Re-install drain plug and tighten securely. See Figure 5-40.
IMPORTANT: Always dispose of hydraulic fluids according to local regulations or take to a recycling center for proper disposal. DO NOT pour onto the ground or down a drain.
6.Remove bolts and filter cover. Remove and discard old filter. Put clean hydraulic fluid on the filter gasket and install gasket and new filter into reservoir. See Figure 5-40.
7.Reinstall filter cover and bolts.
8.Fill reservoir with hydraulic oil until oil level is between red and black marks on sight gauge.
9.Re-install hydraulic oil filler cap and tighten securely.
10.Start engine and let idle for a few minutes.
11.Cycle all front attachment hydraulic functions. Recheck hydraulic oil level.
Track System
Changing Final Drive Oil: New Style
1.Position the excavator on a level surface with final drive plugs positioned as shown in Figure 5-41.
2.Engage the parking brake. Shut off the engine. Remove the ignition key and take it with you.
3.Open the bottom plug and drain the oil into a suitable container. Re-install the plug.
4.Start the engine and move the excavator slightly until plugs are positioned as shown in Figure 5-41.

5.Engage the parking brake. Shut off the engine. Remove the ignition key and take it with you.
6.Remove the top and bottom screw plugs. Pour fresh oil (Chevron Delo Gear 80W90 or BP Transgear 80W90) into the top hole until oil starts to run out of the bottom hole.
7.Re-install both plugs securely.
IMPORTANT:Always dispose of oil according to environmental laws or take to a recycling center for proper disposal. DO NOT pour fluids onto the ground or down a drain.
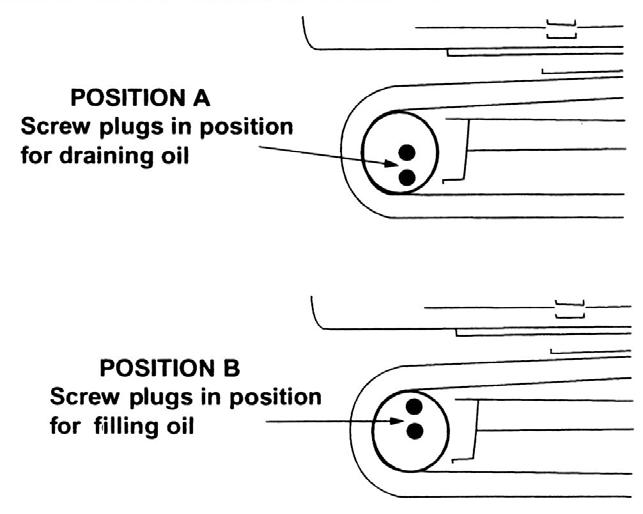
Figure 5-41 Screw Plugs Positioning
Changing Final Drive Oil: Old Style
1.Position the machine on a level surface with final drive plugs positioned as shown in POSITION A, Figure 5-41. Turn off the engine.
2.Open both plugs and drain oil into a suitable container. Re-install plugs.
3.Start the engine and move the machine slightly until plugs are positioned as shown in POSITION B, Figure 5-41. Turn off the engine.
4.Remove both screw plugs. Pour fresh oil (Chevron Delo Gear 80W90 or BP Transgear 80W90) into the top hole until oil starts to run out of the bottom hole.
5.Re-install both plugs securely. IMPORTANT:Always dispose of oil according to local regulations or take to a recycling center for proper disposal. DO NOT pour fluids onto the ground or down a drain.
Checking and Adjusting Track
Tension: New Style
1.Position the machine on a level surface.
2.Use the bucket and dozer blade to lift the machine up until a track is just clear of the ground. See Figure 5-43.
3.Engage the parking brake. Shut off the engine. Remove the ignition key and take it with you.
4.Remove the side plate from the left track to expose the adjustment fitting. See Figure 5-44.
5.Using a grease gun, pump grease into the fitting until the idler wheel is centered as shown in Figure 5-44.
NOTE: A grease gun is supplied with machine tool kit.
IMPORTANT:Do not over-tension the track. If the track is too tight, loosen the grease fitting to relieve the pressure.
Warning
Do not loosen the grease fitting more than two turns, or the fitting could be ejected under pressure and cause injury.
6.Reinstall the side plate.
7.Start the engine. Lower the machine to the ground.
8.Repeat this procedure for the other track.