2 minute read
GETTING TO KNOW YOUR GRINDER (CONTINUED)
FIXED BEDKNIFE SUPPORT (LEFT SIDE)
The bedknife and bedbar is held in position by two magnets and centers. The left side magnet and center position is fixed. See Fig 7.
ADJUSTABLE BEDKNIFE SUPPORT (RIGHT SIDE)
The right side magnet and center is adjustable to match the width of the bedknife. See Fig 8
LOCK KNOB (ON BACK OF RIGHT HAD ADJUSTABLE SUPPORT)
Locks the right magnet and center assembly in position on the tooling bar slide. See Fig 8
!WHEN TIGHTENING THE ADJUSTABLE BEDKNIFE SUPPORT, CHECK TO SEE THAT IT IS TIGHT TO THE MACHINED SURFACES OF THE TOOLING BAR.
Bedknife Setup Gauge
On the outside of each magnet is a retractable bedknife setup gauge. These gauges are used to help align the bedknife to the grinding wheel carriage travel. Operation of the gauges will be explained in the operations section of this manual. See Fig 7 & 8
Tooling Bar Adjustment Handwheel
The tooling bar adjustment handwheel moves the tooling bar horizontally. The handwheel is used to align the the tooling assembly and bedknife to the grinding head. This will ensures maximum life of the bedknife. See Fig 9
Tooling Rotation
To achieve the recommended bedknife angles, the BG1500 bedknife grinder has a rotatable tooling bar with an angle indicator and lock handle. See Fig. 9 To rotate to a new angle or to rotate from the front face to top face, grasp the tooling rotate handle and then loosen the tooling bar rotate lock handle. Manually rotate to the desired angle as indicated on the decal and tighten the lock handle.
Centers
BEDKNIFE SETUP GAUGE (RETRACTED)
BEDKNIFE SETUP GAUGE (UP POSITION)
ANGLE INDICATOR
TOOLING ROTATE HANDLE
TOOLING BAR ADJUSTMENT HANDWHEEL
TOOLING BAR ROTATE
LOCK HANDLE
When To Sharpen The Bedknife
When the grass is not being cut cleanly, or the cut ends of the grass appear torn or ragged, the edges of the reel blade and bedknife have become rounded and need sharpening. See FIG. 10A. The purpose of sharpening is to restore the sharp edges to the reel and bedknife.
IMPORTANT: To fully sharpen a reel mower, you need to grind the reel blades (using a Reel Grinder) and reshape the cutting edge of the bedknife.
NOTE: New bedknives should be ground before being put into use. New bedknives deform and move to match the shape of the bedbar at the time of installation and therefore MUST be ground to a straight surface after installation.
Bedknife Grinding Angles
The bedknife has two faces that normally need to be ground, the top face and the front face (on some models, the front face may be curved and may not need grinding).
The proper grinding angles for the two faces will vary depending on the model. Always follow the manufacturer's recommended specifications for bedknife angles.
Typical Bedknife angles:
There will be a +4 to -10 degrees clearance angle ground on the top face. The angle is usually measured relative to the bedknife mounting surface. See FIG. 11A.
There will be a 0-30 degrees clearance angle ground on the front face. The angle is usually measured relative to a line perpendicular to the bedknife mounting surface. See FIG. 11B.
TERMS:
Bedknife - the stationary blade in a reel mower.
Bedknife Support or bedbar - the bedknife is mounted to this frame member with screws or rivets.
Top Face - the horizontal, ground surface of the bedknife.
Front Relief Angle - the angle between vertical and the manufacturer’s recommended sharpening angle.
Top Relief Angle - the angle between horizontal and the manufacturer’s recommended sharpening angle.
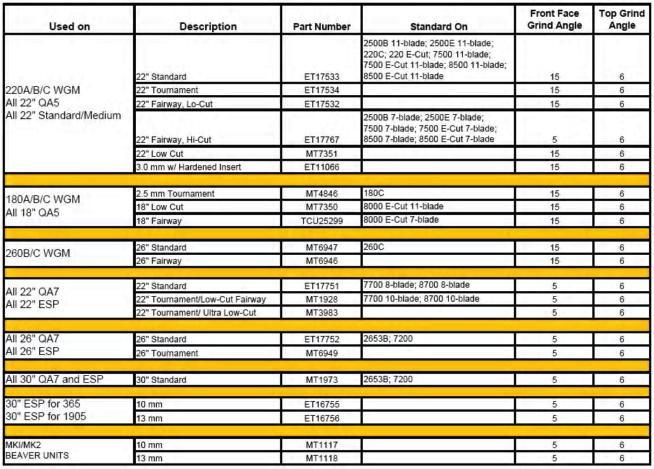
Recommended Face & Top Angles
If your model is not listed, consult your John Deere manual for the recommended sharpening angles.


