1 minute read
lift cylinder installation / removal—see figure-44 5


superbolt installation and specifications
tightening procedures
¢ Thread Diameter 1 1/4” ¢ Jackbolt Diameter 5/16” ¢ Jackbolt Socket Size 1/4” ¢ Required Jackbolt Torque 35 (in./lb.) Read all these instructions completely before you begin.
This procedure is typical for the majority of SUPERBOLT products. Specific installation procedures that are shipped with all products may supersede this general procedure. Use the appropriate instructions shipped with the product you are installing. Contact SUPERBOLT, Inc. at (412) 279-1149 with any questions.
IMPORTANT Air or electric power wrenches of the appropriate size may be used for running up jackbolts. Attempt to tighten as consistently as possible and remove the power wrench frequently; do not tighten all at once. Use a standard torque wrench to verify final torque values.
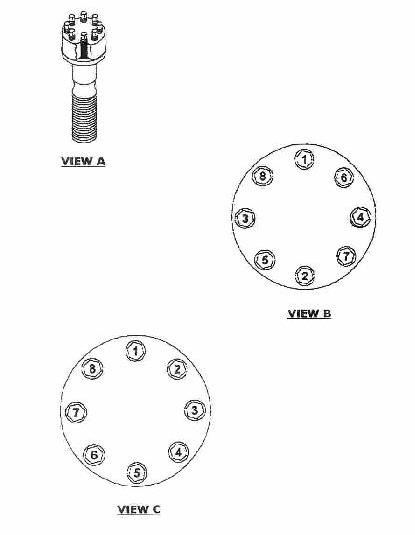
1. SUPERBOLT products are designed for use with hardened surface washers.
Slide the washer onto the bolt or stud first. 2. VIEW A - Check the base of the tensioner(s) and verify that all jackbolts are flush with the bottom of the tennsioner body. 3. VIEW A - Clear any dirt or chips from the threads of the bolt or stud and from the main internal thread of the tensioner 4. VIEW A - Spin the tensioner body down on the main thread of the bolt or stud by hand. The tensioner body should be in light contact with the hardened washer. 5. Determine the target jackbolt torque value for the desired preload, either from the installation sheets shipped with the product or the catalog tables, or by calling SUPERBOLT, Inc. The jackbolt torque value stamped on the tensioner is a standard value for that part, and may not be appropriate for your specific application. Since jackbolt torque is directly proportional to the tension load, you can easily figure other values as required (e.g., 1/2 preload = 1/2 jackbolt torque).
© DBT AMERICA 2005