3 minute read
FAULT HISTORY

from Cat Electric Rope Shovel 465 Series IGBT Shovel HMI - WINCC Manual (Service Manual) - PDF DOWNLOAD

rows located at the top of the screen will take you back to documents previously viewed.
Fault History
The fault History screen displays historical fault information. Faults can be viewed in order of receipt, or sorted by, date, time, or fault type. The fault history screen displays a different Button menu across the bottom of the screen. This menu is specific to the fault display.
• Next Message Moves the selection bar down the screen one fault at a time.
• Previous Message Moves selection bar up the screen one fault at a time.
• Page Up Scrolls screen up and sets selection bar at the top of the screen.
• Page Down Scrolls screen down and sets selection bar at the top of the screen.
• List Start Resets display and selection bar to the first fault in the list.
• List End Resets display and the selection bar to the last fault in the list.
• Short Time Archive Displays last 250 messages.
• Long Time Archive Displays all messages occurring in the last 30 days.
• Filter By Date / Time Opens the following pop-up window.
When the screen initially opens if no selections are currently in effect only the From and To buttons will be visible. If a filter for date or time is currently in effect the displays will show the date and time that is currently selected. To make or change a filter selection press the up or down arrows. Press the OK button to set filter. The Filter by Date / Time button on the main menu will turn green and a message will be displayed to indicate that the filter is set. Filters can be used together or individually.
• Filter By Fault No. Opens the following pop-up window.


This screen is used to set the Fault History Filter to display all instances of one particular alarm. Input the fault type first (ANF, CDA, SIB) then input the numerical characters and press ENTER. Only one fault number can be selected at a time. The Filter by Fault No button on the main menu will turn green and a message will be displayed to indicate that the filter is set. Filters can be used together or individually.
• Filter By Fault Type Opens the following pop-up window.
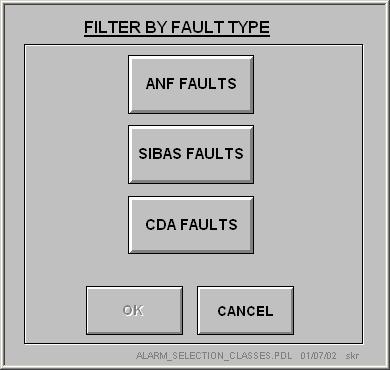
This screen is used to sort the Fault History by Fault type. Select the type and press okay. The Filter by Type button on the main menu will turn green and a message will be displayed to indicate that the filter is set. Filters can be used together or individually.
• Filter Off Resets Fault History to display all faults. Resetting display returns background on “Filter By” buttons to gray and removes filter message.
• Troubleshoot Current Alarm
More information can be obtained about a displayed fault by selecting the fault and pressing the Troubleshooting button. A fault is selected by pressing either the arrow keys on the main menu (Previous Message, Next Message) or by selecting the desired fault from the touch screen. Troubleshooting information will be displayed in the center portion of the screen.
• Exit Fault History Returns display to Overview Screen and standard button menu.
• Save Fault History to A:\ Pressing this button initiates a program that will save the fault history to the A:\ drive. A maximum of 10,000 entries can be stored to disk.