6 minute read
CREATING NEW FAULTS

from Cat Electric Rope Shovel 465 Series IGBT Shovel HMI - WINCC Manual (Service Manual) - PDF DOWNLOAD

Select "Change applies only to the selected text", then OK. This will add the updated text to the Text Library.
• If the application has multiple languages, in Alarm Logging, select View Language and choose the other language. Make any necessary edits just as before.
• Last the updates must be added to file "File_D.txt". This file is located in the directory C:\Siemens\FaultHistory. Open the file with Notepad. Locate the alarm number and make the appropriate changes to the description.
Creating New Faults
• Fault Tags
This applies only to ANF faults and CDA faults; fault tags already exist for SiBas faults 1 to 799.
To create a new tag, select the appropriate tag directory, CDA_Faults or ANFfaults. Double click the appropriate directory, then right click in the right-hand side of the screen. In the popup window select New Tag. This will open the Tag Properties box.
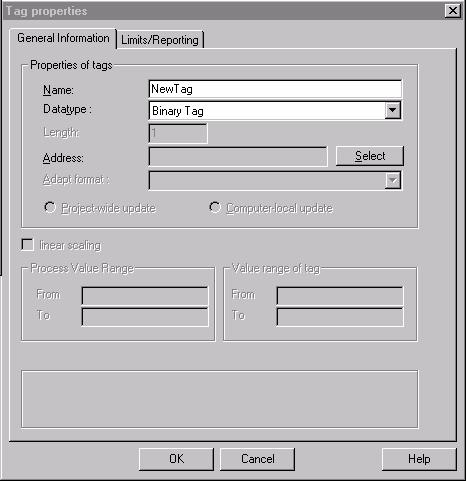
Type in the Tag name in the Name: field. Spaces and symbols cannot be used in tag names. Next select the Datatype. The proper datatype for CDA and ANF tags will be binary. Press "Select" to set the address of the tag. The following screen will appear.
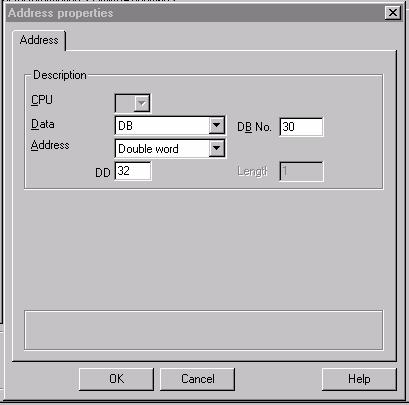
In the "Data" field select, DB, Bit Memory, Input or Output. Enter the address and select OK. This will return you to the Tag Properties screen. Check the information and Press OK.
• Fault Description Creating the fault description is done in the Alarm Logging section of WinCC. Go to Control center, select Editor, and then select Alarm Logging.
Right click on Alarm Logging and select Open. The Alarm Logging Editor will open.

To add new fault number and description right click lower portion of the screen. Select Append New Line. A new line will be added to bottom of list. Scroll to bottom of list. The first column is for the WinCC fault number in this project will correspond with the numeric portion of the system fault number. Select the field you want to edit and Double click to make an entry. When you are finished select a new field to accept the changes. If you close the Alarm Logging tool without deselecting the last field changed that change will not be accepted by the system. The following fields are used in the fault system:
• Number This is the WinCC fault number. When the new line is created WinCC will automatically fill in this field with the next fault number. To change this number double click on the field and type in the new number. As soon as you deselect the field WinCC will reorder the faults to be in numeric order. If you are adding several faults it is sometimes best to do this last.
• Class When the new line is created WinCC will automatically fill in this field. To change the Class double click on the field, an arrow will appear at the right hand side of the field, press the arrow for more options. Select the class, the selection window will close and the new class will appear in the field. See page 83 for descriptions of available classes.
• Type This field is for the fault subclass. When the new line is created WinCC will automatically fill in this field. To change the Type double click on the field, an arrow will appear at the right hand side of the field, press the arrow for more options. The option selection will only display the subtypes of the Class selected. Select the type, the selection window will close and the new subclass will appear in the field. See page 83 for descriptions of available subclasses.
• Event Tag In this field you will enter tag that is used to trigger the fault. To insert the Event Tag, double click on the field. The Select Tag screen will open. A search for the tag can be done manually searching all tag directories or in a specific directory. If all or part of the tag name is know the fault filter at the top of the screen can be used. Wildcard characters can be used in this filter. Select the correct tag and select OK or double click on your selection.
• Event Bit This column relates to the Event Tag. This column is used for selecting the bit status or position. If the tag selected in the Event Tag column is a binary type tag WinCC will set the event bit to 0 this setting cannot be changed. When this tag has a value of 0 the fault will display. If the Event Tag type is anything other than binary then this column is used to identify which bit position of the tag is used to initiate the fault. It is assumed that when the bit value is 0 the fault will be displayed.
• Fault Description This column is used to input the actual text message that will be displayed when this fault occurs. Double click the field and type in the text, deselect the field to enter. Characters +, -, \ or / cannot be used as the initial character in this text string.
• Fault Number This field is used for the assigned Siemens fault number. To enter the text double click the field, deselect to enter the text.
• Help Text This column is not used in this system and can be left at the default setting of Not Set.
• Parameters The default setting of SET for this column will be used no further action is required.
• Loop in Alarm This column is used for setting the variables needed to activate the link to the Troubleshooting Manual. WinCC will default this field to Not Set. Double click on this field, this will open the Loop in Alarm input window.
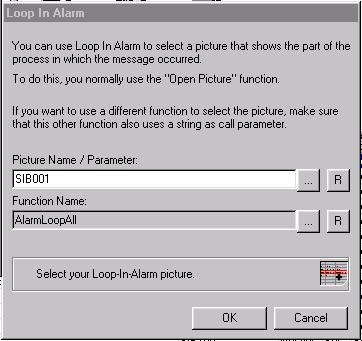
In the Picture Name / Parameter field of the Loop In Alarm window type in the Siemens
Fault Number. To fill in the Function Name field click the browse button at the right hand side of this field, this will open the screen for function selection.
Double click on the Project functions directory to expand the selection. Select AlarmLoopAll
Select the correct function then press OK. The function selection screen will close. Press OK on the Loop In Alarm window to accept your selections. The value in the Loop in Alarm column in the main Alarm Logging screen should change to SET.
After all new alarms are created select the Save button, in the main tool bar. To close the Alarm Logging screen press File in the tool bar, then Exit from the drop down menu. Accept the changes to the ".MCP" file. Alarms can be added or updated even if Runtime is active. Runtime does not have to be reactivated to see the changes.
Last the updates must be added to file "File_D.txt". This file is located in the directory C:\Siemens\FaultHistory. Open the file with Notepad. Locate the alarm number and make the appropriate changes to the description.