3 minute read
Roof cylinder ................................................................ 5


Roof cylinder and roof anchor arm removal and Installation (typical both sides)
To remove the roof cylinder (reference Fig. 91):
1. Extend the roof anchor arm pullout far enough to rest on adjacent cover.
2. Retract the roof cylinder until the anchor arm pullout rests on cover.
3. Shutdown the feeder breaker (see Shutdown procedure in this manual).
4. Turn the circuit breaker to the “OFF” position and disconnect and lock and tag out the main power source. Follow all standard Federal and mine practices for locking/tagging out power sources.
5. For the left hand roof anchor remove the eight (8) hex bolts located towards the hopper end of the hinged cover above main valve bank. Flip up cover to access roof anchor cylinder and arm.
a. If no room to flip cover, pull pins on opposite side of cover and completely remove cover.
6. There are no covers to remove to access the right hand roof anchor, skip step 5.
WARNING! Before performing maintenance on the machine, the circuit breaker should be in the “OFF” position and power should be locked and tagged out at the main power source. Electrical shock or accidental machine movement can cause serious injury or death to personnel.
7. Attach an appropriate lifting device to the roof cylinder and take in any slack in chain.
WARNING! Serious injury or death can result from falling loads. Observe the safe working load limits of lifting devices and keep a safe distance from suspended loads.
8. Disconnect, tag, and cap the hydraulic hoses going to the cylinder.
WARNING! Never disconnect a hydraulic hose if the circuit is pressurized or if there is a load on the circuit. If a hose is disconnected while the circuit is pressurized or a load is on it, the load will fall, causing damage to the machine or serious injury or death to personnel.
9. Pull the upper cotter pin and upper roof cylinder pin. Pull the lower cotter pin and lower cylinder pin.
10. Lift the roof cylinder free from the machine.
11. If necessary, remove the roof anchor arm:
a. Attach an appropriate lifting device to the roof anchor arm and take up any slack in chain.
b. Remove the cotter pin from the anchor arm clevis and pull pin.
c. Lift anchor arm free from machine.
To install the roof cylinder (reference Fig. 91):
1. If necessary, install the roof anchor arm:
a. Extend anchor arm pullout far enough to rest on cover when lifted into position.
b. Attach an appropriate lifting device to the roof anchor arm, lift into place and rest anchor arm pullout on adjacent cover.
c. Lower anchor arm into clevis, insert the anchor arm pin and secure with cotter pin.
WARNING! Serious injury or death can result from falling loads. Observe the safe working load limits of lifting devices and keep a safe distance from suspended loads.
2. Lower the roof cylinder into place with an appropriate lifting device.
3. Place the lower cylinder eye into clevis and install the lower cylinder pin and cotter pin.
4. Place the upper cylinder eye into clevis and install the upper cylinder pin and cotter pin. Remove lifting device.
5. Install the hydraulic hoses to the roof cylinder.
6. Install the cover over the main valve bank on the left hand side of machine. Note: For right hand roof anchor arm it is not necessary to install any covers.
7. Re-energize machine and start the feeder breaker (see “AUTO” or
“MANUAL” starting procedures in this manual).
WARNING! Never disconnect a hydraulic hose if the circuit is pressurized or if there is a load on the circuit. If a hose is disconnected while the circuit is pressurized or a load is on it, the load will fall, causing damage to the machine or serious injury or death to personnel.
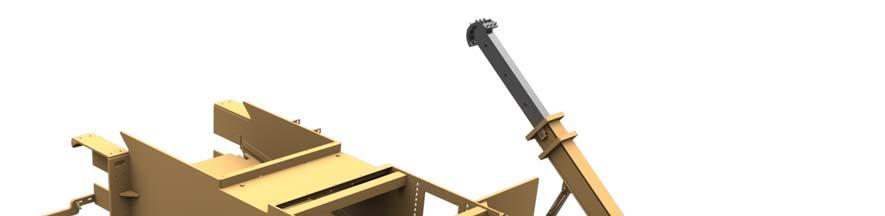
Fig. 91: Roof cylinder removal and installation (typical both sides)
Roof anchor arm pullout (2) Roof anchor arm (2)
Cotter pin (2)
Anchor arm pin (2)

Cylinder pin (4)
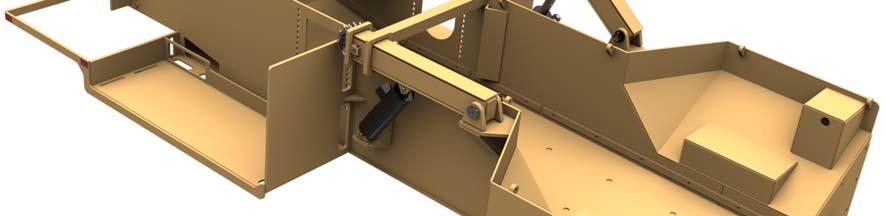
Roof cylinder (2)
Cotter pin (4)
Left hand side (with cover) Hinged cover

Anchor arm pullout resting on adjacent cover
Right hand side (no cover)


Anchor arm pullout resting on cover. Right and left side shown individually.