4 minute read
FUEL SYSTEM


STEP 3
Run the engine for a few minutes, then check the level in the coolant reservoir again. Add coolant solution, if necessary.
Install the coolant reservoir cap.
STEP 5
Install the lower tray under the operator’s compartment.
FUEL SYSTEM Service specifications
Fuel tank sediment removal.......................................Every 10 hours or every day Fuel filter sediment removal.......................................Every 10 hours or every day Fuel pre-filter sediment removal.................................Every 10 hours or every day Fuel filter replacement...................................................................Every 500 hours or when there is a loss of power Fuel pre-filter element replacement..............................................Every 500 hours or when there is a loss of power Fuel tank capacity.....................................................................................249 liters Type of fuel....................................................................See “Fluids and lubricants”
Fuel pre-filter element replacement
STEP 2
Tools required
-One filter strap wrench -One flat-headed screwdriver -One grease or oil can
STEP 1
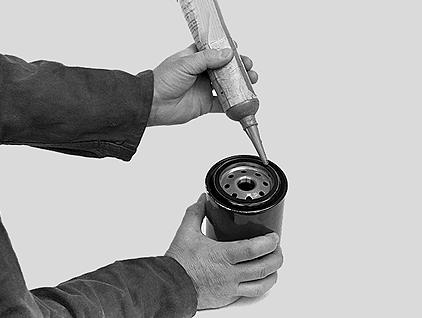
PH08325 Apply a thin coat of oil or grease on the new filter seal. NOTE: Do not fill the new filter with fuel before installing it.

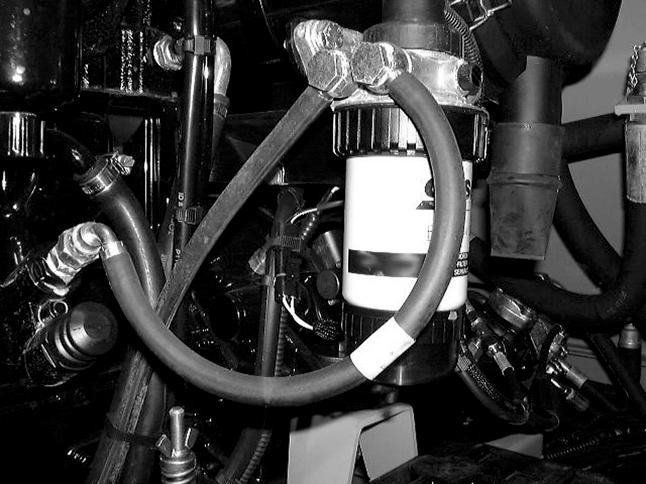
CD00B008 Clean the area around the filter head. Place a container of a suitable capacity under the filter and remove the filter using the filter wrench.
STEP 3 STEP 1

CD00B008 Install the new filter. Turn the filter until the seal comes into contact with the filter head and turn an extra half turn by hand to tighten. IMPORTANT: Do not use a filter wrench. Overtightening can damage the seal and the filter. NOTE: If the engine does not regain full power after replacing the filter, bleed the system.
Bleeding the fuel system
Tools required
-One 17 mm wrench for hexagonal head screws It is necessary to bleed the fuel system when: -The fuel tank has been completely emptied. -Parts of the fuel system have been removed for service or repair work. -The machine has been in storage for a long time.
CD00B007 Loosen the bleed fitting two or three turns.
STEP 2
CD00B011 Operate the priming pump until fuel flows out with no air bubbles in it. Then retighten the bleed fitting.

CD00B010 Loosen the fuel line screw on the injection pump and operate the priming pump until fuel flows out with no air bubbles in it and then retighten the screw. NOTE: If the high pressure fuel lines have been removed, complete the following step:
STEP 4
The engine should run smoothly. If not, repeat the procedure. If the problem persists, it is because air is still getting into the system. Check all the fittings for leaks.
Fuel tank sediment removal

Tools required
-One 10 mm wrench for hexagonal socket head screws
PH07803 Before starting work, place a container of a suitable capacity under the tank, loosen the two drain plugs located under the fuel tank one or two turns and allow the dirty fuel to flow out. Then retighten the plugs.
CD00B009 Loosen the fittings on the injectors and operate the starter motor until the fuel flows out with no air bubbles in it. Retighten the fittings. NOTE: Never operate the starter motor for more than thirty seconds at a time. Wait for two minutes before starting again.
Fuel filter sediment removal Fuel Heater Precleaner
Precleaner sediment removal
1
2
CD00B008 Place a container of a suitable capacity under the filter and manually loosen the drain plug located under the filter bowl one or two turns and allow the dirty fuel to flow out. Then retighten the plug.
CD00B011 Place a container of a suitable capacity under the precleaner. Loosen the bleed screw (1) and open the drain tap (2) a few turns to allow the dirty fuel to flow out. Then close the tap. Retighten the bleed screw. NOTE: A coin can be used to loosen and tighten the bleed screw.
Replacing the filter element
IMPORTANT: The filter element should only be replaced when the fuel tank is nearly empty, to prevent too much fuel from flowing out.
STEP 1
CD00B011 Clean the area around the precleaner head. Place a container of a suitable capacity under the precleaner and remove the filter element by turning the knurled bushing.
CD00B011 Clean the area around the sediment bowl and remove the bowl from the filter element by loosening it manually.
STEP 3
CD00B011 Remove the drain screw and its seal delivered with the new filter element. Check the condition of the bowl seal, replace it if necessary, apply a thin coat of oil to the seal and install the bowl back onto the new filter element, tightening by hand.
STEP 4 STEP 6
CD00B011 Remove any dust from the precleaner head seal. Install the new filter element equipped with its bowl. Align the vertical mark with the bleed screw. Insert the filter element by exerting a light upward pressure. Turn the knurled bushing until it clicks in place.
STEP 5
CD00B011 Operate the priming pump until the fuel flows out with no air bubbles in it, then retighten the bleed screw. IMPORTANT: If the engine does not regain full power after replacing the filter element, bleed the system.
CD00B011 Loosen the bleed screw a few turns.