Periodic Maintenance/Tune-up Tighten all nuts, bolts, and cap screws. Make sure rivets holding components together are tight. Replace all loose rivets. Care must be taken that all calibrated nuts, bolts, and cap screws are tightened to specifications (see General Information/Foreword). It is advisable to lubricate certain components periodically to ensure free movement. Apply light oil to the components using the following list as reference: A. Throttle Lever Pivot
XR236A
2. Release the front storage tray by lightly squeezing the left and right outside edges inward.
B. Brake Lever Pivot C. Auxiliary Brake Pedal Pivot NOTE: The manufacturer recommends the use of new gaskets, lock nuts, and seals and lubricating all internal components when servicing the engine/transmission. SPECIAL TOOLS
A number of special tools must be available to the technician when performing service procedures in this section. NOTE: When indicated for use, each special tool
will be identified by its specific name, as shown in the chart below, and capitalized. Description Compression Tester Kit Drive Belt Gauge Oil Filter Wrench Spanner Wrench Valve Clearance Adjuster
p/n 0444-213 0444-177 0644-389 0444-240 0444-255
XR237A
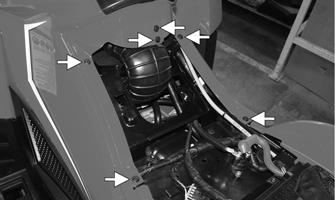
3. Release the four retaining clips to remove the air box lid. Remove the air filter frame and air filter. Note the orientation of the air box lid, air filter, and frame for assembly purposes.
NOTE: Special tools are available from the Service Department.
Air Filter The air filter inside the air filter housing must be clean to provide good engine power and gas mileage. If the ATV is used under normal conditions, service the filter at the intervals specified in the Maintenance Schedule. If operated in dusty, wet, or muddy conditions, inspect and service the filter more frequently.
XR239A
CAUTION Failure to inspect the air filter frequently if the ATV is used in dusty, wet, or muddy conditions can damage the engine.
1. Remove the seat; then lift the front storage box lid. Gently pull out on the side panel plastics to free the storage box lid base tabs from the side panel plastics. Repeat for opposite side. Remove the storage box lid and base. FI705
6