Fuel Systems This section has been organized for servicing the fuel systems; however, some components may vary from model to model. The technician should use discretion and sound judgment when removing/disassembling and assembling/installing components. Whenever any maintenance or inspection is made on the fuel system where fuel leakage may occur, there should be no welding, smoking, or open flames in the area.
WARNING Since the fuel supply hose may be under pressure, remove it slowly to release the pressure. Place an absorbent towel around the connection to absorb gasoline; then remove the hose slowly to release the pressure. Always wear safety glasses when removing the fuel hoses.
NOTE: Whenever a part is worn excessively, cracked, or damaged in any way, replacement is necessary. SPECIAL TOOLS
A number of special tools must be available to the technician when servicing the fuel systems. NOTE: When indicated for use, each special tool will be identified by its specific name, as shown in the chart below, and capitalized. Description EFI Analyzer
p/n 0744-049
EFI Diagnostic System Manual
2257-850
EFI Diagnostic System Manual (Instructions)
2259-020
Fluke Model 77 Multimeter
0644-559
Fuel Hose Clamp Tool
0644-545
Fuel Pressure Test Kit
0644-587
Vacuum Test Pump
0644-131
Fuel Pump Installation Tool Kit
0744-074
Laptop Diagnostic Test Kit
0744-050
Laptop Diagnostic Tool
0744-060
Main Jet Wrench
0644-065
Oil Injection Usage Tool
0644-007
NOTE: Special tools are available from the Arctic
Cat Service Parts Department.
728-272B
3. Check the hoses to ensure that all are correctly connected; then check for cracks. If any cracks are evident in the hoses, replace them making sure none are against any hot or moving parts. Hoses must fit tightly. If hoses do not fit tightly, cut 6 mm (1/4 in.) from the end and install. 4. Check the impulse hose for cracks or any possible air leaks. The hose must fit tightly at both ends. If loose or cracked, replace the hose. 5. Check each carburetor vent hose for kinks or obstructions; remove any obstructions. 6. Check each carburetor float chamber drain hose for water or debris. If seen, clean by removing the plug and draining the drain hose into a small container. 7. Check the gas tank vent hose and fuel hose for obstructions; remove any obstructions.
Changing Main Jets 1. Loosen each carburetor flange clamp and remove each carburetor from the intake flange and boot. 2. Remove the drain plug and O-ring from each carburetor float chamber and drain the gas into either a small container or an absorbent towel. 3. Using Main Jet Wrench, thread the main jet out of each carburetor. Account for the baffle ring. Install the new main jet with baffle ring and tighten securely. 4. Install the drain plug and O-ring; then tighten securely.
CAUTION
Fuel System (Carbureted)
When installing the carburetors, make sure the gasline hoses are properly routed to avoid premature wear and/or contact with exhaust components.
PRE-MAINTENANCE CHECKS
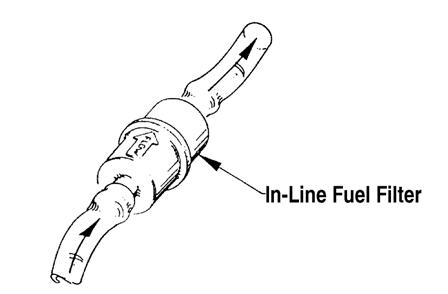
1. Remove the in-line fuel filter. If the filter is dirty, replace the filter. NOTE: Determine which style in-line fuel filter is being replaced and remove and install accordingly.
2. Install a new filter making sure the arrow on the filter is directed toward the fuel pump.
115