Alena Levernois
Design 1 Portfolio Fall 2022
 Professor Carol Hermann
Table of Contents 1. Site Specific Intervention 1 2. Topological Transformations 2 3. Creating Pattern, Color, Texture 3 4. Visual Hierarchy 4 5. Creating a Place 5 6. Making Space 7 01. Significant Artists 9 02. Crafting Cubes & Cylinders 10 Semester Reflection 11
Site Specific Intervention
This project required Hunter F, Ben S and I to choose a site on the Jefferson main campus and turn it into a space that all Jefferson students could enjoy and relate too. We decided to create an area that relates to life for college students. We built origami birds of all different colors and shapes. These birds are supposed to represent college students who are leaving the nest and are going on to a new chapter of their life. The brighter colors represent the students because they are excited for the next chapter. The darker colors represent the parents who resemble sadness.

1
Topological Transformations
The purpose of this project was to select an object and then construct 3 full-scale models out of corrugated cardboard and a 1 out of another material of our choosing. The cardboard models had to be; horizontal stacking, vertical stacking, and interlocking “egg crate”. The material I chose for my 4th shoe model was paper to show the color diversity in the shoe. My object was shown in orthographic and axonometric drawings.


2
Creating Pattern, Color, Texture


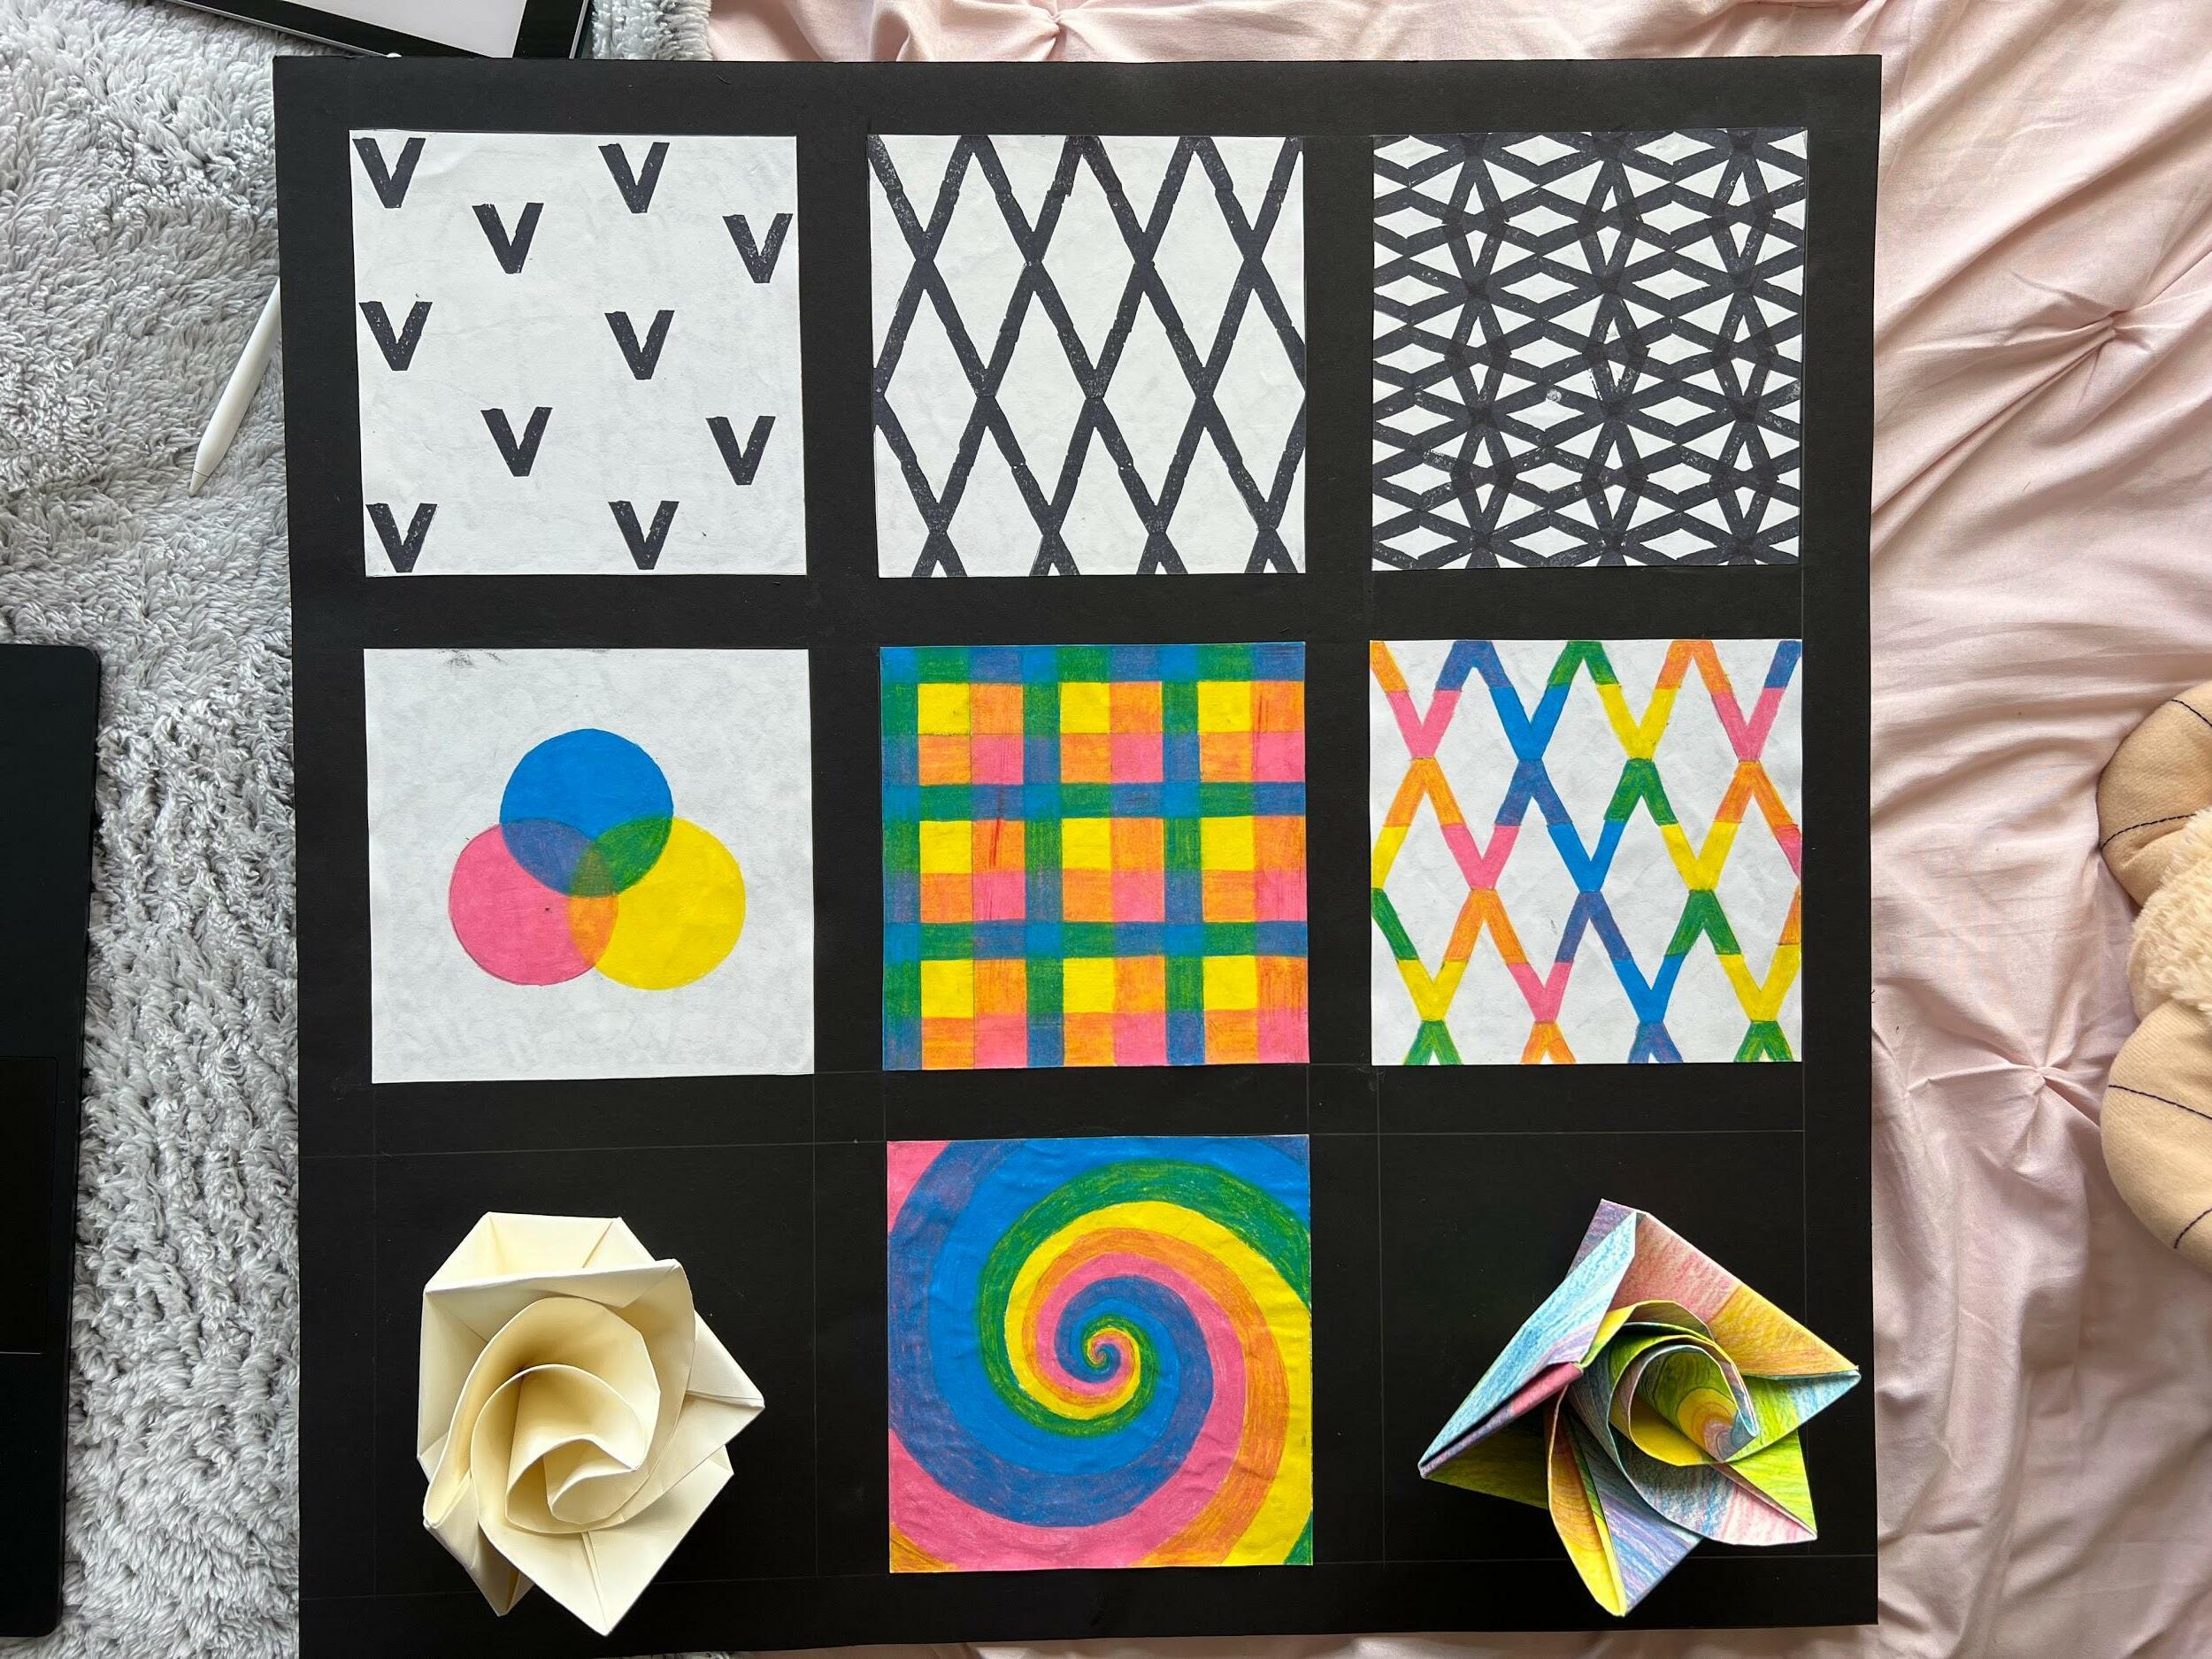
In this project our goal was to create a design out of a 1 by 1 gum eraser. The design I created was a V shape and from this stamp I was able to create a zigzag pattern and a overlapping spider web looking design. Then I had to pick 3 primary colors, I picked pink, yellow and blue. Using these colors I created a color wheel, plaid and then I had to incorporate these colors into one of my stamp patterns. Finally I created a origami rose then used the colors in the origami rose.

3
Visual Hierarchy
For this project we had to choose a textile and then create a 3D model to demonstrate the hierarchy of the textile. The textile I choose was created by the navajo tribe. I turned the textile into an 8x8x8 cube that explored the design possibilities. I created a series of diagrams to help me understand the key points in the textile. I noticed that red stood out to me the most. I created 2 sections to the cube; the diamond side and the stripes side. I created red pieces that extended both forward and backwards to express the importance of red. My model is mostly consisted of wood and the thin piece of red is plexiglass.


4
Creating Place
This project is based off the painting “Circles in a Circle” by Wassily Kandinsky. To understand this painting I drew a series of diagrams at a scale of 18x18. I decided to put all 5 of the diagrams together on 1 paper so I could see them together. I thing created a bas relief that is consisted of circles and lines repeated just like in the painting. Then I captured a 4x4 photograph of part of the bas relief and turned it into a drawing.


5
The drawing helped me create my wood model by showing what stood out the most. I then incorporated the huge circle and the 3 bands into my wood model. I stacked circles on top of each other to represent the elevated crater. And used bending wood to represent the bands. After creating my wood model I drew my plan, elevation, and section.


6
Making Space

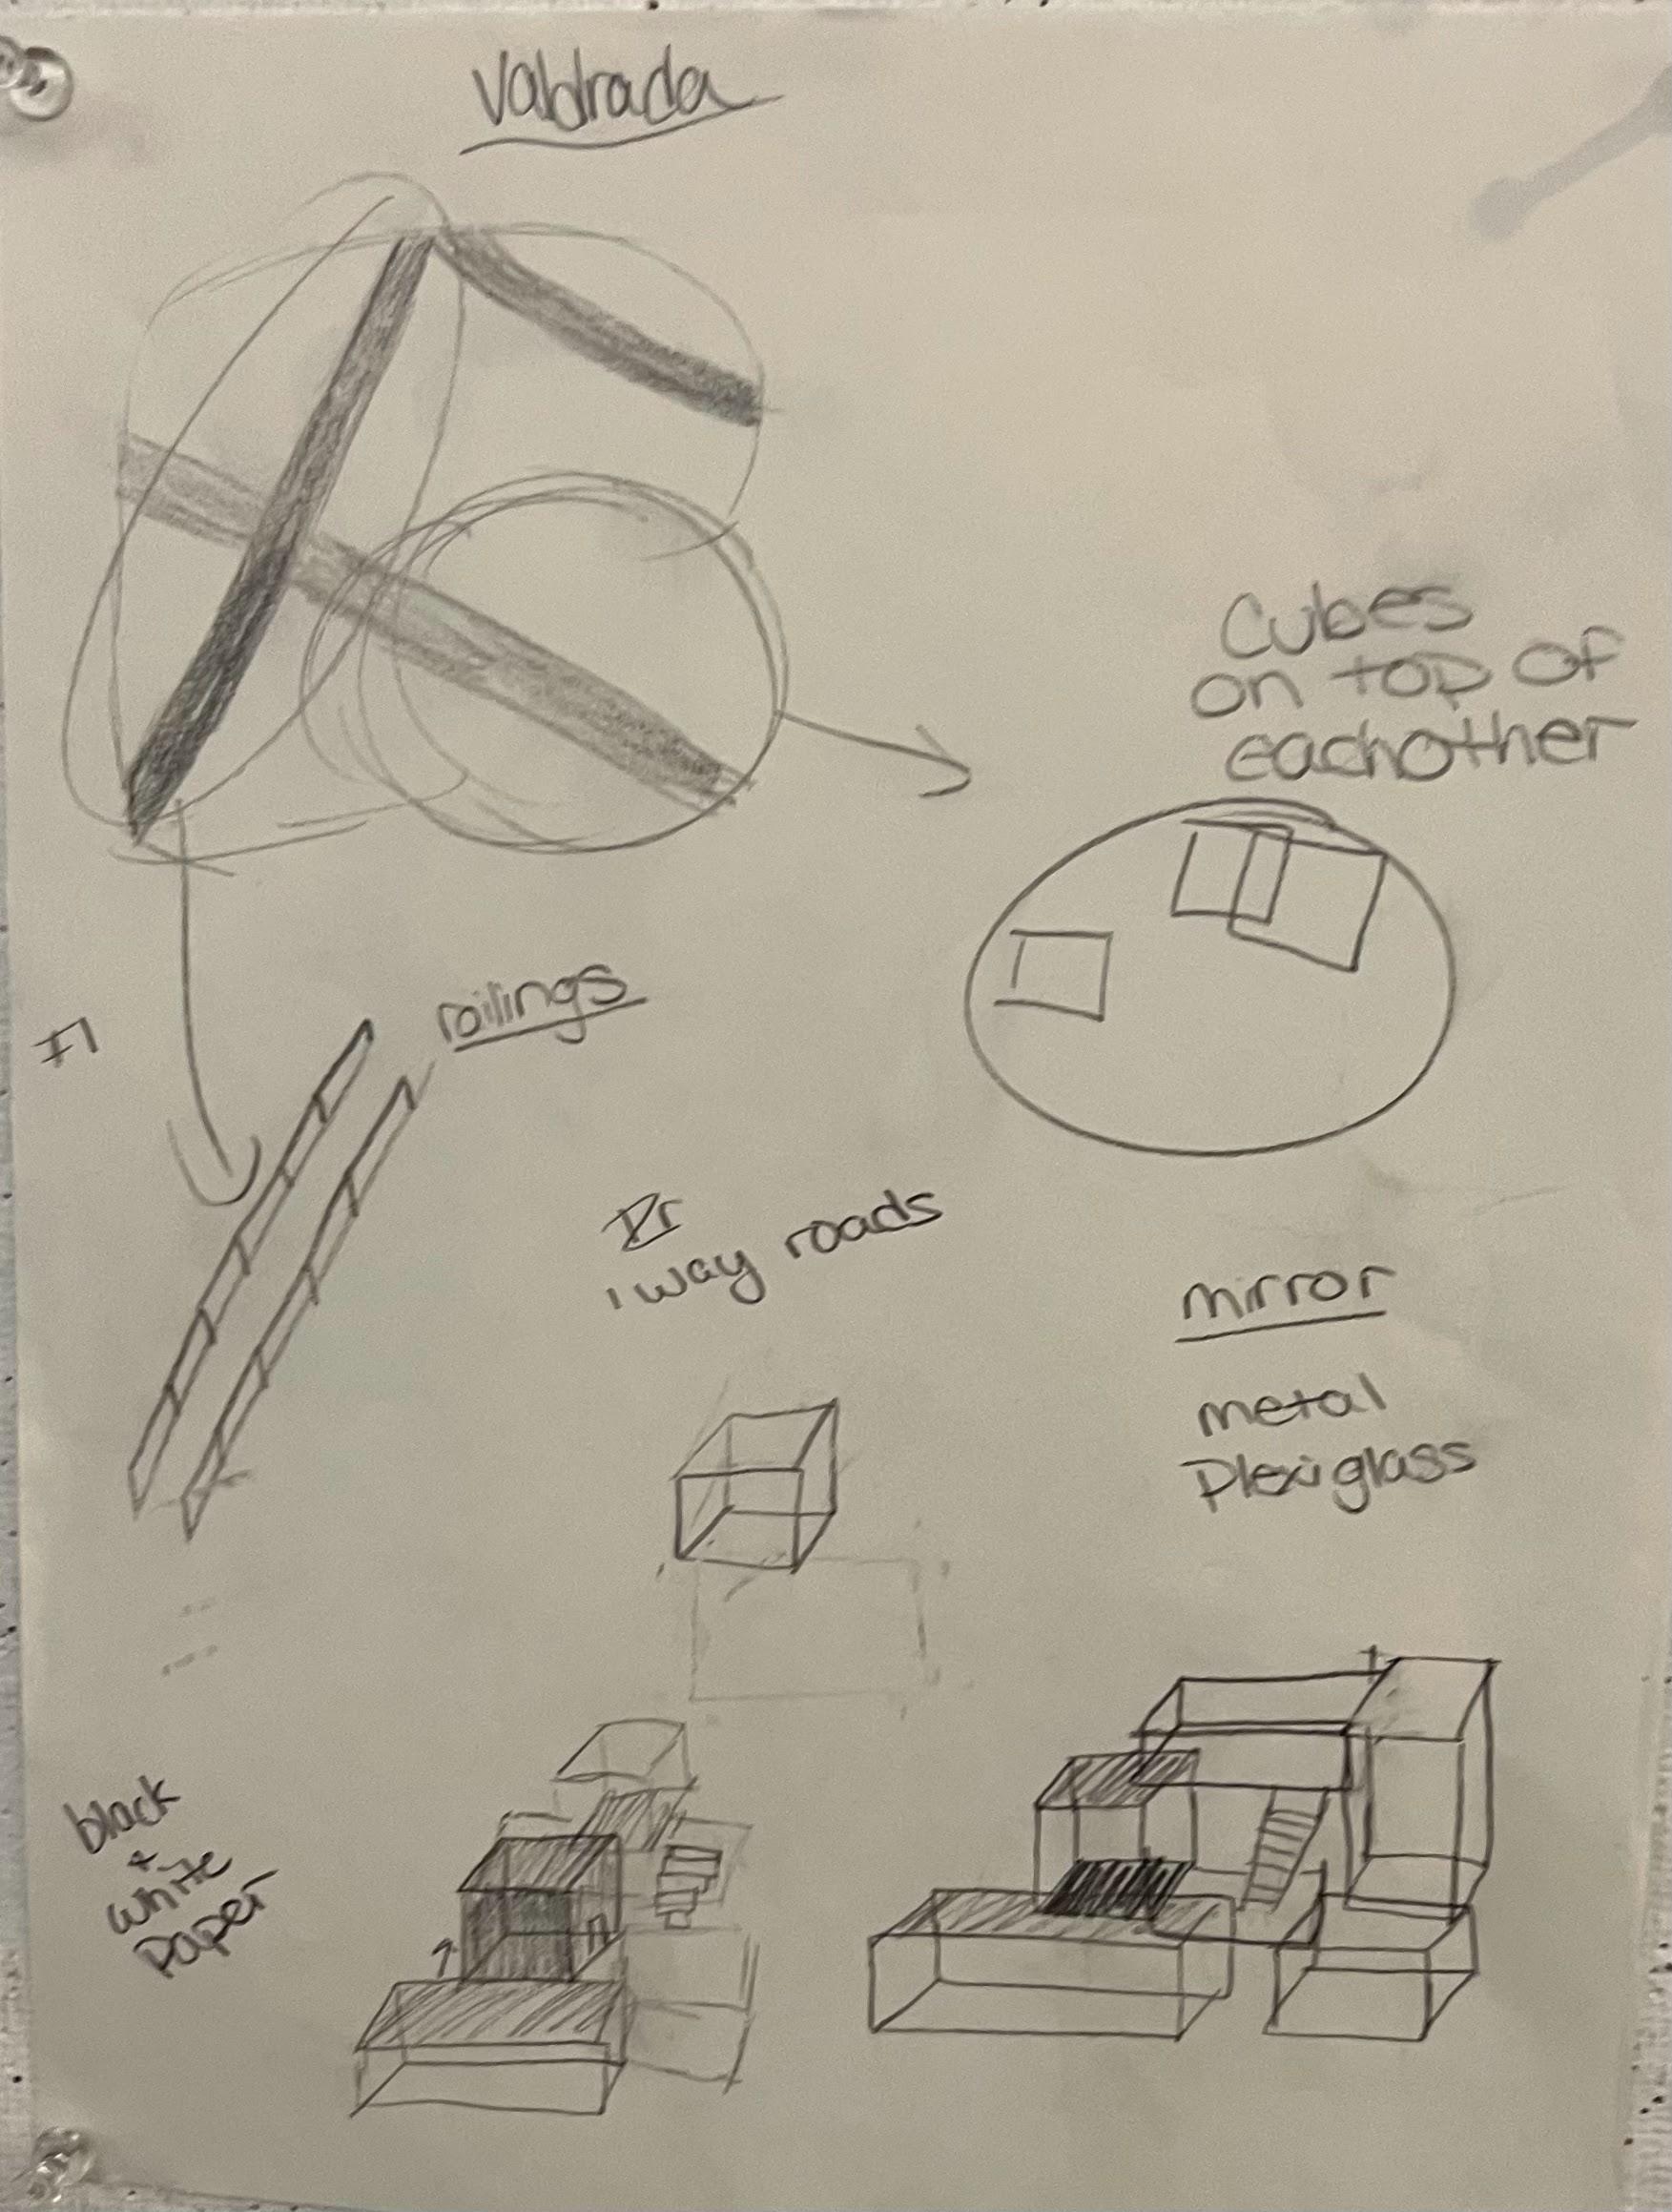

Project 6 was based off of the wooden model constructed in project 5. We had to read the book “Invisible Cities,” from this book we had to choose a city and incorporate it into our site. The city I choose was Valdrada, Valdrada is a city with high streets overlooking the city with houses stacked on top of eachother. And travelers entering the city see 2 cities; one erect above the lake and the other reflected upside down. From this city I began thinking about greece and how buildings are stacked on top of eachother. I became inspired and wanted to incorporate something similar to this in my model.


7
Making Space


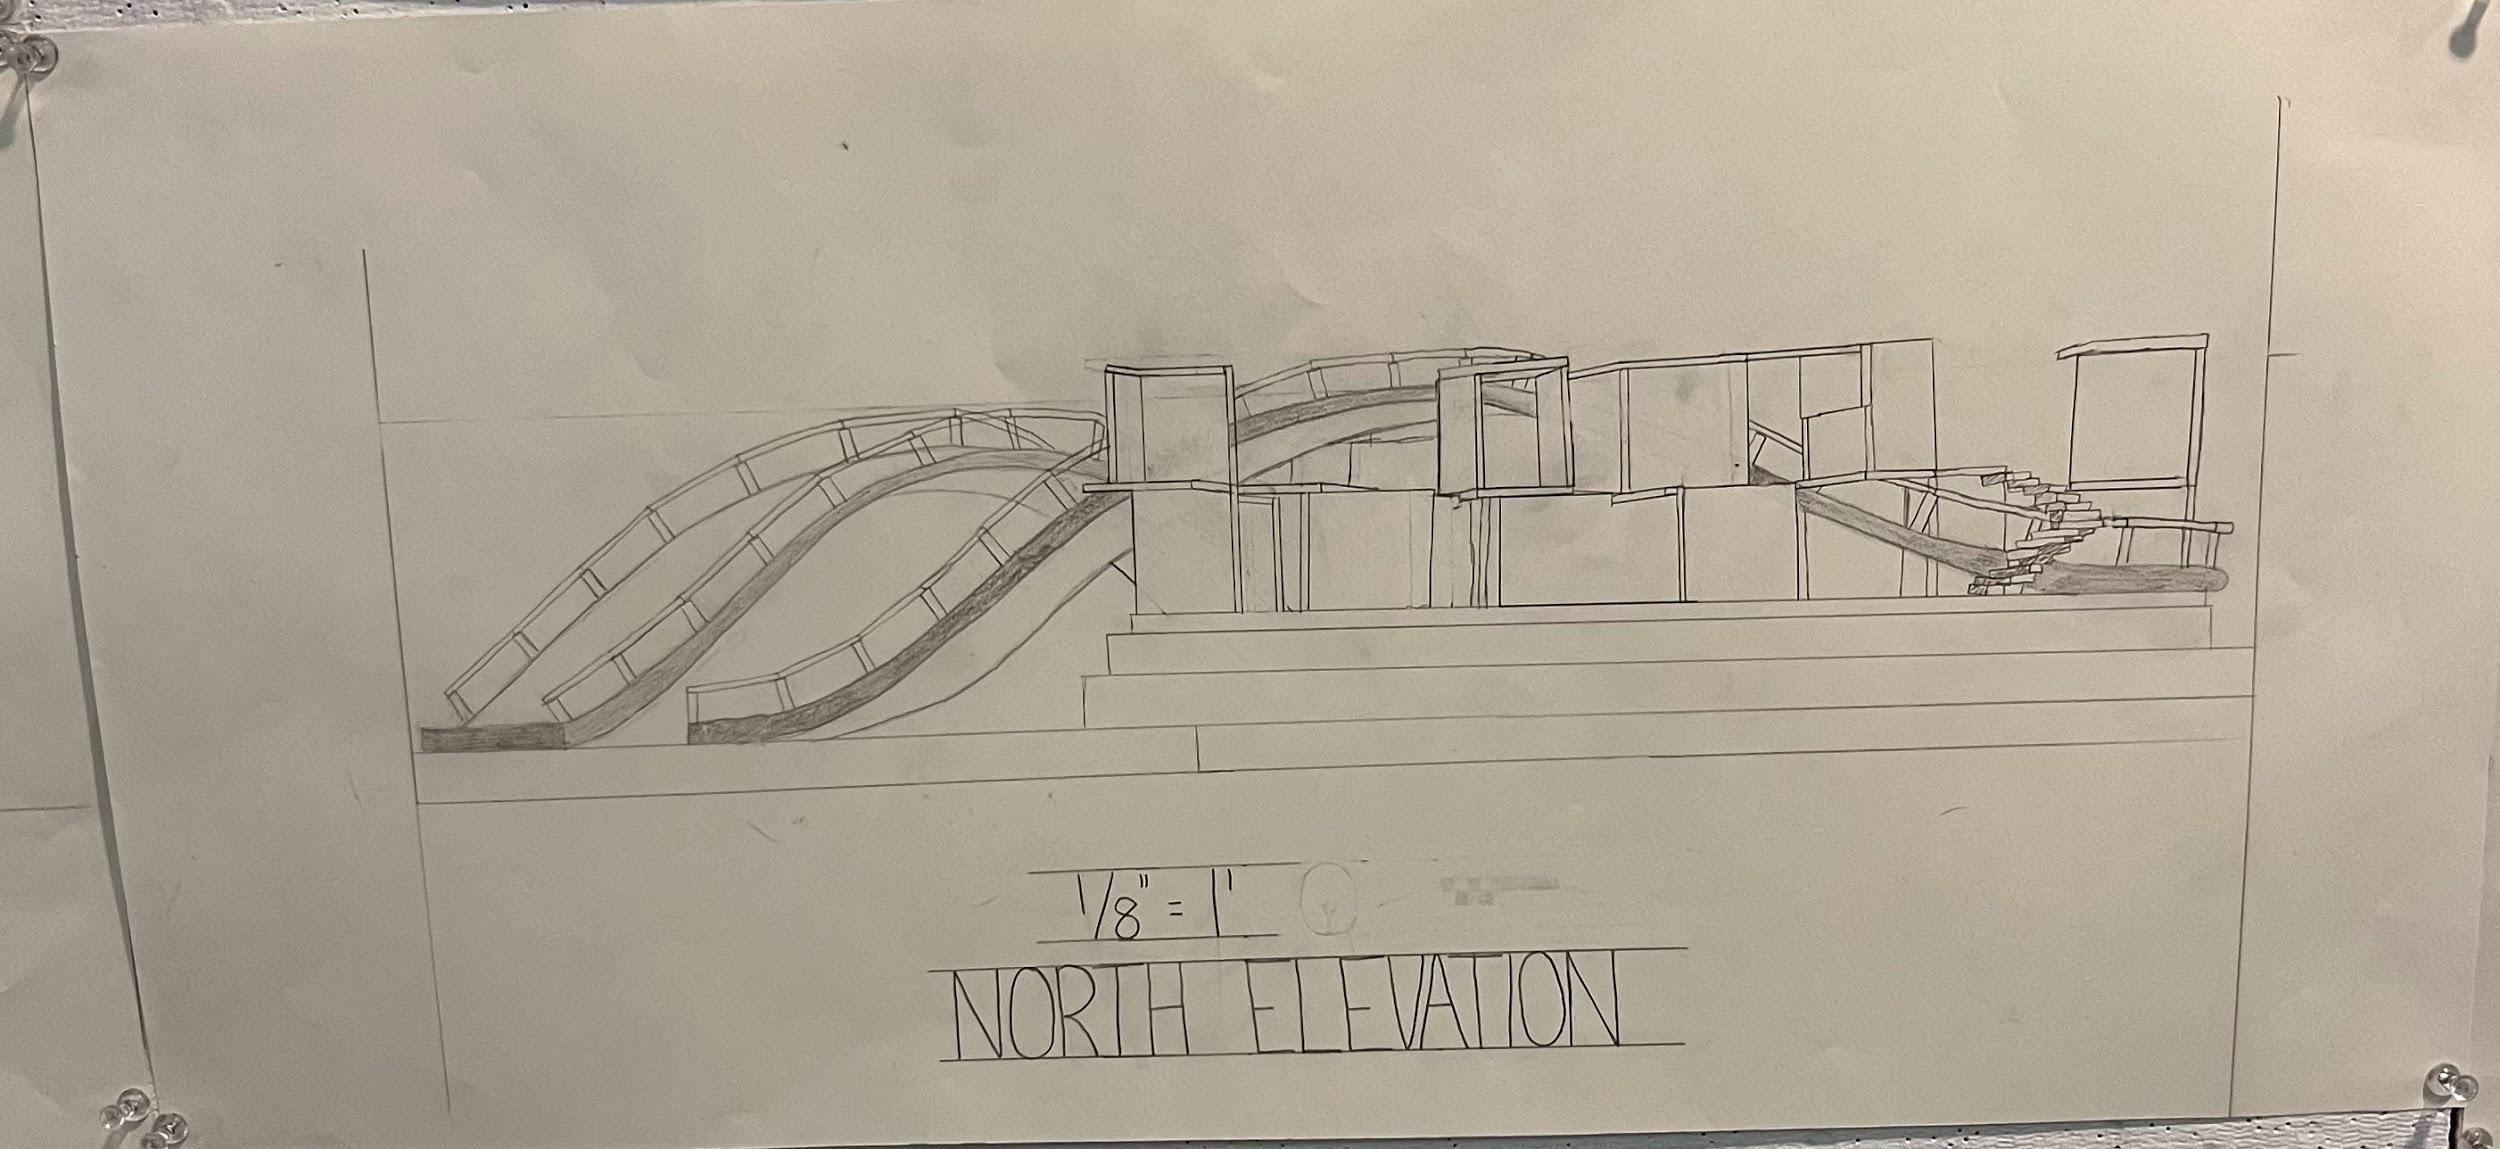

When building my model I created railings to put on the bands to help give a human scale. I then constructed a series of different looking cubes. Some with half walls, some with full, some with 2,3,4 or even 5 sides. All different but similar in a way and they are all connected. I then placed black and white paper with plexiglass on the bottom of my model to represent water. I choose to do this because like water plexiglass gives off a reflections. After creating my model I was able to draw my plan, elevation and section all at a scale of ⅛.


8
Significant Artists
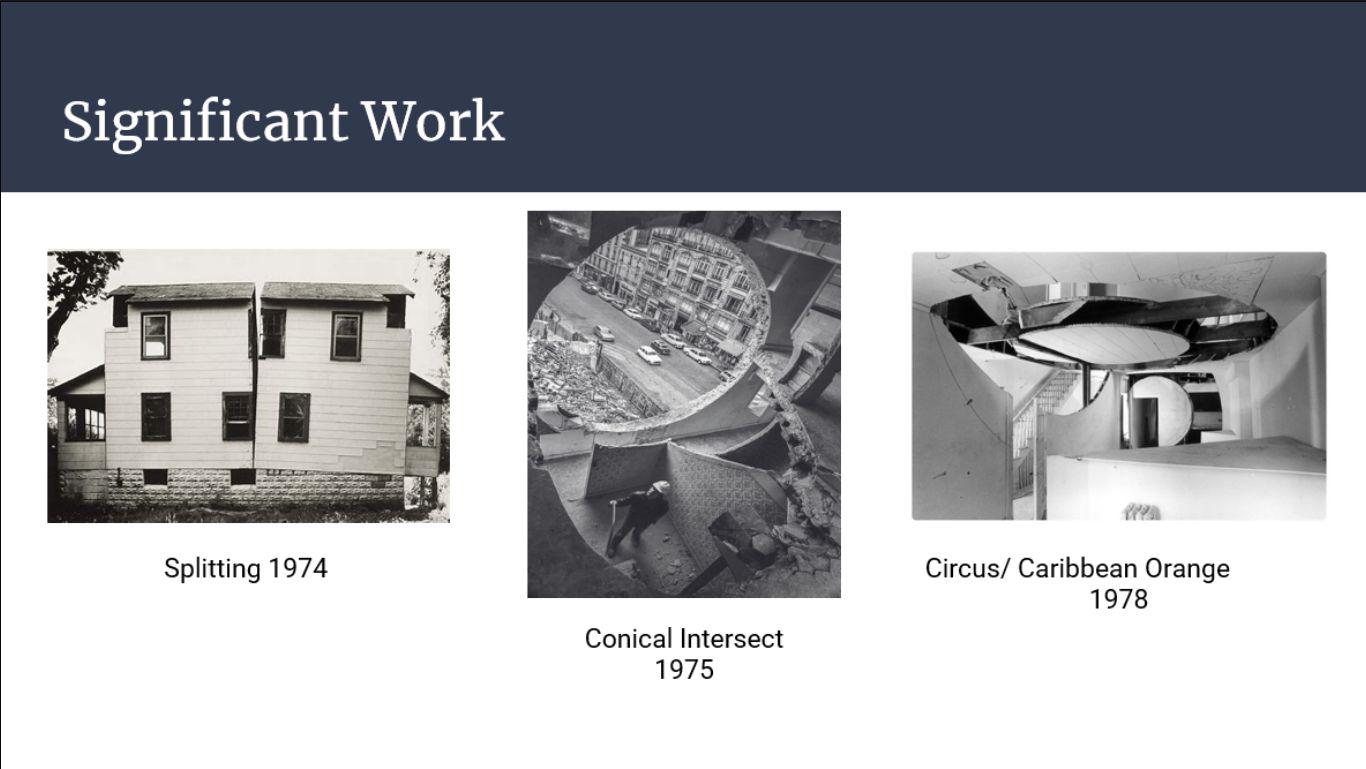
For this presentation Hunter F and I researched Gordon Matta-Clark, a famous sculptor. He is an American artist and is best known for site-specific artworks made in the 1970s. He is best known for unconventional drawings, films, photographs and sculpture that relate to the built environment. His sculptures involved taking an old abandoned building a creating huge holes in them


9
Cubes and Cylinders


Almost every week we were tasked with constructing cubes and cylinders out of different materials. In the beginning the materials were simple; cardboard, foamcore, chipboard etc. But towards the end of the semester they became more difficult including; wood, plexiglass, and even concrete. The purpose of this was to help us gain experience with these materials. Before starting this year I would have never been able to create a cube out of concrete. But now I am able to build a base that will prevent the concrete from seeping through the cracks. All of these cubes had drawings including; a plan, section, elevation and

10
Semester Reflection
Throughout this whole semester I was asked to think about my projects and figure out if what I am doing is abstract or literal. Everytime I answered the question I would say literal because I used to be someone who would not think outside the box. But now I can proudly say that this whole semester has changed my perspective. I am starting to think outside the box and becoming more creative when it comes to projects.
I have also learned about quality over quantity. I used to think that everything asked should be done, even if its sloppy and not good. But as the semester progressed, projects got harder and it became more complicated to get everything done. It wasn't because of time management, it was because of the level of difficulty of some of the things asked. So I started making a list during each project and I prioritized what was best needed for my project and I completed those first.
During my semester I have grown to love the FabLab. I have learned that I am very skilled in the lab and that I enjoy using wood. Wood has become my favorite material to work with, if a project gives me an option on materials, I will always pick wood. I will always choose wood because of the stability, wood is very reliable and I never worry about my project falling apart. The majority of my visual hierarchy cube is made out of wood, I was in the FabLab for more the 10 hours during the entirety of the project. When I was in the FabLab I was never rushing to get out of there, I would take my time and enjoy what I was doing.
I am extremely grateful for Design 1 semester because I was able to meet so many new friends, who I now consider some of my best friends. I am also grateful for the amount of knowledge I gained, coming into design 1 I had no idea what half of the supplies I bought were,. But know I know what 95% of them are and what they do. As I continue to design in the future I will continue to ask myself “is this abstract or is this literal?”
11