Suspension Fitness

Manual

Suspension Fitness | Manual | Version0821 © YMCAfit 2021

YMCAfit is a CIMSPA Training Provider Partner and are authorised to have this training module recognised and assigned Continuing Professional Development (CPD) points by CIMSPA

All rights reserved. Without limiting the rights under copyright reserved above, no part of this publication may be reproduced, stored in or introduced into a retrieval system or transmitted, in any form or by any means (electronic, photocopying, recording or otherwise), without the prior written permission of the copyright owners of this resource.
Introduction to chains 20
Other factors to consider ................................................................................................................................21
A guide to the exercises (NASC) ......................................................................................................................22
Hand support for lower body 22
Hand support for upper body..........................................................................................................................24
Hand support combos .....................................................................................................................................31
Hand support for core 33
Foot support for upper 34
Foot support for lower ....................................................................................................................................35
Foot support combo 37
Flexibility 39 Stretching ........................................................................................................................................................42
Further reading........................................................................................................................43
Suspension fitness equipment, used for whole body, multi-planar workouts in gyms, clients’ homes and the outdoors, has added a versatile, portable and hugely effective option to trainers’ toolkits. This manual and the training accompanying it explore how suspension fitness employs nothing more than your client’s bodyweight and a little bit of creativity in order to produce perfect workouts for a range of clients.
Through the attendance of the one-day face to face training and the contents of this manual, you will learn to: set up suspension fitness equipment for use in a variety of environments, with safety and effectiveness as key principles
identify the benefits of suspension fitness for trainers, and for their clients’ pursuit of health, fitness and performance goals
perform and teach a range of safe and effective suspension fitness exercises
consider progressions, modifications and alternatives to allow sessions to be delivered to a wide range of client groups.
It is important that the suspension fitness instructor has a clear understanding of the underlying principles of this training method, in order to apply them when planning, teaching and evaluating a session. We will need to consider when to use the exercises from this manual depending on many factors, such as environment, client goals and client ability in addition to identifying how these exercises should sit alongside other equipment and training approaches.
By the end of the section you should be able to:
identify the benefits of suspension fitness
compare suspension fitness to other, more traditional training methods
explain how suspension fitness exercises relate to the muscular strength and endurance continuum
identify the potential flexibility and motor skill benefits associated with performing regular suspension fitness workouts
discuss how the concept of ‘functional training’ sits alongside other training approaches and our clients’ goals.
It is essentially a training method that combines bodyweight and some strongly secured cords to produce a multitude of exercises.
Throughout our lives we happily carry around with us a mass that many of us would struggle to push, pull or lift. Usually we are blissfully unaware of how we are required to move and control our bodyweight when we perform everyday tasks. Suspension fitness takes our bodyweight and, through the manipulation of angles, levers, lengths and pivot points, puts it to work.
Bodyweight exercises can be tough, can’t they?
Those of us who have ever performed a ‘pull-up’ will know that lifting our bodyweight is hard going. Pulling your entire bodyweight up directly against gravity means you are attempting to lift a 100% of yourself. What if that was 50%, or only 25%? Could we do it now? Suspension fitness allows you to remain in contact with the floor as you use your bodyweight to work the muscles of both the upper and lower body. Imagine a client firmly holding onto a rope attached to a wall, leaning back slightly and then pulling themselves forwards, to return to an upright position. In this simple example, the amount of work performed by the pulling muscles will depend upon the amount of lean chosen and the bodyweight of the person. Suspension fitness can work in the same way; angling yourself against gravity and then using it to
good effect. Through a firmly attached anchor and the equipment’s adjustable straps, we can give anybody of any fitness level a workout as challenging as they desire. The percentage of bodyweight they are moving can be easily adjusted to meet the goals and ability of the specific client.
Suspension fitness principally makes free weights and resistance machines no longer pivotal in producing a challenging resistance workout as we can use what we always have – ourselves and gravity.
Core stability is widely used by trainers as a term referring to the control of the trunk and its girdles during exercise and everyday life. Many trainers will see suspension fitness as an excellent method in which to challenge these muscles of alignment and control. Clients often want to specifically target the abdominal muscles during their workouts, and suspension fitness offers a multitude of ways to do this. Many of the exercises chosen in this manual will require the connection between the upper and lower body to be sometimes strong, sometimes enduring, but always controlled.
Specific regions can be targeted in an ‘isolated’ fashion if a client so wishes, but the body can also be challenged as just one unit, working from top to bottom, all in one go. The opportunity to challenge the connection from foot to hand, improving strength, endurance and range of motion, is argued by many as a highly effective way to benefit both sporting performance and everyday tasks. This type of training has been adopted by some trainers who favour what they call a ‘functional training’ approach. Many exercises in this text do require the feet to be positioned on the floor whilst working the trunk and arms in this integrated fashion. Exercises performed from standing may provide a more ‘functional’ carryover to the client’s everyday needs. This text also includes many variations of familiar floor based exercises such as press-ups and planks using the suspension fitness equipment to either change the emphasis of an exercise or simply progress/modify it. Adding to suspension fitness’ benefits is the option of challenging clients in all three planes of motion at the same time. This is attractive to many trainers who feel the need to work their clients in what has been referred to as ‘3D’, again with the thought that this is more suited to the demands of both everyday life and the sporting arena.
As with muscular strength and endurance, flexibility exercises can challenge the body as a unit or in parts. Maintaining sufficient range of motion throughout the body can decrease the risk of ‘movement compensations’ occurring. A ‘movement compensation’ can occur if an area of the body has to increase its range of motion to make up for a ‘tight’ muscle somewhere else. These compensations to restriction are very common as one or more regions become inflexible. For example, observe how somebody with ‘tight’ hamstrings tries to touch their toes – either the upper or the lower back will need to flex much more to compensate, allowing the hands to reach for the floor. Once these patterns emerge they often remain. The inflexible regions stay inflexible and the flexible may become even looser. Suspension fitness equipment can assist by increasing the range of motion in one specific region, or allow for a lengthening to take place through a number of connected parts. We must just consider which part of the ‘chain’ needs to be lengthened to ensure that we target the correct part rather than just lengthening the already lengthened element of the body further. Both integrated and isolated approaches are included in this text.
Why would a client decide they want to train like this?
Suspension fitness has the ability to challenge and therefore develop clients’ balance. Some client groups find balance to be one of the most difficult aspects of training. The equipment can offer a point of external support to those challenged by balance, allowing these clients to then perform standing, functionally relevant exercises with greater confidence. Other client groups will wish to push their balance skills much further. Again, this can be accommodated with a bit of fine tuning and the correct exercise choice.
The ability to bring about movement in a coordinated fashion is arguably more challenged in this method of training than in other, more traditional options. If many regions of the body are to work as one, producing the right amount of force at the right time and in the right manner, is key. The CNS must recruit large numbers of muscles to meet the demands of such a task. The size of this task can be varied greatly using suspension fitness. Also, posture is a task of co-ordination and alignment is greatly challenged in this mode of training as no additional benches or back rests offer the support and feedback to the client. The exerciser must maintain good alignment from head to toe based on how the exercise feels and looks without the guidance of a machine.
There may be better methods to develop some of these components of motor skills than suspension fitness allows. This does not mean they can’t be developed and it does not stop inventive trainers devising ways in which to do this. Aspects of reaction time, speed/power and agility can be challenged and combined in jump training.
Suspension fitness needs only light, easily portable equipment to reproduce many free weight or resistance machine based exercises. Although maximally loaded exercises may not be possible for all clients, the scope for taking this equipment to a range of environments for workouts is huge. Clients don’t necessarily need a large array of free weights at home if the loading method can come to them. The same applies to the workout in the park, and as long as an anchor can be found, suspension fitness can offer effective, whole body resistance training alongside more regular outdoor exercise.
Resistance machines can be limited in their ability to challenge the body in its entirety, in just one single exercise. Suspension fitness can do this, if we so wish. Suspension fitness allows a traditional biceps curl to become an exercise that supplies challenges from foot to head and most things in between.
Resistance machines often allow work in only one plane of motion (usually sagittal) whereas in this approach trainers can easily place additional work on a client in a mixture of planes. Varying the degree of sagittal, frontal and transverse challenge can allow for a more specific targeting of the desired movements or muscles.
Anything that offers such versatility limits the need for lots of other kit. Trainers wanting to optimise yearly profits will find there are fewer requirements to purchase more equipment.
What else can suspension fitness give to trainers and clients?
Suspension fitness’ versatility extends not just to equipment options. It also applies to clients. A trainer will discover that clients, varying from novices to serious athletes, can find a workout that matches their fitness and goal profile.
What is ‘functional training’? Does everything have to be ‘functional’ now? The various schools of thought differ on exactly what the term ‘functional’ means. Most would agree that the body is suited to movement, adapts to appropriate levels of exercise induced stress called ‘overload’, and that modern living often offers only limited amounts of either. Anything that improves our clients’ quality of life or their sporting performance is ultimately a benefit. But ‘functional’ as a term can get tricky, even heated. Some may argue a biceps curl is functional for a bodybuilder! Others will say we should consider ‘functional training’ as whole-body ‘movement patterns’, integrating foot to hand, multi-planar in nature, something that would have assisted us in our hunter-gatherer pasts! The debate may then continue along the lines that if we are not training for function, we are wasting our time, and more importantly, our clients’ time. Improving how people move and perform is an excellent thing and trainers should be praised for working towards this goal. The traditional perception that ‘the body only knows movement, not muscle’ is worth significant consideration, especially for those working with performance focused clients. As an instructor, it is also worth noting that some clients do know muscles and they may still just want bigger biceps and a narrower waist. Clients are our customers, if they are not getting what they paid for they will buy it elsewhere. Clients will still care about how they look. They will often come to us to increase muscle size and to reduce body fat. Any new concept or method of training will bring with it new ways to achieve these benefits. This doesn’t mean we have to throw out everything we have previously done, but it can allow us to re-evaluate past practice, keeping the methods that have proved effective and adapting the methods which have proved less so.
The good news for us, as trainers, is that we don’t have to make the call of defining ‘functional training’. We just need to ensure that we have happy clients who achieve their goals. Maybe we can just let the fitness gurus argue it out whilst we simply take on board what we feel is the best of what they say, and pass it on to our clients through excellent exercise delivery. The next piece of good news is that this equipment is so versatile that it can meet the needs of those on any side of the debate. If you want to integrate, you can. If isolation is your thing, that’s possible here too. It’s great to have choice in your exercise repertoire, your approaches to training, and your client base.
80-100% 1RM 75% 1RM 40-60% 1RM
predominantly CP system lactic acid/aerobic systems predominantly lactic acid
Although suspension fitness can challenge the body in an integrated manner the above guidelines still need to be considered for both integrated and isolation approaches to training.
As clients’ goals will not always be purely fitness related, trainers need to be aware of the benefits to health associated with muscular strength and endurance training. Suspension fitness offers another way to achieve these. They can include:
increased bone density
increased resting metabolic rate
decreased body fat
improved self-image
improved posture
reduced risk of injury.
For any exercise to offer benefits it must overload the desired system/s in the desired way. This may be a motor skill, cardiovascular or muscular strength and endurance related challenge. Overload could be considered as the point at which the desired benefits of the exercise start. Depending on a clients’ fitness level and goals, overload may be great or small.
Base
A wide BOS and a low COM will offer less challenge to the muscles which ‘resist displacement’. This is a good way to think of what muscles give us when they supply ‘stability’. The role of muscles in stabilisation will be called upon to a greater extent as the BOS becomes smaller or as the COM travels up or possibly outside this region.
The exercises in this manual are classified as either ‘hand support’ exercises or ‘foot support’ exercises. Hand support exercises are reproducible anywhere that you can anchor the equipment securely to a wall. To use the full range and variations of ‘Foot support’ exercises the equipment needs to be anchored so that the body can be positioned either directly below this point or even either side of it.
(varying degrees of lean alter intensity)
Modifications and progression tools for suspension fitness easier factor harder vertical body position horizontal shorter lever length longer greater points of support fewer less range more less duration of work more less degree of rotational challenge more less reps more less load more less sets more more rest less
The factors above include four of the five ‘Rs’ we usually consider when progressing or modifying any resistance exercise. Slowing an exercise down often makes the exercise more challenging as the muscles worked are placed under tension for a longer duration of time. This is a method often used in hypertrophy related or endurance goals. If ‘Power’ is the desired outcome then speed of movement must be maximal in nature to target the explosive fast twitch fibres in an appropriate fashion. In summary, in most cases slower is harder but if power is the aim speed is essential.
If we are considering all the ways in which to make an exercise more challenging we could add additional load to the body. Certain exercises lend themselves to this idea and although ‘purists’ to the suspension fitness concept may find adding additional load to the body unattractive, this manual aims to supply trainers with many options to meet the many needs of their clients.
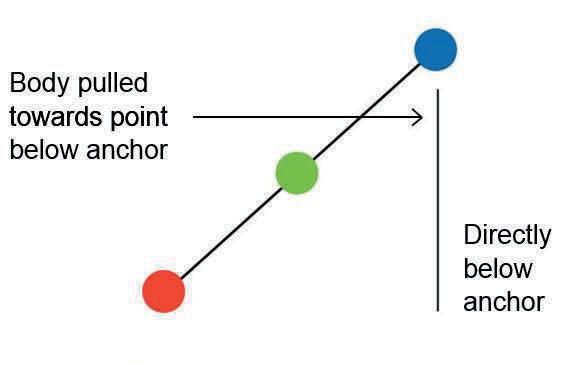
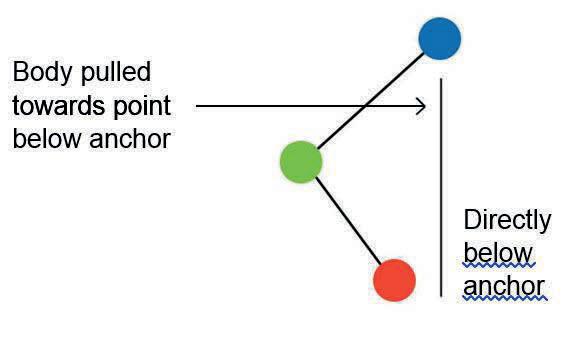
Foot support exercises use the equipment in such a way as to reproduce the forces similar to working either up or downhill. This is achieved by playing with the order of the ‘point of support’ and ‘attachment’ in relation to the position of the anchor.

(body position in relationship to the anchor point alters intensity and direction of pull on the exerciser)
We need to change our body position in relation to the anchor
Uphill point of furthest from anchor Downhill point of support is nearest to anchor
suspension fitness uses percentages of bodyweight to bring about a training effect
the equipment is portable and versatile
there are many ways to increase or decrease intensity
suspension fitness exercises can be categorised as hand or foot support exercises

conditioning exercises and flexibility work can be either integrated or isolated, but the key point is to keep the client happy with safe and effective sessions
in order to achieve a training effect for any of the benefits identified, overload needs to be achieved
to train effectively for strength and/or endurance, the repetitions planned should relate to the muscular strength and endurance continuum.
By the end of this section you should be able to: identify the nature of the instructor’s responsibilities
identify the importance of screening in preparation for a session
recognise when it is appropriate to refer to other professionals
identify factors that will affect the planning of a session
plan a session in the context of health and safety
This section outlines the responsibilities of the instructor to ensure a safe environment which includes the set up and management of the suspension fitness equipment.
The instructor must ensure that they are fully aware of their responsibilities to others and themselves within the workplace. A duty of care must be demonstrated at all times.
The Health and Safety at Work etc. Act 1974 is in place to protect the customer, the employee and the employer. It is the employer’s responsibility to ensure that all staff are fully aware of their duties. These may include making regular checks on equipment and reporting any faults, ensuring fire exits and extinguishers are easily accessible with no obstructions and being aware of first aid procedures within the centre.
In some cases the instructor may be in charge of a particular area. If the instructor is self-employed, they have the same responsibilities in consultation with the centre manager or caretaker of the venue. Teachers should have a current CPR certificate or a full First Aid at Work qualification if they are working in isolation.
Suspension fitness utilises a strong anchor for attachment to a wall, inflexible cords with adjustable handles for feet and hands, and requires a sufficient amount of space within which to operate safely. These present some unique considerations for health and safety, and trainers are certainly advised to scrutinise a number of different factors:
As with any activity, screening must take place. This should be in the form of a physical activity readiness questionnaire (PARQ) and verbal screening prior to the start of the session.
Manufacturers’ guidelines will differ but generally a height of between two to three metres will be required in order to allow for sufficient ‘play’ with the equipment and its exercises.
If using ‘one-piece’ suspension equipment, the loop that allows both cables to be equal needs to be about 2 metres from the floor.
With the equipment fully extended the foot supports should be about 7 to 8 cms from the floor.
Frames – the anchoring end of the equipment needs to be wrapped around the attachment point.
The carabiner is clipped over the strap which is then pulled firm and ready for use.
Anchor using doors – use a door that opens away from you
Wall mounted anchor
Outdoor attachment – e.g. tree or football goalpost.
Clients’ must have absolute confidence in the anchor upon which they are hanging. This confidence should stem from the trainer’s belief in the integrity of the wall and the wall attachment employed. If a door is to be used for this purpose, it is absolutely essential that a sign of some description identifies to other users that this door must not be opened. If trainers cannot be confident that others will not heed or see the sign, the equipment is not a safe or viable option.
A slippery surface will not allow participants to safely ‘lean into’ an exercise to gain some workable resistance. It is advised that surfaces and shoes offer grip to allow a reliable point of support.
Some variations of exercises require the knee against the floor. In such cases a mat should be used to offer comfort and reduce the risk of injury to the client.
Space must be sufficient to allow for both short and long setting exercises to be performed without disruption to other exercisers or the client. This will be a factor on both hill and lean exercises. Exercises which involve a prone position will need careful monitoring, as the client will not be able to monitor their immediate environment without affecting body alignment. This means that the trainer needs to constantly be aware of the whole environment, especially in busier spaces.
Mirrors are excellent for increasing a client’s awareness of their own exercise technique but there must also be caution here. The suspension equipment must be carefully managed so as not to allow handles, attachment hooks or any other piece to collide with glass surfaces.
Session participants need to be constantly reminded to check that the cords stay taut during exercises. Maintaining tension will allow clients to find the ‘sweet spot’, the ‘just right’ position in which to start their exercise. More importantly it will also limit momentum from creeping into technique.
We will need to factor in some additional time to our first few suspension fitness sessions with some clients as they literally ‘learn the ropes’. Demonstration and then client rehearsal of the more complex exercises is key. Supported by positive reinforcement and visual and verbal teaching points, most clients will hopefully progress steadily over the first few weeks, allowing more time for the actual exercises at an effective level of intensity.
Instructors may sometimes be faced with situations that are beyond their control. These could be venue issues, equipment maintenance or availability, emergency requirements or the outcome of screening.
If the instructor does not have the knowledge or qualifications to deal with a situation, they must inform the relevant personnel.
Those busy times in a gym are a great time to showcase our skills as a trainer. We need to be seen to be delivering brilliant, enjoyable sessions to our clients and the more potential clients that see this, the better. One problem with busy times is space. Of course, we may want to use our new suspension fitness equipment at these times if it suits the client’s wants and needs, but we must do so with heightened awareness. We do need to consider where we will train clients and how other gym users can still move around us without interference for either them or our clients. We may need to be creative if we can’t find an obvious place to work, but remember, safety is paramount.
The key points for this section are: the instructor must take responsibility for equipment and environment checks in order to ensure health and safety within the environment
suspension fitness has a number of specific safety aspects which need to be considered prior to a session commencing, and routinely monitored throughout the session itself
it is important that all trainers understand how to safely set up and adjust equipment
in order to ensure adequate time is allowed for the session, factors such as exercise demonstration and correct exercise execution should be allowed for, especially where new exercises are to be used.
By the end of the section you should be able to plan a suspension fitness session to include a: relevant warm up (including mobility, pulse raiser and pre stretch) main workout cool down (including a post workout stretch). Main workouts can combine a variety of resistance training approaches and/or other equipment.
The structure of a suspension fitness session can follow the same format as a standard workout, to include a warm-up, main workout component and cool down.
To ensure that the muscles are fully prepared and to allow sufficient freedom of movement around joints, there needs to be a form of mobility pulse raiser. Suspension fitness equipment can be employed for this purpose although in a gym, in a park or at home, the client may have a preferred/easier way to get ready for their main workout.
Specificity should be taken into account in order to make the warm up effective. Inclusion of the type of exercises that will be used in the main workout can be practised to help improve motor skills. This will also ensure that the joints and muscles go through the ranges of movement required for the workout, but at a lower intensity. It is best to mention that if the aim of the session is to include whole body integration through a large range of motion, then an appropriately comprehensive warm up is required.
Exercises such as reduced range of motion lunges and squats which then begin to incorporate lower intensity pushes or pulls through the arms would be appropriate to effectively raise the body temperature. As the aim of this component of the session is to raise body temperature, ‘lean’ exercises are recommended as they generally rely on standing positions as opposed to floor based ‘hill’ exercises.
There is a great deal of discussion concerning the inclusion of preparation stretches within the warm up component. Research suggests that static stretching prior to working out can have a negative effect on the amount of power (strength x speed) generated within the muscle. Different figures have been offered ranging between 6 and 10% of power output (Kokkonen, J., Nelson, AG., and Cornwell, A, 1998). This suggests that mobility exercises that take the joints through a full range of movement with a mixture of dynamic stretches could be more beneficial than a static prep stretch.
As always, the trainer needs to consider the client. If they are a member of the general public who is training for health benefits, a 6-10% reduction in power output is not going to be of great importance, and therefore, static stretching would be appropriate. However, athletes and more sports focussed clients may feel they want to maintain and tap into this power potential. In this case a more dynamic approach would make sense. To counter this point, it is also worth considering that even some of these clients have a ‘ritual’ of stretches (sometimes static) that they feel must be performed to allow them to feel confident in working at the desired level of the session. To ensure we get it right we just need to ask the right questions!
If stretching is included within the warm up there will be a need to re-warm the body prior to the main workout. This can be achieved by using similar but slightly more intense exercises to the mobility pulse raiser.
The recommended structure of the warm up is as follows:
• mobility pulse raiser preparation stretch
• re-warm.
There are various approaches that can be used within the main workout section of the session. The choice of content will depend on the fitness and skill level of the participant. It would be advisable to use a whole body approach, either in a single session or over the course of a programme, relevant to the client goals.
A few examples:
1. Whole body integration – on all exercises to work the body as a unit throughout (single or basic sets).
2. Whole body approach – work the body with particular attention focussed on one area before moving on to another (single or basic sets).
3. Suspension fitness combined with ‘traditional’ approaches – such as a free weight back squat immediately followed by a lower body suspension exercise (super set).
4. Suspension fitness for just one area mixed in a circuit of more traditional exercises (circuits).
5. Suspension fitness for just one area in a workout and then move on to another area with a more traditional method (basic sets).
This list can be added to with pyramids, tri-sets, drop sets or any number of approaches from the world of resistance training.
A very traditional approach is to start with the larger muscle groups and compound exercises, gradually working down to the smaller muscles and isolation exercises before working the core. There is an argument stating that if the core muscles are specifically trained and fatigued too early, good postural control may be difficult to maintain throughout the session. Another method is alternating between upper and lower body exercises. This type of work may promote cardiovascular fitness as more blood is required to circulate around the body to the working muscles.
The key thing is to ensure that we are achieving what the client wants safely and in the way they want it.
If the main workout approach used a sets system that started with the large muscle groups and finished with smaller isolated muscles, body temperature may have reduced to a level inconsistent with safe, effective stretching. There may also be a build-up of lactate that needs to be eliminated from the muscles. In these circumstances there is a need for a dynamic cool down, sometimes called a re-warmer. The intensity will gradually increase to raise the body temperature to a level that allows safe, effective stretching. Again, as in the warm up, a cool down may be performed elsewhere and in another way rather than using the suspension equipment.
The suspension fitness equipment does offer some very effective options for flexibility. Performing light intensity versions of the main exercises from the session just completed, followed by an individual stretch of the prime movers used is one option.
Alternatively, all of the stretches can be performed in a post workout stretch section. A mixture of maintenance and developmental stretches covering all of the worked muscle groups should be included. The flexibility section of this manual has included both stretch positions that target a whole chain of connected muscles in one go as well as stretches for muscles in isolation.
One suggestion may be to target key restricted areas in isolation first before then integrating these back into a whole body, chain stretch i.e. hamstrings in a developmental stretch then an extensor chain stretch to follow.
The key points for this section are:
ensure warm-ups and cool downs are specific to the content of the main workout consider the type of flexibility work to be performed to achieve effectiveness and balance, incorporate a whole body approach while respecting the clients’ goals
consider a range of approaches, including combining suspension fitness with other training modalities.
The suspension fitness teacher/instructor requires a high level of teaching skills. In this section we explore the essential skills that are needed to ensure safety, effectiveness and enjoyment.
By the end of the section you should be able to:
identify the appropriate teaching skills required to instruct a suspension fitness session
demonstrate relevant instructional skills
identify the need to gather information about client experience
consider motivation of the client throughout the session
The suspension fitness instructor needs to possess a sound understanding of the reasons why exercises should be performed in a certain way in order to achieve a goal, or indeed to decide if they be should be performed at all. It is common in suspension fitness sessions for individuals to initially ask many questions. This point will apply to both the completely new exerciser and the experienced exerciser, new to this particular training method. The client, used to simply adding a few plates to a barbell to increase intensity, needs to be introduced to how their bodyweight can be used to the same effect with a lean here or a longer lever there. This will be a process of seeing demonstrations, hearing explanations and, in this case, feeling the change in intensity from the amount of ‘lean’, or other less familiar factors.
Individuals often learn a skill more quickly if they are given a clear picture to follow. Instructors need to have good technique, sufficient to clearly demonstrate correct joint alignment, control and speed. The instructor should consider what would be the most efficient angle to ensure the client most effectively views the demonstration. Perhaps a few different views of the same exercise are necessary. Many exercises will require more than one angle in order to show joint alignment, range of movement and posture.
Clear demonstration should be reinforced with relevant instruction and teaching points. Teaching points should be clear with the instructor employing a variety of vocabulary, helping to keep
experience – consider the purpose and get ready for
sessions dynamic rather than repeating the continually same thing in the same way. It may be that a trainer needs to rely on this verbal style of delivery if they are working with a very advanced client whose exercises are hard to demonstrate effectively. As long as the client’s performance is safe and achieves the outcome this is a valid option, allowing us to expand our client base.
One of the primary ways you can ensure the client has understood the demonstration, instruction, and teaching points given is to observe their performance. In the same way as the client observed demonstrations from a range of angles, the trainer needs to see the whole picture. This requires changing position to observe the client and then possibly changing position again to communicate effectively.
This means that we move to clearly see the performance and then find the best position from which to communicate, therefore improving or supporting performance even more.
Due to the number of regions of the body that can be challenged simultaneously the trainer must be highly vigilant of a client’s alignment from head to toe. Getting alignment right and reinforcing this control is more likely to reduce injury risk and increase performance. Of course, it is not only the girdles and spine that need such scrutiny. Applying the same principles throughout the linked joints and muscles of the body will improve both our and our clients’ sessions.
Observation will naturally lead to the reinforcement of teaching points, correction of poor technique, or positive praise for good technique. Observation will also lead to identifying the need to offer the client ‘alternatives’. Alternatives can be described as another way to get to the same place but by a different, more achievable or preferred route. As an instructor, you will need alternatives. The more experienced you are as a trainer, the more you will possess. Whatever we have planned, we must also plan to change our plan. Based on the skill level, fitness level and preference of the client we need to find the right exercise. Hopefully, this text will include sufficient options to meet these needs.
There are many ways to motivate clients within a session. Some clients like to be shouted at, but many do not. Sometimes, simply smiling and encouraging may be enough to keep clients focussed on the session and motivated to work effectively. In most cases clients would probably expect a little more than just this. It is of no surprise to say that the use of music can lift a session and a client’s mood. An instructor’s voice and posture can also increase the motivation of a client. Trainers should look and sound as though they are enjoying what they are doing; and are focussed on their client and the quality of the session.
An important element of being a fitness professional is having the ability to evaluate the delivery and content of a session. Clients and other instructors can all give feedback relating to teaching skills and the general flow of sessions/exercises. In order to keep developing, it is important that the trainer spends time reflecting on how the session went and consider what changes are required for the future. For the client, it is of fundamental importance that trainers review content in order to establish the best way to achieve the client’s wants and needs.
The key points for this section are:
all sections of the session must be taught safely and effectively
demonstrations of technique should be clear and show correct alignment
appropriate advice relating to resistance and skill level must be given to the participants
effective observation of the participant should be demonstrated throughout
relevant teaching points and praise of correct technique should be delivered and reinforced throughout.
The suspension fitness instructor needs to be able to perform and more importantly teach a variety of exercises. In this section we explore how to teach a varied selection of exercises.
By the end of the section you should be able to: perform a variety of suspension fitness exercises with correct alignment and technique
deliver the relevant teaching points for a variety of suspension fitness exercises
offer appropriate alternatives /variations for different exercises
identify specific regions or connected regions of the body targeted by specific exercises
consider the appropriate set up position for suspension fitness equipment relevant to the exercise performed consider the planes of motion when selecting exercises.
In reality, we can’t really isolate just one muscle. We can place focus on a certain region, aiming to increase work on a certain muscle but synergists will always be involved to some extent. Muscle synergy makes it quite complicated to identify which muscles are actually doing what roles, especially when we start to consider whole body integration exercises. To allow instructors to identify which specific regions of the body are being targeted in an integrated manner, we can use the following guidelines.
Let’s think about the body as a connection of regions that make up ‘chains’
These muscles, usually on the rear of the body, have an extension role in addition to preventing or decelerating flexion. The erector spinae, the glutes, the hamstrings and muscles on the rear of the lower leg are combined in this chain. The quadriceps, on the anterior of the body, will extend the knee. Sagittal plane exercises will employ this chain.
Muscles with a diagonal pull to gravity allow us to produce rotation, in addition to preventing or decelerating it. Examples are serratus anterior, the obliques, the medial and lateral rotators of the hip and the muscles controlling the orientation of the foot. Any exercise with a ‘transverse’ plane challenge will employ this line of muscles.
Muscles with a line of pull down the side of the body allow us to produce side-bending, in addition to preventing or decelerating it. They include the latissimus dorsi, the obliques, quadratus lumborum, the hip abductors and adductors and the muscles controlling the arches of the foot. Frontal plane exercises will employ this chain.
The anterior of the body is layered with muscles responsible for flexion, in addition to preventing or decelerating extension. They include the rectus abdominus, the hip flexors, and the dorsi-flexors of the ankle. Sagittal plane exercises will also employ this chain.
Of course, specific muscles of the limbs and trunk can be targeted as desired alongside these connected regions. The quadriceps will still extend the knee, a biceps curl will still require resisted concentric elbow flexion, but now it can be combined with a ‘system’ of other muscles connecting the arm to the floor.
Suspension fitness will allow instructors to challenge all three planes simultaneously. Any one plane can be biased more than another, depending on the goals of the client.
Once the intensity of an activity goes above a certain point we cannot help but to co-contract muscles. This means synergists become increasingly involved, but it also means agonists and antagonists will begin to contract together. The relevance to the exercises presented in this manual is that although emphasis is placed on particular chains due to body position in relation in gravity, the muscles of the core will generally be working strongly whatever. This control of the mid-section will come from the front, back and sides of the body in varying degrees.
The exercises included in this text are not exhaustive in terms of the options offered by this training approach. Understanding the principles of the exercise and the methods of progressing or modifying them will allow for an unlimited number of exercises to be developed. The most important aspect is displaying the ability to meet the client’s wants and needs safely, in a way that works for them.
Suspension Fitness | Manual | Version0821 © YMCAfit 2021
N - Name – name of the exercise for this text
A - Area – upper body, lower body or ‘core’ focus (designated by where most individuals would feel the overload most and which muscles may be targeted more specifically)
S - Set up of equipment – e.g. long, mid-long, mid-short, short, or knee (the exact setting will somewhat depend on the environment (high/low ceiling) and so will need to be adapted as such)
C - Chain or chains primarily challenged.
Remember – tension must be maintained in the suspension cords in all exercises throughout
N - Name - Hand support squat

A - Area – lower body (quadriceps, gluteus maximus, hamstrings, and gastrocnemius)
S - Set up of equipment – mid-long
C – Chain – extensor chain
keep weight through the three points of support of the foot in a slightly wider than hip width stance
knee and second toe alignment is maintained throughout
bend at knees, hips and ankles to achieve desired depth before returning to start position.

A - Area – lower body (quadriceps, gluteus maximus, hamstrings, hip abductors and gastrocnemius)
S - Set up of equipment – mid-long C – Chain – extensor chain
hips face anchor, body aligned above in the client’s neutral spine – maintain throughout the exercise
maintain the weight through the three points of support of the front foot and the forefoot of the rear leg
bend at knees, hips and ankles to form a right angle with both front and rear leg
ensure rear foot does not roll to place excessive weight though the big toe
return to start position so that front leg becomes straight.
N - Name - Hand support chest press
A - Area – upper body (pecs, triceps, deltoids)
S - Set up of equipment – mid-long
C – Chain – flexor chain
stand facing away from the anchor
start with the feet slightly wider than hip width apart
with a firm grip of the hand supports and knuckles and wrists aligned, elbows are bent at around shoulder height in a chest press position
extend through arms at elbow and shoulders and then return under control to start position

the only movement occurring should be from the elbows and shoulders
pushing exercises will especially challenge shoulder blade control and these should remain flat against the ribcage throughout the exercise.
start in the wide position so that the arms and trunk form a cross shape
maintain slight bend in the elbows throughout the exercise, keep the wrists strong and aligned in a neutral position
draw the still straight arms across the body in a flye action
the only movement should be at the shoulder joint.
adjust feet so that although still wider apart one foot is forwards of another
clients often find this allows for a more stable base.
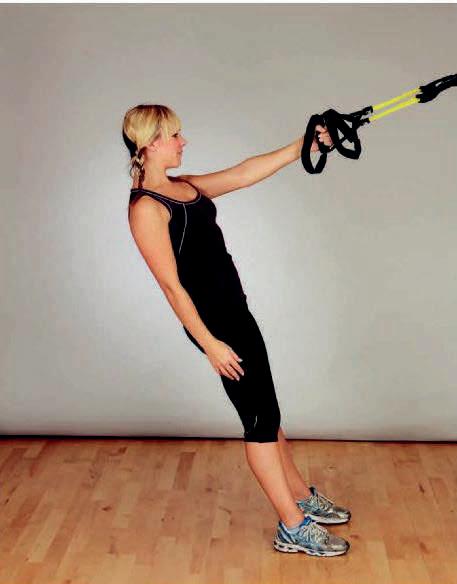
A - Area – upper body (posterior deltoid, latissimus dorsi, biceps, rhomboids/trapezius at shoulder girdle)
S - Set up of equipment – mid-short
C – Chain – extensor chain
stand facing the anchor with the desired amount of lean from the feet up through the trunk
hold onto the suspension equipment with an overhand grip
knuckles and wrists are aligned in a firm neutral position
bend at the elbows as the body is pulled forwards to return to a more vertical position keeping the elbows high and wide at shoulder level throughout
slowly return to the start position
alignment is maintained from the foot to head, ensuring that only the arms and shoulder produce the movement.

N - Name - Hand support roll out
A - Area – core and upper body (latissimus dorsi, rectus abdominus)
S - Set up of equipment – mid-long
C – Chain – flexor chain (single arm rotation spiral)

stand facing away from the anchor with the arms extended
slight bend in elbows and an overhand grip
lean from the floor up as the body travels under control towards the floor
return to the start position
only movement is from the shoulder joint.
N - Name - Hand support rear flye
A - Area – core and upper body (posterior deltoid, rhomboids)
S - Set up of equipment – short C – Chain – extensor chain
stand facing the anchor with arms extended out at around shoulder level or just above

take a firm, secure grip of the hand support with the palms facing one another, knuckles and wrists aligned, and just a slight bend in the elbows
pull the body forwards from the client specific lean until the arms are extended out to the sides of the body in horizontal extension
return to start position.
N - Name - Hand support high and wide rear flye
A - Area – core and upper body (deltoids) S - Set up of equipment – short C – Chain – extensor chain
stand facing the anchor with the arms extended out at around shoulder level or just above
take a firm, secure grip of the hand support with palms facing down, knuckles and wrists aligned, and just a slight bend in the elbows
pull the body forwards from the client specific lean until the arms are above the shoulders in full shoulder flexion, but also abducted - this will form a ‘v’ like shape above the client’s head
return to start position.
Variation: Front raise
as above but just perform shoulder flexion

N - Name - Hand support triceps press
A - Area – core and upper body (triceps, rectus abdominis)
S - Set up of equipment – short-mid C – Chain –flexor chain
stand facing away from the anchor with an overhand grip, arms extended out from the shoulders, and with the hands just above shoulder level

keep the knuckles and wrists aligned
bend at the elbows as the lean of the body increases
return to start position.
N - Name - Hand support bicep curl
A - Area – core and upper body (biceps)
S - Set up of equipment – mid-short C – Chain –extensor chain
stand facing anchor with hands shoulder width apart, just above shoulder level with a supinated grip
bend at the elbows so as to pull the body forwards pivoting through the feet
return to start position.

N - Name – One hand support squat rotation reach
A - Area – upper body, core, lower body (quadriceps, gluteus maximus, hamstrings, lateral rotators and abductors of hip, latissimus dorsi, posterior deltoid, obliques)
S - Set up of equipment – mid-long C – Chain – flexor chain
stand facing the anchor in the same set up position as a lean squat but with only one hand support
the supporting arm is out-stretched at about shoulder level
as the knees bend, hips and ankles rotate the upper body away from the anchor point

extend through the lower body and return the trunk to the start position
maintain the lower body alignment with regards to knees, ankles and toes as required on a squat
the free arm can extend behind the body to increase the rotation challenge on the low part of the squat before returning to the start position
to add more rotational challenge, reach across the body on the return to the start position.
N - Name – Hand support overhead squat

A - Area – lower body, upper body and core S - Set up of equipment – mid C – Chain – extensor chain
stand facing the anchor in a slightly wider than hip width stance
arms straight directly above the shoulders, and palms facing the anchor with a firm grip of the hand supports
bend the knees, hips and ankles, allowing the trunk to stay vertical, knees and toes aligned, and in this case the knees stay behind the toes
return to the start position ensuring the only movement throughout is from the triple extension of the lower body.
N - Name – Hand support full pull sit-up
A - Area – core
S - Set up of equipment – knee

C – Chain – flexor chain
Teaching points
lie supine on a mat with the knees bent and feet towards the anchor
shoulder width arms holding on to the hand supports
wrists and knuckles are aligned
using the abdominals, and with assistance through the arms, pull the trunk up to just about vertical so that hands cross knees.
N - Name – Hand support side bend
A - Area – core and upper body (latissimus dorsi, obliques, quadratus lumborum)
S - Set up of equipment – mid
C – Chain – lateral chain
stand side on to the anchor in a slightly narrower than hip width position, with arms above the head, and elbows bent
palms are in a pronated grip, and securely hold the hand support
maintaining the tension through the equipment, allow the hip furthest from the anchor to move laterally as the hip drops and the arms pull the upper body in the opposite direction
maintain alignment throughout as the body is returned to the start position
N - Name – Foot support press up A - Area – core and upper body (pectorals, triceps, rectus abdominus) S - Set up of equipment – knee C – Chain – flexor chain

feet supported by foot supports and the body is in a prone position
hands are below the shoulders or wider depending on the goal
the neutral alignment through the back of the body is maintained as the movement occurs at the elbows and shoulder joint
the body lowers towards the floor under control and then returns to start position.

N - Name – Foot support lunge
A - Area – lower body (quadriceps, gluteus maximus, hamstrings, gastrocnemius, hip abductors and lateral rotators)
S - Set up of equipment – mid-long
C – Chain – extensor, lateral chain and rotation spiral (add to spine rotation)
the rear foot is supported by the foot attachment and the anchor behind the body
slowly hop forward to find a point of tension through the suspension fitness equipment
the support leg should follow the same points of alignment as the lunge

descend to 90 degree bend position under control and return to straight leg
the upper body should remain aligned in client’s neutral throughout the exercise.
add an additional rotation challenge turn towards the rear leg through the ribcage/thoracic spine
maintain hip position – pointing straight ahead
prevent the support knee following the trunk on the turn.
the rear leg is ‘looped’ below the body behind the lead leg
the hips need to drop laterally to allow this movement to be achieved
aim to keep shoulders aligned with hip bones as the upper body moves as a block.
Abduct the lifted leg out to the side of the body towards the anchor
Knee/toe alignment is maintained as is the knee on top of the ankle of the support leg
N - Name – Foot support
A - Area – lower body (hamstrings, gluteus maximus)
S - Set up of equipment – knee
C – Chain – extensor chain
Teaching points
in a supine position with the heels anchored on the foot supports
lift the hips so as to produce a long, straight body from the shoulder support to the feet
keep the head down throughout
the arms can be placed by the side of the trunk on the floor or across the chest for additional challenge

begin to bend the knees as the hips begin to lift further towards ceiling
return under control to the start position.
N - Name – Foot support suspension bridge
A - Area – lower body (hamstrings, gluteus maximus)
S - Set up of equipment – knee
C – Chain – extensor chain
Teaching points
start in the same position as hamstring curl but with knees above hips and 90 degrees of knee bend
keep the head down throughout
maintain knee bend as the hips are lifted towards the ceiling
return to start position
N - Name – Foot support triceps dip A - Area – upper body (triceps) S - Set up of equipment – knee C – Chain – extensor chain


Teaching points
in an ‘l’ shape position, facing the anchor, place the feet directly below the anchor in the foot supports
the legs initially remain straight but the upper body supported by the arms, with the elbows close in by the sides (shoulder width) and the fingers pointing towards the toes
the elbows bend and the body lowers towards the floor
return to start position, keep a slight bend in the elbow, and alternated legs.
N - Name – Foot support running man plank

A - Area – upper body, lower body and core (deltoids, triceps, rectus abdominus
S - Set up of equipment – knee
C – Chain – extensor chain
start in the same position as for the hill press up
keep one leg extended as the other leg flexes at knee and hip and draws in towards the trunk
the hips lift as extra load is placed through the arms
slowly return and repeat for opposite side.
N - Name – Standing wide hip flexion (and offset feet option)
A - Area – extensor chain opening
S - Set up of equipment – mid
stand facing the anchor, overhand grip, arms straight, slight bend at the elbows, shoulder width apart feet are wide (twice hip width or greater) feet may be parallel to one another or slightly angled out so as to be aligned with knees

hinge form the hips forward to feel a lengthening through the rear of the body maintain trunk alignment throughout with particular reinforcement given to the neck.
narrower or wider in the feet to meet client’s specific abilities consider an off-set, asymmetrical stance to place additional emphasis on desired regions.
N - Name – Piriformis (stand or sit)
A - Area – lower body extensor and rotators opening
S - Set up of equipment – mid
C – Chain – extensor chain
face the anchor with an overhand grip

arms are extended out at shoulder level
place the shin of one leg across the thigh of the supporting leg
aim to keep hips level as the supporting leg bends at the knee
ankles and hip flex to find the desired depth in which the stretch is felt
supporting knee and toes align forwards
ensure the upper body alignment is maintained in a client neutral position.
can also be performed from seated
N - Name – Lateral chain lengthener
A - Area – lateral chain and rotation spiral opening
S - Set up of equipment – mid
C – Chain – lateral chain
Teaching points
stand facing the anchor using a two hand pronated grip

slight bend in the extended arms
feet are hip width apart
keep the upper back, shoulders and head facing the anchor as the pelvis and legs pivot 90 degrees away from the line of pull
as this turn happens, the leg you are turning towards steps back as the other leg steps forwards
the hips can now drop away from the anchor on the rear leg side and the trunk can flex to increase the opening to the upper back especially.
N - Name – Retractors and upper extensors lean
A - Area – upper extensor chain opening
S - Set up of equipment – mid
C – Chain – extensor chain
Teaching points stand hip width facing the anchor
arms extended out at shoulder level with a slight bend in the elbows, allows the shoulder blades to protract forwards as the trunk sits back between the arms

the upper back can curl in a little further and the chin can be slowly tucked in to increase opening through the back of the body.
N - Name – Chest
A - Area – flexor chain opening
S - Set up of equipment – mid
Teaching points
stand hip width facing away from anchor
take a supinated grip with the arms just slightly abducted away from the sides of the trunk
step forward with one leg into a lunge position

ensure the knee and toes align on the front leg, and the knee is directly above the ankle at the bottom of the lunge

keep hips level and pointing straight ahead
ensure the rear foot has weight evenly placed through all five toes as the heel lifts. N - Name – Rectus femoris A - Area – lower body flexor chain opening
S - Set up of equipment – mid
face away from the anchor
come down into a low lunge position so the rear knee is supported by a mat
the front leg is at a 90 degree angle with knee and toes pointing forwards
knee on top of ankle
place rear foot into foot support and gently move forwards or hinge from the hip until an opening is felt on the front of the rear leg and hip.
Kokkonen, J., Nelson, AG., und Cornwell, A. (1998). Acute muscle stretching inhibits maximal strength performance. Res Q Exerc Sport 69: pp. 411–415
Lee, D. (2004). The Pelvic Girdle: An Approach to the Examination and Treatment of the Lumbopelvic-Hip
Region. Sydney, Australia: Churchill Livingstone Myers, T. W. (2008). Anatomy Trains: Myofascial Meridians for Manual and Movement Therapists. Sydney, Australia: Churchill Livingstone
YMCAFIT is one of the UK’s leading health, fitness and wellbeing specific training providers. It offers an extensive range of qualifications from Level 2 to Level 4.
To view YMCA FIT’s full range of qualifications please visit www.ymcafit.org.uk.
A: 111 Great Russell Street, London, WC1B 3NQ
W: www.ymcafit.org.uk
© YMCAfit is part of Central Young Men’s Christian Association (Central YMCA). Registered Charity no. 213121. Limited company registered in England no. 119249. Registered address 112 Great Russell St, London, WC1B 3NQ.