


WOODEN WONDERS Conversation Pieces The TOOLS Yesteryear A VIRTUAL TRADE SHOW EXPERIENCE ISSUE 04 - JUNE 2024 ד”סב MOLDINGS on the PRODUCTION LINE Retail Price: Print $5.99 - Digital Free! WOODWORX WITH YOSSI AND JESSE

2 THE NYGC | ISSUE 04 | June 2024 HelloMGM.com Experience Magnificence!the Actual project! THELEADINGBRANDINCUSTOMSUKKAHSKYLIGHTS AIRSYSTEM 845.789.4381|SKYVIEWSKYLIGHT .COM WE SHIP WORLDWIDE! 90 degree opening formaxkoshersukkah UNBEATABLE GLASS PERFORMANCE EXCLUSIVE TO SKYVIEW! toprevent condensation


KJ TILES CO. 191 RT.59, MONSEY, NY 845.371.5400 | KJTILESCO.COM hand pAinted ART 24X48 SUNNY

4 THE NYGC | ISSUE 04 | June 2024 CONTENTS THE NYGC OUR CONTACT INFO Telephone: 1-845-751-1046 E-mail: ads@thenygc.com Website: www.thenygc.com Jacob Surkis Publisher, CEO Esther Kay Creative Director PUBLISHER’S NOTE 12 HOW’S BUSINESS Woodworx with Yossi & Jesse 22 ON THE PRODUCTION LINE How Moldings are Made a pictorial tour 32 HOW TO DIY Hang a Prehung Door 42 THE TOOLS OF YESTERYEAR Vintage Woodworking 50 ARCHITECTURE + DESIGN Woodwork in Design Design Finds TAKEAWAY


(845) 426-2622 161 ROUTE 59 SUITE 202 MONSEY, NY WE BUILD IT YOU DREAM IT


6 THE NYGC | ISSUE 04 | June 2024 Hundreds of styles and types of garage doors to make your home more beautiful, accessible and convenient. Contact Domestic Garage Doors for the expertise and products that will last you a lifetime. 845.354.6904 Office@domesticgaragedoors.com 24 Washington Avenue Spring Valley, NY 10977 20 years experience || Expert Installation || 1 Year Satisfaction guarantee Wifi & Internet Door Operation New Door Installation Motorize existing doors repairs & replacemnts of parts DOOR MAKES ALL THE DIFFERENCE
Publisher’s Note

As a general contractor, I find immense satisfaction in seeing my hard work come to life. The culmination of meticulous planning, attention to detail, and dedication is truly fulfilling. However, I’d be remiss to say that the journey is always smooth sailing. There are days when the challenges seem insurmountable, and the customer’s expectations appear unreasonable. In those moments, I take
“ THERE ARE DAYS WHEN (...) I TAKE A STEP BACK, REFLECT, AND ASK MYSELF: ‘IS THIS SITUATION A RESULT OF MY OWN DOING?’ AND ‘WHAT CAN I DO TO RECTIFY IT?’ ”
a step back, reflect, and ask myself: ‘Is this situation a result of my own doing?’ and ‘What can I do to rectify it?’ By taking ownership and devising a plan of action, I’m able to regain control and find a solution. Ultimately, as long as I remain genuine and attentive to the customer’s concerns, they will leave as a satisfied client. It’s a valuable lesson that has helped me navigate the ups and downs of this rewarding profession.
Jacob Surkis Founder & Publisher THE NYGC MAGAZINE
June 2024 | ISSUE 04 | THE NYGC 7
the
CONSUMER FEEDBACK
INBOX
Informative Read
Renovation Loans
In ref to “Market Insights”, Issue 3
Att. NYGC,
I found your magazine in the local supermarket, and the article on renovation loans was very interesting and informative.
Thanks and keep it up, S.T.
The Grass is Greener So “REFRESH”ing!
In ref to “How’s Bussiness”, Issue 3
Hi,
We just wanted to say that we were so proud and excited to see the landscaper you featured in last month’s edition! Go Shimmy!
We miss you in NY,
Family S., Spring Valley
Saying Thanks To Landscapers Out
There in the Heat
In ref to “Takeaway”, Issue #3
Dear NYGC,
I loved the last article in the May issue. I agree with the view not to expect anyone’s lawn to look picture-perfect every single day.
In fact, I feel that landscapers are way under-appreciated with what they bring to the table for all of us.
They don’t just enhance the customer’s lawn, they enhance the entire area. Anyone in the vicinity ends up benefiting from the rich views and greenery lining the streets even just as a beautiful backdrop to a long drive home from work.
So, thank you to all the hardworking people out there, making the town brighter and greener!
Shiffy R., Airmont
Dear readers,
Send us your thoughts, questions, comments and critique. We will try our best to feature it in our next issue.
All Inbox letters can be submitted by email to thenygc@gmail.com.
We look forward to hearing from you!
8 THE NYGC | ISSUE 04 | June 2024 3

June 2024 | ISSUE 04 | THE NYGC 9 p. 845.517.2773 f. 845.517.2775 mail@expresselectricinc.com EXCEPTIONAL. EXPERIENCE. EXPRESS. Express Electric delivers an exceptional experience in the realm of electrical services. With a commitment to efficiency and expertise, Express Electric goes beyond the conventional, ensuring a seamless and express resolution to all electrical needs. LICENSED AND INSURED STATE OF NEW JERSEY #16962 • ORANGE COUNTY #481 • CITY OF NEWBURGH #131 • ROCKLAND COUNTY #456 SULLIVAN COUNTY #402 • CITY OF MIDDLETOWN #95 • WESTCHESTER COUNTY #1871 • ULSTER COUNTY #403

10 THE NYGC | ISSUE 04 | June 2024 STANDARD KITCHENS THAT WITHSTAND THE TEST OF TIME. > BUILDERS > CONTRACTORS > DEVELOPERS > MANAGEMENT > FLIPPERS > RENTERS 5 Remsen Ave. suite 3, Monsey NY 10952 | 845.533.4141 | monseykitchens@gmail.com * Offer exp. Aug. 28. 24 Restrictions apply. rldesign | 845.200.4432 60’’ STARTER KITCHEN Includes: • Top & bottom cabinets • Countertops $700 10X10’’ KITCHEN $2,099 ACTUAL RENDERING $50 per sq. ft. QUARTZ COUNTERTOPS

845.425.1619 info @masterroofingus.com | www.masterroofingus.com Residential, Commercial, Maintenance ה״ב For projects of any size For all your roofing and siding needs:
HOW’S BUSINESS?
SETTING UP A SYSTEM EXPLORING THE WOODWORKING INDUSTRY
THE BEGINNING
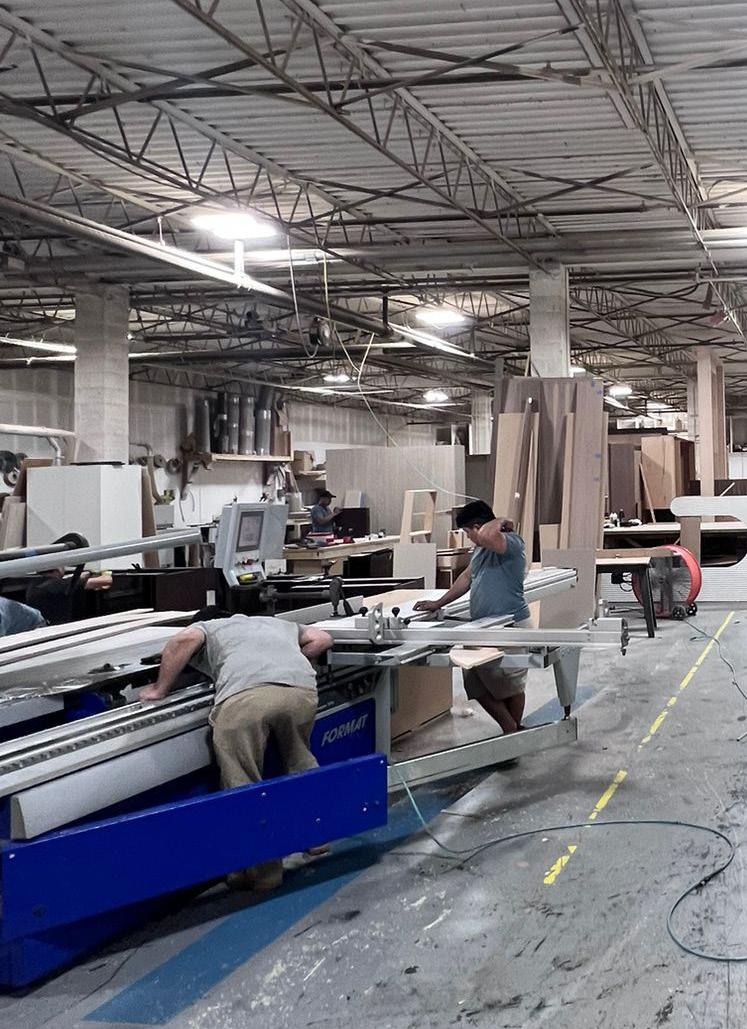
As a young boy growing up in the Chassidish community in Rockland County, I found myself looking for an outlet for my creativity and extra energy. From the age of eight to nine years old, I was busy tinkering with appliances, fixing bikes, and playing around with simple millwork, but my favorite pastime was building furniture. As I got older I was able to build some nice pieces here and there.
My first taste of the real business world was when I started working for my uncle - doing welding in his metal shop, at age 14. A year later I joined a local furniture guy in his one-man-shop and learnt the trade of my dreams hands-on.
After two years working there, I felt ready to start on my own, so - at the young age of 17- I started Yossi’s Woodworx.
I’d learned so much about woodwork, but not a lot regarding the business side of things. The furniture job I’d had before was not set up very professionally business-wise, but I knew that for my company I wanted more professional standards.
WOODWORX
WITH YOSSI & JESSE

After two years working there, I felt ready to start on my own, so - at the young age of 17- I started Yossi’s Woodworx.
12 THE NYGC | ISSUE 04 | June 2024
“
YOSSI
PERLMAN
Founder of Yossi’s Woodworx
That goal was further reinforced countless times down the line as I watched businesses failing when they’d take on too much at a time, or falling apart once the owner reached retirement age.
My goal was to build a strong and legit business that would grow. The beginning was tough, but I was ready for it. I had passion; I was young, optimistic, and willing to put in all the work it took.
I invested 10k in machinery, buying some off from a millwork company that was closing down. Then, I found a space to set up shop. I sub-rented part of a warehouse in Spring Valley. As time went on, I got busier and the business grew bigger, so I took on additional space in the warehouse. Eventually, the guy I’d sub-rented space from moved out, and I used the entire space plus additional areas in the warehouse as well.
GROWING PAINS AND GAINS
Growth came with challenges. It meant constantly messing up and learning new things. For example, we used to lay veneer with Formica glue but then kept having issues with it bubbling, etc. It took a while for us to learn how to properly install the veneer. Losing money
on lessons learned was part of the process. I was busy around the clock with the business.
After four years, one day I injured my ankle and it ended up being broken. It was a bad break and I was unable to do physical work or walk around. The blessing in that was that since I am by nature a very active person, this was my first opportunity to sit and think properly. I went over everything and worked a lot of it out. By the end of that year, I’d repaid all debts from the business and had managed to put 200k in the bank.
In 2021, after seven years of doing business, I was unsure what my next step should be. I was still struggling with lots of different aspects and felt that I needed someone to help me put it all together. With the guidance of a business consultant and a hiring agency, I found my new operational manager- Jesse Stone.
Jesse has 18 years of experience in custom fabrication. He’d done millwork to help pay for school and then ended up staying in the industry. It was time for him to help me take the business to the next level by getting everything organized and properly structured. All it took to get him on board was one interview and we just clicked.

June 2024 | ISSUE 04 | THE NYGC 13

JESSE SPEAKS:
When I saw the job listing for Yossi’s Woodworx, it was after I’d spent years managing and working in custom fabrication.
At that point, I felt it was time for a transition. I was looking for an operation that was already pretty much set up which I could help take to the next level. I reached out, and it seemed the hiring agency got where I was coming from and what I was looking for. I was, therefore, taken by surprise to arrive at an interview in a warehouse where just a handful of guys were rumbling around. There was just one table saw, one edge bander, probably more tools in mine and Yossi’s garages combined than the business had!
I was ushered into a room that was mid-renovation. There was a plastic drop-cloth hanging down from the ceiling, and then Yossi turned to me and asked “So, what do you do?”.
In that bare-bones moment, I was very skeptical. Was this the opportunity to take something raw and make it into something big and beautiful? I wasn’t sure. A lot depended on our actual conversation. I was looking to see if Yossi could relinquish responsibility to others. I also wanted to see how willing he was to go beyond what he’d done until then.
But as soon as we started talking, I could see I was dealing with someone who was driven and passionate, but also had the patience and calm that I’d found missing in many people of the same age.
It was most important to me to have a great relationship with whomever I’d be working with. I knew we’d be together for hours at a time. (Some days I spend more time with Yossi than with my wife!) After getting that vibe from Yossi, I was ready to go ahead with it.
14 THE NYGC | ISSUE 04 | June 2024
How’s BUSINESS? Woodworx


June 2024 | ISSUE 04 | THE NYGC 15
Before Jesse came into the picture everything was running off my phone, but once he was there we got a proper system set up. We used the highly customizable platform of Asana to build an amazing setup geared to the woodworking industry. I honestly think we could sell this software to other millworkers for a lot of money with the great success potential it has.
We went from having 7 workers to over 35 on the team. We could also do 40-50 jobs at a time now, instead of the 15 max we could’ve pulled off in the past. In direct contrast, the stress level and work involved was going down!
Until a certain point, we were sending our products to be finished by a different company, since we had no experience in that department. Then, we got to the point where we had so much work for them, that we ended up buying them out and combining both factories in West Nyack- where we’re now located.
We are still constantly improving the system with a goal for the company to be able to function at least 90 percent without having me there. This ensures the company value even years down the line.
As a bonus to focusing on the process of the business, the product quality ends up improving immensely, even when we aren’t actively working on that aspect. Since everything is more efficient, it gives us more time to do each job a hundred percent correctly.
As an example - over the last year, one of our biggest challenges was getting the finishing department up to par with schedule.
After working on it, we’ve gotten to the point where things are sitting on the shelf finished and ready even a week or two pre-delivery. This gives the pieces enough time to dry, and it gives us the extra time to properly inspect the pieces for imperfections like hair strands or fingerprints on the product. It makes it possible for us to deliver one hundred percent on the first try.
CNC EXPLAINED BY JESSE:
CNC stands for Computer Numerical Control. A CNC woodworking machine is a computercontrolled device that uses specialized software to precisely cut, shape, and carve wood materials.
Unlike traditional woodworking tools that require manual manipulation, a CNC machine operates through programmed instructions. The machine is equipped with motorized axes that move the cutting tools along predefined paths to execute the desired cuts and carvings.
Cutting tools, such as end mills and router bits can be mounted on spindles or tool holders and perform the actual work. There is also a specialty dedicated work surface- often referred to as the bed or table- which provides a stable platform for the woodworking.
CNC has revolutionized the modern woodworking industry with almost every business incorporating it on some level or another, but the real trick with modern technology is to know how to gain the maximum benefit out of it.
By using the knowledge and talent of our experienced millworkers to program the CNC projects, we retain the creativity, originality, and skills of the human hand, while having the amazing precision, accuracy, and efficiency that a machine can deliver.
Aside from that, by having everything mapped out and programmed we will have better data to estimate the exact duration for each project and how much overhead it will take. In addition, it’s a great confidence booster, knowing that every job is being perfectly fulfilled.
16 THE NYGC | ISSUE 04 | June 2024 How’s BUSINESS? Woodworx May 2024
SPREADING THE WORD
From the day I began my company until today, we’ve never had difficulty finding jobs and customers since we were initially open to many different types of projects, based on need. As the business grew, I was able to narrow our niche down and I had to turn customers away when they approached me with jobs I’d stopped focusing on.
Mainly our customers were and still are reaching us through word of mouth.
Although we do use Instagram to promote our brand - and we’ve gotten some high-end clients because of that -, we haven’t done much advertising over the years. Presently, we are aiming to become CNC-operated.
Once we have that set up, our project capacity could go up even higher which means that we may find ourselves looking for additional clientele. At that point, we may have to focus a bit more on marketing.
STRIKING A BALANCE
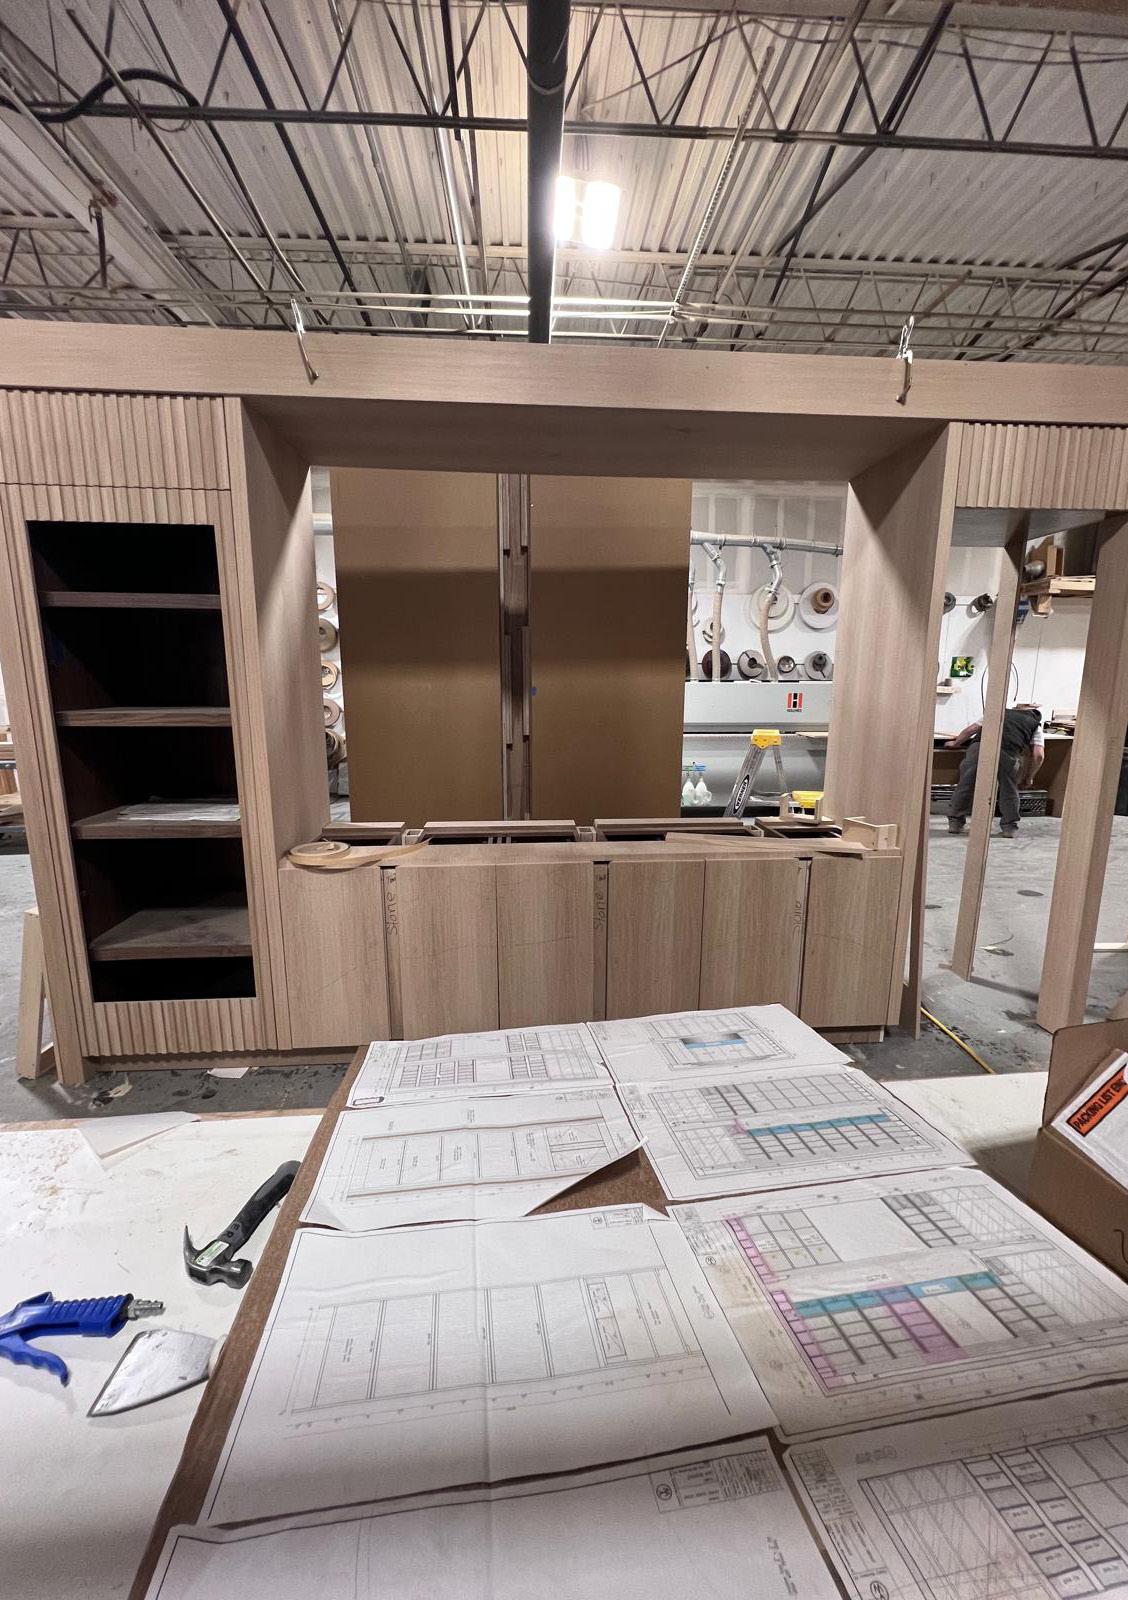
In general, our focus is on high-end, specialty work emphasizing custom projects such as kitchens, closets, libraries, tables, and various millwork.
We do both residential and commercial projects, but I’ve found that there needs to be a balance between the two.
Residential projects are usually detailed and unique. These are the jobs I’d dreamed of, and I love doing them. They also take a lot more time with constant revisions and therefore end up being less profitable. Projects like these are hard to appreciate in the moment with all the stress over every little detail like the edging here or trimming there. It’s only afterward - when we come to visit some 6 months later and see the stunning presentation of a real home starting to be lived inthat we get to experience that wow factor of making a difference in the real world.
Commercial projects- on the other hand- have a quick turnaround time. The customer usually wants it ASAP and is not interested in delving into minute details. Most of them consist of 90% laminates or melamine and don’t take lots of decision-making and brain space.
Taking on those commercial projects acts as a filler so we can then focus on the smaller, special jobs.
For lots of commercial projects, we’ve also been sending out work to third parties with us just doing the shop drawings and supervising the process.
We’ve, also, been busy lately with quite a few highend residential homes. On these projects, we can easily do 1.5 million in just a single home on millwork and we’re not even doing the complete millwork needed. The designers tend to divide the job up between different parties - giving us the higher-end areas, whilst assigning the small stuff like the kids’ vanities, etc. to a different guy and the basics- like closets- to yet a third guy. A component of jobs like these is that we tend to act as a liaison between the designers and architects, working out and interpreting the designs based on how materials work in real life as well as making sure it all fits into the budget while still maintaining the originally planned aesthetic.
To be honest, all jobs are complex on a certain level when it comes to millwork. There are so many different stages and lots of different stakeholders involved in each project including the contractor, the designer, and the architect. Even commercial jobs are still custom work, so - no, I don’t get to sit with my feet up drinking coffee. At least not yet :).
As a general rule, I do like to focus more on fewer projects that are bigger as opposed to a bunch of smaller jobs.
I would say, our current workload is around 65 percent residential and 35 percent commercial projects.
June 2024 | ISSUE 04 | THE NYGC 17
“WITH PROPER STRATEGY AND SYSTEM BUILDING
- you get to the point where you can sustain more and bigger projects at a reasonable rate.”

KNOWING YOUR LIMITS
One of the most important components in building a business made to last is to know where you’re at and what you are ready for. “Make sure you can grow into the clothes you buy”. Jumping the gun may sound like fun, but the correct way to go is slowly and steadily. If you take on too much too fast, you end up grinding your business down.
I had someone offer me a position years ago to manage a big factory for 120K a year. They offered to buy lots of equipment, but I declined since I didn’t feel ready for that yet. Anyone can buy equipment, but you need knowledge and experience to keep it running.
This company ended up buying every type of machinery needed- spending 3 million in the process. They started off getting big jobs in hotels, in Times Square, etc. But, sadly, within a year the business was in the ground, and they were selling the equipment for pennies.
With proper strategy and system building, though, you get to the point where you can sustain more and bigger projects at a reasonable rate.
18 THE NYGC | ISSUE 04 | June 2024
How’s BUSINESS? Woodworx
FROM PASSION TO PRO
As a beginner, I started with a passion. Then, as the business began to take shape, I realized that being too emotionally involved in any project is an impediment to making profit.
Different levels take different types of business operations. To further grow my business, I needed to accept my team and be willing to learn from them. I needed to be open to having people with a lot more experience than I have. It’s an act of humility and takes the ability to let go.
Being too involved every step of the way keeps the team from thriving. They end up second-guessing themselves since the reins aren’t placed in their hands.
When I look at where we are now and compare it to where I started, it’s amazing. I like to focus on those moments on Fridays by having a quick empowerment chat with my team. It’s a great way to go into the weekend while reviewing what we’ve accomplished during the week.
Then it’s time to rest and do it all over again!
This article was contributed by Yossi’s Woodworx Contact them at: info@yossiswoodworx.com

June 2024 | ISSUE 04 | THE NYGC 19


20 THE NYGC | ISSUE 04 | June 2024 Broken? Just fix it. SEAMLESS GUTTERS HEATED GUTTERS GUTTER GUARDS CLEANING & REPAIR Call or Whatsapp: 845.320.2617 info@preferredgutters.com A PREFERRED JOB DONE! Forget the UMBRELLA. Don’t forget the GUTTERS!


on the Production Line
22 THE NYGC | ISSUE 04 | June 2024

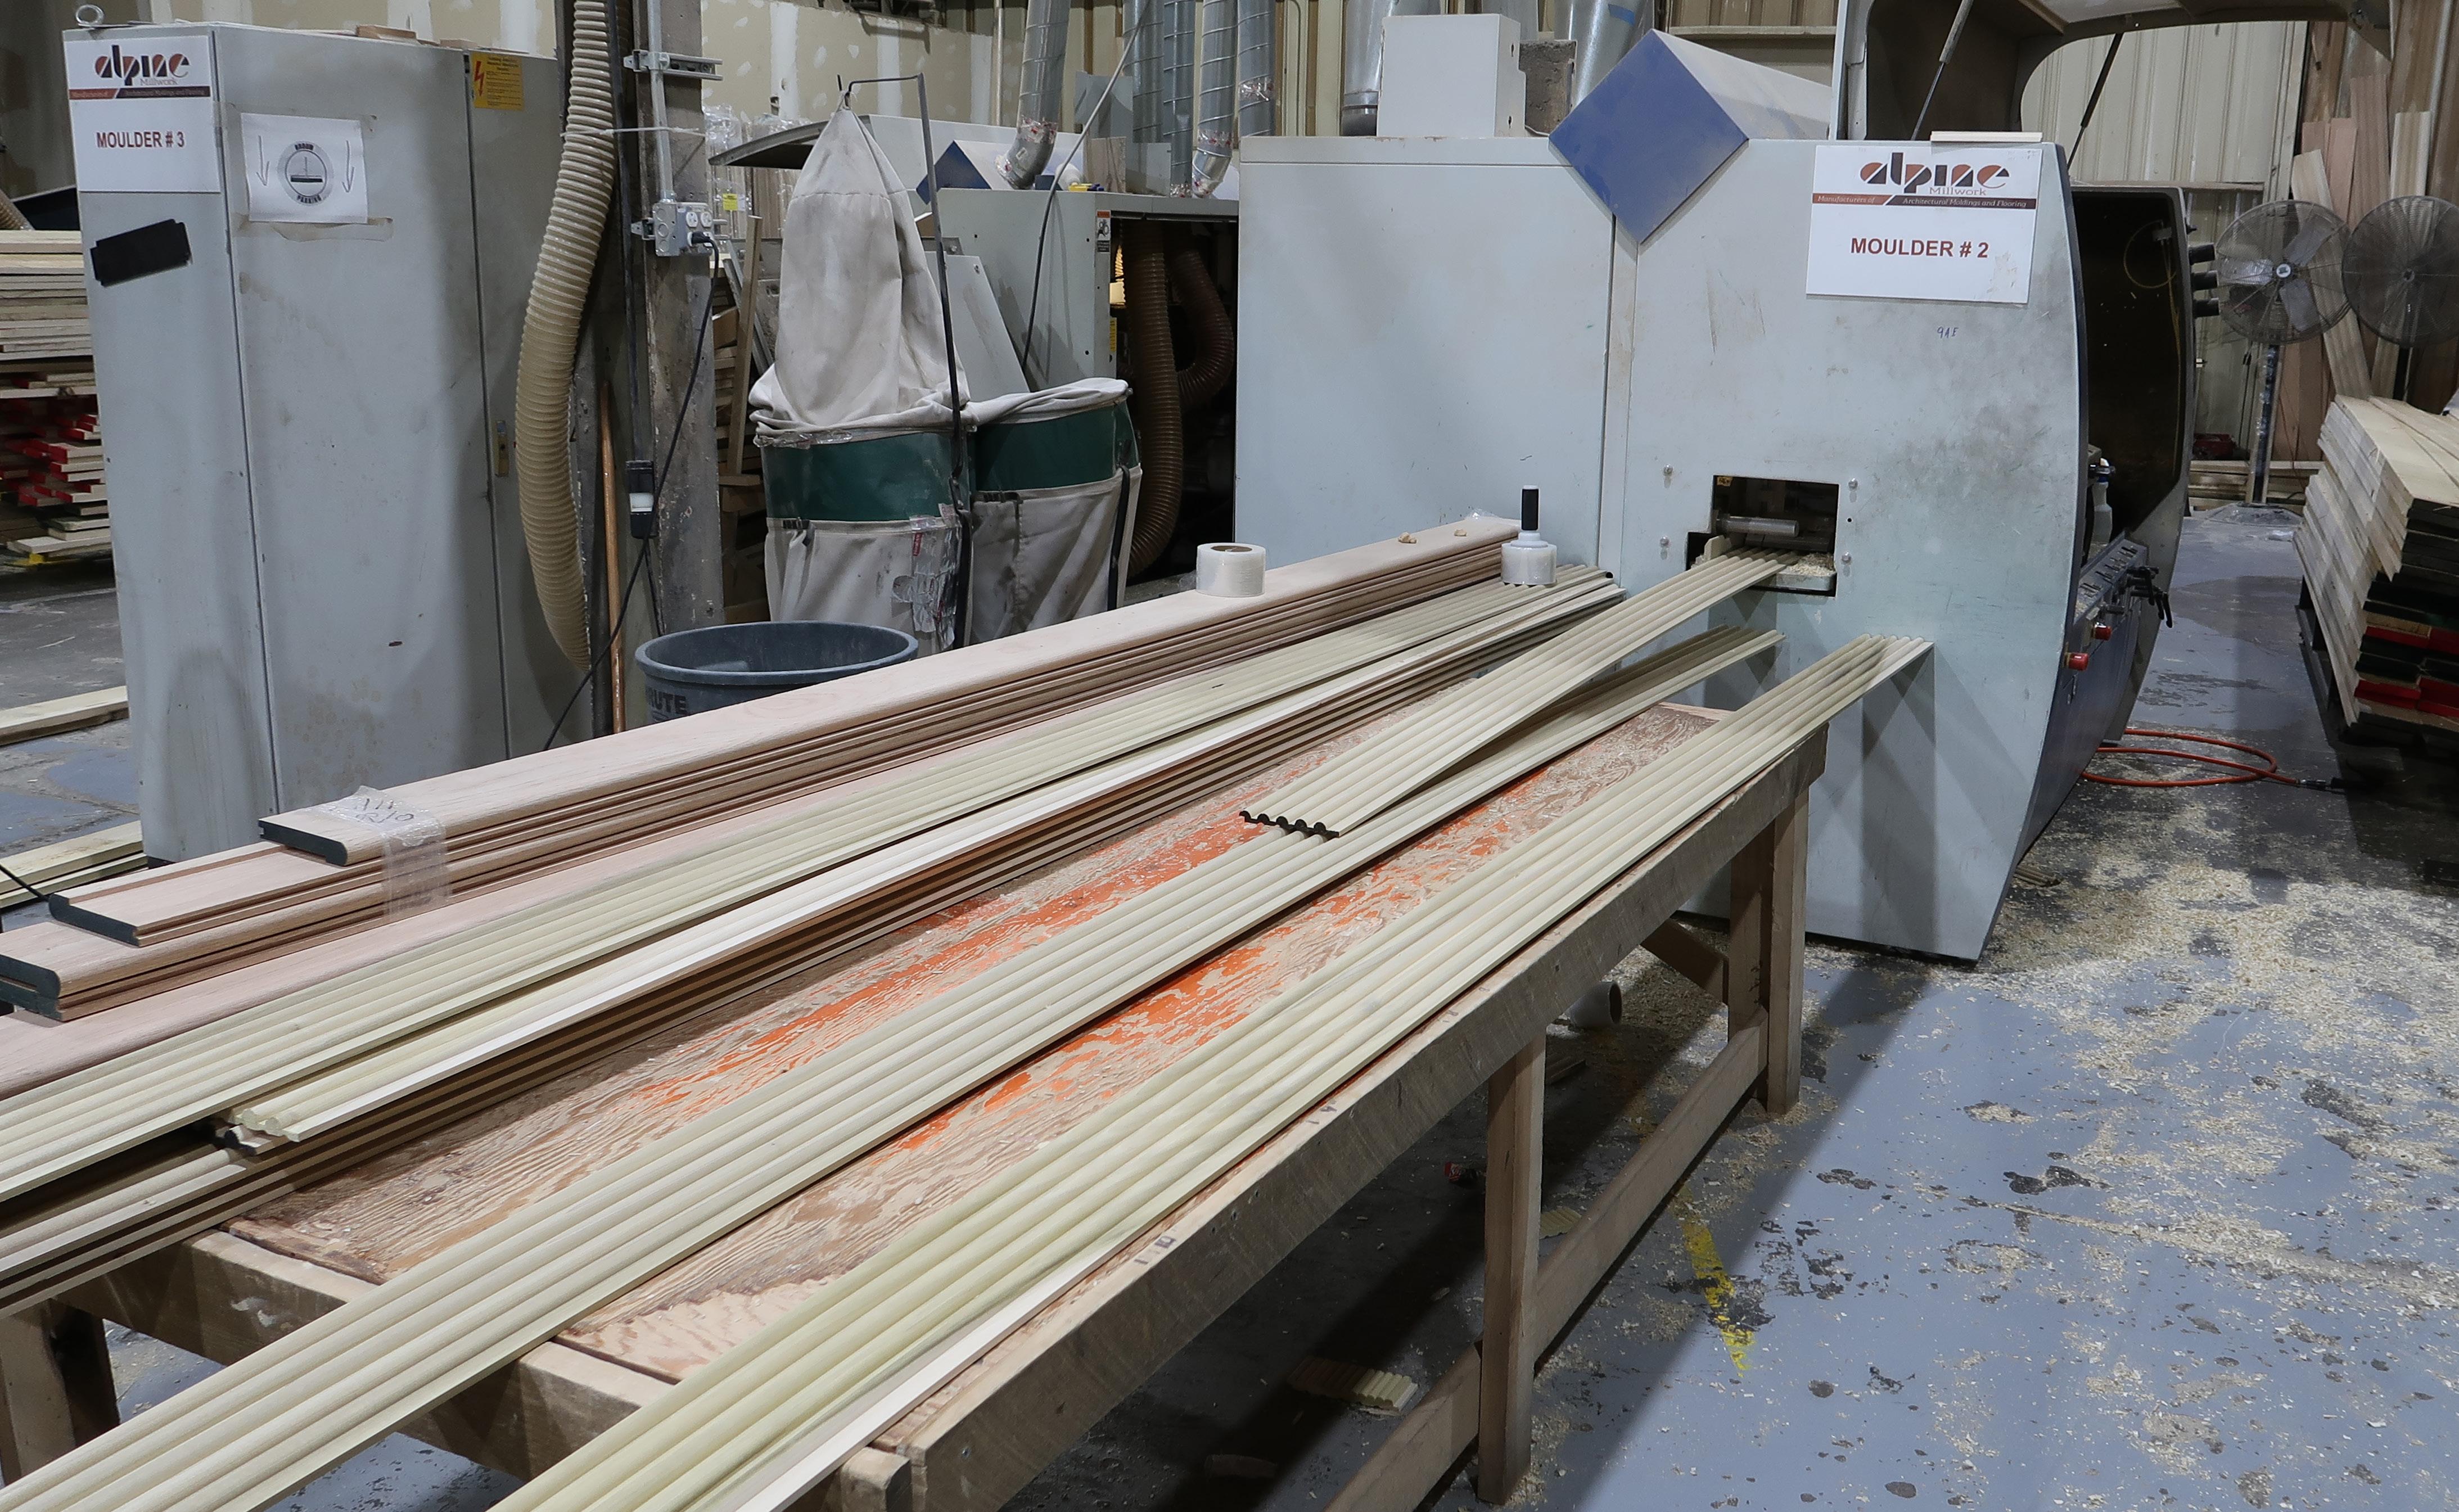
HOW MOLDINGS are made.
Moldings are a crucial architectural feature that adds character and elegance to any space. From crown moldings to baseboards, these decorative trim pieces are produced through a fascinating process that combines traditional craftsmanship with modern manufacturing techniques.
We’d like to thank Alpine Millwork for allowing us to tour their state-of-the-art facility to watch the production process in action. Don’t worry we got some good pics for all those of you who weren’t there!
June 2024 | ISSUE 04 | THE NYGC 23
As you may know, interior moldings are the individual pieces of wood surrounding windows and doors as well as running alongside floors or ceilings where they meet up with the walls of the structure.
FOR WHAT PURPOSE?
Trim and moldings cover unfinished edges of drywall, fill gaps around door and window jambs, and generally dress up intersections of drywall, wood, and other spaces that would otherwise be an eyesore.
Although they play a big part in the decorative part of a home, moldings have had additional reasons for usage throughout the ages.
In some cases, moldings have actually served to protect the structure. For example, the original purpose of paneling on the lower half of a wall was to protect brittle plaster from damage. Additionally, dining rooms and kitchens sometimes feature moldings that run horizontally around the room at the exact height where a chair back can potentially strike the wall, providing a protective buffer called a chair rail.
There is a wide variety of molding types - depending on the position and location of where they will be installed, which means the process of producing them is very customizable based on each specific customer’s needs and wants.
THE PROCESS


on the PRODUCTION LINE Moldings
Raw Lumber Receipt
Template
Ripping
Selection
Knife Prep
Inspection
24 THE NYGC | ISSUE 04 | June 2024
Molding
Shipping Packaging


Doors Window Trim Book Shelves Moldings Crown Molding Chair Rail Custom Works Columns P: 845.354.3870 F: 845.354.3871 E: office@luxuryinteriorinc.com
Step 1
RAW LUMBER RECEIPT
The raw material comes in varying lengths, widths, and thicknesses, as well as different species. The types of woods used include species like red oak, white oak, Brazilian cherry, poplar, mahogany, and pine.


Step 3
TEMPLATE SELECTION
An array of different templates lines the wall. Each template comes with its own knife bits to create the chosen result, and the customer is able to choose whatever design fits their vision.

Step 2
RIPPING
Once the intended type of wood is assembled, it gets placed through a ripper saw which slices the wood into the approximately needed size, leaving a border surrounding each piece so they can still be designed.

26 THE NYGC | ISSUE 04 | June 2024
on the PRODUCTION LINE Moldings
Step 4
KNIFE PREP
Once the template of design is selected, the knife gets properly set up inside the molder, ready to bring the customer’s dream to life.


Step 5
MOLDING
The pieces of wood get carefully molded with the prepared design. Once molded the trim will be very smooth due to the extremely sharp edges of the saw.
Step 6
INSPECTION
Each molding is inspected to make sure there are no blemishes.

June 2024 | ISSUE 04 | THE NYGC 27
Step 7
PACKAGING
The molding orders are grouped and packaged.

Step 8
SHIPPING

They are, then, shipped to the customer’s satisfaction.


...and voila you’ve got some new moldings ready to be installed!

28 THE NYGC | ISSUE 04 | June 2024 on the PRODUCTION LINE Moldings
brands @ thirtyeight 12 .com Atlantic Stone GRANITE - QUARTZ - MARBLE Stone Countertops w ith a Seamless Experience + COUNTERTOPS + BACKSPLASHES + FIREPLACES + WALLSLABS H e r m a n S t e r n - A t l a n t i c S t o n e a n d M a r b l e 718-564-6440 - 11 South Pascack Rd, Spring Valley, NY M-Th 10-5 | F 10-1 | Sun + Other by Appt. | Bentzy @atlanicstoneusa.com


30 THE NYGC | ISSUE 04 | June 2024 GET GC GET GC ELITE STATUS ELITE STATUS SAY YOU SAW IT SAY YOU SAW IT IN THE NYGC IN THE NYGC


LUXURIATE IN NATURE You Need Outdoor 917.280.4411 sales@livoutspace.com www.livoutspace.com More Call LiVout today to explore options for your luxury Succah and beyond. Dreaming of poolside shade? Glass or screen-enclosed porch or patio? Enjoy your outdoors this summer. Next winter. And ever after.
How To

how to hang a prehung door

Pre-hung doors are doors that come from the manufacturer installed in a door framemeaning they’re purchased with the hinges attached to the door and frame, unlike traditional doors that come with no frame and no hinges.
This makes them easier to install by eliminating the need for exact measurements (as done with traditional doors, to prevent gaps between the door and frame).
Follow these steps to hang a pre-hung door!


HARDWARE DOORS MOLDINGS 845-371-2200 Showroom Address: 33 Murray Hill Dr, Nanuet, NY 10954

TOOLS & MATERIALS
o Level
o Hammer/Drill/Screwdriver
o Plumb bob
o Chisel
o Utility knife
o Tape Measure
o Pencil (for markings)
o Pre-hung door kit
o 8d nails
o Shim wedges
o Putty/Tape/Paint (optional- for finishing)

Tips before starting:
NOTES
• The process consists of three parts: mounting the door, mounting the hardware, and then finishing up the work.
• Before starting the installation, it is a good idea to get familiar with the names of various parts involved in the process- as follows:
- The hinges - the device that allows the door to swing open & closed.
- The latch bolt and lockset bore - are part of the doorknob.
- The hinge jamb - refers to the upright support of the door by the hinge.
- The latch jamb and head jamb - make up the rest of the door support frame
- The casing - refers to the trim.
- The mortise for strike plate - is where the lock goes into the wall.
- The header - is the part of your home’s wall framing above the door.
- The king stud - is the stud in the wall that supports the header.
- The trimmer - is the stud in the wall that’s next to the jamb.
- The miter - is the joint where two parts join to form a corner.
34 THE NYGC | ISSUE 04 | June 2024 HOW TO hang a prehung door

STEP 1: LEVELING
Determine if the floor is level where the door will be hung.
Pre-hung doors come with long sides on the frame. This will allow you to cut each side of the door frame according to how level the floor is.
If the floor is not level, cut one side shorter than the other measuring it to fit according to the floor. The fact that one side is shorter than the other will not be noticeable past installation.
STEP 2: STRAIGHTENING THE OPENING
If the opening is not squarely even, install wooden shims between the rough opening and the door frame. These thin, tapered pieces of wood are used to fill in gaps.
To install shims, position the door frame flush with the wall, then hammer some large-finish nails into the frame on the hinge side of the door.
Make sure the nails go through the frame and into the shims and trimmer. Leave part of the nails out, only hammering them all the way into the frame once you are sure the door is perfectly plumb.


June 2024 | ISSUE 04 | THE NYGC 35
A: MOUNTING THE DOOR
PART
STEP 3: SHIMMING THE TRIMMERS
• Measure from the bottom of the hinge jamb to the center of each hinge. Then, on the hinge side of the trimmer (usually on the left), measure up from the floor and mark the hinge locations as recorded.
• Next, tack the plumb bob to the top of the hinge-side trimmer. Then, measure the gap between the plumb bob string and the trimmer by each hinge location.
• Place overlapping shims where the gap between the two is the smallest.
• Make the shims 1/8” thick, and tack them with a finish nail.
• Once done, measure the gap between the new shims and the plumb bob string.
• Place overlapping shims at the other two hinge locations. Adjust each pair’s thickness until the gap between the shims and string is the same as the gap of the first pair.
• Now, securely nail each pair of shims to the trimmer and cut off the ends with a utility knife; this is so they don’t come out past the drywall.

STEP 4: FITTING THE DOOR
Lift the door into the opening. Then, push the hinge jamb tight against the shims that are tacked to the trimmers.
Take an 8d nail and tack it through the face of the hinge-side casing 3” below the miter and into the trimmer stud. Using a level against the face of the casing, adjust the jamb until it’s plumb.
If the wall is set correctly and the casing rests flush against it, drive 8d finish-nails through it and at the other two hinge locations as well.
If the wall is out of plumb and the casing is not resting correctly against it, shim behind the casing at the hinge locations to make the door plumb.
Nail through the casing and shims and into the trimmer stud, securing the door.

36 THE NYGC | ISSUE 04 | June 2024
HOW TO hang a prehung door

STEP 5: ADJUSTING THE REVEAL
This refers to the horizontal gap between the head jamb and the top of the door. It needs to be 1/8 to 3/16” wide and even from all angles.
If you need to, adjust this gap by pushing up the head casing. Drive an 8d nail through the face of the latch-side casing and into the trimmer stud, near the top of the door, to set everything in place.
Don’t forget to check the vertical reveal between the door and jamb on the latch side, too. It should be about as thick as a nickel. Grab the casing and move the jamb by hand to adjust.

Swing the door open and close to see if its leading edge, the one that rests against the stop, clears the jamb by a consistent 1/8” on all sides.
Drive finish nails every 16 inches through the latch-side casing and into the trimmer to set the reveal at the appropriate width. Leave the heads sticking out slightly so they can be set and puttied later. Make sure everything is consistent.
STEP 6: ANCHORING THE JAMB
To keep the jamb where you want it, slip a pair of shims between the main jamb on the latch side and the trimmer, which is near the top of the door opening. When they are just touching the back of the jamb and not adding pressure on it, nail them to the trimmer with more 8d finish-nails.
You’ll want to nail additional pairs of shims a few inches above the base of this jamb and above and below the strike plate, too. Without these shims, the jamb could flex, moving out of place.
B: MOUNTING THE HARDWARE June 2024 | ISSUE 04 | THE NYGC 37
PART
STEP 7: REPLACING THE HINGE SCREW
This is done to keep the door from sagging and binding. On the hinge jamb, remove the center screw from the top hinge and instead use a screw that’s long enough to drive into the trimmer stud at least 1 inch.
(If the long screws don’t match the ones that came with the hinges and door, you can install them behind the hinge leaf so they’re not visible.)


STEP 8: ATTACHING THE SPLIT JAMB
On the outside of your door, there will be a split jamb – it’s the one in two pieces. To attach it, start at the bottom and carefully push the edge of it into the groove of the main jamb. With both hands, tap the two pieces together.
Nail the door casing to the wall on both sides of each miter, in addition to every 18 inches along the casing.
Once they’re together, you’ll want them to stay that way. Drive more 8d finish-nails through the stop and into the trimmers. You’ll need one nail at each hinge location, one through the shims near the top and bottom of the latch jamb, and one just above and below the striker.
Be sure not to nail into the head jamb.
STEP 9: MOUNTING THE LATCH HARDWARE
The door is up – now all that’s left is the small hardware additions. To assemble the latch:
Fasten the strike plate to the mortise in the latch jamb with the screws provided in your kit. If the plate is bigger than the mortise, put the plate on the jamb, outline it, and chisel it to the shape of the outline.
Slip the latch bolt into its bore and fasten the plate into the mortise on the door’s edge with the appropriate screws. If the mortise is too tight, adjust its size just like you did the strike plate.
Fit the doorknobs to both sides of the latch bolt. Once you’re done with that, insert and tighten the connecting screws that hold the knobs together. Test out the knobs and make sure they’re secure.
HOW TO hang a prehung door
38 THE NYGC | ISSUE 04 | June 2024
STEP 10: ADJUSTING THE LATCH
Close the door and listen for it to latch. If the door rattles, bend the prong on the strike plate just a little toward the stop. If the latch doesn’t catch this time, bend the prong away from the stop. Once you find the right arrangement, tighten all the screws.
PART C: FINISHING THE WORK


STEP 11: EVALUATING & ADJUSTING THE LOOK
Step away from the door to look at it, measure it and determine if it’s plumb all the way around the frame. There should be a 1/8” (.32 cm) opening all the way around the door frame.
To make your door look sleek and like it was installed by a professional, hide the nail heads with putty. It is commercially available in many shades – you should be able to find one that matches your door.
Once applied, smooth it out with a scraper or the blunt edge of a knife. It should be in line with the door and not bulge out.
STEP 12: PAINTING & FINISHING
Now that your door is up and installed, the rest is merely aesthetic. Paint or finish the door however you like – just be sure to use tape around the casing and jambs.

...AND FINALLY, ENJOY YOUR BRAND NEW DOOR AND THE SWEET TASTE AS A RESULT OF YOUR OWN HANDIWORK!
June 2024 | ISSUE 04 | THE NYGC 39


40 THE NYGC | ISSUE 04 | June 2024 STAY DRY, STAY SAFE CALL NOW: 1-845-388-1443 DECKS FRENCH DRAINS TRENCH DRAINS CRACKS VISIT OUR WEBSITE: WWW.WATERPROOFING360.COM FOUNDATION ABOVE GRADE WINDOW WELLS SHOWERS CRAWL SPACES WATER MANAGEMENT USEPROMOCODESTAYDRYSTAYSAFEFORA$150DISCOUNTONANYJOBOVER$2,000 AND MORE... BASEMENT WATERPROOFING FRENCH DRAIN ABOVE GRADE WATERPROOFING SUMP PUMP CRACK INJECTIONS SPA/SHOWER Follow us on @Waterproofing360


845.642.1840
FRAMING co COMMERCIAL RESIDENTIAL
SINCE 1992 CUSTOM

the Tools of Yesteryear...
Exploring Antique Woodworking tools
42 THE NYGC | ISSUE 04 | June 2024

WAY BACK WHEN
Tools designed for woodwork can be traced back to years ago. In the past, these tools were implemented by using stones to beat down trees and sharpen sticks for weapons. It’s safe to say we’ve found better uses for woodwork tools throughout the past couple of centuries, but that can only be attributed to the foundations laid by pioneering tool designs.
100 years ago the world was locked in the great war and the outboard motor was maxing at a massive three-horsepower. It was a dire time. The woodwork industry was similarly juvenile, still breaking the backs of carpenters with immense
physical labor and simple tools that often existed only to serve one purpose and within that purpose, one specific application.
The gradual transition from old woodworking hand tools to contemporary battery-powered ones came about as power tools began to be reproduced in handheld forms. These innovations meant that jobs which formerly required a whole kit of different tools could now be handled with just one and a bag full of attachments. The establishing prominence of concrete foundations for buildings also meant that carpenters no longer had to deal with heavy timber sills.
These developments had strange implications for the woodwork industry. A sort of oxymoron formed where the physical labor of the work had been reduced as the tools had made tasks easier, but woodwork projects were now expected to go up faster and be more precise, meaning there were heavier expectations on the workers. With the efficiency of hand-held power tools the work didn’t just become easier, it became more vast.
A sort of oxymoron formed where the physical labor of the work had been reduced - but there were - heavier expectations on the workers.
June 2024 | ISSUE 04 | THE NYGC 43
A Bit of Perspective
The tools we use on contemporary woodwork projects are taken for granted. Carpenters of the past didn’t have access to the powered hand tools that are available today, meaning their work required higher levels of physical labor and for elaborate woodwork projects, achieving detail was a far more meticulous undertaking.
Anyone who considers themselves a woodwork enthusiast should take a look through their power tool collection for a moment, then peruse the following woodworking tools list in retrospect.
• Hand held battery-powered circular saws—Invented in 1923 by a man name Edmond Michel.
• Power drill—First around towards the end of the first world war and known as the hole shooter, also designed by A.H. Petersen after Henry Ford challenged him to design a compact, high capacity power drill.
• Jigsaw—The idea came to Albert Kaufmann after he had attached a saw blade to his wife’s sewing machine. This was in 1946.
• Pneumatic Sander—The first straight line sander wasn’t patented until 1969 when Otto Hendrickson realised the potential of his idea.
Consider this the next time you reach for your power tools. Mentally replace the relevant tool with its manual predecessor and experience the sensation of being a carpenter in the 1910s.
The Survivors
Woodworking tools were not all subject to mechanical transitions, however, with simple devices remaining unchanged through the past century of technological advancements and innovations. Take the chisel for example, with the only changes since first implemented being in the type of metal used for the blade.
The tools that have survived the periods of mechanical upgrades without becoming obsolete, stand tall; their continued existence as necessary tools to the woodworker’s belt is a testament to their practicality and versatility. And that’s what makes these tools, the cool woodworking tools.
The intergenerational nod to their design and vintage look has made antique tools popular among woodwork traditionalists and carpentering historians.
Aside from the chisel, other hand tools have also persevered with the tide of lithium and electricity that revolutionized the woodwork industry.
Traditional Japanese wood-working tools are perhaps the best example, having remained staunch to their earliest designs and still providing useful alternatives to their battery-powered counterparts, especially for jobs requiring Japanese woodworking techniques.
Yet, these fundamental hand tools have grown to adapt to the contemporary worksite.
44 THE NYGC | ISSUE 04 | June 2024 the HISTORY BEHIND Woodworking Tools
Now, these innovations allow even strangers to woodworking to pick up tools and undertake simple woodwork projects. Innovations in the teeth of hand saws or the butts of hammers have supported their continued use, especially in situations where compactness is a priority. But these changes have divided hand tools into contemporary and antique versions, with the latter being more expensive but also more unique.
Antique hammers and saws are now fetching hundreds of dollars on tool marketplaces. The appeal of these tools is in the design and craftsmanship, with antique saws using hardwood handles that have been engraved by hand and buttons on their grip to display early logos of pioneering brands. Similarly, vintage hammers used leather handles and cast iron for the head to create a heavier but more balanced tool. Antique planes have also become popular among collectors, with their history in woodwork extending to the days when carpenters had to build the tools themselves.

a collection of traditional Japanese woodworking tools

Post Construction Cleaning,
Get your new house cleaned to the highest standards, Our experienced team will clean every inch of your space, so you can enjoy moving in to your fresh home!
The Forgotten Tools
But for the hand tools that didn’t quite make it to the 21st century, they may rejoice in their newfound value. Powered hand tools were just too dominant in their practicality for some jobs, replacing the use of some tools mostly or completely. The tools that lost their spot in woodworking workshops still present practical and intelligent designs and have not entirely lost their functionality or appeal.
The power drill replaced the many variations of hand drills that were being used by woodworkers in the early 1900s, sending an array of designs into early retirement. Among these hand drills was the brace design, which has been reanimated in a slightly bigger form for the bonus torque it offers, but has otherwise mostly passed on. The brace is still an efficient tool, able to drill precise holes and easily pierce wood, however it cannot achieve anywhere near the RPM of a power drill.
Millers Falls has their own hand drill design which would have been greatly beneficial for improving a woodworker’s fishing reeling technique. The design featured a crank wheel that would rotate the brace and pierce wood at a much faster RPM than the original U brace design but often would obstruct the vision of the hole being formed in the wood.

Draw knives are still used when crafting the curve on cricket bats, but they are no longer an essential tool for carpenters. These knives were multipurpose tools, having the ability to strip bark from logs, to form concave and convex on wood lengths, as well as basic splitting and cutting duties. The tool’s design itself resembles a period of woodwork gone past, with handles for both hands the tool often requiring its wielder to be seated.
Where to Buy Antique Woodworking Tools & Supplies?
Antique woodworking tools can make a perfect gift for carpenters or DIY hobbyists looking to boost their belts with some slick tools. Keep in mind though, as antique tools will generally be more expensive than contemporary ones, they should not be purchased as substitutes, and instead reserved for traditional projects or home tool museums.
When looking for antique tools make sure you perform some initial research before heading into the markets. For specific tools, research the most popular makers from that generation, and always pay attention to design measurements and specifications to assure authenticity. Try Early American Industries or Fine Tools for information on antique tools. There are plenty of online marketplaces that offer old woodworking tools and while these tools occasionally appear in the Machines4u marketplace, there are other sites that exist predominantly for the sale and resale of vintage tools!

the HISTORY BEHIND Woodworking Tools
a MIller Falls two-speed hand saw


Hardwood / Luxury Vinyl / VCT
NY NJ CT
845-362-0578 WOOD theMOOD EST. 2001 makes
Servicing
www.supremewoodfloors.com
Design Architecture +

50 THE NYGC | ISSUE 04 | June 2024

The way we design our living spaces has a profound impact on our day-to-day lives.

Join us in exploring different trends and issues in today’s Architectural Design Field, and how the world has evolved in architectural design throughout the ages!
Contributed
by:
Silverlock Design Group

June 2024 | ISSUE 04 | THE NYGC 51
DesignWoodwork in
Woodworking and trim work are timeless crafts that have been passed down through generations, offering a unique combination of creativity, precision, and functionality.

From the intricate carvings of ancient furniture to the modern, sleek designs of contemporary homes, woodworking, and trimming have played a vital role in shaping our living spaces and surrounding environments.
Woodworking, in its most basic form, involves working with wood to create various objects, structures, and decorative elements. This can range from building furniture, cabinets, and shelving units to crafting intricate wood carvings, sculptures, and ornaments. Woodworking requires a deep understanding of wood types, densities, grain patterns, and textures, as well as proficiency in various techniques, such as cutting, shaping, joining, and finishing.
Trimming, on the other hand, is a specific aspect of woodworking that focuses on the decorative elements of a room or structure. This includes molding, baseboards, door and window casings, and other ornamental features that add depth, character, and visual interest to a space. Trimming can be used to conceal gaps and joints, create smooth transitions between surfaces, and add a touch of elegance and sophistication to any room.

52 THE NYGC | ISSUE 04 | June 2024 Architecture and DESIGN


914.906.4610 aaajacobj@gmail.com General contractor
Theprocess of woodworking and trimming involves several stages, from conceptualization and design to preparation, execution, and finishing. Woodworkers and trimmers must carefully select the right woods, tools, and materials for each project, taking into account factors such as durability, sustainability, and aesthetic appeal.
SOME OF THE MOST COMMON WOODWORKING AND TRIMMING TECHNIQUES INCLUDE:
CUTTING:
using hand saws, power saws, or modern CNC machines to shape and size wood components

SHAPING:
using chisels, gouges, and other hand tools to create curved or irregular shapes

JOINING:
using mortise and tenon, dovetail, or other joints to assemble wood components

FINISHING:
applying stains, varnishes, or paints to enhance the appearance and durability of wood surfaces

MOLDING:
creating decorative profiles and shapes using specialized tools and techniques

54 THE NYGC | ISSUE 04 | June 2024
Architecture and DESIGN


Woodworking and trimming offer numerous benefits, including:
CUSTOMIZATION:
allowing individuals to create unique, tailored designs that reflect their personal style and preferences
SUSTAINABILITY:
utilizing natural, renewable resources and minimizing waste
DURABILITY:
creating long-lasting, high-quality products that withstand the test of time
AESTHETIC APPEAL:
adding beauty, character, and warmth to living spaces and surroundings
56 THE NYGC | ISSUE 04 | June 2024
Architecture and DESIGN

IN CONCLUSION
Woodworking and trimming are ancient crafts that continue to evolve and thrive in modern times. By combining creativity, skill, and attention to detail, woodworkers and trimmers can create stunning, functional pieces that enhance our daily lives and surroundings. Whether you’re a seasoned professional or a beginner enthusiast, the world of woodworking and trimming offers endless possibilities for expression, innovation, and beauty!

58 THE NYGC | ISSUE 04 | June 2024


Design FINDS


From DIY to mood boards, from design trends to functional hacks, we look forward to bringing you the greatest design finds to help you make any space feel like your own!

This month we focus on- woodwork! (of course!)


Turn to the next page and you’ll want to sit over these intricate designs for hours. The tables are crafted out of wood and then topped with a glass cover for functionality- while still conserving the amazing design seen at the top.


June 2024 | ISSUE 04 | THE NYGC 59
WoodenWonders
Check out these out-of-thebox wooden coffee tables by Papella Design! Any of these can easily transform a room or make a statement all on their own. It takes great ingenuity, creativity, and impeccable workmanship to produce pieces like these!


Model: relax Amazon.com $649.90
Model: papatya Amazon.com $699.90
Model: lara Amazon.com $639.90

60 THE NYGC | ISSUE 04 | June 2024 DESIGN FINDS ... WOODWORK


June 2024 | ISSUE 04 | THE NYGC 61 Model: Bulut Yan Amazon.com $389.90 Amazon.com $889.90
Model: life Amazon.com $999.90
Model: Mercan (top view)
“This milestone marks the point where the vision of their dream home starts to take tangible shape, and the untrained eye can finally appreciate the finishing touches.”
I’ve noticed a crucial moment in the construction process when customers’ excitement and anxiety intersect - the installation of interior doors and moldings. This milestone marks the point where the vision of their dream home starts to take tangible shape, and the untrained eye can finally appreciate the finishing touches.
As a contractor, it’s essential to be proactive and engage with the customer during this phase, ensuring their satisfaction and addressing any minor adjustments they may desire. By doing so, we can guarantee a happy customer in the end, which is the ultimate goal of our profession. This critical stage, aptly referred to as ‘finishings,’ is where our attention to detail and dedication to customer satisfaction truly shine.
- Jacob Surkis

62 THE NYGC | ISSUE 04 | June 2024


June 2024 | ISSUE 04 | THE NYGC 63 Call or whatsApp 845.362.3712 greatgatefencing@gmail.com Discover the true potential of your property with our fencing solutions taylored to your specific needs From elegant designs for homesto robust options for industrial sites, and everything in between pvc | aluminum | wood | chain link | railings | temporary fences | custom Boundless Options To BUILD YOUR BOUNDARIES It’s more than just our exceptional service and quality work that brought us to the top... Call today and experience it yourself! TsdMedia 845.263.5441


Sponsered by At The NYGC Magazine, we pride ourselves on partnering with the most trusted and reputable businesses. Every advertiser featured in our magazine has been thoroughly vetted, & is highly recommended by us. 845-474-8453 845-203-4244
