
9 minute read
The Professional’s LayOut Environment


Aprofessional’s work environment is streamlined, logical, and organized. LayOut provides a default environment that is great for getting started, but ultimately it is not adequate for a professional. Fortunately, you can customize the LayOut environment in several different ways to make it work best for you. You can customize toolbars, optimize system resources, and remove visual clutter. By adding your own set of shortcuts, you can even access all of your frequently used commands with just a few keystrokes. In this chapter, you will learn how to use all of the settings needed to increase productivity, computer performance, and quality of design.
n e W Pre S en TAT ion
Advertisement
To get started and create a new presentation, follow the steps detailed here (Figure 11.1).
1. Open LayOut.
2. If you see the Getting Started window, move on to the next step; otherwise, click on the File drop-down menu and choose New.
3. Select Default Templates c Paper c Plain Paper.
4. Select the Letter Landscape template.
5. Click the Open button to begin.
Sy ST e M Preference S
System preferences do not travel with a model, but they will be the same for every LayOut presentation you create on your computer. To set your preferences, click on the Edit (LayOut on Mac) drop-down menu and choose Preferences. Take a moment to optimize the System Preferences with the following settings.
Applications
LayOut is powerful by itself, but it can also be complemented by external programs that exclusively work with text and raster graphics. You can assign external applications to handle these text and image files in the Applications tab (Figure 11.2).
1. In the Applications tab, click the Choose button for the Default Image Editor.
2. Navigate to and select the executable (.exe) file for your favorite image editor.

3. Click the Open button to assign the Default Image Editor.
4. Repeat steps 1 through 3 for the Default Text Editor.
TIP When you’re navigating to the application shortcut or .exe file, first look on your desktop. if you can’t find a shortcut there, you can find it somewhere in the C:/program files folder.
Folders
To access your own custom collections in LayOut, add default folders in the Folders Tab by following the steps listed here (Figure 11.3).
1. Click on the plus sign (+) next to Templates, and then navigate to and select the RESOURCES/TEMPLATES folder.
2. Click the Open button. Now any template added to the TEMPLATES folder can be accessed from the Getting Started window in LayOut.

3. Click on the plus sign (+) next to Scrapbooks, and then navigate to and select the RESOURCES/SCRAPBOOKS folder.
4. Click the Open button. Now any scrapbook file added to the Scrapbooks folder can be accessed from the Scrapbooks Inspector.
Auto render
Rendering is the number one memory hog in LayOut. Depending on the size, complexity, and organization of the model, rendering can take a significant amount of time to complete. It is important to keep in mind that a clean and organized SketchUp model is the best way to shorten rendering times. In addition, it is pertinent to render only at the necessary resolution and only when absolutely necessary.
The Auto Render feature allows LayOut to always render a viewport when it is updated and needs to be rendered. This is a helpful button to have turned on when you are learning to use LayOut; but as your presentations grow and your SketchUp models become more detailed, you will want to turn off this setting and manually control rendering (Figure 11.4). Consider keeping Auto Render off at all times, and render using your keyboard commands, using the SketchUp Model Inspector, or by right-clicking on the presentation background and choosing Render Images on Page.
To manually control rendering, follow these steps:

1. Navigate to the General tab.
2. Uncheck the Auto Render check box.
TIP The Auto render setting is also available in the SketchUp Model inspector, where it is called Auto. keep in mind that this setting does not travel with the presentation; it is a global setting that applies to every presentation you open in layout.
Shortcuts
Just as in SketchUp, keyboard shortcuts will enable you to work faster. Try to avoid using the icons on your screen, even if it feels slower at first. Once you learn all of the keyboard shortcuts, you will become amazingly faster (Figure 11.5).
Figure 11.5 Use the Shortcuts tab to add keyboard shortcuts to your favorite and most-used commands.
1. Click on the Shortcuts tab.
2. Type Render in the Filter text box. As you are typing, the list will get shorter.
3. Click the Render Images in Document command.

4. Click in the Shortcut text box at the bottom-left corner of the dialog. Hold down the Ctrl and Shift keys, and then press the R key. (The modifier keys will appear in the text box.)
5. Click on the plus sign (+) to add the shortcut. Consider adding the helpful keyboard shortcuts in Figure 11.6.
TIP you can add a simple shortcut such as a letter, or you can add combinations of keys by holding down modifier keys such as Alt, ctrl, and Shift while you press a key. The modifier keys give you almost endless possibilities for adding keyboard shortcuts.
cUST o M Tool BA r S
The default toolbar is adequate, but a few vital buttons are missing from it. Not every command has a logical keyboard shortcut; to compensate, you can keep a row of tool icons on your screen. You can optimize the LayOut workspace by building your own custom toolbars (Figure 11.7).

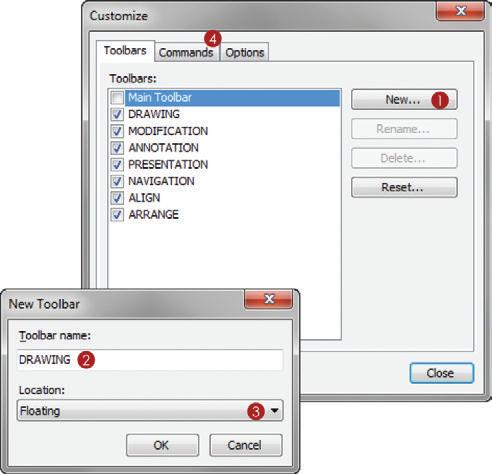
1. Click on the View drop-down menu and choose Toolbars c Customize. Click the New button to add a new toolbar.
2. Name the toolbar DRAWING
3. From the drop-down menu, select an initial location for the toolbar. The exact location doesn’t really matter because you can drag the toolbar and dock and undock freely, but Floating makes it easier for you to work on the new toolbar. Click OK.
4. Click on the Commands tab (Figure 11.8).
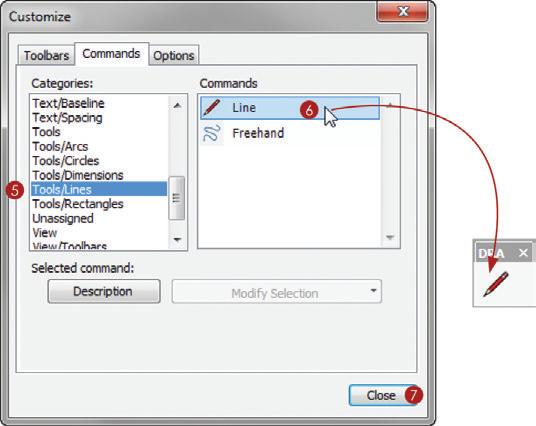
5. Sort through the categories to narrow your search, and select the Tools/Lines category.
6. Drag the Line command from the Commands column into your new toolbar.
7. Continue adding the desired commands to the toolbar. Click the Close button when you are finished.
Consider turning off the Main toolbar and adding these custom toolbars to your professional LayOut environment (Figure 11.9):
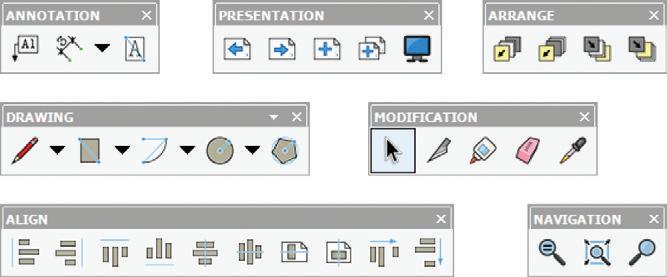
DRAWING: Line, Rectangle, Circle
ANNOTATION: Text, Leader Text, Dimensions
MODIFICATION: Select, Split, Join, Erase, Style
PRESENTATION: Next Page, Previous Page, Duplicate Page, Delete Page
NAVIGATION: Zoom to fit, Actual Size. .
ALIGN: Top, Bottom, Right, Left, vertically, horizontally.
ARRANGE: Move Backward, Move to Back, Move to Front, Move Forward.
TIP right-click on a toolbar and choose lock the Toolbars. This will hold the toolbars in place and remove the draggable lines for docking and undocking. you can always right-click on a toolbar again to unlock it.
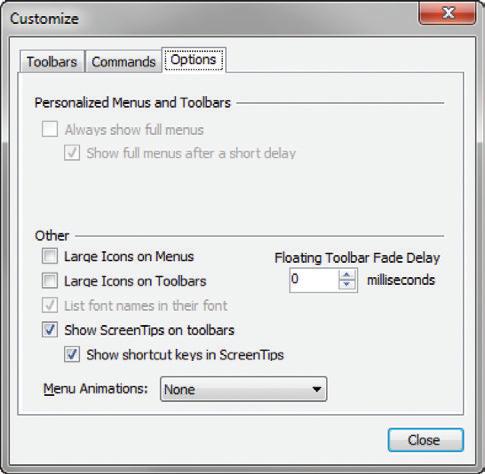
You can personalize some of the toolbar behaviors on the options tab. Be sure to turn off all fades and animations to optimize system performance (Figure 11.10). Activating the Show Screen Tips on Toolbars option will be helpful when you’re learning to use a tool. Even more valuable is to turn on the Show Shortcut keys in Screen Tips option to remind you of the shortcut key.
Tr Ay S
Trays allow you to organize the LayOut Inspectors in the Windows operating system only. Create custom trays to make specific Inspectors readily available for certain tasks. By grouping Inspectors together by task, you can streamline your workflow. Just follow these steps (Figure 11.11).
1. Click on the Window drop-down menu and choose New Tray.
2. Name the new tray PRESENTATION . The PRESENTATION tray will contain everything you need to navigate your LayOut presentation.
3. Check the SketchUp Model, Pages, and Layers Inspector check boxes.

4. Click the Add button to finish creating the tray.
5. Click on the Window drop-down menu and choose New Tray.
6. Name the new tray ANNOTATION . The ANNOTATION tray will contain everything you need to make annotations in your presentation.
7. Check the Colors, Shape Style, Dimension Style, Text Style, and Scrapbooks Inspector check boxes.
8. Click the Add button to finish creating the tray.
After you’ve created the tray, click the pushpin icon next to the Close button to set the tray to auto-hide. Now, when the tray is not in use, it will automatically close and give you more working screen space. To access the tray, simply hover on the Tray tab. Click and drag on a tray to make it floating, or dock it at the top, bottom, or sides of the LayOut application. Now that you know all of the methods, you can organize your screen any way you like.
TIP if you click on the View drop-down menu and choose restore Default Workspace, you will return to the default layout environment and all custom trays and toolbars will be deleted.
TIP if you don't prefer the Auto hide feature, use the ctrl+D keyboard shortcut to toggle between hiding and unhiding the trays.
B AS ic lAyoUT Te MP l AT e
Create a basic, blank layout template to use as a starting point for any new presentations or title blocks you make in the future. All of the settings that travel with the file will be optimized to ensure that LayOut is running at full speed.
Rendering Quality
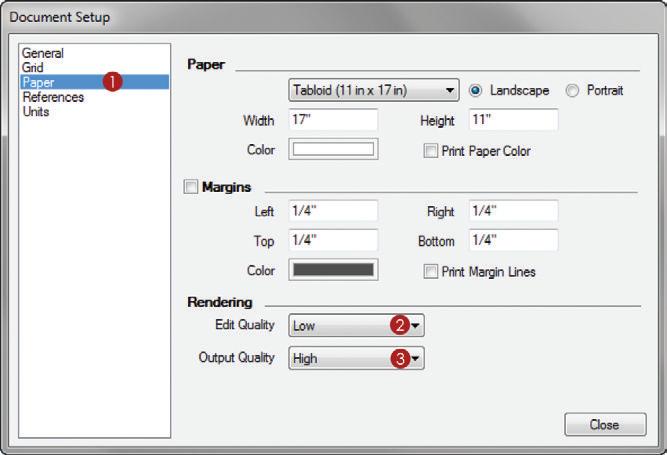
Each model has a paper quality setting (Figure 11.12). Set the Edit Quality to Low, which is acceptable for the screen resolution. Typically, the Low setting will render everything well enough that you can evaluate a model without having to wait for a high-quality render. Set the Output Quality to High for exports and presentations. Rendering at a High setting is worth the wait when you’re creating the final output.
To optimize the Paper settings, follow these steps:
1. Click on the File drop-down menu and choose Document Setup c Paper.
2. Click on the Edit Quality drop-down menu and choose Low.
3. Click on the Output Quality drop-down menu and choose High.
Layers
Layers in LayOut work in the traditional fashion of stacking and visibility. If a layer is turned on, the contents on that layer are visible. If a layer is turned off, the contents on that layer are not visible. The stacking order of the layers will determine which entities are on top. So, if a layer is on the bottom of the stack, any object on the layers above will cover up the bottom layer entities.
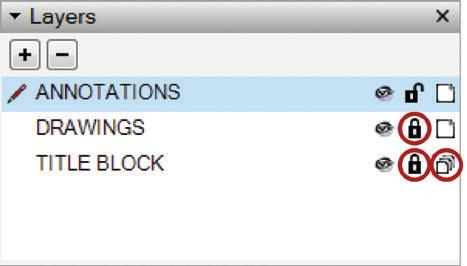
There are only three layers that a professional absolutely needs in every presentation; they are ANNOTATIONS, DRAWINGS, and TITLE BLOCK.
At the top of the stack is the ANNOTATIONS layer. This layer contains labels, leaders, dimensions, text, and lines that further explain drawings and images. Also on the ANNOTATIONS layer is anything within the title block that does not repeat, such as page numbers and descriptions. This is typically the most-used layer in LayOut, and it is usually unlocked.
The DRAWINGS layer contains any entity that is inserted into LayOut. This includes SketchUp models, images, maps, and photos. Basically, anything that you are going to annotate belongs on the DRAWINGS layer. Typically, you will insert several entities onto the DRAWINGS layer, and then lock the layer as you annotate.
The TITLE BLOCK layer is a shared layer that contains the presentation graphics (Figure 11.13). This layer appears on every page of your presentation. Repeating graphics, watermarks, project information, logos, and page dividing lines belong on the TITLE BLOCK layer. Entities on this layer might be modified at the beginning of a project, but the layer typically remains locked most of the time.
To create the new layers, follow these steps:
1. Click on the plus sign (+) to add another new layer. Name the new layer TITLE BLOCK
2. Click on the Share Layer toggle to share the layer.
3. To lock the layer, click on the padlock next to the layer name.
4. Click on the plus sign (+) again to add another new layer. Name the new layer DRAWINGS
5. To lock the layer, click on the padlock next to the layer name.
6. Within the Layers Inspector, click on the plus sign (+) to add a new layer. Name the new layer ANNOTATIONS
Now that you have optimized the presentation, save it at this clean, blank state to use for creating new presentations and title blocks in the future (Figure 11.14).
Just follow these steps:
1. Click on the File drop-down menu and choose Save as Template. Name the presentation BIC_8.5 x 11 – Landscape

3. Select the RESOURCES/TEMPLATES folder.
4. Click the OK button. Now this template will be available every time you start a new presentation in LayOut.
c h APT er Poin TS
☑ Keeping your LayOut workspace clean and organized will help increase your speed and efficiency.
☑ Every professional’s workspace evolves based on personal preference. It is important to know all of the ways you can optimize your workspace, but you don’t need to use all of them.
☑ There are also features you can turn off within your operating system. Personalize your Windows experience and turn off Transparencies in Windows. When you’re working on a laptop, be sure that you are using the High Performance setting, rather than Balanced or Power Saver.
☑ Spend a small amount of time optimizing your work environment, and you will save an enormous amount of time on every project.
☑ The basic BIC_8.5x11 - Landscape template can be used to start any new document or title block in the future, with the settings and layers already optimized.


