14 minute read
Chapter 13 LayOut Collections


LayOut has two series of collections: title blocks and scrapbooks. Customizing, organizing, and using each of these types of collections will help you create LayOut presentations more easily and more efficiently. By effectively using LayOut collections, you will be able to open your own title block and already have your company’s address and logo inserted, so you won’t have to keep changing it; Your office’s graphic standards will be available at the click of a button, and shared on a network drive where everyone can add and contribute. All of this and more is possible with LayOut collections.
Te MP l AT e S
Advertisement
Templates can be quite useful for a number of things. They can be very hard-lined traditional architectural title blocks, or they can even be optimized for screen presentations. In this section, you will create your own customized, architectural title block.
TIP once you’ve started making a layout presentation with a specific template, you won’t be able to switch to a different template. you can, however, modify the new presentation to look however you like.
creating a Title Block Template
Before you can use a title block template, you’ll need to create it. You have already reviewed all of the skills and tools you need to do just that.
Getting Started
Follow these step-by-step instructions to create your own architectural title block.
1. Open LayOut and start a new presentation using the BIC_8.5x11 – Landscape template.
2. Click on the File drop-down menu and choose Document Setup c Grid.

3. On the Grid tab (Figure 13.1), turn on the grid and grid snaps. Also adjust the grid to 1 g with four divisions.
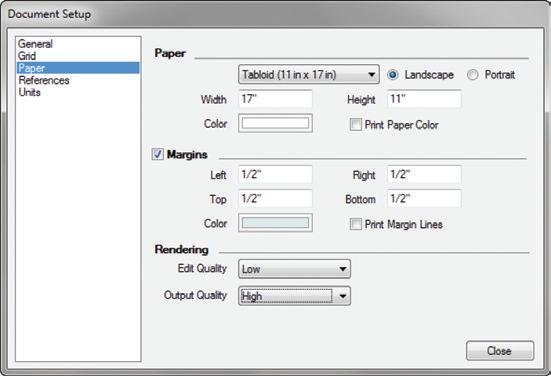
4. On the Paper tab (Figure 13.2), change the paper size to Tabloid and adjust the margins to 1/2 g .
Adding Lines
To develop a unique graphic style, you’ll need to add lines, as indicated here.
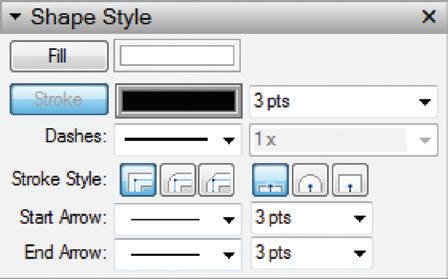
1. Activate the Line tool, set the stroke width to 3, and turn off the Fill. Click once to start the line at the top-right corner of the margin (Figure 13.3).
2. Draw a line along the margins as shown and then double-click on the bottom-left corner of the margin to finish the line (Figure 13.4).


Adding Text
Use the Text tool to add several informational text boxes to your title block (Figure 13.5). Once a text box is created, use the Select tool to rotate and place the text.
Follow these steps:
1. Add a text box for your office name and contact information. Rotate and position the text on the title block as shown.
2. Add a generic text box for the client’s name and contact information. Rotate and position the text on the title block as shown.
3. Add a generic text box for the project title and information. Rotate and position the text on the title block as shown.
4. Add a generic text box for the Sheet Description. Rotate and position the text on the title block as shown.
5. Add a generic text box for Sheet Information. Position on the title block as shown.
6. Add a generic text box for the sheet number. The sheet number text is white with a black fill. Position on the title block as shown.
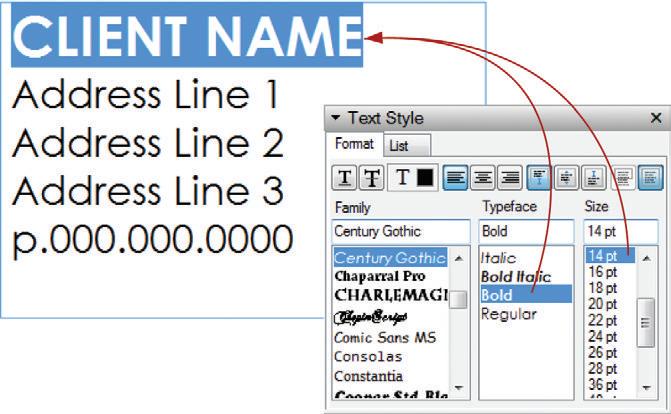
TIP you can assign different properties to the text in a text box. Double-click in the text box and select the top line of text. Within the Text Style inspector, change the selection to bold, independent of the rest of the text in the Text window (figure 13.6).
Adding Images
By following these steps, you can add images to your title block.
1. Click on the File drop-down menu and choose Insert.
2. Navigate to the TSWFA files and choose the logo.jpg .
3. Using the Select tool, rotate, resize, and position the logo image on the title block (Figure 13.7).
Assigning Layers
Add all of the title block entities to the TITLE BLOCK layer. These entities will be the same, or repeated, on every page of the presentation (Figure 13.8).

1. Set the active layer to TITLE BLOCK.
2. Select the entities that will appear on every page of the presentation; title block lines, logo, and text boxes.
3. Right-click on the selection and choose Move to Current Layer.
4. In the Layers Inspector, lock the TITLE BLOCK layer. Add unique entities of the title block to the ANNOTATIONS layer. These text boxes will need to be different on every page of the presentation (Figure 13.8).
1. Set the active layer to ANNOTATIONS.
2. Select the entities that will be unique on every page of the presentation; Drawing Number text box and Sheet Description text box.
3. Right-click on the selection and choose Move to Current Layer.
Saving as a Template
Now that you have created your own title block, you can optimize the settings and save it to your collection.
1. Click on the File drop-down menu and choose Document Setup.
2. On the Grid tab, turn off the grid.
3. On the Paper tab, turn off the margins.
4. Click on the File drop-down menu and choose Save as Template.
5. Select the RESOURCES/BIC_Templates folder and save it with the name BIC_11x17
Landscape – Linear
Now, every time you open LayOut or start a new presentation, this title block will be available in the Getting Started window.

Scr APB ook S
Scrapbooks are prebuilt pieces of annotation, composed of layout geometry and entities. Scrapbooks are not a special file format; they are simply layout presentations containing layout entities grouped in useful ways. While Scrapbooks serve a functional purpose of further explaining a design, they also contribute to the overall graphic style of the drawings. Lines, shapes, fills, and fonts all contribute to your own personal graphic standards.
creating a Scrapbook
You have already reviewed all of the skills and tools that you need to create your own scrapbook. Follow these step-by-step instructions to create your own custom scrapbook collection to complement the BIC_11x17 Landscape – Linear template.
Getting Started
To get started, simply follow these steps:
1. Click on the File drop-down menu and choose New. Select the BIC_8.5x11 – Landscape template and choose Open.
2. Click on the File drop-down menu and choose Document Setup. In the Paper tab, change the paper size to 5 g n 5 g .
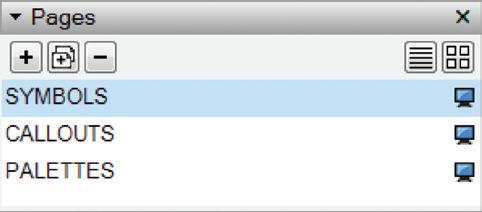
3. In the Pages Inspector, double-click on the only page and rename it SYMBOLS. Click on the plus sign (+) to add two more pages. Name the pages CALLOUTS and PALETTES (Figure 13.9).

4. In the Layers Inspector, delete the TITLE BLOCK layer because you don’t need it in a scrapbook collection. Rename the DRAWINGS layer to BACKGROUND. Rename the ANNOTATIONS layer to SCRAPBOOKS and leave it as the current layer (Figure 13.10).
Chapter 13: LayOut Collections
TIP When you insert a scrapbook, all of its entities are assigned to the active layer in the current presentation. This is why it is pointless to have several different layers in a scrapbook.
Symbols
Symbols are used to add graphic and text information to a drawing. They can be used to count doors and windows, as well as define north and the graphic scale of a drawing. In this section, you will create several commonly used symbols for creating a set of construction documents.
Door Tag
Door tags are used to count new doors, and reference them to the additional information provided in the door schedule. Follow these steps to create a simple door tag:
1. Activate the Circle tool, set the stroke width to .5, and turn off the Fill. Click once to define the center point of the circle (Figure 13.11).

2. Move your cursor away from the center point and click to loosely define the radius.

3. Immediately type a precise radius of 1/8 , then press Enter.
4. Activate the Text tool. While you hold down the Ctrl key (Option on Mac), click and hold on the center point of the circle (Figure 13.12).
5. Move your cursor away from the center point to create the text box, and release the mouse button to finish. Add generic text to the text box, such as “01”, and press Esc to finish.
6. Activate the Select tool, click and drag from right to left to select both the circle and the text entities as shown in Figure 13.13.

7. Right-click on the selection and choose Group.
TIP if a piece of annotation in a scrapbook contains more than one entity, those entities must be grouped for the entire symbol to come in as one.
Window Tag
Window tags are used to count new windows, and reference them to the additional information provided in the window schedule. Follow these steps to create a simple window tag:
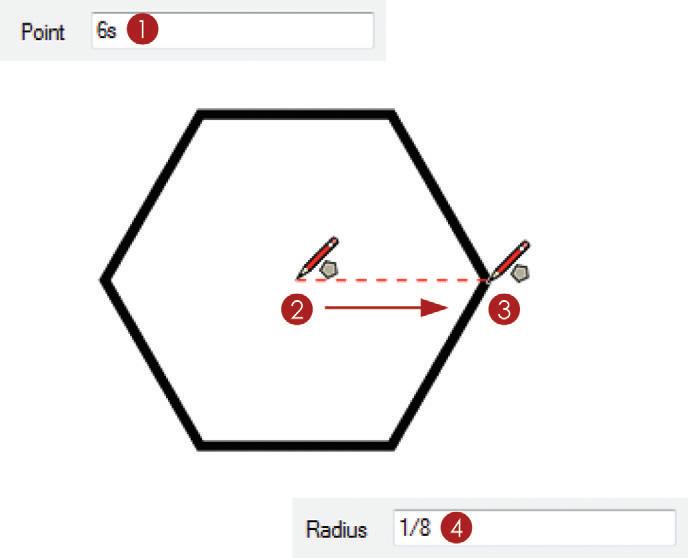
1. Activate the Polygon tool, set the stroke width to .5, and turn off the Fill. Assign the number of sides by entering 6s , then press Enter (Figure 13.14).
2. Click once to define the center point of the hexagon.
3. Move your cursor away from the center point and click to loosely define the radius.
4. Type a precise radius of 1/8 , then press Enter.
5. Activate the Text tool. Hover on the top and side center points to encourage an inference. While holding the Ctrl key (Option on Mac), click and hold on the inferenced center point of the hexagon (Figure 13.15).
6. Move your cursor away from the center point to create the text box. Release the mouse button to finish. Add generic text to the text box , such as “A”, and press Esc to finish.
7. Activate the Select tool. Click and drag from right to left to select both the circle and the text entities.
8. Right-click on the selection and choose Group so it functions properly as a scrapbook (Figure 13.16).

North Arrow
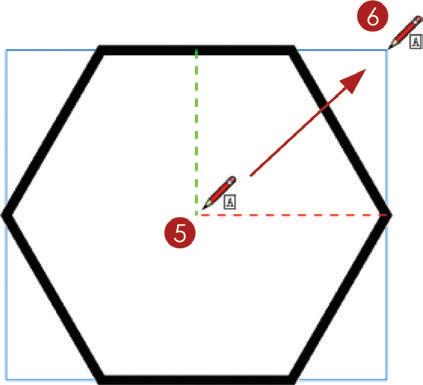
A north arrow graphic shows the viewer an accurate north direction on the drawings. Follow these steps to create a simple north arrow:
1. Activate the Circle tool, and set the stroke width to 1 and the Fill color as white. Click once to define the center point of the circle (Figure 13.17).
2. Move your cursor away from the center point and click to loosely define the radius.

3. Immediately type a precise radius of 1/4, then press Enter.
4. Activate the Line tool and set the stroke width to 3. Click once on the center point of the circle to start the line (Figure 13.18).
5. Move your cursor away from the start point of the line and double-click on the top point of the circle to finish.
6. Select both entities, and then right-click and choose Group so that it functions properly as a scrapbook.
Graphic Scale
A graphic scale gives the viewer of the drawing a visual reference for the architectural scale applied to the drawing. Follow these steps to create a simple graphic scale:
1. Activate the Rectangle tool, set the Fill to black, and turn off the Stroke. Click once to start the rectangle (Figure 13.19).
2. Move your cursor away from the start point and click again to loosely define the dimensions of the rectangle.

3. Type the precise dimensions for the rectangle as 1/4, 1/16 , then press Enter.
4. While holding down the Ctrl key (Option on Mac), click and drag on the rectangle to make a copy (Figure 13.20).
5. Snap the bottom-left corner of the copy to the top-right corner of the original.
6. While holding down the Ctrl key (Option on Mac), click and drag on the second rectangle to make another copy.
7. Snap the top-left corner of the copy to the bottom-right corner of the original.
8. While the rectangle is still selected, click and drag the right Scale grip to the right of your screen (Figure 13.21).
9. Release the grip to finish loosely scaling, and immediately type a precise scale factor of 2 , then press Enter.
10. Repeat the copying and scaling steps to produce the image shown in Figure 13.22.
Figure 13.22 All rectangles are copied and scaled.
11. Add generic text to each division of the scale as shown in Figure 13.23. This text will need to be edited depending on the scale of the drawing it represents.
Figure 13.23 Add text to the graphic scale.
12. Select all graphic scale entities, right-click on the selection, and choose Group so that it functions properly as a scrapbook.
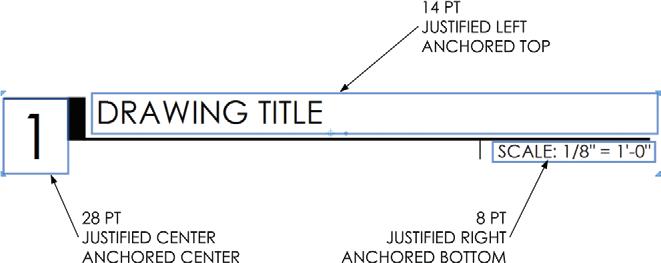
Drawing Title
A drawing title calls out what a drawing is, and also provides a number for coordinating drawings. Follow these steps to create a simple Drawing Title:
Figure 13.24 Draw the main line for the drawing title.
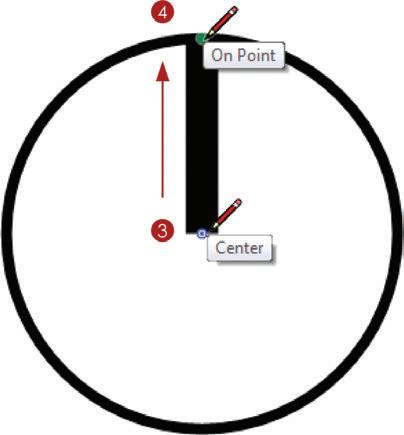
1. Activate the Line tool, set the stroke width to 1, and turn off the Fill. Click once to start the line (Figure 13.24).
2. Draw a line 1/2 g to the right, 1/4 g down, and then 3 1/2 g to the right.
3. Change the stroke width to .5. Click on the existing line to start another line (Figure 13.25).
4. Move your cursor down and double-click to loosely finish the line. At this point, type a precise dimension of 1/8 , then press Enter.
5. Activate the Rectangle tool, set the stroke width to 1, and turn on the Fill and color it black. Click once to start the rectangle.
6. Move your cursor away from the start point and click again to finish.

7. Add text to the drawing’s title as shown in Figure 13.26.
8. Select the entire drawing title, right-click on the selection, and choose Make Group so that it functions properly as a scrapbook.
Callouts
Callouts are used to link and coordinate drawings. A callout is text that references another drawing on another page. Use the Pages Inspector to advance to the Callouts page of your scrapbook presentation. Separating the scrapbooks into pages keeps them organized and makes them easier to use.
Interior Elevation
An interior elevation callout points at an interior wall and references the actual interior elevation with a drawing and sheet number.
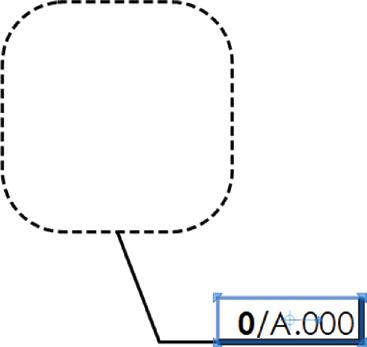
1. Activate the Text tool. Set the stroke width to 1, the Fill to white, and the font size to 10.
2. While holding the Ctrl key, click and drag to create a text box.
3. Add the text 0/A.000 and press Esc to finish.
4. Right-click on the text and choose Size to Fit to optimize the vertical size of the text box. Resize the text box horizontally as needed.
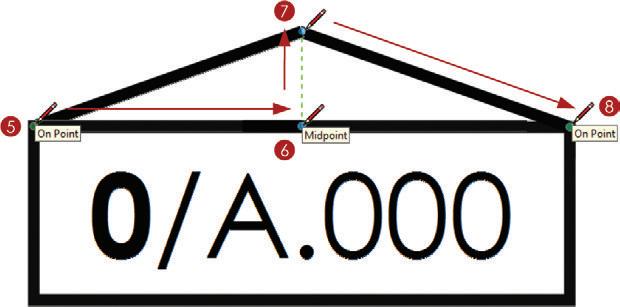
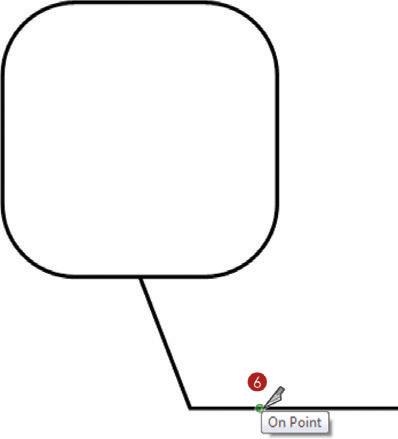
5. Activate the Line tool, and set the Fill color to black. Click on the top-left corner of the text box to start the line (Figure 13.27).
6. Hover on the text box’s midpoint to encourage an inference.
7. Move your cursor up and click to end the line segment.
8. Double-click on the top-right corner of the text box to finish.
9. Select the entire elevation callout, right-click on the selection, and choose Make Group so that it functions properly as a scrapbook.
Section
A building section callout defines where a building section is cut through the plan and references the actual building section drawing with a drawing and sheet number.
1. Activate the Line tool, set the stroke width to 1, and turn off Fill. Click once to start the line.
2. Draw a line as shown in Figure 13.28. Double-click on the last inferred point to finish the line.
3. Activate the Split tool and click on the two endpoints as shown (Figure 13.29).
Figure 13.29 The Split tool breaks lines into separate segments, which can have different Shape Style properties.
4. Select the two ends and assign a stroke width of 2.
5. Select the middle line and assign a dash pattern to represent the section cut line.
6. Activate the Text tool and add a text box on the long end of the section callout baseline. Enter the generic text 0/0.00. Reposition and resize the text box as needed (Figure 13.30). Figure 13.30 Add text to the section callout.
7. Select the entire section callout, right-click on the selection, and choose Make Group so that it functions properly as a scrapbook.
Detail
A detail callout defines the portion of a building condition to be further explained and enlarged, and references the actual detail drawing with a drawing and sheet number.
1. Activate the Rectangle tool, set the stroke width to 1, and turn off the Fill. Press the Up arrow key to switch to a rounded-corner rectangle and immediately type a precise radius of .25, then press Enter (Figure 13.31).
2. Click once to define the start point of the rectangle.

3. Move your cursor away from the start point and click to loosely define the dimensions.
4. Immediately type the precise dimensions 1,1, then press Enter.
5. Use the Line tool to draw a leader line as shown in Figure 13.32.
6. Use the Split tool to break the leader line as shown in Figure 13.33.

7. Select the rectangle and assign a dash pattern. Adjust the Pattern Scale as needed. Keep in mind that any entity can be modified after it is created.
8. Select the leader line and assign a stroke width of .5.
9. Select the end of the leader line and assign a stroke width of 2.
10. Activate the Text tool and add a text box on the long end of the leader line. Enter the generic text 0/0.00. Reposition and resize the text box as needed (Figure 13.34).
11. Select the entire detail callout, right-click on the selection, and choose Make Group so that it functions properly as a scrapbook.
Palette
You can use a palette scrapbook as a quick way to assign default settings. With most tools, you can hover in the Scrapbooks Inspector and match the default properties of the active tool to a specific scrapbook. Add these entities to your palette so you can draw much more efficiently in LayOut.
TIP entities that will never be sampled or inserted into a drawing can be placed on a locked layer. for example, the text that describes the scrapbook won’t be imported; assign it to the BAckgroUnD layer , then lock the BAckgroUnD layer.
To create a palette scrapbook, follow these steps:
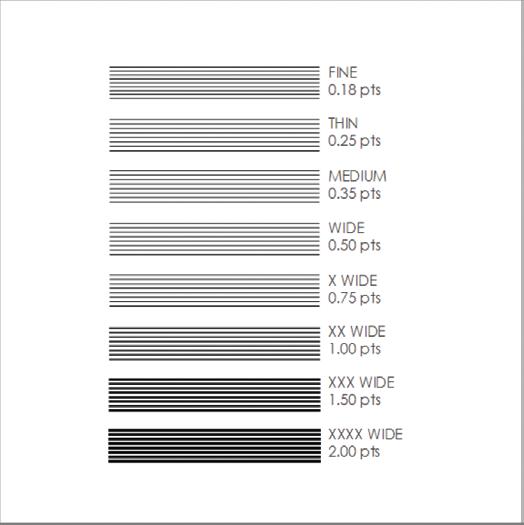
1. Draw a line approximately 2 g long.
2. Using the Select tool, hold down the Ctrl key to make a copy, and then hold down the Shift key to lock the axis. Click and drag the line down by 1/16 g. Copy the line 10 times as shown in Figure 13.35.
3. Select all of the lines, right-click on the selection, and choose Group.
4. Add a text box to the right of the group and enter the generic text Description on the first line and 0.00 pt on the second line (Figure 13.36).
Figure 13.35 If you place several lines close together instead of placing just one, clicking on a line will be easy even when the palette is condensed into the smaller Scrapbooks Inspector.
5. Copy the group and the generic description down the page seven times. Use the Precise Move tool to space the copies at equal intervals.
6. Select the first group of lines and assign a stroke width of .18.

7. Select the top group of lines and change the stroke width to 0.18 pts in the Shape Style Inspector. Also, change the text description to Fine on the first line and 0.18 pts on the second line.
8. Change all stroke widths and corresponding descriptions as shown in Figure 13.37.
9. Make the BACKGROUND layer the current layer. Select all of the descriptions, rightclick on the selection, and choose Move to Current Layer.
10. Lock the BACKGROUND layer. Entities on a locked layer cannot be sampled or inserted as a scrapbook.
Saving Scrapbooks
Now that you have created a custom scrapbook, add it to your collections. Just follow these steps:
1. Click on the File drop-down menu and choose Save as Scrapbook.
2. Select the RESOURCES/SCRAPBOOKS folder and save it as BIC_Linear
Now this scrapbook will always be available in the Scrapbooks Inspector collections drop-down.
U S ing c ollec T ion S
Take a few minutes to experiment with your new creations.
1. Click on the File drop-down menu and choose New.
2. Select the BIC_11x17 Landscape – Linear template that you just created and click on Open.
3. In the Scrapbooks Inspector, click on the Collections drop-down menu and choose the BIC_Linear scrapbook.
Practice adding scrapbooks to your presentation and using scrapbooks as palettes. While you’re practicing, keep the following tips in mind:
☑ Activate a tool, then hover over a scrapbook and click to absorb the scrapbook's properties as the tool's default settings.
☑ Tools can pull default settings from any scrapbook entity. For example, the Text tool can absorb default settings from lines, and the Line tool can absorb default settings from a piece of text within a scrapbook.
☑ With the Select tool active, click on a scrapbook in the Scrapbooks Inspector and then click in your presentation to place it.
☑ Scrapbooks are simply grouped layout entities. Use the Select tool to double-click into a scrapbook and modify it once it is inserted into your presentation. This operation is similar to navigating containers in SketchUp.


