8 minute read
Chapter 6 The Professional’s SketchUp Environment


Aprofessional’s work environment is streamlined, logical, and organized. SketchUp provides a default environment that is great for learning but is ultimately not fit for professional use. Customize the SketchUp environment to make it work best for you. Optimize system resources, remove visual clutter, and access all commands with a keystroke by adding your own set of shortcuts to enhance your SketchUp experience.
Tool BA r S
Advertisement
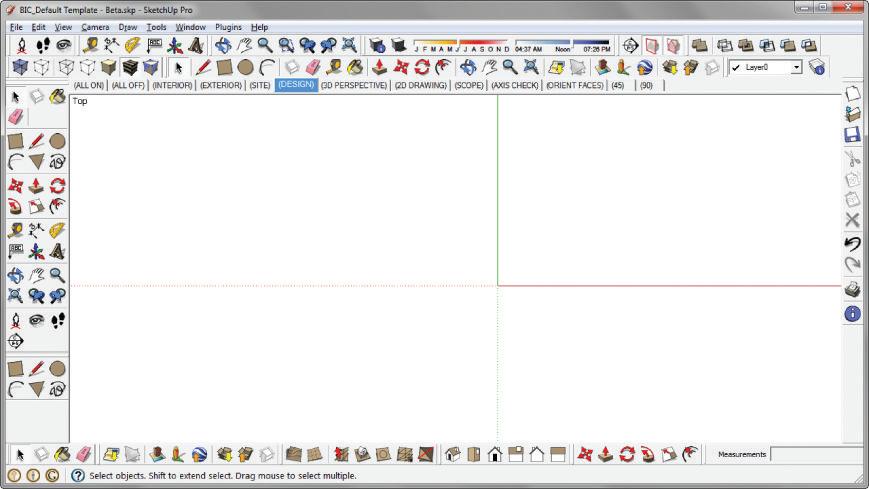
Toolbars generally clutter screen space with static icons taking up space that should be used for exciting 3D graphics (Figure 6.1, Figure 6.2). Using toolbars and icons takes your eyes off of the design. It’s like texting while driving: it’s very distracting and can be disastrous. That might be an exaggeration, but seriously, you should keep your eyes on the road and model at all times by minimizing your use of toolbars. Instead of having all those buttons and icons, a better solution is to have an extensive collection of keyboard shortcuts. If you can’t completely eliminate toolbars and go full-screen full-time, try to limit yourself to the following settings.
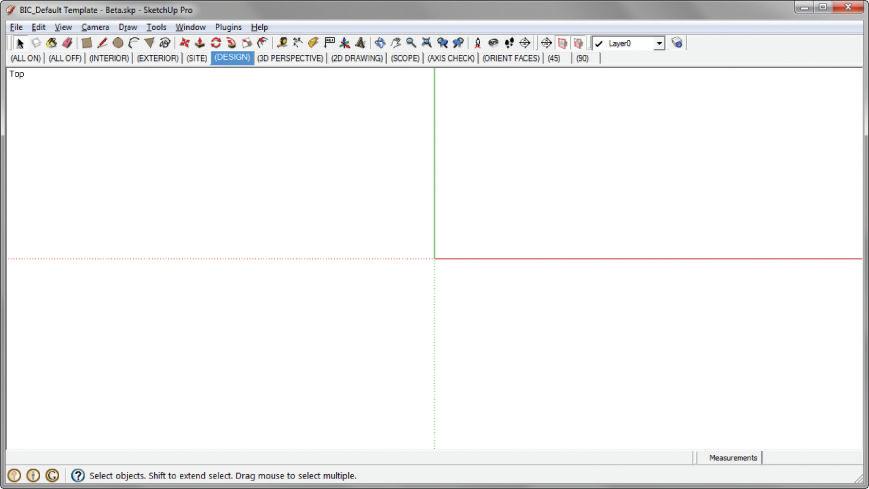
☑ A pixel is a valuable commodity. Maximize your 3D workspace by minimizing your toolbar footprint. Select View c Toolbars c Large Buttons to toggle the large icons on and off.
☑ Monitors are enormous these days, so it is reasonable to allow yourself one row of toolbars across the top of your screen. Select View c Toolbars and open the following toolbars: Construction, Drawing, Layers, Measurements, Modification, Principal, Sections, and Walkthrough (Figure 6.3). These toolbars are worth keeping open all the time. When you’re performing specific tasks, you’ll need to open other toolbars briefly, but you don’t need to have them open at all times. Once you start working with your favorite tools, you’ll be able to determine which toolbars you prefer to have open and accessible at all times.
☑ Dock the toolbars to organize your workspace. Click and drag an undocked toolbar to the top, bottom, or side of the screen. The toolbar will lock itself to the SketchUp window. To undock a toolbar, click and drag on the line at the left of the toolbar, move it away from the perimeter of the SketchUp workspace, and release the toolbar to place it where you want.
TIP once you have all of your toolbars in place, select View c Toolbars c Save Toolbar positions. now, you can undock and reposition the toolbars, and always be able to get back to the original positions by choosing View c Toolbars c restore Toolbar Positions.
Di A log S
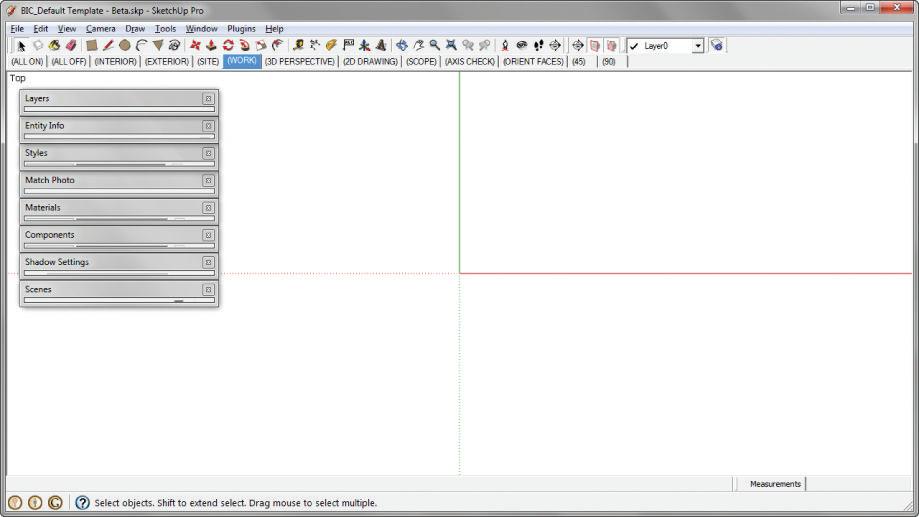
All dialog boxes and windows are available from the Window drop-down menu. You can collapse all dialogs by clicking on the window heading. While they are collapsed, the dialog boxes can be docked to other dialogs. Typically, it is best to keep open only the dialogs that you’ll need to use regularly—such as Entity Info, Materials, Components, Styles, Layers, Scenes, and Shadows. The other dialogs are not used as often, so it is fine to open them on an as-needed basis.
You can hide all of the dialogs at once by clicking on the Window drop-down menu and choosing Hide Dialogs. Unhide the dialogs by going to the same menu and choosing Show Dialogs. See Figure 6.4 and Figure 6.5.

Sy ST e M Preference S
SketchUp has additional settings you can use to tweak your system and make it more streamlined and efficient. Use the Preferences dialog to adjust these settings. System preferences do not travel with the model; they are local SketchUp settings that are the same for every model you open. You will need to adjust these settings on every computer you work on. To access system preferences, click on the Window (SketchUp on Mac) drop-down menu and choose Preferences.
Drawing
The easiest way to draw in SketchUp is to use a threebutton, scroll-wheel mouse utilizing click-move-click. SketchUp’s default settings provide both the click-dragrelease and click-move-click style of drawing. Change the Drawing settings to allow only Click-Move-Click and Continuous Line (Figure 6.6). This will prevent you from clicking and dragging, which makes it very easy to accidentally move objects by tiny increments or accidentally draw tiny, almost-unnoticeable unwanted geometry. Drawing style is a personal preference, so feel free to adjust to the one that works for you.
Files
By specifying file locations, you can save time because you won’t have to navigate through multiple folders to perform common SketchUp tasks (Figure 6.7). When you import, export, and open collections, SketchUp will already know where you want to look first. Select Window c Preferences and then select the Files menu at the left. Set your default file locations as follows:

☑ In the Models field, define the starting point for all open and save operations. Designate the directory path as \Desktop\ACTIVE PROJECTS\ or your office’s shared network drive.

☑ In the Components field, set the default location to use when you open or create a collection in the Components browser. Set the directory path to \Desktop\ACTIVE PROJECTS\RESOURCES\Components\
☑ In the Materials field, set the default location to use when you open or create a collection in the Materials browser. Set the directory path to \Desktop\ACTIVE PROJECTS\ RESOURCES\Materials\.
☑ In the Styles field, set the default location to use when you open or create a collection in the Styles browser. Set the directory path to \Desktop\ACTIVE PROJECTS\RESOURCES\ Styles\.
☑ The Texture Images field is where you can set the default location for all images that can be used as textures. SketchUp will use this location as the starting point for all File c Insert c Image as Texture operations. Set the directory path to \Desktop\TEMP\
☑ In the Watermark Images field, set the default location for all images that can be used as a watermark. Set the directory path to \Desktop\ACTIVE PROJECTS\
☑ In the Export Models field, set the default location for all models that are to be exported out of SketchUp. SketchUp will use this location as the starting point for all File c Export c 3D Model operations. Set the directory path to \Desktop\ACTIVE PROJECTS\.
General
Within the General settings, make sure the Auto-Save box is checked, and allow SketchUp to automatically save your model every 5 minutes (Figure 6.8). Auto-saving can take a long time if your model is large; however, by applying the model lightening techniques explained in this book you will minimize the problem. Remember, SketchUp will not auto-save a new model until you have first saved it yourself.
Creating a backup file is pretty much a necessity—just in case! A backup file is saved in the same folder as the original .skp file and given the extension .skb. In the rare event that a model becomes unusable, change the file extension of the backup from .skb to .skp and you will be able to open the file in SketchUp.

Open Gl
Open GL settings can be used to troubleshoot your graphics card if strange things happen in your model (Figure 6.9). Uncheck the Use Hardware Acceleration box to disable your graphics card and take it out of the equation. If this fixes the problem, you know that your graphics card needs to be replaced or is incompatible, or the driver needs to be updated.
Use Maximum Texture Size is not necessary and will actually slow down your computer performance; leave this option unchecked. The maximum texture size improves the appearance of what you see on your screen but does so at the cost of system performance. This setting will not improve printing or exporting resolution.
The Use Fast Feedback option is necessary; leave it turned on. SketchUp typically controls this setting on its own. If your graphics card supports this feature, SketchUp will use it.
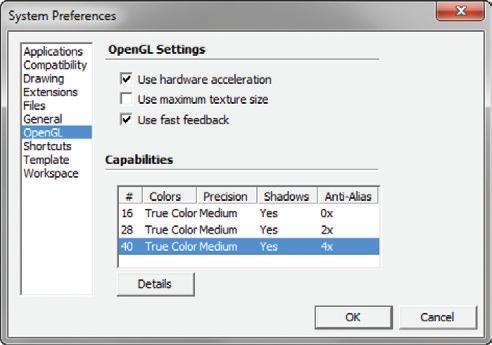
In the Capabilities section, choose the best options for your graphics card. Anti-aliasing smooths out the jagged edges that result from a diagonal line of pixels. Pick a setting with the highest amount of anti-alias your monitor can handle, so your model will look its best on your screen.
Shortcuts
Keyboard shortcuts allow you to access any SketchUp command with the press of a key. Use shortcuts to help you work faster and relieve a huge amount of strain on your eyes and mouse hand. Every time you take your eyes off your design, you are slowing down. Take the time to focus on your keyboarding technique and set up your own custom keyboard shortcuts.
Adding Shortcuts
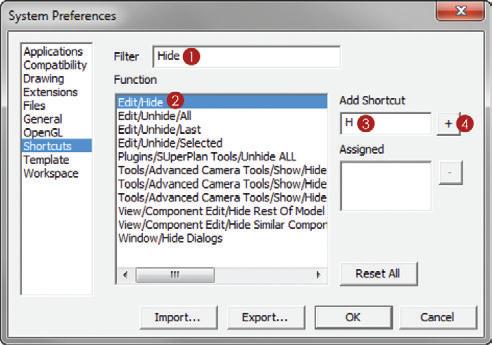
Modify your keyboard shortcuts in the Preferences dialog box by clicking on the Window (SketchUp on Mac) drop-down menu and choosing Preferences c Shortcuts (Figure 6.10).
1. Type a command, such as hide, into the Filter window to parse through all of the options and quickly find a command.
2. Click on a command in the Function box—for example, Edit/Hide.
3. Click in the Add Shortcut box and press the H key.
4. Click on the plus sign (+) to lock in the assigned keyboard shortcut.
TIP if you try to assign a key that is already associated with another command, you will be prompted to reassign the key to the new command. Don't worry. you can always use the reset All button to restore the keyboard shortcuts to the default state.
TIP By using shortcuts to interact with the Windows operating system, you will be able to work faster and more efficiently in any program. hold down the Alt key and tap the Tab key to scroll through all the open applications. once you are in an application, hold down the ctrl key and tap the Tab key to scroll through the open files within that application. hold down the Windows key and tap the Tab key to see a 3D scrolling effect that displays all open applications.
Now that you’ve assigned the keyboard shortcut H to the command Hide Geometry, the H key is taken; however, several helpful hide commands are left unassigned. You may have trouble remembering them if they don’t have an “H” associated with them. Fortunately, you can use combinations of modifier keys such as Ctrl, Shift, and Alt to add more shortcut options in the Add Shortcut text box. To assign a modifier key to a shortcut command, simply press and hold the modifier key while you enter the desired key in the text box. For example, to hide the rest of the model when you’re editing a group or component, assign the keyboard shortcut Ctrl+H. To unhide all, assign the keyboard shortcut Shift+H. Assign the shortcut Alt+H to show/hide hidden geometry. For a less-frequently used command such as Hide Similar Components, try to assign a combination of the modifier keys such as Ctrl+Shift+H.
In addition to the common commands and tools, it is helpful to have shortcuts assigned to just about every command you use. Figure 6.11 lists some less-frequently used commands that will help you expedite modeling every day.
You can use the Shortcuts tab to export and share a list of your shortcuts and file locations. Click on the Export button to save a .dat file containing all of your shortcuts. You can email this file to colleagues and even use this file to set up standard shortcuts and file locations on your other machines. Simply click the Import button and select the preferences.dat file.
Figure 6.11 Take the time to add additional shortcuts. If you constantly access a command using an icon or a drop-down menu, take the time to assign a keyboard shortcut to that command.

Download the official BIC_Shortcuts list at www.suexch.com/tSWFa . Save the file to your TEMP folder. Next, in the Shortcuts window, click on Import. Select the BIC_Shortcuts file from your TEMP folder and click Import. You may be prompted to reassign some of your current shortcuts, so be sure to archive your current settings first!
Ready Stance
To stay nimble, keep your left hand in the standard typing position with your thumb on the spacebar. This is an excellent default three-point stance for tackling SketchUp. If you already have a comfortable stance, stick with it—but at the same time, don’t be afraid to try something new. Just be sure to always use the keyboard shortcuts and practice using keys without looking, even if it seems slower at first. Keyboard shortcuts will make you faster.
c h APT er Poin TS
☑ A clean screen will encourage efficiency and ultimately increase productivity.
☑ Keep your eyes on the model by using keystrokes without looking at the keyboard. Even if this technique takes longer at first, it will make you much faster in the long run.
☑ Customize your keyboard shortcuts in a way that makes sense to you.
☑ Try using keyboard shortcuts in other programs too.


