EnrollChildreninKidKare
ActivateChildren
WithdrawChildren
TransferChildrenBetweenCenters
DeleteorMergeChildData
ChildRosters
EditChildInformation
MenuTemplates
CreateaMasterMenu
RecordIndividualCenterMenus
UnderstandtheMenuCalendar
HowtoRecordActualQuantities
MenuExamples
MenuReporting
AdjustingGrainOunceEquivalents
ManageMenuFooters
ManageFormulaTypes
AbouteForms
AddaSignatureforeForms
eFormsSettingsforCenterSponsors
EnableSNAPValidationforeForms
EnableCentersforeForms
CustomizeeFormsEmailTemplates
SendRenewalInvitationswitheForms
SendNewEnrollmentswitheForms
VieweFormInvitationStatuses
Approve&RenewEnrollmentwitheForms
Clickabovetowatchaquickvideo
CenterSponsors: StepstoGetStarted Belowisalistoftasksyoushouldcompleteasyougetstartedwith KidKare.Clickeachlinktojumptothearticleformoreinformation.
Center Sponsors Checklist ThebasicmonthlyprocesswithKidKare typicallyfollowsthepatternbelow.Clickthe imagetotherighttoviewaprintableversionof thisdocument,orusethis link.
AdministrativeTasks SponsorStaffManagement
ViewReimbursementRates
ManageCompanyInformation
SponsorStaffManagement CreateSponsorStaffRoles You can create staff roles with customized permissions. This allows you to set default permission levels for specific staff groups. For example, you can set up administrators, managers, claims processors, monitors, volunteers, and so on. Then, when you create a new staff account, you can simply select the staff type and assign that type's permissionstotheuser.
•
• •
Clickthe Roles&Permissions tab.
Click AddRole.
•
• Fromthemenutotheleft,clickTools.Select SponsorUserPermissions. TheSponsor UserPermissionspageopens.
•
•
Clickthe RoleName boxandenterthenamefor thisrole. Click Save. Next,click nexttopermissionstoenableand disablethem.
YoucanalsoclickSelectAlltoturnonall permissionsforthisrole,oryoucanclick Unselect Alltodisableallpermissionsforthisrole.Your changesaresavedautomatically.
CreateSponsor StaffAccounts Allsponsor/back-officestaffmembersshouldhavetheirown,uniqueloginIDand passwordwithwhichtoaccessKidKare.Youcanassignpermissionstoeachindividual user,oryoucancreatestaffroles.Youcancustomizepermissionsforeachstaffroles andthenassignthattypetotheusersyoucreate.However,ifyouhaveasmallstaffor wanttosetpermissionsforeachindividualstaffmember,youdonothavetosetupstaff roles.Formoreinformation,seeCreate Sponsor Staff Roles.
•
• Fromthemenutotheleft,clickTools.Select SponsorUserPermissions.TheSponsor UserPermissionspageopens.
•
•
•
ClickAddUser.The AddUser pop-upopens.
ClicktheFirstName and LastNameboxesand entertheuser'sfullname.
Clickthe Emailboxandentertheemailaddress forthisuserifapplicable.
•
Clickthe Roledrop-downmenutoassignarole withpre-setpermissionstothisuser.Youcan customizepermissionsforthisuserlater,if needed.
•
• ClickAddUser.The UserAddedmessage displays. Setapasswordfortheuser.
-Ifyouprovidedanemailaddress,click Email UserInstructions tosendtheuseranemail containinginstructionsforaccessingtheir account.
-Ifyoudidnotprovideanemailaddress,enter apasswordfortheuserandclickSet Password.
CustomizeSponsor StaffPermissions Staffpermissionsallowyoutodeterminewhocanaccesswhatportionsof KidKare.Forexample,youcanrestrictcertainusersfromaccessingand editingyourfoodlist.Youcaneithersetdefaultpermissionswhen creatingspecificstaffroles,oryoucancustomizeindividualuser permissionsontheUserDetailspage.Thisarticlecoverssetting permissionsontheUserDetailspage.See CreateCenterStaffRoles for moreinformationoncreatingpre-setpermissionsets.
• • • • Fromthemenutotheleft,click Tools. Select SponsorUserPermissions. TheSponsor UserPermissionspageopens. Click nexttotheuserforwhomtoupdate permissions.TheUserDetailspageopens. Scrolltothe UserPermissions section.
• Next,click nexttopermissionstoenableand disablethem.Youcanalsoclick SelectAll toturn onallpermissionsforthisuser,oryoucanclick UnselectAll todisableallpermissionsforthis user.Yourchangesaresavedautomatically.
ViewReimbursement Rates YoucanviewcurrentreimbursementratesforCACFP claimsinKidKare.
Todoso:
•
•
• Fromthemenutotheleft,click Administration. Select ViewReimbursementRates. TheView ReimbursementRatespageopens. Clickthe StateType andchoosefromthe following:48Contiguous AlaskaHawaii - Washington,DC
• Clickthe EffectiveMonth boxandselecttheyear andmonthtoview.
ManageCompany Information UpdateYourLoginInformation Updateyourlogininformationwheneveryouneedbyusingthe MyAccount page.
In the top-right corner, click your username and select My Account. The My Account page opens.
Toupdateyourpassword:
Inthe UserDetails section,clickthe
ClicktoReset link. Enteranewpassword.
Clickthecheckmarktosaveyour changes.
Tochangeyourusername:
Click Edit.
In the UserDetails section, click the Username box and enter your updated username.
Click Save.
Scanthiscodetogotothe trainingsitetoviewvideos
ReviewYourAccountInformation It’simportantthatyourcompanyinformationiscorrect,asitprintson variousreports.CheckandupdatethisinformationintheManage ClientInformationpage.
Fromthemenutotheleft,clickAdministration. SelectManageClient Information,theManage ClientInformationpageopens.
Confirmthatthedisplayedinformationis correct.EnsurethattheStateAgreement#is enteredinthe StateAssigned# field. Ifyoumadeanychanges,click Save.
Note: If there are fields that need to be updated but they are greyed out and cannot be changed, you need to reach out to OSDE for these changes.
CenterManagement •Enroll&ManageCenters
•CenterWelcomeLetter
•ManageCenterStaff
•Remove&ReactivateCenters
•ManageCenterClassrooms
Enroll&ManageCenters EnrollCenters Allcentersarepre-enrolledbasedondataprovidedbyOSDE. Whenanewcenteris approvedforthefoodprogram,OSDEwillalertKidKareandthecenterwillbeenrolledfor you. Ifanyadjustmentsneedtobemadetoanycenterdetails,contactOSDEdirectlyas thecenterdetailsareread-onlyandmanagedbythestatetoensuretheymatchwhatis intheCNPsite. -
CenterWelcome Letter CustomizetheCenterWelcomeLetter Youcancustomizethewelcomelettersenttoyourcenteradminswith alinktotheirKidKareaccount.
•
• • LogintoKidKare. Click atthetopofthemainmenu.
Inthe GeneralSettingssection, clickEditWelcome LetterTemplate.TheWelcomeLetterTemplate pop-upopens.
• • ClickEdit.UpdatetheSubjectandFromboxes,as needed. Variablesyoucanusetofill-incertain informationarelistedatthebottomoftheeditor (SponsorName,CenterPhone,andsoon).Toadd oneofthesevariablestoyourtext,type@and begintypingthevariabletouse.Alistof availableitemsdisplaysasyoutype,soyoucan selectthevariableyouneed.Forexample,toadd theprovider'snametotheSubject,youwould type@CenterName inthe Subjectbox.
•Specifywhichwelcomeletteryouaresending: Thelettermarked with template,click istheactiveone.Toenabletheother .Notethatthesliderturns greenandtheotherletter'ssliderturnsred.You canonlyhaveoneactivewelcomeletterata time.
•Clickthefirst Messageboxandcustomizeyour messaging.Justasyoudidin Step5, youcanuse variablestocompletecertaininformation,such asthecenter'sname.
•Clickthe Signatureboxtocustomizeyour signature.
•Click AddAttachmenttoaddanyattachments needed. Whenfinished,click Save.
•
SendCenterWelcomeLetter Use KidKare to send welcome messages to centers. This welcome message will either include installation and login information for KidKare. To select the letter to send and customizethecontent,see CustomizetheCenterWelcomeLetter.
•Fromthemenutotheleft,click Center Management.
•SelectManageCenterInformation.
•ClicktheSelectCenterdrop-downmenuatthe topofthewindowandselectthecentertowhich tosendthewelcomeletter.
•VerifythattheEmailAddress enteredinthe primarycontactinfosectionofthegeneraltabis correct.Thisistheemailthatreceivedthe welcomeletter.
Clickthe Oversighttab.
•
•Inthe CenterLogin tab,click SendWelcome Letter. TheWelcomeLetterpop-upopensand displaysthetextyouenteredtotheWelcome Lettertemplate.
•Makechangestotheemail,asneeded.
• Whenfinished,click Send.
View&UpdateCenterInformation ToaccesstheManageCenterInformationpage:
•Fromthemenutotheleft,click Center Management.
•Select ManageCenterInformation.
•Click the Select Center drop-down menu at the topofthewindowandselectthecentertoview.
•
The ManageCenterInformationpageopens.This windowisdividedintothreetabs:
-General - License/Schedule -Oversight
• • Reviewtheinformationineachtabandensure thatitiscorrectfortheclaimmonthonwhich youareworking.
Click Savetosaveanychanges.
Note: Any license details or center preferences in the area are read-only and cannot be modified. To make changes to this data, please reach out to OSDE directly.
ControlCenterAccessto KidKareFeatures • Click .TheSettingspageopens.
•
Inthe GeneralSettings sectionyoucan:
-Clickthe Languagedrop-downmenuand selectSpanishtoviewKidKarein Spanish.
-Click nextto Wouldyouliketorequire centerstafftocertifytheaccuracyof attendancewhensavingAttendance&Meal CountsinKidKare?torequireyourcentersto acknowledgethatattendanceandmeal countsrecordedareaccurate.
Inthe eFormsSettings section,clicknextto eachoptiontoenableit.Youcanchangesettings forthefollowing:
-Wouldyouliketorequiresitestoapprove enrollmentforms?
-Wouldyouliketorequiresitestoapprove incomeeligibilityforms?Aresitesallowedto sendnewenrollmentrequeststoparents?
-Ifaparentcompletesinfantfeedingdetails, doyouwanttoindicatethattheinfantformis onfileforthechild?
IfaparentindicatestheyparticipateinSNAP, wouldyouliketorequirethemtoprovidetheir SNAPnumberforvalidation?
-WouldyouliketorequireSNAPnumber validationforparentstosubmittheirforms?
Wouldyouliketodisalloworwarntheparentof incorrectformatting?
• -Wouldyouliketohidethe'OpenOnline Forms'button?
Inthe CenterAccesssection,clicknexttoeach optiontoenableit.Youcanchangesettingsfor thefollowing:
ManagetheSchool Calendar TheSchoolCalendarpageallowsyoutoaddschooloutdaysforyoursites.Thisis usefulforsettingupsummervacation,holidays,orextendedschoolclosures.
Addingschooloutdatestothecalendarremovestherequirementthatsitesselect SchoolOutwhencheckingchildreninfortheday.
Youcanaddschooloutdaysperchild,center,school,orschooldistrict.Youcan alsoaddschooloutdaysforallchildrenandallcentersatonce.
•Fromthemenutotheleft,click Menus/Attendance.
Select ManageSchoolCalendar.TheSchool Calendarpageopens.
• •Choosefromthefollowingoptions:
- AllChildren,AllCenters:Createaschoolout eventforallsitesandchidlren.
-
Center: Createaschoolouteventforasingle site.Ifyouselectthisoption,youmustselecta centeratthetopofthewindow.
Child:Createaschoolouteventforaspecific child.Ifyouselectthisoption,youmustselect acenter(topofthewindow)andachild(to therightofthecalendaroptions).
•
- SchoolDistrict:Createaschoolouteventfor anentireschooldistrict.Ifyouselectthis option,youmustselectacenter(topofthe window),astate(ifyouoperateinmultiple states),andaschooldistrict(totherightof thecalendaroptions).
-
School:Createaschoolouteventforasingle school.Ifyouselectthisoption,youmust selectacenter(topofthewindow)anda school(totherightofthecalendaroptions).
ToaddSchoolOutdays:
-FromtheDraggableEventssection,clickand dragSchoolOuttothecalendar,anddropit onthefirstdateoftheevent.Ifyouareadding asingleday,theprocessiscomplete.
- Ifyouneedtoaddadaterange,double-click theschoolouteventyouplacedonthe calendar.TheEventEditorpop-upopens.
-SelectMulti-Day.
- UsetheEventStartDateandEventEndDate boxestoupdatethedaterange.TheEvent StartDatedefaultstothedateonwhichyou placedtheeventoriginally.
- ClickOK.Theeventisaddedtothedatesyou specified.
• Toremove SchoolOutdays:
- Double-clicktheeventonthecalendar.The EventEditoropens.
-
Click Delete.
-AttheAreYouSureprompt,clickDelete.
Scanthiscodetogotothe trainingsitetoviewvideos
SetAt-RiskProgram SchoolDates IfyousponsorcenterswhoparticipatesintheARASprogram,this iswheretheARASProgramschooldatesaresetontheschool calendar. ThesedatesareRead-Onlyandcanbemodifiedby reachingouttoOSDEdirectlyoremailing Oklahoma@kidkare.com.
Manage CenterStaff AddCenterStaff Toaddcenterstaffmembers:
•Fromthemenutotheleft,click Tools.
•Select CenterUserPermissions.
•Clickthe SelectCenterdrop-downmenuatthe topofthewindowandselectthecenterforwhich toaddusers.
ClickAddUser. TheAddUserpop-upopens. •
Clickthe FirstName and LastNameboxesand entertheuser'sfirstandlastname.
Clickthe Emailboxandentertheuser'semail address.
Clickthe Roledrop-downmenuandselectthe userroletoassigntothisuser.
Click AddUser. TheUserAddedmessage displays.
Setapasswordfortheuser.
-Ifyouprovidedanemailaddress,click Email UserInstructions tosendtheuseranemail containinginstructionsforaccessingtheir account.
-Ifyoudidnotprovideanemailaddress,enter apasswordfortheuserandclickSet Password.
CreateCenterStaffRoles Note: Thisarticleisforaddingcenterstaffrolesasasponsorsofcenters.Ifyouoperateinanindependentcenterorarea sponsoredcenteruserneedingtosetupuserrolesandpermissions,seeSetUserPermissions.
Each user role is a combination of certain permissions settings that you can customize. If you customize one of the existing user roles, the word -Custom is added to the end of the role to designate that you have edited the permissions for that role. For example, if you customize the permissions for the Teacher role, the role becomes Teacher - Custom. You canalsoaddnewuserrolesthatyoucanthenassigntonewandexistingusers.
•
•
•
•
•
Select CenterUserPermissions.
Clickthe Roles&Permissions tab.
Click AddRole.
•
• Fromthemenutotheleft,click Tools.
Clickthe RoleName boxandenteranamefor thisrole.
Click Save.
Next,usetheslidersnexttoeachpermissionto enableitforthisrole.Allpermissionsfornew rolesaresettoNobydefault.
SetCenterAdmin Permissions YoucancontrolwhatareasofKidKareacenter'sadministratorcanaccess.
• • • From the menu to the left, click Tools. Select CenterAdministratorPermissions. The CenterAdministratorPermissionspageopens. Usethesliderstotogglepermissionsonandoff. Yourchangesaresavedautomatically.
Scanthiscodetogotothe trainingsitetoviewvideos
Remove& ReactivateCenters RemoveCenters Youcanremove/deactivatecentersfromyouractivelistofcenters. CentersthatyouhaveremovedcannolongeraccessKidKare.
Todoso:
•Fromthemenutotheleft,clickCenter Management.
•Select ManageCenterInformation.
•ClicktheSelectCenter drop-downmenuatthe topofthepageandselectthecentertoremove. TheManageCenterInformationpageopens.
•Click RemoveCenterinthetoprightcorner.The RemoveCenterpop-upopens.
•Clickthe WithdrawalDateandselectthedateon whichtoremovethiscenter.Thisboxdefaultsto today'sdate.
•Clickthe RemovalReason drop-downmenuand selectthereasonyouareremovingthiscenter.
• • Click Continue. Atthe CenterRemovedSuccessfully message, click Close.
Note:Toviewinformationforcentersyou'veremoved, checktheRemovedboxintheSelectCenterdrop-down menutoincludeRemovedCentersinthemenu.
ReactivateRemovedCenters Afteryou'veremovedacenter,youcanre-activatethemifneeded.Perhapsthecenter closedatonepoint,butdecidedtoresumebusiness.Maybetheyswitchedsponsors,butare returningtoyou.Nomatterthereasonyouremovedthecenter,youcanreactivatethemat anytime.
•Fromthemenutotheleft,click Center Management.
•Click ManageCenterInformation.
•ClicktheSelectCenterdrop-downmenu,clear the Activeand Pendingboxesandcheckthe Removedbox.ThisfilterstheSelectCenterlistto removedcentersonly.
•Selecttheremovedcentertoreactivate.The ManageCenterInformationwindowopens. Click ReactivateCenter.
•
•AttheAreYouSureprompt,click Yes.
•Atthe CenterReactivatedprompt,click Close.
ManageCenter Classrooms AddClassrooms •Fromthemenutotheleft,clickCenter Management.
•Under Classrooms,select ManageClassrooms.
•ClicktheSelectCenterdrop-downmenuatthe topofthewindowandselectthecenterforwhich toaddclassrooms.TheManageClassrooms pageopens.
•Click AddClassroom. TheAddNewClassroom pop-upopens.
•ClicktheShortName boxandenterashortname forthisclassrooms.
•ClicktheFullNameboxandentertheclassroom's fullname.
•Clickthe BuildingName boxandenterthe buildinginwhichthisclassroomislocated,if applicable.
EditClassrooms •Fromthemenutotheleft,click Center Management.
•Under Classrooms,select ManageClassrooms.
•Clickthe SelectCenterdrop-downmenuatthe topofthewindowandselectthecenterforwhich toaddclassrooms.TheManageClassrooms pageopens.
•Clicktheclassroomtoupdate.TheEdit Classroompop-upopens.
•Updatetheclassroomnameinformation,as needed.
•
Whenfinished,clickSave.
DeleteClassrooms •Fromthemenutotheleft,clickCenter Management.
•Under Classrooms,select ManageClassrooms.
•Clickthe SelectCenter drop-downmenuatthe topofthewindowandselectthecenterforwhich toaddclassrooms.TheManageClassrooms pageopens.
•Clicktheclassroomtodelete.The EditClassroom pop-upopens.
•
Click Delete.
Note: You can only delete classrooms to which children are not currently assigned. If a classroom has children assigned to it, theDeleteoptiondoesnotdisplay.
AssignClassrooms •Fromthemenutotheleftselect Center Management.
•Under Classrooms,select AssignClassroom.
•ClicktheSelectCenterdrop-downmenuatthe topofthewindowandselectthecenterforwhich toaddclassrooms.TheAssignClassroomspage opens.
•
Checktheboxnexttoeachchildtoassigntoa classroom.
Clickthe Assigndrop-downmenuandselectthe classroomtowhichtoassignthechildren.
• • • ClickSave. Click AssignClassrooms. TheAssignClassrooms pop-upopens.
Observer Mode WhatisObserverMode? ObserverModegivessponsorstheabilitytologinandobserveeachsiteina"view only"mode.
LogintoKidKare.
Select ObserverMode fromthemenuontheleft. Clickonthesiteyouwanttoobserve.
• Thehomepagefortheselectedsiteopens.You arenowinObserverModefortheselectedsite.
HowdoIaccessObserverMode? •
Onceyouaredonereviewingthissite,clickExit
ObserverModeinthetoprightcorner.Youwill returntothelistofsitesanbeabletoselecta differentsitetoobserve.
Children •EnrollChildreninKidKare
•ActivateChildren
•WithdrawChildren
•TransferChildrenBetweenCenters
•DeleteorMergeChildData
•ChildRosters
•EditChildInformation
EnrollChildreninKidKare You,thesponsor,andcenterscanbothenrollchildren.CenterscanalsoimportCDT childrenfromanotherprogram,suchasProcare.Whencentersenrollchildren,those childrenareautomaticallysettoPending,Youmustreviewandactivatethesechildren. Formoreinformation,seeActivateChildren.
IMPORTANT: CheckwithyourcentertoseeiftheyhaveProcarebeforeyouenrollchildren.Donotenrollchildrenifyourcenter isplanningtoimportfromProcare,asthiscanresultinduplicaterecords.Sentanemailto Oklahoma@KidKare.comand requestaProcareintegration.
•
•
• Fromthemenutotheleft,click Children. Select EnrollChild.
Clickthe SelectCenter drop-downmenuatthe topofthewindowandselectthecenterforwhich toenrollchildren.TheEnrollChildpageopens. Thepageisbrokenintothree(3)stepswith separatesections,asshownintheimagebelow.
• In the Personal Details section: Click the First Name,MiddleName(optional), andLastName boxesandenterthechild'sfull name.
- IntheEthnicitysection,checkthe Hispanic/LatinoboxortheNotHispanicbox.
- Inthe Racesection,click optionthatapplies.
-
nexttoeach
•
Clickthe Child#boxandenterachild number,oracceptthesystem-generated number.Youcanenteruptofourcharacters inthisbox.
-Clickthe Classroomdrop-downmenuand selecttheclassroomtowhichtoassignthis child.Youcanalsoenteranewclassroom name.
ClicktheBirthDateboxandselectthechild's dateofbirth.Theiragedisplaystotherightof thisboxautomatically.
IntheIn/OutTimes section:
- SelecttheMealsforwhichthischild participates.
Click nexttoOvernightApproved?Ifthis childisapprovedtoremainincareovernight. Selecteachdaythechildwillbeincareand entertheirinandouttimesinthe correspondingboxthatdisplay.
• • Click nexttoWillpickupanddropoff timesvary? toindicatethatpickupanddropofftimesmayvaryfromwhatisenteredhere.
Inthe EnrollmentDetailssection,selectthe child's EnrollmentDate,EnrollmentExpiration Date,andIEFExpirationDate.TheEnrollment Dateboxdefaultstotoday'sdate. Expiration defaultsto9/30.
Ifthisisaninfant,completetheInfantFood Detailssection.Ifthisisnotaninfant,continueto thenextpoint.
-ClicktheFormulaOfferedboxandenterthe formulaofferedtothischild.
- Click nexttoeachoftheoptionsbelow thatapply: ◦
Willtheparentprovidebreastmilk? Willtheparentprovideformula? Willtheparentprovidefood?
•
•
• -Click nextto InfantFormofFile toindicate you have an infant form on-file for this child. This refers to the infant information on the enrollmentform, Next,complete Specialand DietInformation sections,asneeded.Click nexttoeachoption inthesesectionsthatapplytothechildyouare enrolling.Youcanalsoadda DietExpirationDate andNotestothechild'sDietInformation.
Inthe DoctorInformation,enterthechild's primarycarephysician'snameandphone number,ifneeded.
If this is a school age child, it is optional to complete the School Details section. If this is not a schoolagechild,go tonextpoint.
-Clickthe SchoolName drop-downmenuand selecttheschoolthischildattends.
-Clickthe SchoolDistrictdrop-downmenuand selectthechild'sschooldistrict.
-
Clickthe School# boxandentertheschool's identifyingnumber.
ClicktheType/Level boxandselectthechild's schoollevel.YoucanalsoselectNoSchoolor SchoolAge.
Inthe PayDetailssection:
-Clickthe PaySource drop-downmenuand selectPaidbyCounty/State,PaidbyParent,or NoPay.
Clickthe Startand EndDate boxestoset datesforthispaymentmethod.
Clickthe AdditionalNotes boxandenterany additionalnotesaboutthepaydetailsforthis child.
ClickNext.ThePrimaryGuardianformdisplays.
Addaprimaryguardian.
- Click Existingtoselectanexisting parent/guardian.Then,selectthecontact.
Click Newtoaddanewparent/guardianand entertheirinformation.
Click Next. Thefinalenrollmentpageopens.If anysiblingsarefound(childrenwiththesame parent),theydisplayintheSiblingsandChildren (SameParent)section.
•
• Whenfinished,click EnrollChild.TheManage ChildInformationwindowopensanddisplaysthe informationyoucompleted.Childrenyouenroll asasponsorareautomaticallysettoActive status.Youcanupdatethechild'sstatusas neededinthiswindow.
•
• Inthe Reimbursement/ChildDetails section:
-Selectthechild'sreimbursementlevel: Free, Reduced,orPaid.
Clickthe FRPEligibilityBasis drop-down menuandselectthebasisforthechild's reimbursementlevel.
Checkoffifthechildis TitleXX/XIX and entera QualifyingProgram#,ifneeded.
-ClicktheSponsorNotes boxandaddany additionalnotesaboutthechild'sreimbursement details.
Inthe AdditionalDetailssection,click eachoptionthatapplies. nextto
Activate Children Whencentersenrollchildren,thechildrenareautomaticallysetto Pending status.Sponsorsmustthenreviewandactivatethesechildren.Thereare twowaystoentercategoricaleligibility(FRPrates)andactivatechildren: Oneatatimeormultipleatatime.
ActivatingMultiple ChildrenataTime •
• Fromthemenutotheleft,click ActivateChildren.
UsetheFindRecords sectiontofiltertherecords thatdisplay.
- Choosewhethertoactivatechildrenfor All ActiveCentersorthe SelectedCenter. Ifyou choosetheSelectedCenteroption,clickthe SelectCenterdrop-downmenuatthetopof thispageandselectthecenter.
-Clickthe ExcludeChildrenifEnrollment Finalizeddrop-downmenu,selectBeforeor After,andthenselectadateinthe correspondingdatefield.
•
-Checkthe IncludeWithdrawnChildrenWho WereNeverActivatedboxtoinclude withdrawnchildrenwhowereneveractivated. Click Go toapplyyourfilters.
Checktheboxnexttoeachchildtoactivate.You canalsochecktheboxinthetableheaderto selectalldisplayedchildren.Double-checkyour selectionsbeforeproceeding,asthisaction cannotbeundone.
• ClickActivate.
ActivatingChildren OneataTime •
• Fromthemenutotheleft,click ActivateChildren.
Usethe FindRecords sectiontofiltertherecords thatdisplay.
- Choosewhethertoactivatechildrenfor All ActiveCentersorthe SelectedCenter.Ifyou choosethe SelectedCenter option,clickthe SelectCenterdrop-downmenuatthetopof thispageandselectthecenter.
-Clickthe ExcludeChildrenifEnrollment Finalizeddrop-downmenu,selectBeforeor After,andthenselectadateinthe correspondingdatefield.
-ChecktheIncludeWithdrawnChildrenWho WereNeverActivated boxtoinclude withdrawnchildrenwhowereneveractivated. Click Go toapplyyourfilters.
Clickachild'snametoaccesstheManageChild Information page. Reviewthechild'sinformationandselectActive atthetopofthispage.Yourchangesaresaved automatically.
Scanthiscodetogotothe trainingsitetoviewvideos
Withdraw Children Whenachildleavesachildcarecenter,theyshouldbewithdrawnfromthe program.Withdrawingachildremovesthemfromfuturerosters.However, youcanstillaccessawithdrawnchild'sinformationandclaimhistory.
•
•
•
• Fromthemenutotheleft,click Children. Click ListChildren.
UsetheFindRecordssectiontofiltertherecords thatdisplay.
- Choosewhethertoactivatechildrenfor All ActiveCenters orthe SelectedCenter. Ifyou choosethe SelectedCenter option,clickthe SelectCenterdrop-downmenuatthetopof thispageandselectthecenter.
-Click Statusdrop-downmenuandselecta childstatusof All,Enrolled,Pending,Enrolled &Pending,orWithdrawn. Click Gotoapplyyourfilters.
Usetheblankfieldstosearchforthechildthatis beingwithdrawn.
Click Withdrawagain. ClickonthenameoftheChildtowithdraw. Click Withdraw. Enterthedateofthelastdaythischildwasin care.
TransferChildren BetweenCenters Youcantransferchildrenfromonecentertoanotherwiththe CopyChildfeature.Onceyoucopythechildtothenewcenter inwhichtheyareenrolled,youmustwithdrawthechildfrom theoriginalcenter.
•
•
•
• Fromthemenutotheleft,click Children. Select CopyChild. TheCopyChildwindowopens. Clickthe ChildName drop-downmenuand selectthechildtocopy. Clickthe DestinationCenter drop-downmenu andselectthecentertowhichtocopythechild.
• Click Copy. Thechildiscopiedtothenewcenter. Ifthechildisnolongerattendingtheoriginal center,youshouldwithdrawthemfromthat center.
DeleteorMerge ChildData IfyoumistakenlyenteredachildintoKidKaretwice,youmayneed todeletethechildrecordentirely,ormergethechildrecords.
•
•
Fromthemenutotheleft,click DeleteChild.
Clickthe SelectCenter drop-downmenuatthe topofthewindowtoselectthecenterfromwhich todeleteachild.
•
Clickthe SelectaChild drop-downmenuand selectthechildtodelete.
•
• Click Delete.
Ifthechildyouselectedhaseitherbeenclaimed orhashouseholdincomeentered,youare promptedtomergethechildintoanotherrecord.
-Click Yestoproceedwithmergingthechild. Gotothenextstep.
Click Notodeletethechild.Thechildis deletedandyoucannowexitthispage.
Atthe Selectprompt,clickthedrop-downmenu andselectthechildrecordinwhichtomergethe childyouselectedfordeletion.
• ClickMergeChild.Allofthepreviouschild's recordsaremergedintothechildrecordyou selected.
Child Rosters TherearetwoversionsofthechildrosterinKidKare:asponsorversionandacenterversion. Thecenterversiondisplaysallenrolledandpendingchildren.Thesponsorversiondisplays allchildrenwhowereincludedontheclaimfortheselectedmonth.
•
•
•
•
• Fromthemenutotheleft,click Reports.
Clickthe SelectaCategory drop-downmenu andselect Children.
Clickthe SelectaReportdrop-downmenuand choosefromthefollowing:
-ChildRoster ChildRoster[CenterVersion] ClicktheMonthboxandselecttheclaimmonth forwhichtorunthereport.
Clickthe SelectCenter drop-downmenuand selectthecenterforwhichtoprinttheroster:
- Select AllActiveCenters toprintrostersforall centerscurrentlysettoActivestatus.
-Select ChooseMultipleCenters tosetfiltersfor thecenterstoinclude.Whenyouselectthis option,theFilterforCenter(s) and Select Center(s) sectionsdisplay.Youcanfilterby Status(required),State(required-ifyou operateinmultiplestates), City,andmore.Use thedrop-downmenustosetfilters,andthen clickSearch.Then,checktheboxnexttoeach centertoincludeinthe SelectCenter(s) section.
- Selectasinglecenterforwhichtoprintthe report.
•
• Ifyouareprintingrostersformultiplecenters, specifyasort.YoucanselectCenterNameor CenterNumber.
Next,generatethereport:
-Ifyouareprintingasingleroster,clickRun. ThereportdownloadsasaPDF.
-Ifyouareprintingrostersformultiplecenters, click Export. ThereportdownloadsasaPDF.
EditChild Information Asasponsoryouhaveaccesstoreviewandeditchildinformationwhetheryouare updatingaguardianemailaddress,addinganewallergy,orupdatingenrollment information.Notethatthesearethesamestepsacenterwouldfollowtoeditchild information.
• • •
• Fromthemenutotheleft,clickChildren. ClickManageChildInformation.
Inthetoprightcorner,selecttheCenterforthe childthatneedstobeupdated.
Usethefilterstonarrowdownyoursearch
- ChoosewhetherthisparticipantisActive, Pending,orWithdrawn.
-Ifyouchoose Withdrawn,youmustentera dateintothe Afterdatefield.Thisistosearch forallchildrenwithdrawnafterthedateyou select.
• •
UsetheSelectaChilddropdowntochoosethe childtoedit.
Selectthechild’snameinthedropdown.
Fromthisscreen,usetheorange Editbuttonsto editthechildinformation.
ClickSave.
Click HERE to learn more about child allergies and conditions
Menus& Attendance MenuTemplates
CreateaMasterMenu
RecordIndividualCenterMenus
UnderstandtheMenuCalendar
DailyMenu
HowtoRecordActualQuantities
MenuExamples
MenuReporting
AdjustingGrainOunceEquivalents
ManageMenuFooters
ManageFormulaTypes
CenterAttendanceandServedMeals
RecordingMealsforInfants
ManageSchoolCalendar
Menu Templates YoucanuseMenuTemplatestocreate cyclemenusinKidKare.Onceyour MenuTemplatesarebuilt,youcan thenaddthemtotheDailyMenu easilywithouthavingtobuildthem outweekbyweek. Thisfeatureisnotrequired,butisa bigtimesaverifyouhavecycle menusormealsthatyouserveoften. Scanthiscodetogotothe trainingsitetoviewvideos
•
CreatingMenuTemplateson theMenuTemplatesPage EditMenuTemplates Fromthemenutotheleft,click Menus/Attendance.
Select MenuTemplates. TheMenuTemplates pageopens.
Atthetopofthepage,select Infantsor Non-Infants.
Click AddMenu.
Clickthe WhichMealWouldYouLike toAdd drop-downmenuandselectBreakfast, Snacks,orLunch/Dinner.
Clickthe WhatistheName of ThisMenubox andenteranameforthismenu.
Note:WhennamingyourMenuTemplates,keepinmind thatthisiswhatyou,yourstaff,andyourguardianswill seeontheMenuCalendarsyoupostorsendout.Best Practiceistousenamesthatdescribethemealsuchas “LasagnaandVeggies”or“EggBurritowithsalsa”.
• Clickeachdrop-downmenuandselectthe appropriatemealcomponents.
• Whenfinished,click Save.
Fromthemenutotheleft,click •
Menus/Attendance.
• Select MenuTemplates. TheMenuTemplates pageopens.
• • Locatethemenutochange. Click nexttothemenutoedit.Themenu detailsdisplay.
•
• Click Edit. Selectnewfoodsandenteranewmenuname, ifneeded.
• Whenfinished,click Save.
DeleteMenuTemplates •
•
• Fromthemenutotheleft,click Menu Templates.TheMenuTemplatespageopens. Click nexttothemenuto delete. Attheconfirmationprompt,click Delete.
CreateMasterMenus You can create centralized menus for individual site use. First, create one or more master menu plans. Then, release them to the sites you choose. Once sites receive the master menu, they can print the Menu reportandpostitintheircenterforstaffandparentstosee.
Themastermenufeaturewasdesignedtobeusedformultiplesitesthatareusingthesamemenu, suchasthosewithacentralkitchen,tomakemenuplanningeasier.Ifanindividualcenterhasitsown menuplanthatdiffersfromothersites,thereisnoneedtocreatemastermenus.Yourcentercanplan theirownmenusfromtheirownaccount.
AddingMasterMenus •Fromthemenutotheleft,click Menus/Attendance.
•
•
Select MasterMenuCalendar. The MasterMenu Calendarpageopens.
•ClicktheMenuNamedrop-downmenuandscroll totheEnterNewMasterMenubox. Clickthe EnterNewMasterMenuboxandentera nameforthemenutocreate. Press Enter.
•
•Double-clickthedateonwhichthemenushould beserved.
•
•
• Whenfinished,click Save Clickthemealtypetoexpandthesection.For example,ifyou'readdinglunch,clickLunch.
Usethedrop-downmenusinthe Non-Infants and/orInfants sectiontoselectthecomponents forthismeal.
Copy&PasteMenus foraSingleDay •Fromthemenutotheleft,click Menus/Attendance.
•
Click MasterMenuCalendar.
•Selectthe MasterMenuNameyouwanttocopy menusfrom.
•
Click MenuActions inthetop-rightcorner.
•
•
•
• Select Copy. TheCopyMenuspop-upopens.
Select Infants,Non-Infants, orboth. Click Day.
• Clickthe SelectaDayboxandenterthedayto copy.Youcanalsoclick fromacalendar.
•
•
Inthe HowOftenShouldMenuRepeat field, specifyhowoftenthismenushouldrepeat:Daily, Weekly,orMonthly).
Setuprepetitionfrequencyaccordingtoyour selectionintheHowOftenShouldMenuRepeat field. toselectthedate
•Specifywhentostoprepeatingthismenu:
- EndAfter:Selectthe EndAfter option.Then, clicktheOccurrencesboxandenterthe numberofoccurrences.
-
EndBy: Selectthe EndBy option.Then,click theSelectaDayboxandenterthedateon whichtostoprepeatingthemenu.
• Click Continue.
•Attheconfirmationprompt,reviewyour selectionsandclick CopyMenus.
Copy&PasteMenus forMultipleDays •Fromthemenutotheleft,click Menus/Attendance.
•
Click MasterMenuCalendar.
•Selectthe MasterMenuNameyouwanttocopy menusfrom.
•
Click MenuActions inthetop-rightcorner.
•
•
•
• SelectCopy. TheCopyMenuspop-upopens. Select Infants,Non-Infants,orboth.
Click Multi-Day.
•Inthe WhatDaysWouldYouLiketoCopyYour MenusFromsection,selectthedaysyouneedto copy.Enterthefirstdateinthefirstbox,andenter thelastdateinthesecondbox.Youcanalso click toselectdatesfromacalendar.
• Clickthe BeginPastingOnboxandentertheday onwhichtobeginpastingyourmenus.Youcan alsoclick toselectdatesfromacalendar.
• Specifywhethertoskipweekends.Weekendsare settoskipbydefault.
Click Continue.
• •Attheconfirmationprompt,reviewyour selections,andclick CopyMenus.
AssignMenustoSites OnceyouhavefinishedyourMasteMenuforthe month,youwillassignthemenutotheproper centers.
•Fromthemenutotheleft,click Menus/Attendance.
Click MasterMenuCalendar.
• •Selectthe MasterMenuNameyouwanttocopy menusfrom.
•
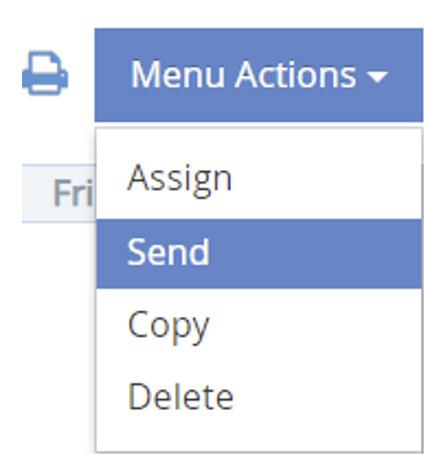
Click MenuActions inthetop-rightcorner.
•
•
• SelectAssign. The Assignpop-upopens. Selectwhichcenterswillgetthismenu,click Save.
Click MenuActions again,selectSend. Click MenuActions again,selectSend.
Aconfirmationpops-up,click Yes,then ok.
RecordIndividual CenterDailyMenus Youcanrecordmenusforanyselectedcenter,ifneeded.Note thatthesearethesamestepsacenterwouldfollowtorecord menusthemselvesinKidKare.
•Fromthemenutotheleft,click Menus/Attendance.
•
Select CenterDailyMenu.
•ClicktheSelectCenterdrop-downmenuatthe topofthewindowandselectthecenterforwhich toentermenus.
•
•
Clickthedateboxandenterthedateforwhichto recordamenu.
Click Non-InfantsorInfants.
•Click toexpandameal.Click tocollapse itagain.
• Selecttheappropriatemealcomponents.You canalsoclick Menutoselectasavedmenu template.Amessagedisplayswhenthemeal patternrequirementsforthemealtypehavenot beenfulfilledbythemenu.Oncethemealpattern guidancehasbeensatisfied,andtherequired number/typesofcomponentsareassociated withthemeal,theerrornolongerdisplays.You canclick CreateMenu tosavethismealasa menutemplate.
•
Ifyouarerecordinga Bread/AltorInfantCereal andneedtooverridetheounceequivalents calculationsavedtothefoodlisttoaccommodate branddifferences,click CalculateOzEqfor1 ServingundertheBread/AltorInfantCerealfood item.Entertheupdatedservingfromthenutrition labelandclickSave.
•
ClickEstimateAttendancetoestimateattendance forthismeal.
ClicktheMenuNotesboxandenteranynotesabout thismeal,ifneeded.
•
Ifthiscenterhasparticipantsovertheageof18 enrolled,theAdultMealPatternSubstitutions sectiondisplays.
◦
◦
• Click nexttoWasyogurtsubstitutedformilk?If yousubstituteyogurtformilkatthismeal.
Click nexttoWasmilservedtoadults?Ifmilk wasservedtoadultsatthismeal.
ClickSave.
Understandthe MenuCalendar UsetheMenuCalendartoschedulefuturemenus,reviewmenusamonthata time,anduseasavisualofanymissingcomponentsormeals.Notethat thesearethesamestepsacenterwouldfollowtorecordattendanceand mealcountsthemselves.
Toaccessthemenucalendar:
•Fromthemenutotheleft,click Menus/Attendance.
•
Click CenterMenuCalendar. TheMenu Calendarpageopens
CalendarDisplay Youcanupdatethecalendardisplaytosuityourneeds.
•
• ClickInfantsorNon-Infantstotogglebetween infantandnon-infantmenus.Thisoptiononly displaysifyouhaverecordedmealsand attendance/mealcounts.
ClickFiltersintheorangebubbleinthetop-right cornerofthepagetoupdatewhatdisplaysonthe calendar:
-Weekends:ClickShowtoshowweekends,and clickHidetohideweekends.Hidingweekends removesSaturdayandSundayfromthe calendarandexpandstheweekdaycolumns. Thisisespeciallyusefulwhenviewingthe calendaronamobiledevice.
-ViewWarnings:Clickeachwarningyouneedto seeonthecalendar.Youcanshoworhide warningsthatdisplayforthefollowing:
MenuIncomplete MissingEstimatedAttendance
QuantitiesInsufficient
-ShowWarningsAs: ClickIconstoshowmenu warningsasicons,orclickTexttoshowmenu warningsastext.Thecalendardisplaysall menuwarningsastextbydefault.Thisallows youtobecomefamiliarwiththewarning messages.Formoreinformation,seetheMenu Warningssectionbelow:
•ClickadaytoaccesstheDailyMenupageforthat day.Youcanalsoclickanemptydatetoadda mealtoadaywheremealshavenotyetbeen plannedorserved.
•Menuwarningsdisplayformenusthathavebeen entered,butneedadditionalinformationorhave problemsthatmaycausethemealtobe disallowed.Thesewarningsarespecifictothe menusyouenteredandhavenocorrelationtoany claimsprocessingerrors.
•Click and tomovebetweenmonths.You canalsoclick Todaytoreturntotoday'sdate.
CalendarWarnings Menuwarningsalwaysdisplayinthe followingorder:
•MenuIncomplete:Thiswarningdisplayswhena mealisscheduledforthedayanddoesnothave alloftherequiredcomponentstobecreditable underCACFPregulations.Forexample,ifalunchis scheduledanddoesnothaveallfive(5)menu components,thisalertdisplaysonthecalendar. Also,theaffectedmealisoutlinedinredonthe calendar.
•MenuIncomplete:Thiswarningdisplayswhena mealisscheduledforthedayanddoesnothave attendanceestimated.
• QuantitiesInsufficient: Thiswarningdisplaysfor onlythosecenterswhoarerequiredtoenter actualquantitiesservedwhenamealis/was scheduledforthecurrentdayorforapriorday, andactualquantitiesservedhavenotbeen recordedortherewasnotenoughserved.This neverdisplaysforfuturedates,anditdoesnot displayforthosecenterswhoarenotrequiredto enteractualquantitiesserved.
RecordActual QuantitiesPrepared Recording ActualQuantitiesServed isrequiredbyyourstateandmustbedone foreachmealpriortosubmittingyourclaims.
RecordActualQuantities •
• • GototheDailyMenu page.Therearetwowaysto dothis:
-Fromthemenutotheleft,click Menus/Attendance. Then,clickDailyMenu.
-Fromthemenutotheleft,clickCalendar.Then, double-clickthedayforwhichtoestimate attendance.
Click Non-Infantsatthetopofthepagetoshow thecorrectmenu.
Click intheActualQuantitiesServed column.
TheEnterQuantitiesServedpop-upopensand onlydisplaysthosemenucomponentswherea fooditemwasselectedontheDailyMenu
Note:TheNon-Infantpop-upshowsthreemilktypes: WholeMilk,1%/SkimMilk,andSubstituteMilk.Thisallows youtoenterquantitiesservedbymilktypesotheyare properlycalculatedandreflectedontheMenu ProductionRecordandtheMilkAudit.
• • • Clickeach boxandenterthequantityserved.
Clickthecorresponding drop-down menuand selecttheunitofmeasurement.
Click Save.
RecordActualQuantities Watch the video linked above to learn more about entering Actual Quantities. OSDE requires that the actual amount prepared is entered for each meal component, each day.
This same video can be used to help train your center staff as well.
Please note that the actual amount served/prepared should be equal to, or more than the amount required.
MenuExamples When selecting your food components, it’s important to use the primary components that make your meal creditable. For any “extra” items, you can use the Menu Template Name or the Menu Notes section. Below are some examples of menu names and componentstohelpguideyou.
Note: OSDE requires that Menu Notes be entered prior to saving. Menu notes should be used to elaborate on specific brands used, if a secondary option was provided, extra items served, CN label numbers, etc.
If you truly have no notes, you can enter N/A.
Menu Reporting CenterSponsors:Printthe MenuProductionRecord TheMenuProductionRecordliststheamountoffoodcentersneedtoserveand purchasetoadequatelyservechildrenintheircare.Itmayalsoincludeactual quantitiesservedandleftoverquantities,ifrecorded(subjecttopolicyM.01andpolicy M.01f).Beforeprintingthisreport,centers/sponsorsshouldrecordcentermenusand estimateattendance(atleast).Estimatingattendanceallowscenterstoplanaheadof timesotheycanpurchasetheappropriatequantitiesoffood(aslistedonthereport).If youprintthisreportafterrecordingactualattendanceand/oractualquantitiesserved, thequantitiesneededbasedonactualattendancedisplayonthisreport,asdothe actualquantitiesprepared.
Sponsorscanusethisreportwhenauditing centerstoensurethatthecorrectamounts offoodarebeingpreparedandserved.
Fromthemenutotheleft,click Reports.
Clickthe SelectaCategory drop-downmenu andselect Menus.
ClicktheSelectaReportdrop-downmenuand select MenuProductionRecord.
Clickthe SelectCenterdrop-downmenuand selectthecenterforwhichtoprintthereport. YoucanalsoselectAllActiveCenterstoprint thisreportforallcenters.
Clickthenextdrop-downmenuandchoose fromthefollowing: Both,Non-Infant,orInfant.
Clickthe Fromboxandselectthereportstart date.
Clickthe Toboxandselectthereportenddate.
ClickRun.ThereportdownloadsasaPDF.
Note:SponsorsshouldensurethattheyhaveselectedthecorrectFoodQuantityTypeintheFood Tool,asthisaffectstheunitsofmeasureusedontheMenuProductionrecordwhencalculating quantities.Ifyouarerecordingindividualinfantmenus,theMenuProductionRecordforinfantsonly showsquantitiesforthedefaultinfantmenu.Ensurethatcentershaveeitherrecordedorestimated attendance.
PrintingtheCenter MonthlyMenuReport Werecommendyouperiodicallyreview yoursites’plannedmenustoensurethat theymeetmealpatternrequirements eachday.
ReviewingtheCenter MonthlyMenuReport Whenreviewingcentermenus,make surethat:
• •
•
• Fromthemenutotheleft,clickReports.
ClicktheSelectaCategorydrop-downmenu andselectMenus.
Clickthe SelectaReportdrop-downmenuand select CenterMonthlyMenu plan.
Clickthe Dateboxandselectthemonthfor whichtorunthisreport.
•
•
Clickthe SelectCenterdrop-downmenuand selectthecenterforwhichtorunthisreport.You canselect AllActiveCenters toprintthisreport forallactivecenters,oryoucanclick Select MultipleCentersandsetfiltersforthecenters toinclude.
Click Run. ThereportdownloadsasaPDF.
• • • Juiceisonlyplannedforonceperday. Thereisavegetableplannedateachlunchand dinner.
Awholegrain-richfoodisplannedforatleast onceperday.Therearenograin-based dessertspresent.
AdjustingGrain OunceEquivalents •Whenrecordingmenus,click CalculateOzEq for1Serving undertheBread/Altfooditem.The OunceEquivalentCalculatorpop-upopens.The Bread/Altyouselecteddisplaysinthedropdown.
Note:KidKareispre-programmedwiththemostused grainounceequivalentservingsizes.Usethistoverify andupdatetheservinginformationifyourbread componentisdifferentthanwhatisprogrammedinto KidKare.
• • Clickthe ServingSize boxandupdatethe commonservingsize,ifneeded.Followingour exampleabove,we'llleavethissetto1Slice. ClicktheServingWeightboxandupdatethe servingweightasstatedonthenutritionallabel foryourfood.Inourexample,weneedtochange thisto45.
•
Usethecorresponding drop-downmenu toselect theweightunit.Thiswilltypicallybegrams(g), butsomelabelsmaygivetheservingweightin ounces.Ifthisisthecase,selectounce(oz).Once yousetthenewweight,the1Serving=box updatesanddisplaysthetotalounceequivalents inoneservingofyourfooditem.Continuingour BrandBexample,you'llseethatBrandBcontains 1.5ozeqinoneservingvsthe1ozeqsavedtothe foodlistforBrandA.
• ClickSave.
Onceyousavethisoverride,itwillapplytoallquantities reportedforthisBread/Altonthemenu.
Ifyoucopythismenuforfutureuseorsavethismenuas atemplate,thisoverrideisretainedsoyoudonothave toenteritagain.
Pleasenotethatthisonlyappliestomenussavedonthe
DailyMenu page—templatescreatedontheMenu
Templates pagewillusethefoodlistcalculationuntil youoverrideitafterapplyingitto DailyMenu.
Manage MenuFooters Youcanaddfooterstoinfantandnon-infant menusfromtheManageMenuFootersCDT dialogbox.Thetextyouenterhereprintson thefollowingreports:
• •
CenterMonthlyMenuPlan
CenterWeeklyMenuPlan
CenterWeeklyMenu-Non-InfantsOnly
CenterWeeklyMenu-InfantsOnly
MasterMenuMonthlyPlan-Non-InfantsOnly
MasterMenuMonthlyPlan-InfantsOnly
Notethatthefooterwillalsoprintonthecenter versionofthesereports.Toaddmenufooters:
•Fromthemenutotheleft,click Administration.
•
• Select ManageMenu Footers.
Clickthe NoninfantMenuFooter boxandenter thetexttodisplayonnon-infantmenus.
• •
Clickthe InfantMenuFooter andenterthetextto displayoninfantmenus. Whenfinished,click.
ManageFormula Types UsetheManageFormulaTypeswindowtocreateformulaoptionsyoucan selectwhencreatingchildrecordsandrecordinginfantmenus.
•
•
• Fromthemenutotheleft,click Administration. Select ManageFormulaTypes. TheManage FormulaTypespageopens.
Toaddaformulatype:
-Click AddFormulaType.TheAddFormula Typepop-upopens.
-Clickthe FormulaType boxandenterthe formulaname. Click Save.
•
Toeditaformulatype:
-Clickthetypetoedit.TheEditformulaType pop-upopens.
-Updatethename,asneeded.
- Click Save.
•
Todeleteaformulatype:
-Clickthetypetoremove.TheEditFormula Typepop-upopens.
Note:Ensurethatyouhaveselectedthe correctformulatypetoremove.Thereisno confirmationmessage,andtheformulatype isremovedimmediately.
- Click Delete.
•
CenterAttendance &ServedMeals YoucanrecordDailyAttendanceandMealCountsforanyselectedcenter,ifneeded.NotethatatStep4 thesearethesamestepsacenterwouldfollowtorecordattendanceandmealcountsthemselves.
Fromthemenutotheleft,clickMenus/Attendance.
Click CenterDailyAttendance/ServedMeals.
Selectthecenteryouareenteringdataforinthe toprightdropdown.
• Makesurethecorrectdate,classroom,andmeal areselectedatthetop.
Checkthe boxnexttoeachparticipant'snameto markattendance.
Click torecordamealcount.Aparticipant mustbemarkedinattendancebeforeyoucan accessthisoption.
Ifyouhavesitesthatareopenenrolledandusethemeal counteroption,click HERE towatchavideoonhowyour siteswillusetheKidKareMealCounterfeaturetotrack meals.
•
RecordingMeals forInfants YoucanrecordindividualinfantmenusontheAttendance&MealCountpage.Ifyouhavealreadyrecordedan infantmenuontheDailyMenupage,thismenuisusedasthedefaultforallinfants,andyoucanmake adjustmentshere.
Fromthemenutotheleft,click Menus/Attendance. •Iftheinfantisservedsomethingoutsideofthe ClickCenter DailyAttendance/ServedMeals. Selectthecenteryouareenteringdataforinthe toprightdropdown. defaultmenu(ifoneexists),followthesteps below.Iftheinfantisservedthedefaultmenu,go tothenextstep.
-Click nexttoeachfoodcomponentto enableordisableforthisinfant. Makesurethecorrectdate,classroom,andmeal
-Clickthe FoodServed drop-downmenuto areselectedatthetopofthepage. selectthefoodthisinfantiseating. Click torecordamealcountforaninfant. Theinfantmustbemarkedinattendancebefore youcanaccessthisoption.TheInfantMenu pop-upopens.
•Ifyouarerequiredtorecordquantitiesserved, usethe QuantityServedboxestoenterthe amountservedtothisinfant.
Note:Iftheinfantisbeingservedthedefaultmenuand theunitofmeasureusedforrecordingquantitieshas alreadybeenset,youcannotchangetheunitused.For example,ifthedefaultmenuhasquantitiesrecordedin tablespoons,youcannotswitchthequantitytoounces. ThisensuresthatKidKarecanaccuratelycalculatethe quantitiesservedforthedefaultmenu.Thefigurebelow showsthelockedquantityforaninfantinthe0-5 monthsagegroup.
•
• Click Continue.
Repeat Steps4-7 foreachinfantpresentatthe meal.
•
Whenfinished,click Save.
Scanthiscodetogotothe trainingsitetoviewvideos
PrintIndividualInfantMenus
Ifyouhaveenabledindividualinfantmenu reporting,youcanprintindividualinfant menus.TheInfantFeedingReportlistsmenus foreachinfantservedandincludesthe followingforeachmeal: Thisreportalsoincludesinformationsuchas, thecenter'snameandsitenumber,whether theparentacceptscenterformulaand/or food,theinfant'sageinmonths,theinfant's dateofbirth,andmore.
•MealComponents
•FoodServedbyComponent
•QuantityRequiredbyComponent
•QuantityServedbyComponent
Eachinfantislistedonaseparatepage.This reportissortedbychildname,andyoucan printitforallactivecentersorforyour selectedcenter.
Toprintthisreport:
Fromthemenutotheleft,click Reports.
Clickthe SelectaCategory drop-downmenu andselect Menus.
Clickthe SelectaReport drop-downmenu andselectInfantFeedingReport.
Clickthe SelectCenterdrop-downmenuand selectthecenterforwhichtoprintthereport. Youcanalsoselect AllActiveCenters toprint thereportforAllActiveCenters.
Clickthe FromandToboxes tosetthedate rangeforwhichtoprintthisreport.
ClickRun.ThereportdownloadsasaPDF.
ManageSchool Calendar TheSchoolCalendarpageallowsyoutoaddschooloutdaysforyoursites.Thisisusefulfor settingupsummervacation,holidays,orextendedschoolclosures.Addingschooloutdatesto thecalendarremovestherequirementthatsitesselectSchoolOutwhencheckingchildrenin fortheday.
Youcanaddschooloutdaysperchild,center,school,orschooldistrict.Youcanalsoadd schooloutdaysforallchildrenandallcentersatonce.
•
• Fromthemenutotheleft,click Select TheSchoolCalendar pageopens.
•
Menus/Attendance.
SchoolCalendar.
Choosefromthefollowingoptions:
- AllChildren,AllCenters:Createaschool outeventforallsitesandchidlren.
-
Center:Createaschoolouteventfora singlesite.Ifyouselectthisoption,you mustselectacenteratthetopofthe window.
- Child:Createaschoolouteventfora specificchild.Ifyouselectthisoption, youmustselectacenter(topofthe window)andachild(totherightofthe calendaroptions).
-
SchoolDistrict:Createaschooloutevent foranentireschooldistrict.Ifyouselect thisoption,youmustselectacenter(top ofthewindow),astate(ifyouoperatein multiplestates),andaschooldistrict(to therightofthecalendaroptions).
•
- School: Createaschoolouteventfora singleschool.Ifyouselectthisoption, youmustselectacenter(topofthe window)andaschool(totherightofthe calendaroptions).
Toadd SchoolOut days:
-Fromthe DraggableEventssection,click anddragSchoolOuttothecalendar,and dropitonthefirstdateoftheevent.Ifyou areaddingasingleday,theprocessis complete.
-
Ifyouneedtoaddadaterange, double-clicktheschoolouteventyou placedonthecalendar.TheEventEditor pop-upopens.
-Select Multi-Day.
- UsetheEventStartDateandEventEnd Dateboxestoupdatethedaterange.The EventStartDatedefaultstothedateon whichyouplacedtheeventoriginally.
- ClickOK. Theeventisaddedtothedates youspecified.
• Toremove SchoolOut days:
- Double-clicktheeventonthecalendar. TheEventEditoropens. Click Delete.
-Atthe AreYouSureprompt,clickDelete.
Children Attendance Centers
Claims
Menus Receipts
You can find all of these reports by clicking on Reports from the menu to the left and selecting the appropriate category.
ChildrenReports • ChildRoster:Thisreportlistsallchildrenfora selectedcenterorforallcenters.Itincludes F/R/Pcountsandpercentages,F/R/Pbasis,as wellasbasicdemographicinformationand enrollmentdatesforthelistedchildren.
• •
ChildRoster[CenterVersion]:Thisreportlists childrenforaselectedcenterorforallcenters. However,itdoesnotincludeinformation beyondbasicdemographicsandenrollment dates.
ChildListExport:ThisisaCSVlistofall children.Usethisreportwhenlookingfora reportonallergiesorspecialneeds.
IEFList:Thisreportsummarizesincome eligibilityforminformationsavedtochild recordsforaselectedclaimmonth.Itincludes householdinformationifsuchinformationwas savedtothechildprofile.Eachcenterincluded printsonanewpage.
ChildIEF/EnrollmentReport: Thisreportprints enrollmentand/orincomeeligibilityformsfor selectedchildren.Youmustselectacenter beforeyouprintthisreport.
VerifyFRPConsistentWithinFamily:This reportliststheFRPstatusofrelatedchildren enrolledintheselectedcenter.
ChildRacialCountSummary-PerCenter:This reportprovidesacountofchildrenbroken downbyraceandethnicityforaspecific center.
ChildrenClaimedWithoutAbsence:Thisreport listschildrenclaimedfortheselectedclaim monthwithoutanyabsences.
ChildrenNotClaimed:Thisreportlistsactive childrenwhowerenotclaimedforaselected claimmonth.Notethatthisreportdoesnot takeattendanceintoconsideration—itonly checkswhetheranactivechildwasclaimedfor thatmonth.
AttendanceReports WeeklyAttendance+MealCountReport: This reportlistsweeklyattendanceandmeal countsformultiplecenteroraspecificcenter
MonthlyClaimedAttendanceOnlyReport:This reportincludesclaimedattendanceforthe selectedclaimmonth.
MonthlyPaidAttendanceOnly:Thisreportlists paidattendanceforaselectedclaimmonth.It alsoincludesclassroomtotals.
MonthlyPaidMealCountsbyAgeGroup:This reportlistspaidmealcountsforaselected claimmonthbyagegroup.Italsoincludes totalsforeachagegroup.
MonthlyPaidMealCountsbyChild:Thisreport listspaidmealcountsforaselectedclaim monthbychild.Itincludestotalsfor Free/Reduced/Paidmeals,aswellasAtRisk Totals. •
MonthlyPaidMealCountSummary: This reportlistsallpaidmealsforaselectedclaim month.Itisbrokendownbymealtype.
WeeklyPaidAttendance+MealCounts:This reportlistsweeklyattendance,brokendownby attendanceandmeal.
ActualvsEstimateMealCountSummary: This reportcomparesactualmealcountswiththe estimatedmealcounts,brokendownbymeal.
DailyFRPReport: ThisreportprovidesaFree, Reduced,andPaidbreakdownofallmeals claimedeachdayintheselectedclaimmonth.
CenterReports CenterInfoReport:ThisPDFreportlists centersandcenterdetails.
• CenterEnrollmentStatistics:ThisisaCSVlist ofcentersthatincludesenrollmentstatistics brokendownbyFree/Reduced/Paid.Italso includesnumbersformissingenrollments,as wellastotalenrollment.
•
CentersDisallowanceExport:ThisisaCSVlist ofcenterswithdisallowancesfortheselected claimmonth.Itliststhecentername,disallow reason,andthetotalnumberofdisallowances forthatcenter.
CentersErrorSummaryExport: Thisreport providesasummaryoferrorsforyourcenters foraspecificclaimmonth.
CentersSummaryExport:ThisisaCSVlistof centersthatincludesanyassignedmonitors, numberofpendingchildren,expiring enrollmentsandenrollmentforms,andsoon.
ClaimsReports ClaimsListExport:ThisisaCSVlistofclaims andclaimdetails.
•
OfficeErrorReport:Thisreportprovidesaquick claimoverviewandlistsspecificerrorsthat occurredwhenprocessingtheclaim.This reportalsoprintsafteryouprocessclaims.For detailedinformationabouttheerrorsthatmay appearonthisreport,seeErrorCodes.
ClaimsRoster: Thisreportlistschildren, enrollmentinformation,FRPstatus,basis,and soon. •
• CenterErrorLetter: Thisreportprovidesaquick claimoverviewandlistscertainerrorsthat occurredwhenprocessingclaimsforaspecific center.
MonthlyMilkAuditSummary: Thisreport summarizesmilktotalsenteredviatheMilk Auditfeature.Youcanprintthisreportasa PDF,oryoucanexportittoaspreadsheetfile.
MenusReports • CenterMonthlyMenuPlan: Thisreportprints yourcenters'menuplansfortheselectedclaim month.
•
CenterWeeklyMenu/Non-Infants Only/InfantsOnly:Thisreportprintsasingle center'sweeklymenuplan.Youcanprintthis forasingleweekortheentiremonth.
•
MasterMonthlyMenuPlan/Non-Infants Only/InfantsOnly: Thisreportprintsmaster menusfortheselectedclaimmonth.
• MenuProductionRecord:Thisreportliststhe amountoffoodcentersneedtoserveand purchasetoadequatelyservechildrenintheir care.
•
MenuNotesReport:Thisreportprintsany notescentersenteredwhenrecordingmenus. Itisdividedintonon-infantnotesandinfant notes.
ReceiptReports • Non-ProfitStatusReport: Usethisreportto ensurethatcentersarerunninganon-profit foodservice.
•
CenterReceiptsJournalReport: Viewalistof allreceipts.Thisreportincludesvendor, description,andexpensesbrokendownby category.
•
MonthlyReceiptTotals:Viewalistofcenters thatsubmittedreceipts,thetotalnumberof receiptssubmittedbyeachcenter,andthe totalofeachexpensecategory.
•
ReceiptListExport: Exportreceiptdatatoa spreadsheetfile(XLSX).Usefilterstoselectthe exactdatayouneedtoexport.
Receipts ManageVendors
Manage&VerifyReceipts
QuickEntry
Itemizedentry
Manage Vendors Add&ManageVendors Vendorsaretypicallystoresfromwhichsitespurchasefood.Youcanalsoaddcenterstaffasvendorsto tracktheirlaborasreceipts.Youmustaddvendorsbeforeyoucanenterreceiptsforyoursites.
• • Fromthemenutotheleft,clickTools. SelectManageVendors.
-Toaddavendor: Click AddVendor. TheAddVendorpop-up opens.
-Clickthe Name boxandenterthevendor's name.
-Entertheremainingvendorinformation,as needed.Onlythe Name boxisrequired.
-Clickthe Centerdrop-downmenuandselect thecentertowhichtoapplythisvendor.All Centersisselectedbydefault. Click Save. -
•
•
•
• Todeleteaformulatype:
-Clickthetypetoremove.TheEditFormula Typepop-upopens.
Note:Eachvendoryouaddmustbeunique. KidKarewillnotifyyouifavendoralready exists.Updatethevendor'snametoproceed.
Toeditavendor:
- Clickthevendortoedit.TheEditVendor pop-upopens.
-Makechangestotheinformationhere,as needed.
-Whenfinished,clickSave.
Todeleteavendor:
- Clickthevendortodelete.TheEditVendor pop-upopens. ClickDelete. ThevendorissettoInactive.
-
Tore-activateavendor,click Reactivatecolumn. inthe
MergeVendors Vendorsmustbeunique.Youcanmergeduplicate vendorstosinglevendorrecordsforeaseof management.
•Fromthemenutotheleft,click Tools.
• Select MergeVendors.TheMergeVendorspage opens.
•
•
Inthe SourceVendorsection,selectthevendorto merge.
Inthe DestinationVendor section,selectthe mergedestination.
• Click Merge.
Scanthiscodetogotothe trainingsitetoviewvideos
Manage&VerifyReceipts AddItemizedReceipts YouwilluseItemizedEntrytoaddexpensesthatyou currentlyhavetoenterintotheOSDEFood PurchasingForm. Anyreceiptsthatarenotalready categorized,alongwithfoodprogramlabor,should beenteredhere.Whenyouuseitemizedentrytoadd expenses,youentereachitemonthereceiptin detail.Itemizedentriesincludetheitemcategory, amount,quantity,totalcost,andanoptional description.
Fromthemenutotheleft,clickAdministration. SelectManageVerifyReceipts.
ClicktheSelectCenterdrop-downmenuatthe topofthewindowandselectthecenteryouare enteringreceiptsfor.
ClickAddReceipt.TheAddReceiptspageopens. ClicktheItemizedEntrytab. Scanthiscodetogotothe
CompletetheExpenseDetailsection.
TheDate,Vendor,PaymentMethodandReceipt
Totalboxesarerequired.
WerecommendyoualsoenteraDescriptionfor reportingpurposes.
CompletetheReceiptDetailssection.
ClicktheSelectaCategorydrop-downmenuand selecttheexpensecategory.Allexpense categoriesexceptUnapprovedcounttowards reimbursementforthefoodprogram.
Entertheitemquantity.Youcanenteruptofour (4)decimalplaces.Thisboxdefaultsto1.
IfyouselectedaMilkcategory,youcanuse theGallonsConverter.
Click ortype+(plussign)inthe quantitybox.
Enterthenumberofpints,quarts,halfgallons,and/orouncesofmilkyou purchased. ClickSave.
Clickthe$boxandentertheitem'sunitprice.The systemautomaticallymultipliestheunitpriceby thequantityandprovidesatotal.Youcannot changethecalculatedtotal.
ClicktheDescriptionboxandenteradescription forthislineitem.Youcanenterupto255 characters.Thisboxisoptional.
Click toaddanotherline.
ClickSaveinthetop-rightcorner.Youcanalsoclick Save/AddAnothertosaveyourentryandbegin addinganotherone.
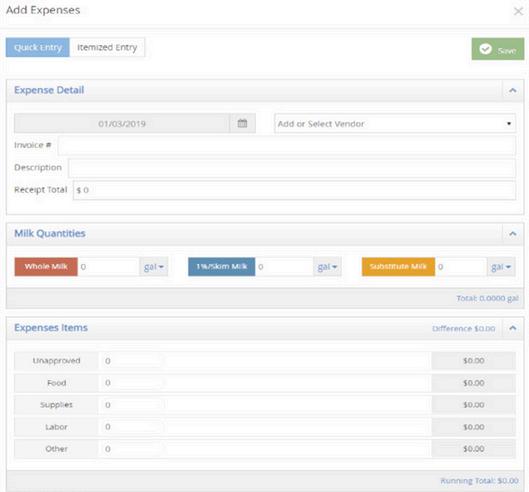
AddReceipts:QuickEntry YouwilluseQuickEntrytoaddexpensesthatyoucurrentlydo NOT havetoenterintotheFoodPurchasingForm.The categoryfieldscalculatethetotalforthecategorybytaking thesumofallnumbersenteredforthecategory.Therunning totalisthencomparedtothereceipttotal.
• Fromthemenutotheleft,click Administration.
Select ManageVerifyReceipts.
ClicktheSelectCenter drop-downmenuatthe topofthewindowandselectthecenterwith whichtowork.
•
•
• Click AddReceipt.TheAddReceiptspageopens.
Clickthe QuickEntry tab.
Completethe ExpenseDetailsection.
- The Date,Vendor,andReceiptTotalboxesare required.
Werecommendyoualsoentera Description forreportingpurposes.
Note:Youcannotsaveyourentryifthereceiptand runningtotaldonotmatch.Thereceiptandrunning totalmustalsobothbegreaterthanzero.Youmust alsocompleteallrequiredfieldsbeforesaving.
•
Enteryourmilkquantitiesingallons.Youcanalso usetheGallonsConverter:
Clickthe Gallinknexttothemilktype,ortype +(plussign)inthemilkquantitybox.
• Enterthenumberofpints,quarts,half-gallons, and/orouncesofmilkyoupurchased.
Click Save.Enteryourexpensesinthe ExpensesItems section.
- Clicktheboxnexttothecategorytorecord, andenterthedollaramount.Allexpense categoriesexceptUnapprovedcounttowards reimbursementforthefoodprogram.
Press Tabtoentermultiple,separatedollar amountsineachcategory.
Click X nexttoadollaramounttoremoveit.
- Type/(forwardslash)inaboxtopopulateit withtheremainingdifference.
Click Saveinthetop-rightcorner.Youcanalso clickSave/AddAnother tosaveyourentryand beginaddinganotherone.
VerifyReceipts Verifyingreceiptsallowsyoutotrackwhichsiteshave sentyoureceiptsandconfirmthedataiscorrect.
Eventhoughthisstepisoptional,werecommendyou completeitifyouallowsitestoentertheirown receipts.
• Fromthemenutotheleft,click Administration. Click ManageVerifyReceipts. TheManageVerify Receiptspageopens.
Usethedrop-downmenuandselectadaterange toview.Youcanchoosefromthefollowing:
Last90Days
Last60Days
Last30Days
CurrentMonth
PreviousMonth
CustomDate
Clickthelinkinthe Datecolumntoviewthereceipt details.TheEditExpensepop-upopens. Makeanychanges,asneeded.Whenfinished, click Save. Click Verify.
EnterFoodProgramLabor ToenterFoodProgramlaborandAdminlabor,youwill usetheItemizedEntrymethod. Watchthevideobelow forexamplesonhowtoenterlabor.
Note:YoucanclickVerifyAllfromtheManageVerify Receiptspagetoverifyallreceiptslistedfortheselected centerfortheselecteddaterange.Also,toremovereceipts youcannotverify,accesstheEditExpensepop-upandclick Delete.Deletingreceiptsispermanent.
MilkAudit ReviewMilk Audit MilkAuditforCenterSponsors •
• Fromthemenutotheleft,clickClaimsandselect Clickthe drop-downmenuatthe topofthepageandselectthecenterforwhichto viewtheMilkAudit.TheMilkAuditdisplays.
•
SelectCenter
Clickthe Monthboxandselecttheclaimmonthto view.
• Select Calculated+Actualstoviewmilk auditinformationbasedoncalculated andactualservedquantities.
PreviousMonthCarryOver/StartingBalance: Thismaybetheendingbalancefromthe previousmonth(dependingonyourspecific policysettings).Toeditstartingbalances, click ,enterthenewamount,andclick . MilkAudit.
Note:Thisoptionmaynotdisplayaccordingtoyour settings.Ifthisisthecase,thenumbersyouareviewing aretheCalculatednumbers.
Thefollowinginformationdisplaysinthetablefor theselectedmonth:
Note:Thisoptionmaynotbeavailableaccordingtothe preferencesyourstatehasset. Centersdonothavethe abilitytoedittheircarryoveramounts,onlysponsors.
•
-Purchased:Thisistheamountofmilk purchased,basedonreceiptdate.
-Required: Thisistheamountofmilkrequired basedonmenusandmealcounts.
-WrittenOff: Thisistheamountofmilkwritten offforthemonth.Forexample,thisnumber accountsforcasesinwhichthemilkwas spilled,spoiled,andsoon.
-EndofMonthBalance:Thisistheamountof milkleftoverattheendofthemonth.
-ActualServed: Thisistheactualtotalofmilk servedduringtheselectedmonthbasedon mealrecords.Thisrowonlydisplaysifyou select Calculated+ActualinStep4.
ActualEndofMonthBalance:Thisisthe actualendofmonthbalancebasedonthe followingformula:CarryOver+PurchasedWrittenOffActualServed.Thisrowonly displaysifyouselectCalculated+Actualin Step7.
Click Printandchooseareporttoprint.Youcan choose SummaryReportor DetailedReport.Both reportsdownloadasPDFs.
UsingtheDailyCalendar UsetheDailyCalendartoviewand/oradd milkevents,suchaspurchasesorwrite offs.
ClickShowDailyCalendar. TheDailyCalendar displaysatthebottomofthewindow.The Calculatedversionisshowninthefigurebelow.
• Toaddawriteoff:
Clickthedrop-downmenuandselectthemilk type.Youcanchoosefrom Whole,1%/Skim,or Substitute.
- Inthe DraggableEvents section,clickthe WriteOffeventanddragittothe calendar. Dropitonthedayonwhichtoapplyit. TheMilkWriteOffpop-upopens.
Note:Adaycanonlyhaveonewriteoffeventatatime. YoucannotchangethedateintheMilkWriteOffpop-up. Ifyouareasponsoredcenter,yourfoodprogramsponsor mustenablethisfeature.
Dropitonthedayonwhichtoapplyit.The AddExpensespop-upopens.
Clickthetextboxandentertheamountof milkyouarewritingoff.
Clickthecorrespondingdrop-downmenu andselect Gallons,Pints,orQuarts. Allunits ofmeasureareconve!rtedtogallonsonceyou save. Click Save.
Toaddapurchase:
◦ IntheDraggableEventssection,clickthe Purchaseeventanddragittothe calendar. ◦ ◦ Select QuickEntry or ItemizedEntry. Enteryourmilkquantities.
Note:YoumusthavetheVendor/Receiptspermission enabledonyouraccounttoaccessandworkwith Purchaseevents.Ifyouareasponsoredcenter,yourfood programsponsormustenablethisfeature.
ClickSave.
- Toeditanevent:
◦
Clicktheeventtoedit.Apop-upopens. Enternewinformationovertheexisting information.Notethatyoucannotchange theeventdate.
Click Save. ◦
Toremoveanevent:
◦ ClicktheXintherightcornerofthe eventbanner.
Respondtotheconfirmationprompt.
•
AdditionalCalendar Items • Thefollowingitemsalsodisplayonthecalendar:
•Required:Requiredamountsdisplayforeachday whereancalculatedorcalculated+actual calculationispresent.Youcannotadd,move,or removethesemarkers.
• MilkShortage(Calculated): Thisicondisplays oneachdayforwhichthedailyendingbalance valueiscalculatedtobenegative.Clickthisicon toviewtheanticipatedshortageamount.
MilkShortage(Actual): Thisicondisplayson eachdayforwhichthedailyendingbalance basedonthecalculatedvaluesisnegative.Click thisicontoviewtheactualshortageamount.
ShortageAnalysis:Thissectiondisplaysthe calculatedtotalamountofgallonsyouareshort bydayorbyclaim.Thisisdeterminedbyhow yoursystemissetup.Forsponsoredcenters,your foodprogramsponsormakesthisdistinction.If youselectedCalculated+Actualatthetopofthe page,theactualshortagesdisplayaswell.
Scanthiscodetogotothe trainingsitetoviewvideos
PreparetoProcessClaims
TrackReceivedClaims
Process&ReprocessClaims
SubmitClaimstoState
Review&ManageClaims
PreparetoProcessClaims ChangetheClaimMonth KidKaretracksclaimmonth-specificinformationindependentofyourcomputer’sdate.Thisshouldbe themonthimmediatelybeforethecalendarmonth(inmostcases)andistheclaimmonthonwhich youareworking.
Onlyonepersonneedstoadvancetheclaimmonthforeachaccount.Oncethemonthhasbeen changedintheaccount,otherusersmustlogoutandlogbackintothesoftwarebeforetheyseethe change.
•Fromthemenutotheleft,clickClaims.
•Select AdvanceClaimMonth.TheAdvance ClaimMonthpageopens.
• Tochangeyourcurrentclaimmonth:
Click click toadvancetheclaimmonth,and tomovetheclaimmonthback.
Note: Enrollmentexpirationdatesensurethatchildren whoaren'tre-enrolledarenotreimbursedmorethanone yearaftertheirdateofenrollment(subjecttopolicyD.1). However,childrenremainactiveevenoncetheir enrollmentexpires,unlessyouwithdrawtheminthe ManageChildinformationwindow.Checkingthe AutomaticallyWithdrawExpiredEnrollmentsboxwhen changingtheclaimmonthautomaticallymarkschildren withexpiredenrollmentaswithdrawn.
• • Click Save. Checkthe AutomaticallyWithdrawExpired Enrollments optiontomarkallchildrenwith expiredenrollmentsaswithdrawnasoftheir enrollmentexpirationdate
ActivatePending Children Whencentersenrollchildren,thechildren areautomaticallysettoPendingstatus. Sponsorsmustthenreviewandactivate thesechildren.Therearetwowaystoenter categoricaleligibility(FRPrates)and activatechildren:Oneatatimeormultiple atatime.
ActivatingMultiple ChildrenataTime •
• Fromthemenutotheleft,click Activate Children.
Usethe FindRecordssectiontofilterthe recordsthatdisplay.
- ChoosewhethertoactivatechildrenforAll ActiveCentersortheSelectedCenter. If youchoosetheSelectedCenteroption,click theSelectCenterdrop-downmenuatthe topofthispageandselectthecenter.
•
-ClicktheExcludeChildrenifEnrollment Finalizeddrop-downmenu,selectBeforeor After,andthenselectadateinthe correspondingdatefield.
-Checkthe IncludeWithdrawnChildrenWho WereNeverActivated boxtoinclude withdrawnchildrenwhowerenever activated. Click Gotoapplyyourfilters.
Checktheboxnexttoeachchildtoactivate. Youcanalsochecktheboxinthetableheader toselectalldisplayedchildren.Double-check yourselectionsbeforeproceeding,asthis actioncannotbeundone.
• Click Activate.
ActivatingChildren OneataTime •
• Fromthemenutotheleft,click Activate Children.
Usethe FindRecords sectiontofilterthe recordsthatdisplay.
- Choosewhethertoactivatechildrenfor All ActiveCenters orthe SelectedCenter. If youchoosetheSelectedCenteroption, clicktheSelectCenterdrop-downmenuat thetopofthispageandselectthecenter.
-Clickthe ExcludeChildrenifEnrollment Finalizeddrop-downmenu,select Before orAfter,andthenselectadateinthe correspondingdatefield.
-
-ChecktheIncludeWithdrawnChildren WhoWereNeverActivatedboxtoinclude withdrawnchildrenwhowerenever activated. Click Gotoapplyyourfilters.
• • Clickachild'snametoaccessthe Manage ChildInformation page.
Reviewthechild'sinformationandselect Activeatthetopofthispage.Yourchanges aresavedautomatically.
TrackReceived Claims TheTrackReceivedClaimsfeatureallowsyoutoseewhichcentershavesubmitted claimsforprocessing.Youcanprintorexportthisinformationandusetheresulting datatocontactcenterswhoarenotclaimingandactaccordingly.
•Fromthemenutotheleft,click Claimsand select TrackReceivedClaims. TheTrack ReceivedClaimspageopens.
•Inthe FindRecords section,clickthe Claim Months drop-downmenuandselecttheclaim month(s)toview.
•
Clickthe NotReceived tab.Centerswhohave notsubmittedclaimsfortheselectedmonth(s) displayinthistab.Youcanalsoseewhether attendancewasrecorded,mealswere recorded,andthelastmonthinwhichyou processedaclaimforthelistedcenters.
• Printorexportthereport:
- Click Printtosendthereporttoyourprinter.
Whatifthecenter doesn’tsubmittheir claim?
Ifacenterdoesnotsubmittheirclaim, thesponsorcanmarkitassubmittedon thecentersbehalftobeingprocessing.
•
• • Fromthemenutotheleft,clickClaimsand selectMarkCenter’sClaimforProcessing.The pageopens.
Selectthecenterthatneedstobesubmittedin thetoprightcorner.
Choosetheclaimmonth.Someclaimdata populatesforthemonthselected.Reviewthis dataforaccuracypriortomovingontothenext step.
•
• ClickSubmit. Ifan InconsistentClaimInfo boxpopsup, reviewthe Numberordayswithchildren claimed and Numberofdayswithmenus again.Thesenumbersmightbedifferentifa menuwasenteredbutthecenterwasclosedfor aholidayorothervariousreasons.Ifthese numbersarecorrect,click YEStocontinue submitting. Scanthiscodetogotothe trainingsitetoviewvideos
Process& ReprocessClaims Onceasitesubmitsaclaim,processitinKidKare.Whenaclaimisprocessed,KidKare looksatthedataenteredintotheprogramandensuresthatitmeetsCACFPrequirements.
BeforeYouBegin Beforeyoubeginprocessingclaims,makesurethat:
•
• Centerdataisaccurate.
•
Pendingchildrenhavebeenactivated(ifthe signedenrollmentformhasbeenreceived). Receiptshavebeenenteredandverified.
Schooloutdayshavebeenenteredontheschool calendar(ifapplicable).
• Itisokayifthesetasksarenotcompleteby processingtime,aserrorsdisplayforany disallowancesoncetheclaimisprocessed. However,youwillsavetimebyensuringthatalldata isenteredandaccuratebeforeyouprocessclaims.
ProcessingClaims •
Fromthemenutotheleft,clickClaimsandselect ProcessClaims.The ProcessClaims pageopens.If youdonotoperateinmultiplestates,goto Step3.
Clickthe Statedrop-downmenuandselectthe stateforwhichtoprocessclaims.Youcanselect multiplestates,oryoucanselect All.
Clickthe ClaimMonthdrop-downmenuandselect thecorrectclaimmonth.
Clickthe ProcessingActions drop-downmenuand select ProcessNewClaims.
Cleartheboxnexttoeachclaimyoudonotneedto process.Allclaimsareselectedbydefault.
ClickProcess.or,toprinttheOER,clickthedown arrownexttoProcessandselect ProcessandPrint OER.
ReviewErrors RevieweacherrorontheOER.Eacherrorresultseither inanAllow/WarnorDisallowmessage.Errorsresulting inadisallowancearedeductedfromthe reimbursement.Errorsresultinginawarningare notificationmessagesthatdonotdeductfromthe reimbursementbutneedtoberesearched.Ifthereare noclaimerrors,aCongratulationsmessagedisplays.
Youcancorrectsomeerrorsandre-processthe claim.
Re-processingClaims •
Fromthemenutotheleft,clickClaimsandselect ProcessClaims.TheProcessClaimspageopens.If youdonotoperateinmultiplestates,goto Step3.
•Clickthe Statedrop-downmenuandselectthe stateforwhichtoprocessclaims.Youcanselect multiplestates,oryoucanselectAll.
•Clickthe ClaimMonth drop-downmenuandselect thecorrectclaimmonth.
•Clickthe ProcessingActions drop-downmenuand select ReprocessExistingClaims.
WhentoRe-ProcessClaims Re-processingclaimsissometimesnecessaryifyou processaclaim,butsomepieceofinformationwas incorrectwhentheclaimwasprocessedinitially.
•Fromthemenutotheleft,click Claimsandselect
•Clickthe State drop-downmenuandselectthe stateforwhichtoprocessclaims.Youcanselect multiplestates,oryoucanselect All.
•Clickthe ClaimMonth drop-downmenuand selectthecorrectclaimmonth.
•Clickthe ProcessingActionsdrop-downmenu andselectReprocessExistingClaims.
•
ClickProcess.or,toprinttheOER,clickthedown arrownexttoProcessandselectProcessandPrint OER.
• ProcessClaims. TheProcessClaimspageopens. Ifyoudonotoperateinmultiplestates,gotoStep 3.
Click Process.or,toprinttheOER,clickthedown arrownexttoProcessandselectProcessand Print OER.
Sendclaimsbackto centertofixerrors Ifacentersubmitstheirclaimbutneedstoedititfor somereason,youcanunsubmittheclaimforthat center.
Ifthecenterclaimhas NOTbeenprocessed,followthe stepsbelow:
•Fromthemenutotheleft,clickClaims.
•Select Un-SubmitCenterClaims. TheUn-Submit CenterClaimspageopens.
•Selecttheclaimmonthfortheclaimthatneedsto besentbacktothecenter,clickGO.
•
Checktheboxnexttothecenterforwhichto un-submitclaims.
•Click Unsubmit. Thecentercannowaccessand edittheirclaimagain.Thecentermustsubmittheir claimagainoncetheyaredonemakingchanges.
IfthecenterclaimHASalreadybeenprocessedfollow thestepsbelow:
•Fromthemenutotheleft,click Claims.
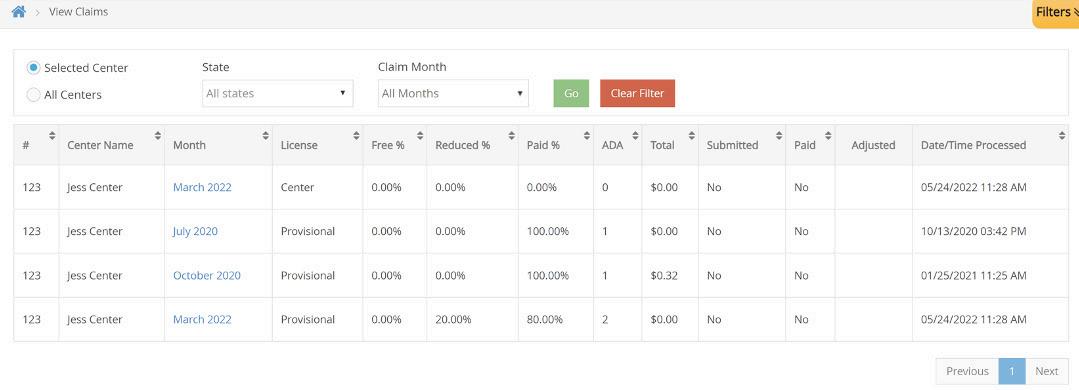
•Select ListClaims. TheViewClaimspageopens.
•Setfiltersfortheclaimstoview:
- SelecttheAllCentersoptionortheSelected Centeroption.IfyouchooseSelectedCenter,you mustselectacenteratthetopofthepage.
-Ifyouoperateinmultiplestates,clickthe State drop-downmenuandselectthestate(s)toview. Youcanalsoselect AllStates.
-Clickthe ClaimMonthdrop-downmenuand selecttheclaimmonthtoview.Youcanalso selectAllMonths.
Click Go.
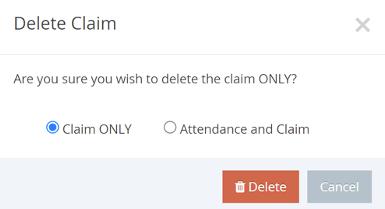
Clickthelinkinthe Monthcolumntoopenthe ClaimDetailspagefortheclaimtoun-submit. Click Delete.
At the confirmation prompt, choose Claim ONLY optionandthenclickDelete.
Next,click Tools fromthemenutotheleftand select Un-SubmitCenterClaims.TheUn-submit CenterClaimspageopens.
Checktheboxnexttothecenterforwhichto un-submitclaims.
Click Unsubmit.Thecentercannowaccessand edittheirclaimagain.Thecentermustsubmit theirclaimagainoncetheyaredonemaking changes.
PrintingtheOERfrom theReportsMenu From the menu to the left, click Reports. Click the SelectaCategorydrop-downmenuand select Claims.
PrintingtheOERfrom theClaimDetailsPage •
Clickthe SelectaReportdrop-downmenuand select OfficeErrorReport.
ClicktheMonthboxandselectthemonthforwhich toprintthereport.
Clickthe SelectCenter drop-downmenuand selectthecenterforwhichtoprinttheOER.Youcan alsoselect AllActiveCenters toprinttheOERforall currentlyactivecenters.
Click Run. TheOERdownloadsasaPDF.
•
Fromthemenutotheleft,click Claims.Select ListClaims. TheViewClaimspageopens.Set filtersfortheclaimstoview:
SelecttheAllCentersoptionorthe SelectedCenter option.Ifyouchoose SelectedCenter,youmust selectacenteratthetopofthepage.
-Ifyouoperateinmultiplestates,clickthe State drop-downmenuandselectthestate(s)to view.Youcanalsoselect AllStates.
-ClicktheClaimMonthdrop-downmenuand selecttheclaimmonthtoview.Youcanalso select AllMonths.
ClickGo.
ClickthelinkintheMonthcolumntoopenthe ClaimDetailspagefortheclaimtoview.
ClicktheClaimActionsdrop-downmenuand selectOfficeErrorReport.TheOERdownloadsasa PDF
Review& ManageClaims ViewCenterClaims Once you have created claims in KidKare via the Process Claims function or by manually entering claims, they are added to the View Claims page. Access this page to review, manage,andupdateclaimsasneeded.
ViewtheClaimsList •
•
•
Fromthemenutotheleft,click Claims. Select ListClaims. TheViewClaimspageopens.
Setfiltersfortheclaimstoview:
- SelecttheAllCentersoptionortheSelected Centeroption.IfyouchooseSelectedCenter, youmustselectacenteratthetopofthe page.
-Ifyouoperateinmultiplestates,clickthe Statedrop-downmenuandselectthe state(s)toview.YoucanalsoselectAllStates.
•
Click Go.Claimsmatchingthefiltersyouset display.
• -ClicktheClaimMonthdrop-downmenuand selecttheclaimmonthtoview.Youcanalso selectAllMonths.
Youcandothefollowinginthiswindow:
-Clickthelinkinthe Monthcolumntoview claimdetails.
-Clickeachcolumnheadertosortinformation inascendingordescendingorder.
-ClickFilterstocustomizethecolumns displayedonthispage.
UnderstandSpecificColumns intheListClaimsWindow Thefollowingisadefinitionofspecificcolumns foundontheViewClaimspage:
•#:Thiscolumndisplaysthenumberassignedto thecenterwhosubmittedtheclaim.
•CenterName:Thiscolumndisplaysthenameof thecenterwhosubmittedtheclaim.Month:This columndisplaystheclaimmonthforwhichthe claimwassubmitted.
•License: Thiscolumndisplaysthecenter'slicense forwhichtheclaimwassubmitted.
•Details: ClickViewinthiscolumntoviewclaim details.
•Free%/Reduced%/Paid%:Thesecolumnsindicate thepercentageofchildrenontheclaimwhoare reimbursedatFree,Reduced,orPaidrates.
•ADA: Thiscolumnliststheaveragedaily attendancereportedontheclaim.
•Total:Thiscolumnliststhetotaldollaramountof theclaim.
Submitted: Thiscolumnindicateswhetherornot you 'vemarkedthisclaimassubmittedtothe state.
Paid: Thiscolumnindicateswhetherthelisted claimhasbeenpaid.
Adjusted:Thiscolumnindicateswhetheryou've madeanyadjustmentstothisclaim.
ViewClaimDetails TheClaimDetailswindowdisplaysdetailed informationaboutclaimsyouhaveprocessed.This includestheclaimsource,totals,andrates.Youcan alsoreprocessclaims,printtheOfficeErrorReport, andadjustclaimcountsinthiswindow.
•
• Fromthemenutotheleft,click Claims.Select ListClaims. TheViewClaimspageopens.Set filtersfortheclaimstoview: - AllCenters Selected
Selectthe Centeroption.IfyouchooseSelectedCenter, youmustselectacenteratthetopofthe page. optionorthe
-Ifyouoperateinmultiplestates,clickthe Statedrop-downmenuandselectthe state(s)toview.YoucanalsoselectAll States.
-Clickthe ClaimMonthdrop-downmenu andselecttheclaimmonthtoview.Youcan alsoselectAllMonths.
Click Go. Claimsmatchingthefiltersyouset display.
DeleteClaims Typically,whenyoudeleteaclaimitistheresultofa dataentryerror.Iftheclaimyouneedtoremovehas notyetbeensubmittedtothestate,youcan completelydeletetheclaimfromyoursystem.
WAIT: Hasthisclaimbeensubmittedand/orpaid?Ifso, donotdeleteit.Youmustzerotheclaimamounts, instead. •
Clickthelinkinthe Monthcolumntoopenthe ClaimDetailspagefortheclaimtoview.
Youcandothefollowinginthiswindow:
-Reprocesstheclaim. -Deletetheclaim.
-Adjustclaimcounts.
- PrinttheOfficeErrorReport.
-ViewtheClaimSummary,ClaimStatus, ClaimTotals,theClaimErrorList.
Fromthemenutotheleft,click Claims.
Select ListClaims.TheViewClaimspageopens.
Setfiltersfortheclaimstoview:
- Selectthe AllCentersoptionortheSelected Centeroption.IfyouchooseSelected Center,youmustselectacenteratthetop ofthepage.
-Ifyouoperateinmultiplestates,clickthe Statedrop-downmenuandselectthe state(s)toview.YoucanalsoselectAll States.
-Clickthe ClaimMonthdrop-downmenu andselecttheclaimmonthtoview.Youcan alsoselectAllMonths. Click Go.
•
•
•
• Click Clickthelinkinthe Monthcolumntoopenthe ClaimDetailspagefortheclaimtoun-submit Click Delete. Attheconfirmationprompt,choose Claim optionortheAttendanceandClaim ONLY option. Delete.
Scanthiscodetogotothe trainingsitetoviewvideos
SubmitClaimstotheState Afterclaimsareprocessedandreprocessedasneeded,andtheclaimsareready tobesubmitted,youwillgenerateanuploadfiletoenterintotheCNPsite.Note:
KidKaredoesnotautomaticallyputyourdataintoCNP,youwillrunareportin KidKareandentertheclaimsdataintothestatesite.
GeneratingClaimReports Toaccesstheuploadfileand/ortoviewclaim reports:
•Fromthemenutotheleft,clickClaims.
•Select SubmitClaimstoState.TheSubmit ClaimstoStatepageopens.
•Ensurethatthecorrectclaimmonthis selected.
• Ontherightsideofthescreen,clickthe Reportsdropdownandselect CenterClaim Totals togenerateasinglefilecontainingall dataneededtoenterclaimsintotheCNP site.
Scanthiscodetogotothe trainingsitetoviewvideos
MarkingClaims asSubmitted Whenyouhavefiledaclaimorareabouttofile aclaimwithyourstateagency,marktheclaim assubmittedinKidKare.Whenyoumarkclaims assubmitted,allprocessedclaimsarebundled togetherinasubmissionbatchwiththecurrent date.Ifyoulaterneedtoadjustanyofthese claims,orifanyclaimscomeinlate,those claimsarekeptinaseparatesubmissionbatch. Thisway,youcaneasilyseparateyouroriginal claimfromanyamendedclaimssubmittedto thestateagency.Thisishelpfulforaudits.To markclaimsassubmitted:
• Click MarkasSubmitted. Once you mark a claim as submitted, all claim records associated with the claim are locked. Any changes made to the claim after you mark it as submitted are considered adjustments.
•
•
• Fromthemenutotheleft,click Claims. Select SubmitClaimstoState. TheSubmit ClaimstoStatepageopens. Ensurethatthecorrectclaimmonthis selected.
•
ClicktheSubmissionBatch drop-downmenu andselect NotYetSubmitted.
eFormsforSponsors AbouteForms
AddaSignatureforeForms eFormsSettingsforCenterSponsors
EnableSNAPValidationforeForms
EnableCentersforeForms
CustomizeeFormsEmailTemplates
SendRenewalInvitationswitheForms
SendNewEnrollmentswitheForms
VieweFormInvitationStatuses
Approve&RenewEnrollmentwitheForms
PrintCompletedeFormdRecords
About eForms eFormsisanall-in-oneenrollmentprocessforthefoodprogramthateliminatespaper formsforcentersandyourback-office.Withthisfeature,youcansendenrollment invitationsdirectlytoparents,trackenrollmentstatus,andapproveandrenewchild enrollmentwithasingleclick
•
• • AddaSignaturetoKidKare:Eachformyou approveandrenewthrougheFormsrequires yoursignature.Beforeyouapproveandrenew forms,addyoursignaturetoKidKare.
AdjusteFormsSettings: Whenyouallowyour centerstouseeFormsforenrollments,youcan furthercustomizetheactionstheycantake.For example,youcanspecifythatyourcenters mustreviewandapproveenrollmentsbefore formsaresenttoyouforfinal approval/renewal.Thesesettingsarelocated ontheSettingspageinKidKare.
EnableCentersforeForms: Givecenters accesstotheeFormsfeature.Centersremain enableduntilyoudisablethem.
• Send Invitations: Send invitations to parents/centers to update child enrollment forms. Use filters to select the centers/children to which to send invitations. Parents with an email address on file automatically receive an email that invites them to update child enrollment and/or income eligibility information online.
•
Centers:Centerscanviewalistofallsent invitations,whichallowsthemtofollow-upwith parents,haveparentsupdateenrollments onlineusingadeviceatthecenter,cancel invitations(ifneeded),orevenfilloutpaper forms(centerscanthenmarktheformas completedon-site).Dependingonyour settings,centersmustapproveeach enrollmentbeforesponsorscanrenewit.
• ViewInvitationStatus: Youcanseehowmany newenrollmentformsand/orincomeeligibility formshavebeencompleted,started(butnot finished),canceled,andsoon.TheeForms featureprovidesanoverviewofallstatuses acrossallcenterswhousetheeFormsfeature.
Approve&Renew:Oncetheenrollmentsare complete,reviewthembycomparingtheold formstothenewforms.Youcanalsoview parentsignatures.Onceyou'vereviewedthe data,updatetheinformationinKidKarewiththe clickofabutton.
AddaSignature foreForms EachformyouapproveandrenewthrougheFormsrequiresyoursignature.
Beforeyouapproveandrenewforms,addyoursignaturetoKidKareinthe
AddSignaturepopup.Todoso:
•
• • ClickWelcomeinthetop-rightcorner,and selectAddSignature.
ClicktheTypeSignatureboxandtypeyour name.
Usingyourmouse,finger,orstylus,signthe E-Signaturebox.
• Click Accept&Sign.
eFormsSettings forCenterSponsors WhenyouallowyourcenterstouseeFormsforenrollments,youcanfurthercustomize theactionstheycantake.ThesesettingsarelocatedontheSettingspage.
•
•
Click .TheSettingspageopens.
Inthe CenterAccess section,set eFormsto Yes toallowyourcenterstoaccesseFormsin KidKare.Ifyouneedtocustomizethis permissionforspecificcenters,youcandoso ontheEnableCenterspage.Formore information,see EnableCenters.
• IntheeFormsSettingssection,click next toeachoptiontoenableit.Youcanchange settingsforthefollowing:
Wouldyouliketorequiresitestoapprove enrollmentforms?
Wouldyouliketorequiresitestoapprove enrollmentforms?
Wouldyouliketorequiresitestoapprove incomeeligibilityforms?Whocansendnew enrollmentrequests?
Aresitesallowedtosendnewenrollment requeststoparents?
Ifaparentcompletesinfantfeedingdetails, doyouwanttoindicatethattheinfantform isonfileforthechild?
Ifaparentindicatestheyparticipatein SNAP,wouldyouliketorequirethemto providetheirSNAPnumberforvalidation?
WouldyouliketorequireSNAP/TANFnumber validationforparentstosubmittheirforms?
◦ SelectDisallowforthisoptiontoensure thecorrectnumbersareentered.
Note:Ifyourequireyoursitestoapproveeitherform type,ensurethattheyaddasignaturetoKidKare. Directthemto thishelparticleforinstructions.Ifyou select"SITE"underthefirsttwoapprovalsettings,the sponsorwillnotbeabletoapproveorrenewany eForms.Ifyouselect "SPONSOR"underthefirsttwo approvalsettings,thesitewillnotbeabletoapprove orrenewanyeForms.Usetheoption "BOTH"inorder toallowthesitesand/orsponsortomakefinal approvalsoneForms.
•Yourchangesaresavedautomatically.
Note:Youcanonlychangetheapprovaldropdown optionsineFormssettingsiftherearenocurrent eFormspending.IfthereareeFormspending,those mustbeapprovedorcancelledinordertoadjust thesesettings.
Scanthiscodetogotothe trainingsitetoviewvideos
EnableSNAP ValidationforeForms YoucanrequirethatSNAP/TANFnumbersbevalidatedbeforeparentscansubmittheir forms.ValidationensuresthattheparentprovidedacorrectlyformattedSNAP/TANF numberwhencompletingincomeeligibilityinformation.
Whenyouenablethisfeature,youcanalsospecifywhethertheparentiswarnedand abletosubmittheirformsorwhetherparentscannotcontinuecompletingtheirforms untilthenumberisformattedcorrectly.
Todoso:
•
• Click .TheSettingspageopens.
IntheeFormsSettingssection,click nextto WouldyouliketorequireSNAP/TANF numbervalidationforparentstosubmittheir forms?ThisenablesSNAP/TANFvalidation.
• Next,specifywhattodowhenaparentinputs aninvalidSNAP/TANFnumber:
- SetthistoDisallow:Theparentwillreceive amessageadvisingthemthattheprovided SNAP/TANFnumberisinvalid,andtheywill beunabletocompleteandsubmittheform untiltheycorrectit
EnableCentersforeForms Ifyouhavenotdonesoalready,accesstheSettingspageandensurethateForms isenabledintheCenterAccesssection.
•
Fromthemenutotheleft,click eForms. Click EnableCenters.
UsetheCenterandStatusboxestofilterthe centersthatdisplay.
Click inthe Statuscolumntoenableor disableeFormsstatusforthelistedcenter.
• Click ReviewChanges. Ensurethatyourchangesarecorrect. Click Save.
CustomizeeForms EmailTemplates Customizetheemailsparent/guardiansreceivewhenyousendenrollmentinvitations, sendformsbackforrevision,andapproveenrollments.Youcanalsocustomizethe ThankYouemailsentwhentheparentsubmitstheirinformationtoyouoryourcenter.
•
•
• • Fromthemenutotheleft,click eForms.Click Send Invitations.TheSendInvitationspage opens.
Click EditEmail.TheInitialInvitationTemplate pageopensbydefault.
Clickthedrop-downmenuatthetopofthepage andselectthetemplatetoedit.Forexample, select ThankYouforYourSubmissionTemplate toedittheautomatedemailparents/guardians receiveuponformsubmission.
•Click Editinthebottom-rightcorner.TheRich TextEditor(RTE)opens.YoucanedittheSubject, From,and Messagefields.
•Variablesyoucanusearelistedatthebottomof theeditor.Tousethisvariables,clickinthe messageandtypethevariableexactlyasit appears.Thesewillpopulateuser-specific informationinthemessagewhenitissent.For example,#ParentName#willdisplayasJohn SmithifthisemailissenttoJohnSmith.
•Click AddAttachmenttoaddanattachmentto thismessage. Whenfinished,click Save.
•
SendRenewal InvitationswitheForms •
•
• Fromthemenutotheleft,click eForms.
Click SendInvitations.
Setfiltersforthecenters/childrentoinclude.
-Clickthe Statedrop-downmenuandselect thestate(s)toview.Thisoptionisonly availableifyouaresetupformultiplestates.
-Clickthe Centersdrop-downmenuandselect thespecificcenter(s)toview.
-Clickthe ChildExpiredandExpiringWithin drop-downmenuandselect30Days,60Days, 90Days,orCustomDate.IfyouselectCustom Date,setadaterangeinthe From/To boxes.
- Click nexttoHideInvitationsThatAre CurrentlyOpen tohideopeninvitations.This issettoNobydefault.
-Inthe WhatFormsWouldYouLiketoSee section,clickelectEnrollment,IncomeForm, orboth.
- ClickGo.
•
Checktheboxnexttothechild/centertowhichto sendaninvitation.Youcanalsochecktheboxat thetopofthecolumntoselectalldisplayed records.
• Click emailaddressareemaileddirectly. andselectAll,EF,orIEF.Parentswithan displays nexttochildrenforwhomthereisnoemail addressonfile.
SendNewEnrollments witheForms Sendingenrollmentformstonewparticipantscanbecompletedatthesponsorlevel,oratthe sitelevelaslongpermissionsareset.Notethatthesearethesamestepsacenterwouldfollowtosend anenrollmentformtoanewparticipant.
•
•
•
• • Fromthemenutotheleft,click ObserverMode. SelecttheCenterinwhichyouarewantingto enrollthenewparticipant.
Fromthemenutotheleft,click Children.
Click ListChildren.
Click andselect SendeForms.Notethatthe Addbuttondefaultstothisselectionuponpage revisit.
• Completethe ParticipantDetailssection.
-
-Clickthe FirstName andLastNameboxesand entertheparticipant'sfirstandlastname. Clickthe BirthDate boxandenterthe participant'sbirthdate.
-Clickthe Classroomdrop-downmenuandselect theclassroomtowhichtoassigntheparticipant. Youcanselect Unassignedtoassignthe participanttoaclassroomlater.Youcanalso click toaddanewclassroom.
-Ifyouneedtoenrollasiblingatthesametime, click AddParticipant. RepeatSteps3a-3c for theadditionalchild.Youcanaddasmany siblings,asneeded.Addingchildrenthisway ensuresthattheparentonlyneedstocomplete oneincomeeligibilityformforthehousehold.
• Completethe GuardianDetails section.
- Click Existingtoselectanexisting parent/guardian.Then,selectthecontact. Click Newtoaddanewparent/guardianand entertheirinformation.
NextSteps •
Click SendInvitation.
WhatDoIDoiftheGuardianDoes NotHaveanEmailAddress? Iftheguardiandoesnothaveanemailaddress,they cancompletetheformon-site.
•Fromthemenutotheleft,click eForms.
•
• Click ViewStatus. Locatetheappropriaterecord.Forinstructions,see ViewStatus. Ifyouareasponsoredcenter,see Work witheFormsforSponsoredCenters.
•Click inthecolumntothefarright.Thisopensthe formonthedeviceyouareusing.
•Havetheguardiancompleteandsigntheform.
Onceparentscompletethenecessaryenrollment andincomeeligibilityforms,youmustapproveand renewparticipantsonthe Approve&Renewpage. Formoreinformation,seeApprove&Renew.Youcan alsomonitorenrollmentstatusonthe ViewStatus page.Formoreinformation,seeViewStatus.
Scanthiscodetogotothe trainingsitetoviewvideos
VieweForm InvitationStatuses TheViewStatuspageprovidesanoverviewofyourcenters'invitation statuses.Youcanseehowmanyinvitationshavebeensent,howmany arecomplete,andsoon.
•
• Fromthemenutotheleft,click Click ViewStatus -Setfiltersfortheinformationtoview.
◦ Click Go. -Clickeachcolumntosortinformationin ascendingordescendingorder. eForms.
◦ Clickthe Statedrop-downmenuandselect thestate(s)toview.Thisoptionisonly availableifyouaresetupformultiple states.
◦ Clickthe Centersdrop-downmenuandselect thespecificcenter(s)toview.
◦
◦ SelectEF,IEF,orboth.
Clickthe InvitationSentDate drop-down menuandselect30Days,60Days,90Days,or CustomDate.IfyouselectCustomDate,seta daterangeinthe From/Toboxes.
-Clickacenternametoviewthatcenterin ObserverMode.
- Click nexttoExportandVieworAllto exporteFormsstatusinformation.
◦ ExportView:Thisexportstheinformation displayedontheViewStatuspage.
◦ ExportAll:Thisexportscomplete invitationstatusdetails.
OnceyouhaveinvitationsintheSubmitted status,youcanapproveandrenewthem.For moreinformation,see ApproveandRenew.
Click Filtersinthetop-rightcornertochoose which columns to display. You can also filter by access to the eForms feature. Possible columns include:
•NameNumber
• •TotalSent State
•
•
• Renewed Canceled CustomizingtheView StatusPage
• NotStarted InProgress NeedsApproval
•Submitted
SponsorApproved
• •ManuallyCompleted
•
InvitationStatuses DEFINITION STATUS NotStarted
InProgress
NeedsApproval
Submitted Sponsor Approved
Manually Completed
Renewed
Canceled
Theparentshavenotstartedfillingouttheformyet.
Theparentshavestartedfillingouttheform,buthavenotyetfinished.
Theformneedstobeapproved(byyouorthecenter).
Theparentorthecenterhassubmittedtheformtoyou.
Youhaveapprovedtheforms.
Theparentcompletedapaperform.
Youhaveupdatedthesystemwiththenewdate.
Theinvitationwascanceled.
Approve&Renew EnrollmentwitheForms EnrollmentinformationisnotupdatedinKidKare untilyouapproveandrenewenrollmentsonthe Approve&Renewpage.Thisallowsyoutocontrol whenenrollmentinformationforyourcentersis updated.However,rememberthatchildrenupdated withafutureenrollmentdatemaybedisallowed fromthecurrentclaim.
Inmostcases,itisbettertowaituntilthecurrent claimisprocessedbeforerenewingenrollments.For example,ifyournewenrollmentstartdateis10/1, youshouldwaituntiltheSeptemberclaimis processedbeforerenewingenrollments.
Whenyouhaveformsreadytoreview,anotification displaysinthetop-rightcornerofthepageoverthe bellicon.Theexamplebelowshowsanotification thatsomecentershaveformsreadyforapproval andrenewal.
Youcanapproveandrenewformsatthesametime,or youcanapproveandrenewtheformsastwo completelyseparatesteps.Eachstepisdescribed below:
•Approve:Reviewformsandcheckforerrors.For example,checknumbersforcategorically eligibleforms,verifyparentsignatures,review changes,comparelastyear'sinformationwith theupdatedinformation,andsoon.
•Renew: Onceyouapprovetheforms,renewthem. ThisupdatesthedatainKidKare. Remembertokeeptiminginmindforthisstep.
•ApproveandRenew: Approveandrenewformsin
onestep.
•
BeforeRenewingForms BeforeyourenewformsandupdatedatainKidKare:
•
• Reviewandapproveforms.
Verifythatthenewdateswillnotcause disallowancesonthecurrentclaim. Verifythatyouhaveaddedyoursignatureto KidKare.Formoreinformation,see AddaSignature foreForms.
ApprovingandRenewingForms •
• Fromthemenutotheleft,click eForms.Click Approve&Renew. TheApprove&Renew pageopens.
IntheShowRecordsForsection,setfilters,as needed.
-Clickthe Statedrop-downmenuandselect thestate(s)toview.Thisoptionisonly availableifyouaresetupformultiplestates.
-Clickthe Centersdrop-downmenuand selectthespecificcenter(s)toview.
-Clickthe Datedrop-downmenuandselect 30Days,60Days,90Days,CurrentYear,or PreviousYear.
-Click nextto OnlyShowFormsThatHave AlreadyBeenApproved tofiltertoonlythose formsthathavealreadybeenapproved.
Click Go. -
Note:Youcanalsoclick Filtersinthetop-rightcornerto setadditionalfiltersandsorts,aswellastospecifywhich columnsdisplayonthepage.
• Checktheboxnexttotherecord(s)toupdate.
Note:Click ViewFormstoviewtheformsyouare approving/renewing.
• Dooneofthefollowing:
- BulkEdit:IntheBulkEditsection,setnew datesintheBulkSetNewEnrollmentDate, BulkSetNewEnrollmentExpirationDate,and BulkSetNewIEFExpirationDateboxes.Click Apply.ClickApproveorApprove&Renew.
-
AcceptParentSignatureDates:ClickApprove orApprove&Renew.
Notes:IfyoudonothaveasignaturesetupinKidKare,you arepromptedtoaddoneonceyouclickApprove/Approve &Renew.Youcanalsoclickachild'snametoviewtheir recordandeditinformation,asneeded.Whenfinished, click ApproveorApprove&Renew.
SendingFormsBackforRevision Ifaformrequiresrevision,youcansenditbackto theparentforchanges.Todoso:
• OntheApprove&Renewpage,locatethe appropriatechild.
•Clickthechild'sname.TheChildInformation pageopens.
Click SendBackforRevision.
• •
• Selecttheform(s)tosendback(EF,IEF,or both).
Clickthetextboxandenternotesforthe parent.Thisinformationisincludedinthe emailsenttotheparent.
Click Send.
ExportingApprovalInformation nexttoExportandVieworAlltoexport
• Click approvalinformation.
-ExportView: Thisexportstheinformation displayedontheApprove&Renewpage.
- ExportAll:Thisexportscompleteapproval data.
PrintCompleted eFormsRecords CompletedeFormsarestoredwithinKidKare.Youcanretrieveandprinttheseforms, asneeded.However,wedorecommendthatyousimplystoreadigitalcopy,if needed.Remember,youcanretrievetheseformsfromKidKareatanytime.
•
• Fromthemenutotheleft,click eForms. ClickReports.TheReportspageopens.
• Inthe ShowRecordsFor section,setfiltersfor theformstoview.
-Select Enrollmentor ReEnrollment.
-Selecttheformtype.Youcanchoosefrom EF, IEF,orAllFormTypes.
-
Selectthecenter(s)toview.Youcanselectas manycenters,asneeded,oryoucanselect AllCenters.
- Selectthedaterangetoview.Youcanselect CurrentYear,PreviousYear,orCustomDate.If youselectCustomDate,usetheFrom/To boxestosetadaterange.
•Click Run. Reportsmeetingthelimitsyouset display.
•Todownloadanindividualform,clickView Form.APDFdownloads.Youcanthenprintthis PDF,asneeded.
•Toprintmultipleformsatonce:
-Checktheboxnexttoeachformtoprint.
-Click Combine&PrintForms. Theformsyou selecteddownload.
Messages EnableMessaging forCenters BeforeyoucanuseKidKare'smessaging features,youmustenablecentermessaging ontheSettingspage.
Click .TheMessagespageopenstothe Receivedtabbydefault.
Click SendMessage. TheMessageEditor opens.
•
• Click IntheCenterAccesssection,click Messages.Yourchangesaresaved automatically. .TheSettingspageopens.
MessageCentersin KidKare KidKare'smessagingfeatureallowsyoutosend messagesdirectlytoyourcentersinKidKare. Yoursitescanthenreviewandrespondtothese messages,allowingbothofyoutokeepa recordofcommunicationsonline.
ClicktheSendTodrop-downmenuandselect thecenter(s)tomessage.Youcanusethe Searchboxinthismenutosearchforspecific centers.Tomessageallcenters,selectAll Centers.
Clickthe Subjectboxandenterasubjectfor thismessage.
Clickthe Messageboxandenterthecontents ofyourmessage.
Toaddanattachmenttoyourmessage: -ClickAddAttachmentandselectFile. -Browsetothelocationonyourcomputer wheretheattachmentisstored.
• • Whenfinished,click Send.
• Clickamessagetoviewthemessage content.
CenterSponsors:View ReceivedMessages ReceivedmessagesdisplayintheReceivedtab ontheMessagespage.Itisdividedintothe followingcolumns:ReceivedFrom,Subject,and Date.Youcanalsoseethetotalnumberof messages,aswellasthenumberthatare unreadatthebottomofthispage.
• t Clickthe Signatureboxandenteryouremail signature.
Click . TheMessagepageopensand displaystheReceivedtabbydefault. Your messagesdisplayinatable. Unreadmessages displayinbold.
• Ifyourcenterhasattachedafile,clickthefile nameinthe Attachmentssectiontoviewand downloadit.
Whenfinished,clickthe Receivedtabto returntoyourreceivedmessageslist. Usethe SearchMessages boxtofilterthe messagesthatdisplay.Themessagelistis updatedasyoutype.
•
•
Tomarkmessagesasread/unread:
-Checktheboxnexttothemessagesto markasread/unread.Youcanalsocheck theboxatthetopofthecolumntoselect allmessages.
-ClickMarkasRead or MarkasUnread.
Toarchivemessages:
-Checktheboxnexttothemessagesto archive.Youcanalsochecktheboxatthe topofthecolumntoselectallmessages.
-ClickArchiveSelected.Themessagesyou selectedaremovedtotheArchivedtab.
CenterSponsors:
ViewSentMessages
Youcanviewmessagesyouhavesentinthe SentMessagestab.LiketheReceivedtab,the SentMessagestabisdividedintothefollowing columns:SentTo,Subject,Reports,andDate.The totalnumberofmessagesandunreadreports displayatthebottomofthetable.
• Clickthe SentMessages tab.
•Tomarksentmessagesasread/unread:
-Checktheboxnexttothemessage(s). Checktheboxatthetopofthecolumnto selectallmessages.
-Click MarkasRead or MarkasUnread.
•Toarchivemessages:
-Checktheboxnexttothemessage(s)to archive.Checktheboxatthetopofthe columntoselectallmessages.
-Click ArchiveSelected.Themessagesare movedtotheArchivedtab.
Toviewmessagereports,clickthelinkinthe Reportscolumn.Formoreinformationabout messagereports,see ViewMessageReports.
Note:Youcanalsosendmessagesfromthistab.Click SendMessageandselecttherecipients.
• Click .TheMessagespageopens.
CenterSponsors:View MessageReports Messagereportsprovideusefuldataforyour sentmessages,suchasthenumberofrecipients whoopenedthemessage.
Toviewthisreport:
•
• Click .TheMessagespageopens. ClicktheSentMessagestab.
•Clickthelinkinthe Reportscolumnforthe messagetoview.Themessagereportopens.
• Thisreportisdividedintothefollowing sections:
- MessageDetails: Thissectiondisplaysthe messagesubject,content,andsentdate. Italsoprovidesthenumberofrecipients whohaveopenedthemessageandthe numberofrecipientswhohaveresponded toanyattachedsurvey.
Questions:Thissectiondisplaysany surveyquestionsyouincludedinyour messaging.Ifyoudidnotincludeasurvey inyourmessage,thissectiondoesnot display.
Report: Thissectionprovidesareviewof recipientswhohaveopenedthemessage.
Toreviewalltrainingvideosforyoursitesclickthebuttonbelow:
ScantheQRcodetoviewthefullcentertrainingpage orclick here. https://support.kidkare.com/ok-sponsored-center
KidKareSupport TechnicalSupportContact We constantly strive to enhance our customer support and ensure that you have access to the appropriate resources when you require our assistance. This resource guide will assist you in identifying the most effective procedures for obtaining the necessarysupportforyouandyourteam.
KidKareTrainingand KnowledgeBase OurTrainingHubandKnowledgeBasearefilled witheveryresourceyoumayneedtohelpwith allofourproductsandfeatures.Wesuggest startingherefirst: