


Below is a list of tasks you should complete as you get started with Minute Menu CX. Click each link to view more information. Each article opens in a different tab, so you do not have to leave this page.
• Create Staff-Member Accounts
• Confirm Your Company Information
• Enroll Centers
• Enroll Children
• Create Master Menus
• Send Welcome Messages to Your Centers
For information about your basic monthly process with KidKare, see Monthly Process.
Note: If your centers use Procare 10 or higher and want to import children, do not enroll children, as this could result in duplicates. Please email training@kidkare.com to get your Procare accounts connected with KidKare.
The basic monthly process with KidKare typically follows the pattern below. Click each link to view more information. Each article opens in a different tab, so you do not have to leave this page.
• Advance the Claim Month
• Ensure Center Information is Correct
• Activate Pending Children (as Signed Forms are Received)
• Enter and/or Verify Center Receipts
• Enter Site Reviews
• Process Claims
• Submit Claims to the State
• Issue Payments to Your Centers
Administrative Tasks
• Sponsor Staff Management
• View Reimbursement Rates
• Manage Company Information
You can create staff roles with customized permissions. This allows you to set default permission levels for specific staff groups. For example, you can set up administrators, managers, claims processors, monitors, volunteers, and so on. Then, when you create a new staff account, you can simply select the staff type and assign that type's permissions to the user.
• From the menu to the left, click Tools.
• Select Sponsor User Permissions. The Sponsor User Permissions page opens.
• Click the Roles & Permissions tab.
• Click Add Role.
• Click the Role Name box and enter the name for this role.
• Click Save.

• Next, click next to permissions to enable and disable them. You can also click Select All to turn
on all permissions for this role, or you can click Unselect All to disable all permissions for this role. Your changes are saved automatically.

All sponsor/back-office staff members should have their own, unique login ID and password with which to access KidKare. You can assign permissions to each individual user, or you can create staff roles. You can customize permissions for each staff roles and then assign that type to the users you create. However, if you have a small staff or want to set permissions for each individual staff member, you do not have to set up staff roles. For more information, see Create Sponsor Staff Roles.
• From the menu to the left, click Tools.
• Select Sponsor User Permissions. The Sponsor User Permissions page opens.
• Click Add User. The Add User pop-up opens.
• Click the First Name and Last Name boxes and enter the user's full name.
• Click the Email box and enter the email address for this user.
• Click the Role drop-down menu to assign a role with pre-set permissions to this user. You can customize permissions for this user later, if needed.
• Click Add User. The User Added message displays.
• Set a password for the user.
- If you provided an email address, click Email User Instructions to send the user an email containing instructions for accessing their account.
- If you did not provide an email address, enter a password for the user and click Set Password.
Video Link: Sponsor Users and Permissions


Staff permissions allow you to determine who can access what portions of KidKare. For example, you can restrict certain users from accessing and editing your food list. You can either set default permissions when creating specific staff roles, or you can customize individual user permissions on the User Details page. This article covers setting permissions on the User Details page. See Create Center Staff Roles for more information on creating pre-set permission sets.
• From the menu to the left, click Tools.
• Select Sponsor User Permissions. The Sponsor User Permissions page opens.
• Click next to the user for whom to update permissions. The User Details page opens.
• Scroll to the User Permissions section.

• Next, click next to permissions to enable and disable them. You can also click Select All to turn on all permissions for this user, or you can click Unselect All to disable all permissions for this user. Your changes are saved automatically.
You can view current reimbursement rates for CACFP claims in KidKare.
To do so:
• From the menu to the left, click Administration.
• Select View Reimbursement Rates. The View Reimbursement Rates page opens.
• Click the State Type and choose from the following:
- 48 Contiguous
- Alaska Hawaii
- Washington, DC
• Click the Effective Month box and select the year and month to view.


Update your login information whenever you need by using the My Account page.
• In the top-right corner, click your username and select My Account. The My Account page opens.


• To update your password:
- In the User Details section, click the Click to Reset link.
- Enter a new password.
- Click the checkmark to save your changes.
• To change your username:
- Click Edit.
- In the User Details section, click the Username box and enter your updated username.
- Click Save.

It’s important that your company information is correct, as it prints on various reports. Check and update this information in the Manage Client Information page.
• From the menu to the left, click Administration.
• Select Manage Client Information. The Manage Client Information page opens.


• Confirm that the displayed information is correct. Your CNP Sponsor Name and Sponsor ID should be updated here and match what is in CNP exactly. This must be entered correctly in order for your claim to upload correctly. If you do not know your Sponsor Name and ID, see page 16.
- Sponsor Name = Legal Business Name
- Sponsor ID = State Assigned #
• If you made any changes, click Save.


• Enroll & Manage Centers
• Center Welcome Letter
• Manage Center Staff
• Remove & Reactivate Centers
• Manage Center Classrooms
Before you enroll your centers, login to the CNP site to review your Site Name and Site ID.
You will need to enter these exactly as they show in CNP for your claims to be uploaded to the CNP site. You can also find your Sponsor ID and Name here as well.
In order to find this information, you will need to login to the CNP site and follow the steps below:
• From the menu to the left, click on Upload Claim.

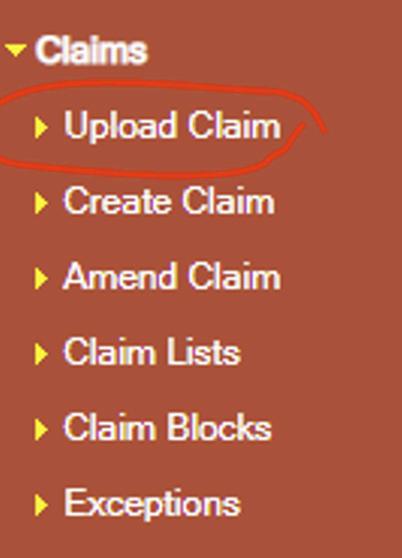
• Scroll down to the section labeled How To Use Claim Upload and click on the number 4. The Configuration Information.
• The configuration page loads and you can see your Sponsor Name and ID as well as your Site Name and ID.


Enroll new centers in your program to provide them with access to the KidKare platform and allow them to begin submitting claims.
• From the menu to the left, click Center Management.
• Click Enroll Center. The Enroll Center page opens. This page is divided into three tabs:
- General
- License/Schedule
- Oversight
• In the General tab:
- In the Center Info section: click the Center Number box and enter an identifying number for this center. You can enter up to four (4) digits in this box. Then, click the Center Name box and enter the center's name exactly as it shows in the CNP website. Lastly, click the Profit Status drop-down menu and select Non-Profit or For-Profit.
- In the Center Basics section, click the Original Start Date box and select the center's CACFP start date. If you do not know this date, enter the first day of the current month.
- In the Center Site Info section, click the State drop-down menu and select the state in which this center operates.
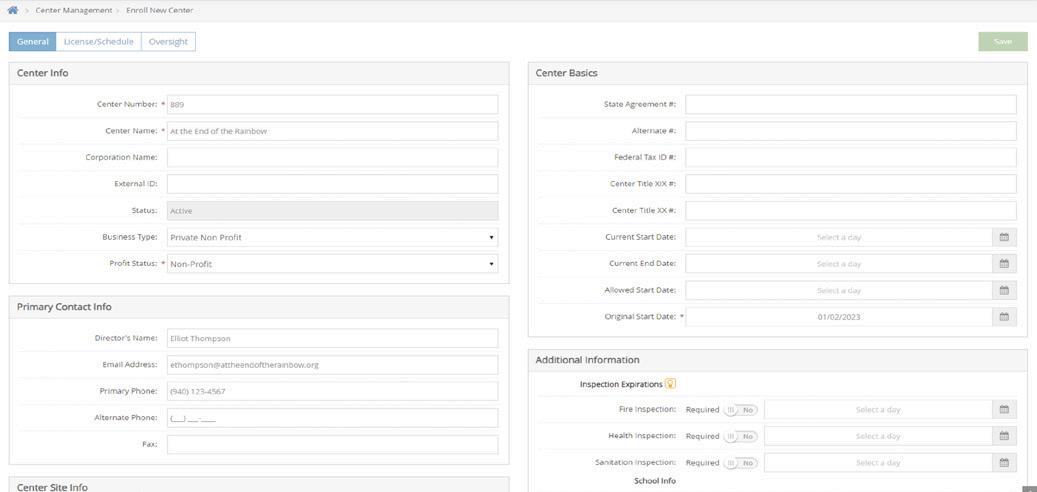

- Complete the remaining information in this tab, as needed. Note that while only the required fields are called out in this article, we strongly recommend you complete all other applicable fields, including the director's name and email address so you can send a welcome email through the program.
Note: The Center Name must match the Site Name from the CNP website. Refer to CNP Site ID and Site Name if you do not know your Site Name.
• Click the License/Schedule tab and complete the following:
- In the License Info section, Click the License Type drop-down menu and select the type of license under which the center operates.
- Click the Program Type drop-down menu and select a program type. You can choose from the following:
◦ Adult Day Care
◦ Child Care Center
◦ At Risk - ARAS
Note: Only select At Risk -ARAS if the center is At-Risk ONLY. If the center has both regular and At-Risk claims, select Child Care Center.
◦ OSCH - Outside School Hours Care
◦ Head Start
◦ Emergency/Homeless Shelter
◦ Summer Food Program (SFSP
- Click the Total box in the Max Capacity section and enter the total number of children allowed at the center.

- Enter the Site ID as it shows in the CNP website.
- Select the Approved Meals for this center.
◦ If this is an At-Risk/SFSP center:
◦ Click next to At-Risk/SFSP Participant.

◦ Select each meal that is approved for At-Risk or SFSP.
Note: If a site does both ARAS and SFSP, enroll them as two separate sites. For sites that do ARAS and have a regular claim, selecting meals here allows them to claim At-Risk meals.
- In the Meal Schedule section, enter a starting and ending time for each meal. You can type a single digit and press Tab. KidKare automatically formats the time for you.


Note: The Site ID must match the Site ID from the CNP website. Refer to CNP Site ID and Site Name if you do not know your Site ID. If you are approved for before school breakfast or after school snack, change Servings to 2. In the Serving 2 column, enter the times for before school breakfast and/or after school snack.
- Complete the remaining applicable information in this tab.
• Click the Oversight tab and complete the following:
- In the Center Info section, click the Driving Instructions box and enter any directions and notes on getting to the center. These directions are available when leaving for site visits. You can also enter the mileage to the center and the map location.
- Click the Administration Type drop-down menu and choose Legally Affiliated with Sponsor
- In the Center Login Info section, you can update the center's log in ID and password to something easier, or you can accept the system-generated one. Click Send Welcome Letter to send a welcome email containing this login information to the center.
• Click Save.

Your Head Start centers require specific set up parameters in KidKare. This article outlines a few of the differences between these locations and other center programs, as well as how you handle said differences in KidKare.
Your Head Start centers require specific set up parameters in Minute Menu CX. This article outlines a few of the differences between these locations and other center programs, as well as how you handle said differences in Minute Menu CX.
• From the menu to the left, click Center Management.
• Click Enroll Center. The Enroll Center page opens.
• Begin setting the center up as you normally would. For details, see Enroll Centers.
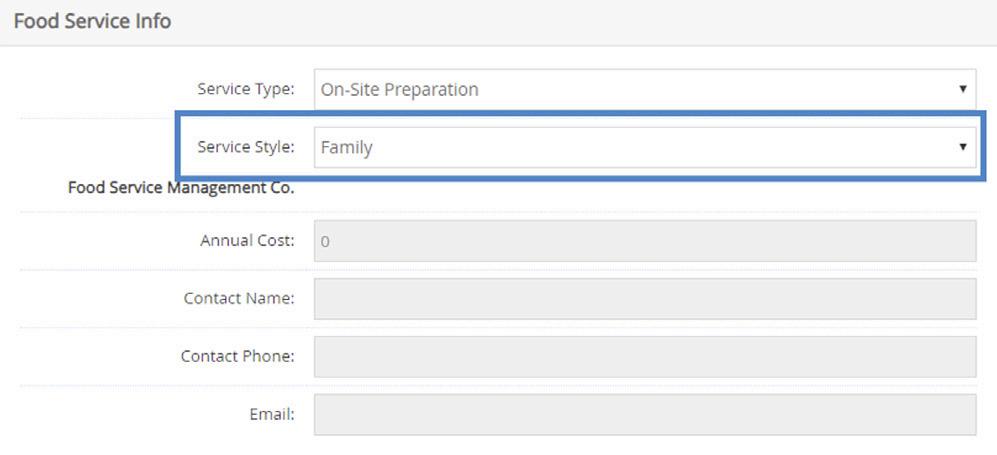
• In the General tab, Set the Service Style drop-down menu to Family.


• In the License/Schedule tab, click the Program
Type drop-down menu and select Head Start.


• Finish enrolling the center as you usually would.
All children enrolled at a Head Start center are reimbursed at the Free rate. If you use eForms, children should default to Free based on the income information their parents provide once you approve and renew their forms.
If you are manually enrolling children for a Head Start center, set the Reimbursement Level drop-down menu in the Manage Child Information Oversight tab to Free and provide the supporting income information from the paper income eligibility form.
Note that children enrolled in Head Start programs may also have varied schedules. This could be morning attendance two days and afternoon attendance three days, or some children may only be present for a few months of the year. You can use the Child and Attendance reports to track attendance for these children.
When entering your Daily Manu, you can include the CN label number in the menu notes section. This lets the State and your sites know that the food is a CN-labeled product being offered at meal service. The CN label details should still be stored on-location.
You can customize the welcome letter sent to your centers when you first enroll them in your KidKare account.
• Log in to app.kidkare.com. Use the same credentials you use to access Minute Menu CX.
• Click Edit.

• Click . The Settings page opens.
• In the General Settings section, click Edit Welcome Letter Template . The Welcome Letter Template pop-up opens.

• Update the Subject and From boxes, as needed. Variables you can use to fill-in certain information are listed at the bottom of the editor (SponsorName, CenterPhone, and so on). To add one of these variables to your text, type @ and begin typing the variable to use. A list of available items displays as you type, so you can select the variable you need. For example, to add the provider's name to the Subject, you would type @CenterName in the Subject box.


• Specify which welcome letter you are sending: KidKare or Minute Menu CX. The letter marked with is the active one. To enable the other template, click . Note that the slider turns green and the other letter's slider turns red. You can only have one active welcome letter at a time.

• Click the first Message box and customize your messaging. Just as you did in Step 5, you can use variables to complete certain information, such as the center's name.
• Click the Signature box to customize your signature.
• Click Add Attachment to add any attachments needed.
• When finished, click Save.
Use KidKare to send welcome messages to centers. Depending on whether you are implementing your centers with Minute Menu CX or KidKare, this welcome message will either include installation and login information for Minute Menu CX or login information and help content for KidKare. To select the letter to send and customize the content, see Customize the Center Welcome Letter.
• From the menu to the left, click Center Management.
• Select Manage Center Information.
• Click the Select Center drop-down menu at the top of the window and select the center to which to send the welcome letter.
• Verify that the Email Address entered in the primary contact info section of the general tab is correct. This is the email that received the welcome letter.
• Click the Oversight tab.
• In the Center Login tab, click Send Welcome Letter. The Welcome Letter pop-up opens and displays the text you entered to the Welcome Letter template.


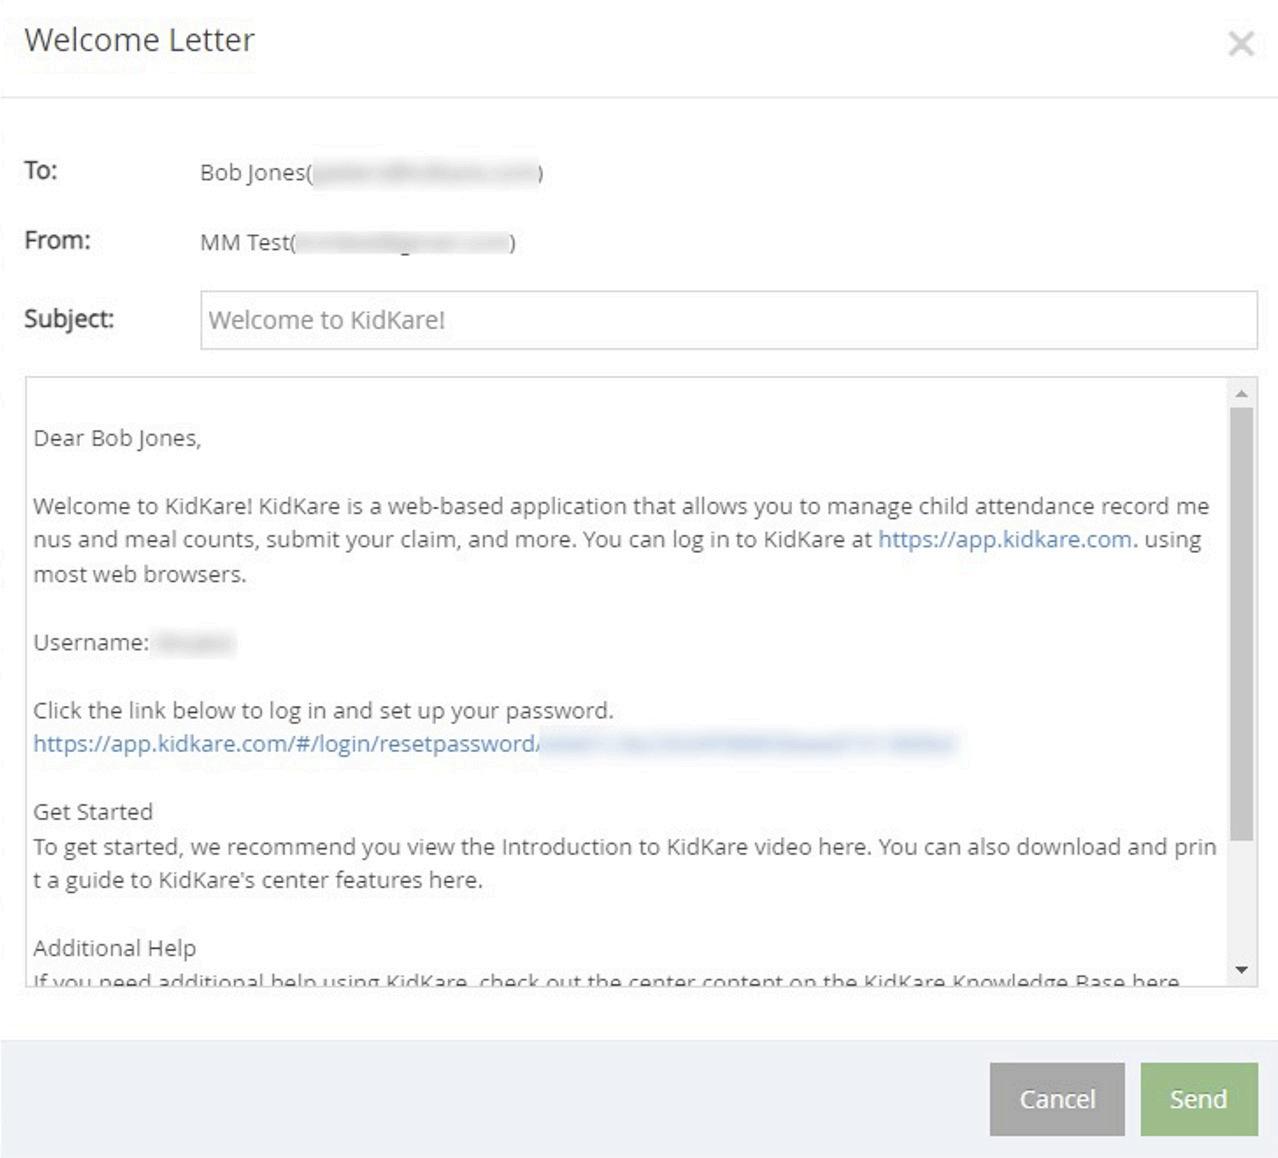
• Make changes to the email, as needed.
• When finished, click Send.
To access the Manage Center Information page:
• From the menu to the left, click Center Management.
• Select Manage Center Information.
• Click the Select Center drop-down menu at the top of the window and select the center to view.


• The Manage Center Information page opens. This window is divided into three tabs:
- General
- License/Schedule
- Oversight
• Review the information in each tab and ensure that it is correct for the claim month on which you are working.
• Click Save to save any changes.

• Click . The Settings page opens.

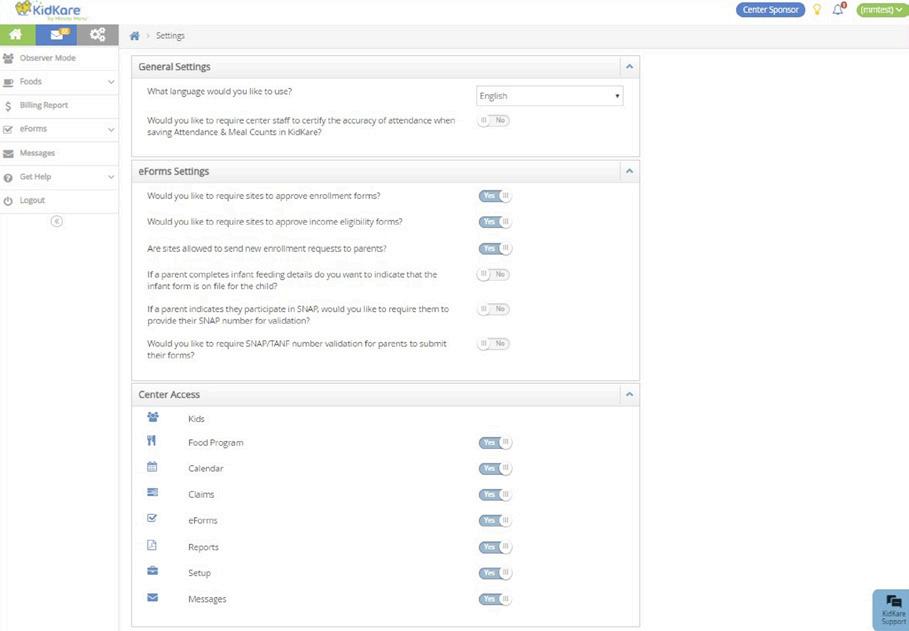
• In the General Settings section you can:
- Click the Language drop-down menu and select Spanish to view KidKare in Spanish .

- Click next to Would you like to require center staff to certify the accuracy of attendance when saving Attendance & Meal Counts in KidKare? to require your centers to acknowledge that attendance and meal counts recorded are accurate.
• In the eForms Settings section, click next to each option to enable it. You can change settings for the following:
- Would you like to require sites to approve enrollment forms?
- Would you like to require sites to approve income eligibility forms? Are sites allowed to send new enrollment requests to parents?
- If a parent completes infant feeding details, do you want to indicate that the infant form is on file for the child?
- If a parent indicates they participate in SNAP, would you like to require them to provide their SNAP number for validation?
- Would you like to require SNAP number validation for parents to submit their forms?
◦ Would you like to disallow or warn the parent of incorrect formatting?
- Would you like to hide the 'Open Online Forms' button?
• In the Center Access section, click next to each option to enable it. You can change settings for the following:
◦


The School Calendar page allows you to add school out days for your sites. This is useful for setting up summer vacation, holidays, or extended school closures. Adding school out dates to the calendar removes the requirement that sites select School Out when checking children in for the day.
You can add school out days per child, center, school, or school district. You can also add school out days for all children and all centers at once.
• From the menu to the left, click Menus/Attendance.
• Select Manage School Calendar. The School Calendar page opens.
• Choose from the following options:
- All Children, All Centers: Create a school out event for all sites and chidlren.
- Center: Create a school out event for a single site. If you select this option, you must select a center at the top of the window.
- Child: Create a school out event for a specific child. If you select this option, you must select a center (top of the window) and a child (to the right of the calendar options).
- School District: Create a school out event for an entire school district. If you select this option, you must select a center (top of the window), a state (if you operate in multiple states), and a school district (to the right of the calendar options).
- School: Create a school out event for a single school. If you select this option, you must select a center (top of the window) and a school (to the right of the calendar options).
• To add School Out days:
- From the Draggable Events section, click and drag School Out to the calendar, and drop it on the first date of the event. If you are adding a single day, the process is complete.
- If you need to add a date range, double-click the school out event you placed on the calendar. The Event Editor pop-up opens.
- Select Multi-Day.
- Use the Event Start Date and Event End Date boxes to update the date range. The Event Start Date defaults to the date on which you placed the event originally.

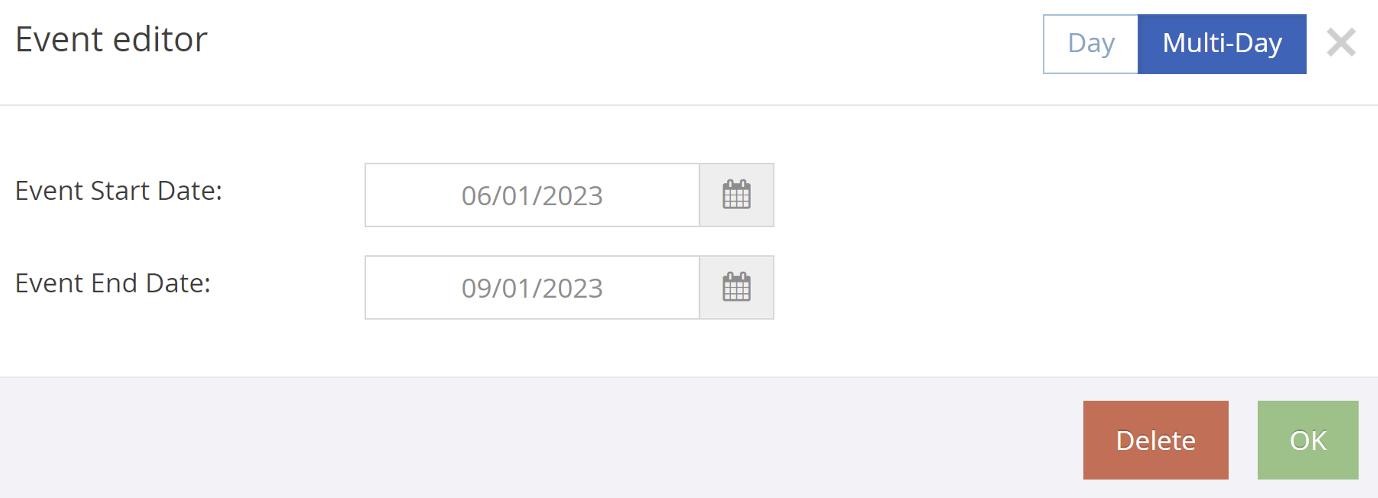
- Click OK . The event is added to the dates you specified.

• To remove School Out days:
- Double-click the event on the calendar. The Event Editor opens.
- Click Delete.
- At the Are You Sure prompt, click Delete.
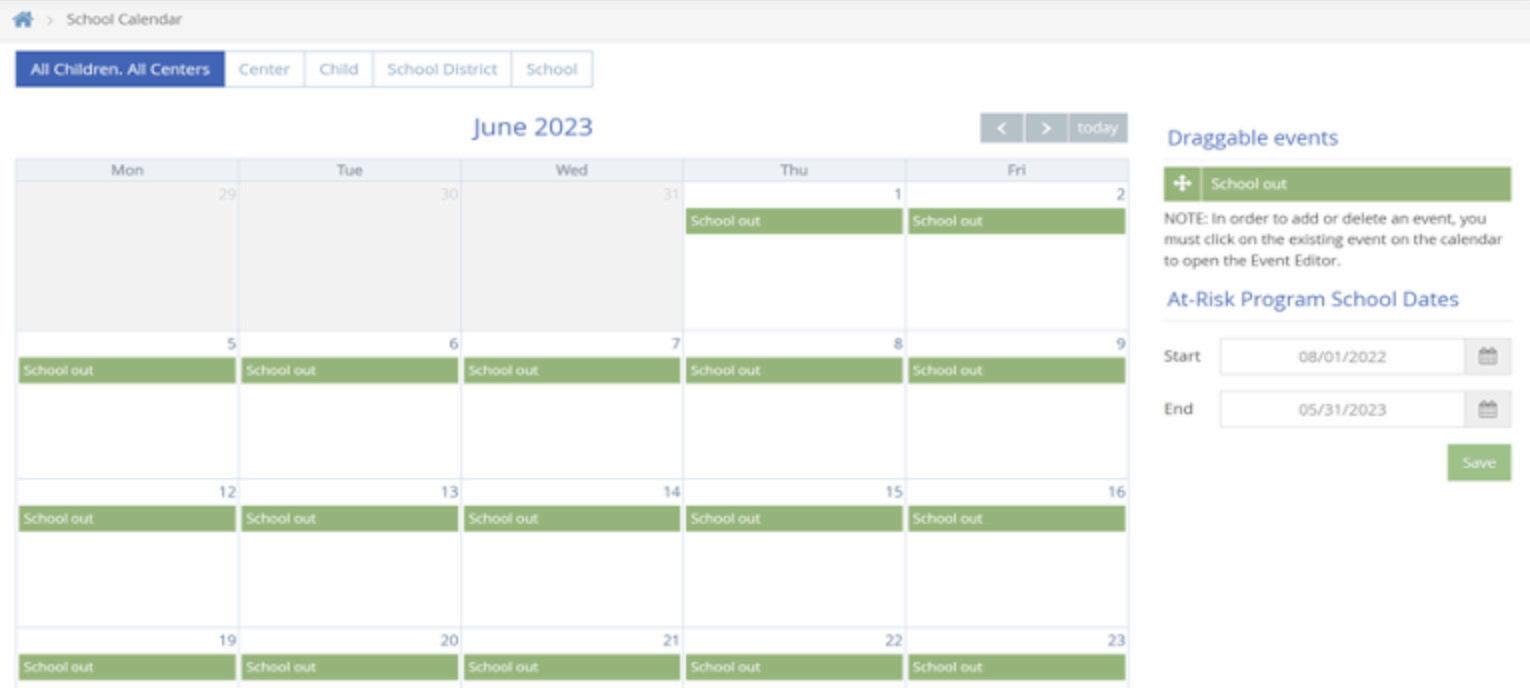


If you sponsor centers who participate in the ARAS program, set ARAS Program school dates on the school calendar:
• On the School Calendar page, select All Children, All Centers, or select Center . If you select Center, click the drop-down menu at the top of the page to select a s specific center.
• In the At-Risk Program School Dates section, click the Start box and enter the program start date.
• Click End and select the program end date.
• Click Save


Note: This article is for adding center staff accounts as a sponsor of centers. If you operate in an independent center or are a sponsored center user needing to add staff to your account, see Add Users.
To add center staff members:
• From the menu to the left, click Tools.
• Select Center User Permissions.
• Click the Select Center drop-down menu at the top of the window and select the center for which to add users.
• Click Add User. The Add User pop-up opens.
• Click the First Name and Last Name boxes and enter the user's first and last name.
• Click the Email box and enter the user's email address.
• Click the Role drop-down menu and select the user role to assign to this user.
• Click Add User. The User Added message displays.


• Set a password for the user.
- If you provided an email address, click Email User Instructions to send the user an email containing instructions for accessing their account.
- If you did not provide an email address, enter a password for the user and click Set Password.
Note: This article is for adding center staff roles as a sponsors of centers. If you operate in an independent center or are a sponsored center user needing to set up user roles and permissions, see Set User Permissions.
Each user role is a combination of certain permissions settings that you can customize. If you customize one of the existing user roles, the word -Custom is added to the end of the role to designate that you have edited the permissions for that role. For example, if you customize the permissions for the Teacher role, the role becomes Teacher - Custom. You can also add new user roles that you can then assign to new and existing users.
• From the menu to the left, click Tools.
• Select Center User Permissions.
• Click the Roles & Permissions tab.
• Click Add Role.
• Click the Role Name box and enter a name for this role.
• Click Save .
• Next, use the sliders next to each permission to enable it for this role. All permissions for new roles are set to No by default.


Video Link: Setup and Manage Center Staff
You can control what areas of KidKare a center's administrator can access.
• From the menu to the left, click Tools.
• Select Center Administrator Permissions. The Center Administrator Permissions page opens.
• Use the sliders to toggle permissions on and off. Your changes are saved automatically.


You can remove centers from your active list of centers. Centers that you have removed can no longer access KidKare.
To do so:
• From the menu to the left, click Center Management.
• Select Manage Center Information.
• Click the Select Center drop-down menu at the top of the page and select the center to remove. The Manage Center Information page opens.
• Click Remove Center in the top right corner. The Remove Center pop-up opens.
• Click the Withdrawal Date and select the date on which to remove this center. This box defaults to today's date.
• Click the Removal Reason drop-down menu and select the reason you are removing this center.


• Click Continue.
• At the Center Removed Successfully message, click Close.
Note: To view information for centers you've removed, check the Removed box in the Select Center drop- down menu to include Removed Centers in the menu.
After you've removed a center, you can re-activate them if needed. Perhaps the center closed at one point, but decided to resume business. Maybe they switched sponsors, but are returning to you. No matter the reason you removed the center, you can reactivate them at any time.
• From the menu to the left, click Center Management.
• Click Manage Center Information.
• Click the Select Center drop-down menu, clear the Active and Pending boxes and check the Removed box. This filters the Select Center list to removed centers only.
• Select the removed center to reactivate. The Manage Center Information window opens.
• Click Reactivate Center.
• At the Are You Sure prompt, click Yes.
• At the Center Reactivated prompt, click Close.


• From the menu to the left, click Center Management.
• Select Manage Classrooms.
• Click the Select Center drop-down menu at the top of the window and select the center for which to add classrooms. The Manage Classrooms page opens.
• Click Add Classroom. The Add New Classroom pop-up opens.
• click the Short Name box and enter a short name for this classrooms.
• Click the Full Name box and enter the classroom's full name.

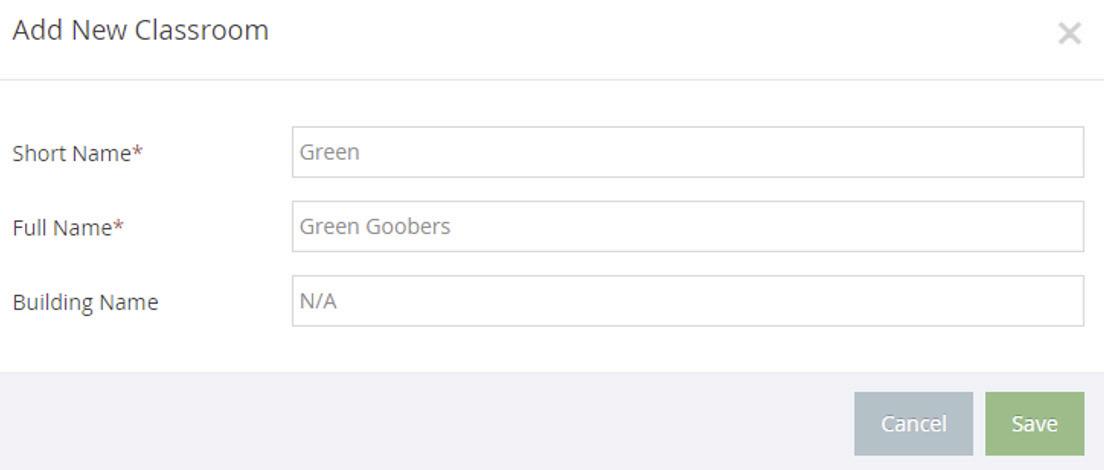
• Click the Building Name box and enter the building in which this classroom is located, if applicable.
• From the menu to the left, click Center Management.
• Select Manage Classrooms.
• Click the Select Center drop-down menu at the top of the window and select the center for which to add classrooms. The Manage Classrooms page opens.
• Click the classroom to update. The Edit Classroom pop-up opens.
• Update the classroom name information, as needed.
• When finished, click Save.

• From the menu to the left, click Center Management.
• Select Manage Classrooms.
• Click the Select Center drop-down menu at the top of the window and select the center for which to add classrooms. The Manage Classrooms page opens.
• Click the classroom to delete. The Edit Classroom pop-up opens.
• Click Delete.
Note: You can only delete classrooms to which children are not currently assigned. If a classroom has children assigned to it, the Delete option does not display.
• From the menu to the left, click Center Management.
• Select Assign Classroom.
• Click the Select Center drop-down menu at the top of the window and select the center for which to add classrooms. The Assign Classrooms page opens.
• Check the box next to each child to assign to a classroom.


• Click Assign Classrooms. The Assign Classrooms pop-up opens.
• Click the Assign drop-down menu and select the classroom to which to assign the children.


• Click Save.
Observer Mode gives sponsors the ability to login to KidKare using their Sponsor credentials from MinuteMenuCX. Sponsors login and are able to observe each site in a "view only" mode.
• Login to KidKare.
• Select Observer Mode from the menu on the left.
• Click on the site you want to observe.

• Once you are done reviewing this site, click Exit Observer Mode in the top right corner. You will return to the list of sites an be able to select a different site to observe.

• The home page for the selected site opens. You are now in Observer Mode for the selected site.


Video Link: Observed Mode
• Enroll Children in KidKare
• Activate Children
• Withdraw Children
• Transfer Children Between Centers
• Delete or Merge Child Data
• Child Rosters
• Edit Child Information
You, the sponsor, and centers can both enroll children. Centers can also import CDT children from another program, such as Procare. When centers enroll children, those children are automatically set to Pending, You must review and activate these children. For more information, see Activate Children.
IMPORTANT: Check with your center to see if they have Procare before you enroll children. Do not enroll children if your center is planning to import from Procare, as this can result in duplicate records. Sent an email to Training@KidKare.com and request a Procare integration.
• From the menu to the left, click Children.
• Select Enroll Child.
• Click the Select Center drop-down menu at the top of the window and select the center for which to enroll children. The Enroll Child page opens. The page is broken into three (3) steps with separate sections, as shown in the image below.
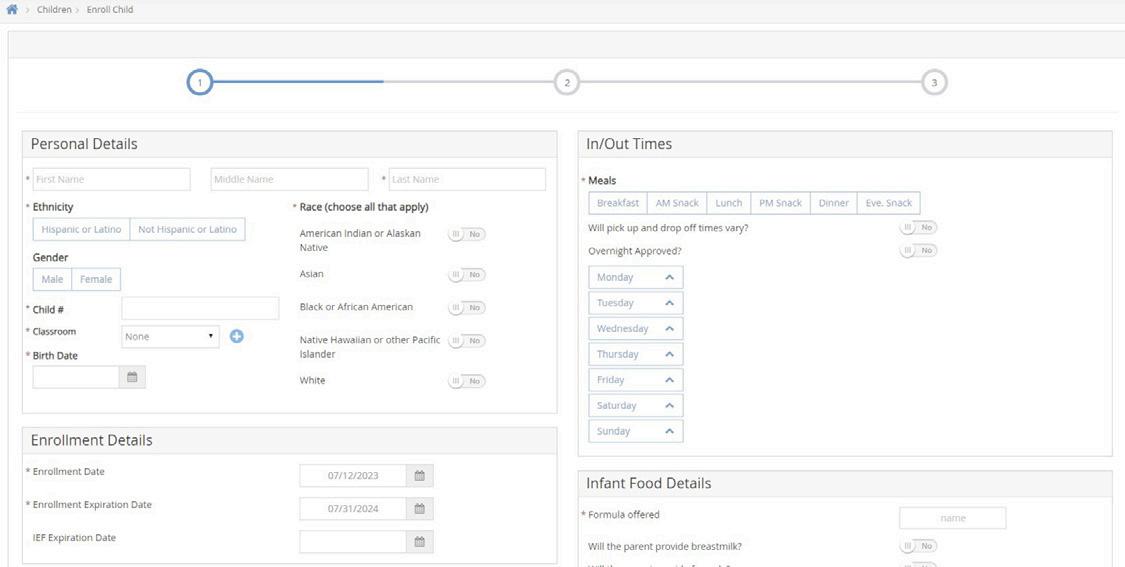
• In the Personal Details section:
• Click the First Name, Middle Name (optional), and Last Name boxes and enter the child's full name.
- In the Ethnicity section, check the Hispanic/Latino box or the Not Hispanic box.

- In the Race section, click next to each option that applies.
- Click the Child # box and enter a child number, or accept the system-generated number. You can enter up to four characters in this box.
- Click the Classroom drop-down menu and select the classroom to which to assign this child. You can also enter a new classroom name.
- Click the Birth Date box and select the child's date of birth. Their age displays to the right of this box automatically.
• In the In/Out Times section:
- Select the Meals for which this child participates.


- Click next to Will pick up and drop off times vary? to indicate that pick up and drop-off times may vary from what is entered here.

- Click next to Overnight Approved? if this child is approved to remain in care overnight.
- Select each day the child will be in care and enter their in and out times in the corresponding box that display.
• In the Enrollment Details section, select the child's Enrollment Date, Enrollment Expiration Date, and IEF Expiration Date. The Enrollment Date box defaults to today's date.
• If this is an infant, complete the Infant Food Details section. If this is not an infant, continue to the next point.
- Click the Formula Offered box and enter the formula offered to this child.

- Click next to each of the options below that apply:
◦ Will the parent provide breastmilk?
◦ Will the parent provide formula?
◦ Will the parent provide food?

- Click next to Infant Form of File to indicate you have an infant form on-file for this child. This option may not be required in all states. Contact your State Agency for guidance.
• Next, complete Special and Diet Information sections, as needed. Click next to each option in these sections that apply to the child you are enrolling. You can also add a Diet Expiration Date and Notes to the child's Diet Information.

• In the Doctor Information , enter the child's primary care physician's name and phone number, if needed.
• If this is a school age child, complete the School Details section. If this is not a school age child, go to next point.
- Click the School Name drop-down menu and select the school this child attends.
- Click the School District drop-down menu and select the child's school district.
- Click the School # box and enter the school's identifying number.
- Click the Type/Level box and select the child's school level. You can also select No School or School Age.
• In the Pay Details section:
- Click the Pay Source drop-down menu and select Paid by County/State, Paid by Parent, or No Pay.
- Click the Start and End Date boxes to set dates for this payment method.
- Click the Additional Notes box and enter any additional notes about the pay details for this child.
• Click Next. The Primary Guardian form displays.
• Add a primary guardian.

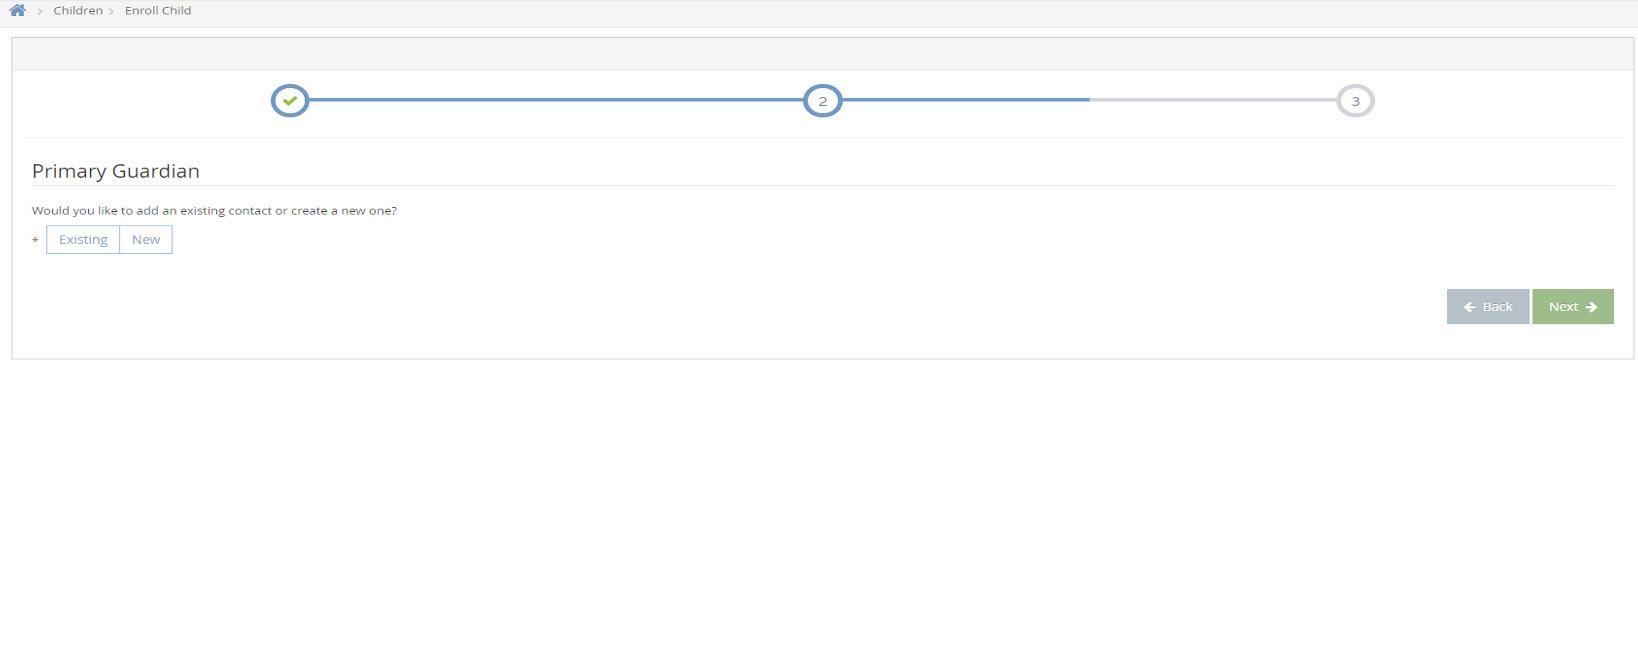
parent/guardian. Then, select the contact.
- Click New to add a new parent/guardian and enter their information.
• Click Next. The final enrollment page opens. If any siblings are found (children with the same parent), they display in the Siblings and Children (Same Parent) section.

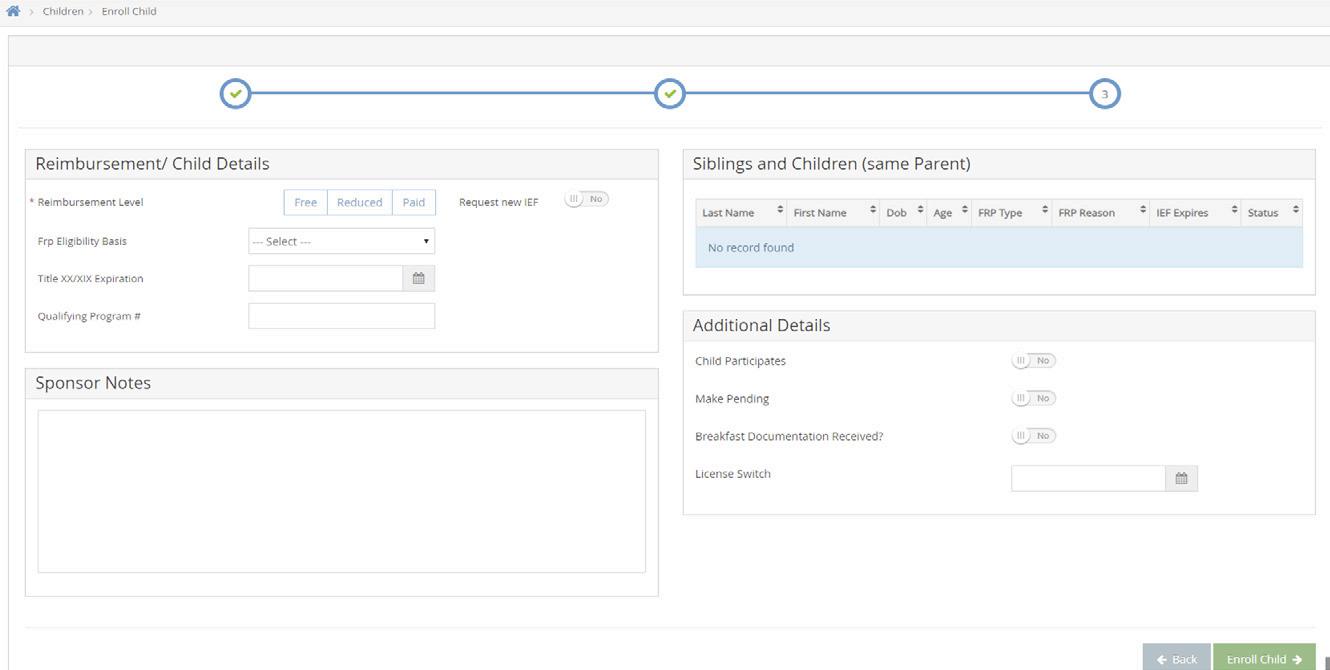
• In the Reimbursement/Child Details section:
- Select the child's reimbursement level: Free, Reduced, or Paid.
- Click the FRP Eligibility Basis drop-down menu and select the basis for the child's reimbursement level.
- Add a Title XX/XIX Expiration Date and Qualifying Program # , if needed.
• Click the Sponsor Notes box and add any additional notes about the child's reimbursement details.

• In the Additional Details section, click next to each option that applies.

• When finished, click Enroll Child. The Manage Child Information window opens and displays the information you completed. Children you enroll as a sponsor are automatically set to Active status. You can update the child's status as needed in this window.

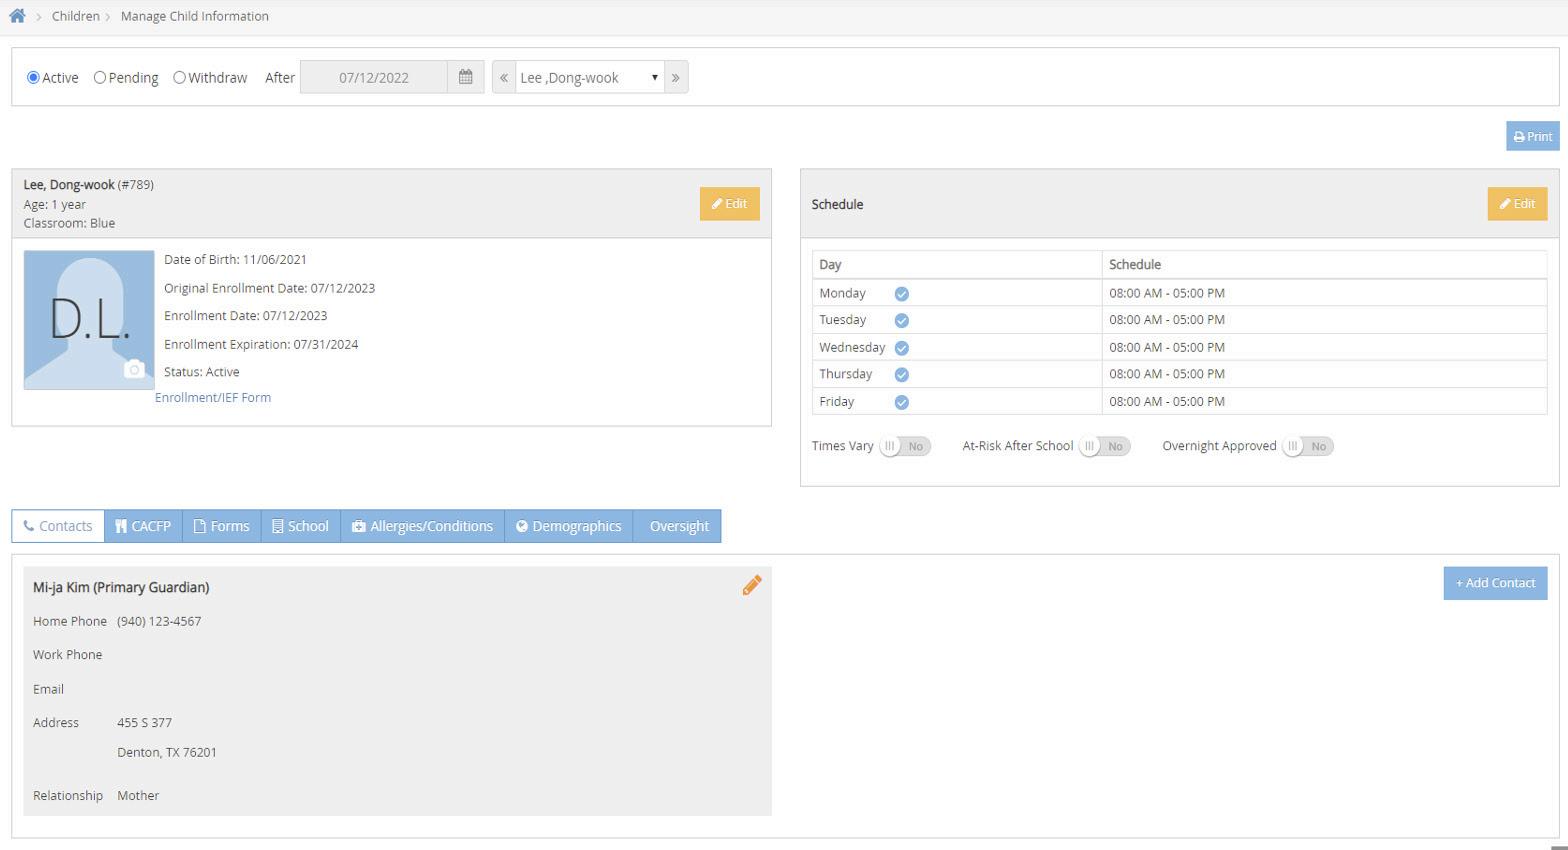

When centers enroll children, the children are automatically set to Pending status. Sponsors must then review and activate these children. There are two ways to enter categorical eligibility (FRP rates) and activate children:
One at a time or multiple at a time.
• From the menu to the left, click Activate Children.
• Use the Find Records section to filter the records that display.
- Choose whether to activate children for All Active Centers or the Selected Center. If you choose the Selected Center option, click the Select Center drop-down menu at the top of this page and select the center.
- Click the Exclude Children if Enrollment Finalized drop-down menu, select Before or After, and then select a date in the corresponding date field.
- Check the Include Withdrawn Children Who Were Never Activated box to include withdrawn children who were never activated.
- Click Go to apply your filters.
• Check the box next to each child to activate. You can also check the box in the table header to select all displayed children. Double-check your selections before proceeding, as this action cannot be undone.


• Click Activate.
• From the menu to the left, click Activate Children.
• Use the Find Records section to filter the records that display.
- Choose whether to activate children for All Active Centers or the Selected Center . If you choose the Selected Center option, click the Select Center drop-down menu at the top of this page and select the center.
- Click the Exclude Children if Enrollment
Finalized drop-down menu, select Before or After, and then select a date in the corresponding date field.
- Check the Include Withdrawn Children Who Were Never Activated box to include withdrawn children who were never activated.
- Click Go to apply your filters.
• Click a child's name to access the Manage Child Information page.
• Review the child's information and select Active at the top of this page. Your changes are saved automatically.

When a child leaves a child care center, they should be withdrawn from the program. Withdrawing a child removes them from future rosters. However, you can still access a withdrawn child's information and claim history.
• From the menu to the left, click Children.
• Click List Children.
• Use the Find Records section to filter the records that display.
- Choose whether to activate children for All Active Centers or the Selected Center. If you choose the Selected Center option, click the Select Center drop-down menu at the top of this page and select the center.
- Click Status drop-down menu and select a child status of All, Enrolled, Pending, Enrolled & Pending, or Withdrawn.
- Click Go to apply your filters.
• Use the blank fields to search for the child that is being withdrawn.


• Click on the name of the Child to withdraw.
• Click Withdraw.
• Enter the date of the last day this child was in care.

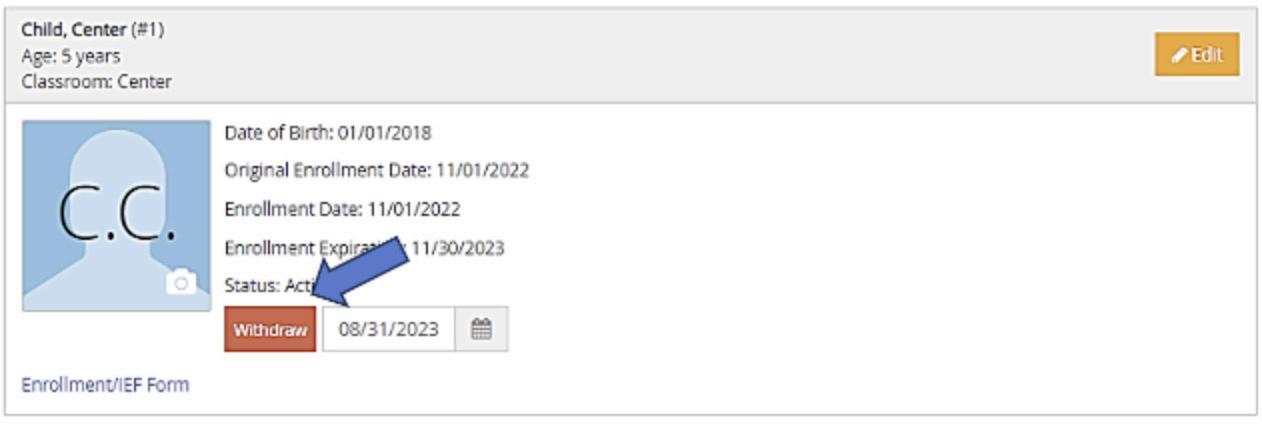
• Click Withdraw again.
You can transfer children from one center to another with the Copy Child feature. Once you copy the child to the new center in which they are enrolled, you must withdraw the child from the original center.
• From the menu to the left, click Children.
• Select Copy Child. The Copy Child window opens.
• Click the Child Name drop-down menu and select the child to copy.
• Click the Destination Center drop-down menu and select the center to which to copy the child.
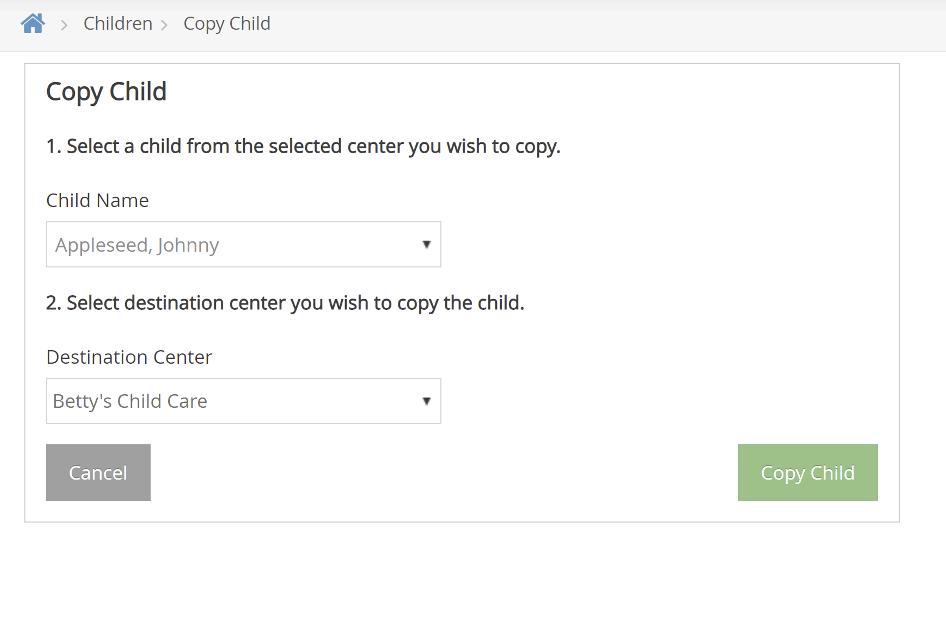
• Click Copy. The child is copied to the new center. If the child is no longer attending the original center, you should withdraw them from that center.

If you mistakenly entered a child into KidKare twice, you may need to delete the child record entirely, or merge the child records.
• From the menu to the left, click Delete Child.
• Click the Select Center drop-down menu at the top of the window to select the center from which to delete a child.
• Click the Select a Child drop-down menu and select the child to delete.


• Click Delete.
• If the child you selected has either been claimed or has household income entered, you are prompted to merge the child into another record.
- Click Yes to proceed with merging the child. Go to the next step.
- Click No to delete the child. The child is deleted and you can now exit this page.
• At the Select prompt, click the drop-down menu and select the child record in which to merge the child you selected for deletion.


• Click Merge Child. All of the previous child's records are merged into the child record you selected.
There are two versions of the child roster in KidKare: a sponsor version and a center version. The center version displays all enrolled and pending children. The sponsor version displays all children who were included on the claim for the selected month.
• From the menu to the left, click Reports.
• Click the Select a Category drop-down menu and select Children.
• Click the Select a Report drop-down menu and choose from the following:
- Child Roster
- Child Roster [Center Version]
• Click the Month box and select the claim month for which to run the report.
• Click the Select Center drop-down menu and select the center for which to print the roster:
- Select All Active Centers to print rosters for all centers currently set to Active status.

- Select Choose Multiple Centers to set filters for the centers to include. When you select this option, the Filter for Center(s) and Select Center(s) sections display. You can filter by Status (required), State (required - if you operate in multiple states), City , and more. Use the drop-down menus to set filters, and then click Search. Then, check the box next to each center to include in the Select Center(s) section.

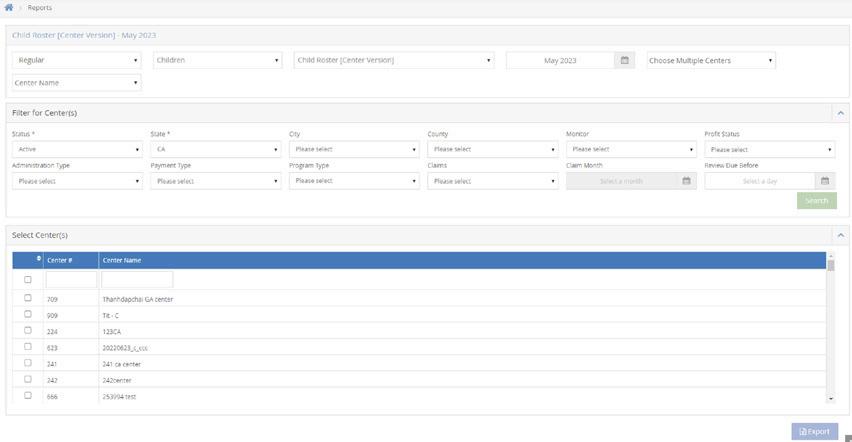
- Select a single center for which to print the report.
• If you are printing rosters for multiple centers, specify a sort. You can select Center Name or Center Number.
• Next, generate the report:
- If you are printing a single roster, click Run. The report downloads as a PDF.
- If you are printing rosters for multiple centers, click Export. The report downloads as a PDF.
As a sponsor you have access to review and edit child information whether you are updating a guardian email address, adding a new allergy, or updating enrollment information. Note that at Step 7 these are the same steps a center would follow to edit child information.
• From the menu to the left, click Children.
• Click Manage Child Information.
• In the top right corner, select the Center for the child that needs to be updated.


• Use the filters to narrow down your search
- Choose whether this participant is Active, Pending, or Withdrawn.
- If you choose Withdrawn , you must enter a date into the After date field. This is to search for all children withdrawn after the date you select.
• Use the Select a Child drop down to choose the child to edit.
• Select the child’s name in the dropdown.


• From this screen, use the orange Edit buttons to edit the child information.
• Click Save.


Video Link: Edit Participant Details
◦ Menu Templates
◦ Create a Master Menu
◦ Record Individual Center Menus
◦ Understand the Menu Calendar
◦ Daily Menu
◦ How to Record Actual Quantities
◦ Menu Examples
◦ Menu Reporting
◦ Adjusting Grain Ounce Equivalents
◦ Manage Menu Footers
◦ Manage Formula Types
◦ Center Attendance and Served Meals
◦ Recording Meals for Infants
◦ Manage School Calendar
You can use Menu Templates to create your full 4-week cycle menu in KidKare. Once your Menu Templates are built, you can then add them to the Daily Menu easily without having to build them out week by week.

• From the menu to the left, click Menus/Attendance.
• Select Menu Templates. The Menu Templates page opens.
• At the top of the page, select Infants or Non-Infants.
• Click Add Menu.
• Click the Which Meal Would You Like to Add drop-down menu and select Breakfast, Snacks, or Lunch/Dinner.
• Click the What is the Name of This Menu box and enter a name for this menu.
• From the menu to the left, click Menus/Attendance.
• Select Menu Templates. The Menu Templates page opens.
• Locate the menu to change.

• Click next to the menu to edit. The menu details display.
• Click Edit.
• Select new foods and enter a new menu name, if needed.
• When finished, click Save.
Note: When naming your Menu Templates, keep in mind that this is what you, your staff, and your guardians will see on the Menu Calendars you post or send out. Best Practice is to use names that describe the meal such as “Lasagna and Veggies” or “Egg Burrito with salsa”.
• From the menu to the left, click Menu Templates. The Menu Templates page opens.
• Click each drop-down menu and select the appropriate meal components.
• When finished, click Save.
• Click next to the menu to delete.

• At the confirmation prompt, click Delete.
You can create centralized menus for individual site use. First, create one or more master menu plans. Then, release them to the sites you choose. Once sites receive the master menu, they can print the Menu report and post it in their center for staff and parents to see.
The master menu feature was designed to be used for multiple sites that are using the same menu, such as those with a central kitchen, to make menu planning easier. If an individual center has its own menu plan that differs from other sites, there is no need to create master menus. Your center can plan their own menus from their own account.
• From the menu to the left, click Menus/Attendance.
• Select Master Menu Calendar. The Master Menu Calendar page opens.
• Click the Menu Name drop-down menu and scroll to the Enter New Master Menu box.
• Click the Enter New Master Menu box and enter a name for the menu to create.
• Press Enter.
• Double-click the date on which the menu should be served.
• Click the meal type to expand the section. For example, if you're adding lunch, click Lunch.
• Use the drop-down menus in the Non-Infants and/or Infants section to select the components for this meal.

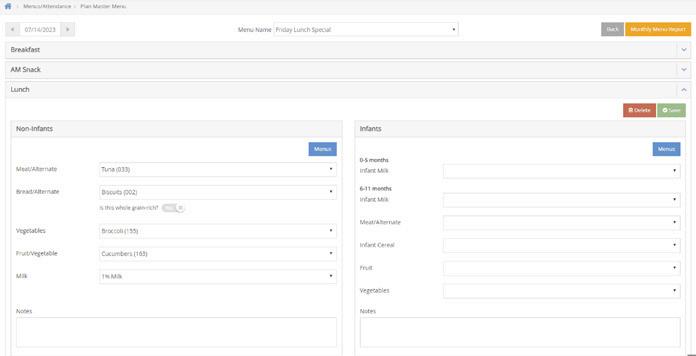
• When finished, click Save
• From the menu to the left, click Menus/Attendance.
• Click Master Menu Calendar.
• Select the Master Menu Name you want to copy menus from.
• Click Menu Actions in the top-right corner.


• Select Copy.
• The Copy Menus pop-up opens.
• Select Infants, Non-Infants, or both.
• Click Day.

• Click the Select a Day box and enter the day to copy. You can also click to select the date from a calendar.

• In the How Often Should Menu Repeat field, specify how often this menu should repeat: Daily, Weekly, or Monthly).
• Set up repetition frequency according to your selection in the How Often Should Menu Repeat field.
• Specify when to stop repeating this menu:
- End After: Select the End After option. Then, click the Occurrences box and enter the number of occurrences.
- End By: Select the End By option. Then, click the Select a Day box and enter the date on which to stop repeating the menu.
• Click Continue.
• At the confirmation prompt, review your selections and click Copy Menus.

• From the menu to the left, click Menus/Attendance.
• Click Master Menu Calendar.
• Select the Master Menu Name you want to copy menus from.
• Click Menu Actions in the top-right corner.


• Select Copy.
• The Copy Menus pop-up opens.
• Select Infants, Non-Infants, or both.
• Click Multi-Day.


• In the What Days Would You Like to Copy Your Menus From section, select the days you need to copy. Enter the first date in the first box, and enter the last date in the second box. You can also click to select dates from a calendar.

• Click the Begin Pasting On box and enter the day on which to begin pasting your menus. You can also click to select dates from a calendar.

• Specify whether to skip weekends. Weekends are set to skip by default.
• Click Continue.
• At the confirmation prompt, review your selections, and click Copy Menus.

Once you have finished your Maste Menu for the month, you will assign the menu to the proper centers.
• From the menu to the left, click Menus/Attendance.
• Click Master Menu Calendar.
• Select the Master Menu Name you want to copy menus from.
• Click Menu Actions in the top-right corner.


• Select Assign.
• The Assign pop-up opens.
• Select which centers will get this menu, click Save.
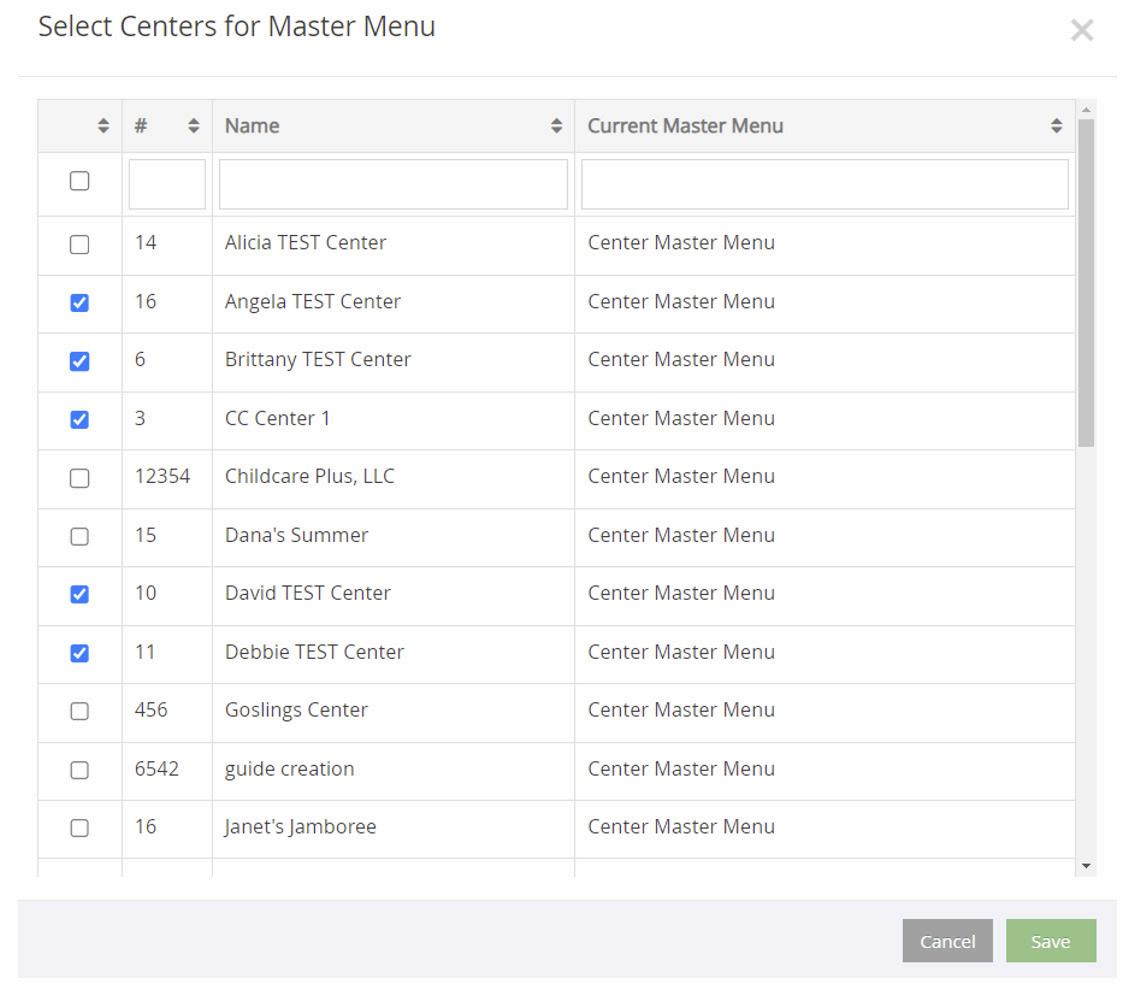

• Click Menu Actions again, select Send.

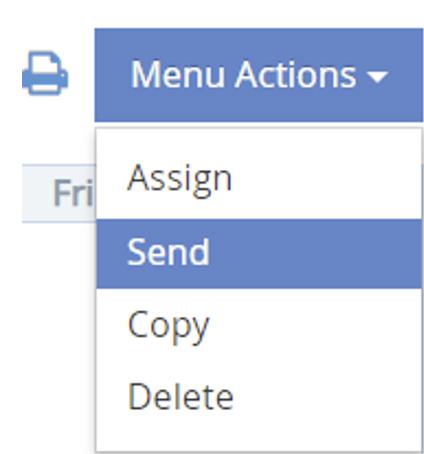
• Click Menu Actions again, select Send.
• A confirmation pops-up, click Yes , then ok.
• From the menu to the left, click Menus/Attendance.
• Select Center Daily Menu.
• Click the Select Center drop-down menu at the top of the window and select the center for which to enter menus.
• Click the date box and enter the date for which to record a menu.
• Select the appropriate meal components. You can also click Menu to select a saved menu template. A message displays when the meal pattern requirements for the meal type have not been fulfilled by the menu. Once the meal pattern guidance has been satisfied, and the required number/types of components are associated with the meal, the error no longer displays. You can click Create Menu to save this meal as a menu template. You can record menus for any selected center, if needed. Note that these are the same steps a center would follow to record menus themselves in KidKare, save for step 3.
• Click Non-Infants or Infants.


• Click to expand a meal. Click to collapse it again.

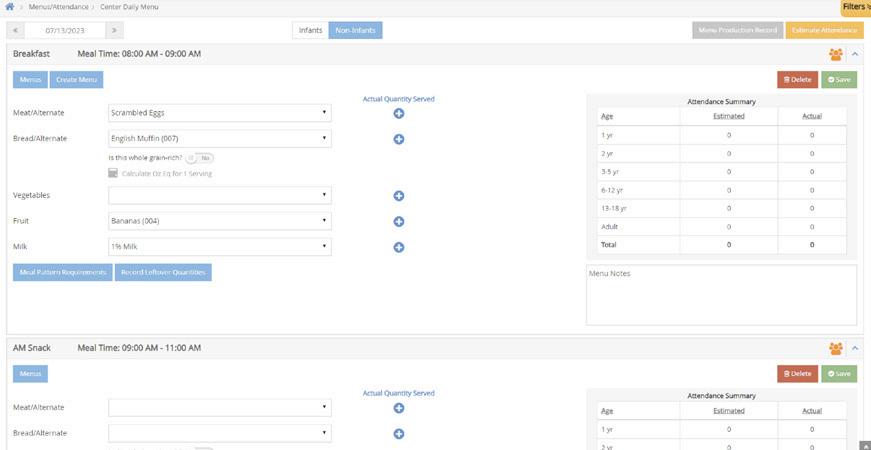
• If you are recording a Bread/Alt or Infant Cereal and need to override the ounce equivalents calculation saved to the food list to accommodate brand differences, click Calculate Oz Eq for 1 Serving under the Bread/Alt or Infant Cereal food item. Enter the updated serving from the nutrition label and click Save.

• If this center has participants over the age of 18 enrolled, the Adult Meal Pattern Substitutions section displays.

◦ Click next to Was yogurt substituted for milk? If you substitute yogurt for milk at this meal.

◦ Click next to Was mil served to adults? If milk was served to adults at this meal.
• Click Estimate Attendance to estimate attendance for this meal.
• Click the Menu Notes box and enter any notes about this meal, if needed.
• Click Save.
Use the Menu Calendar to schedule future menus, review menus a month at a time, and use as a visual of any missing components or meals. Note that these are the same steps a center would follow to record attendance and meal counts themselves.
To access the menu calendar:
• From the menu to the left, click Menus/Attendance.
• Click Center Menu Calendar. The Menu Calendar page opens


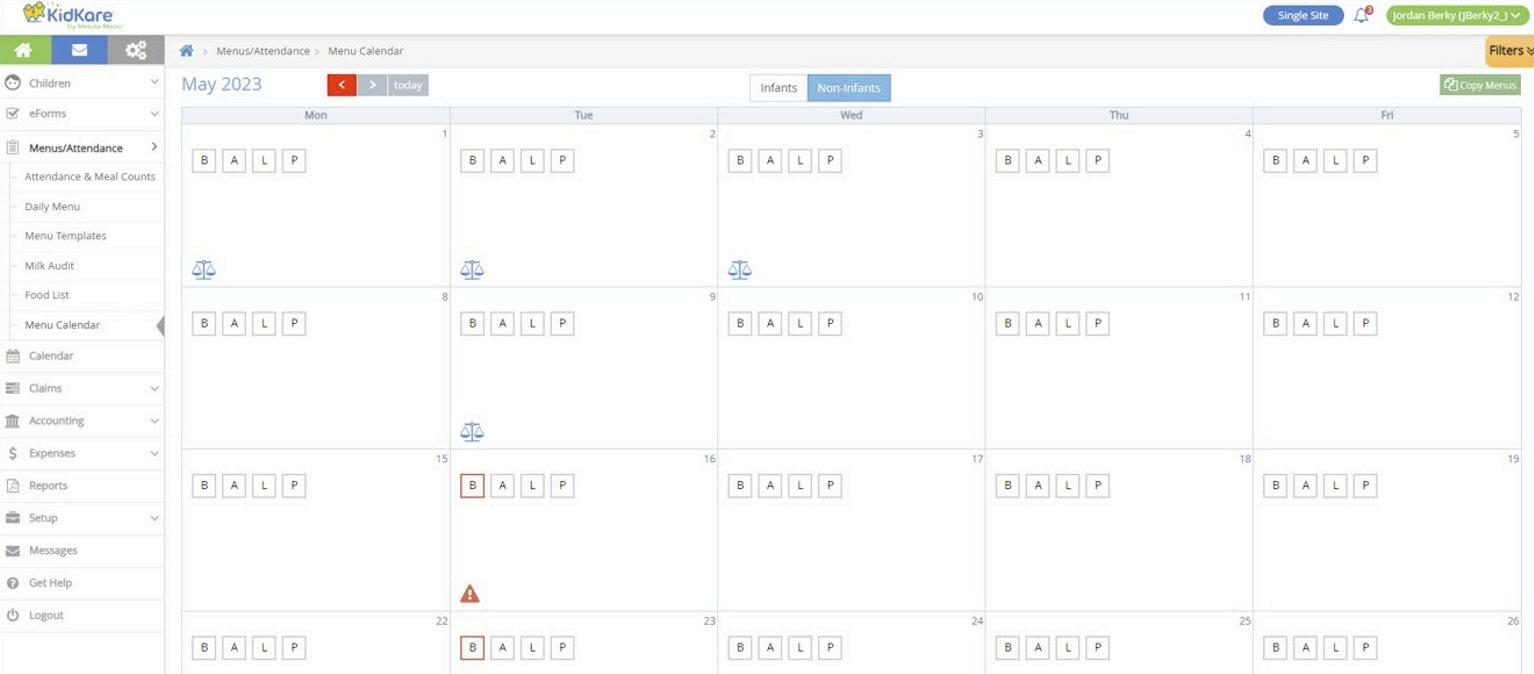
You can update the calendar display to suit your needs.
• Click Infants or Non-Infants to toggle between infant and non-infant menus. This option only displays if you have recorded meals and attendance/meal counts.
• Click Filters in the orange bubble in the top-right corner of the page to update what displays on the calendar:
- Weekends: Click Show to show weekends, and click Hide to hide weekends. Hiding weekends removes Saturday and Sunday from the calendar and expands the weekday columns. This is especially useful when viewing the calendar on a mobile device.
- View Warnings: Click each warning you need to see on the calendar. You can show or hide warnings that display for the following:
◦ Menu Incomplete
◦ Missing Estimated Attendance
◦ Quantities Insufficient
- Show Warnings As: Click Icons to show menu warnings as icons, or click Text to show menu warnings as text. The calendar displays all menu warnings as text by default. This allows you to become familiar with the warning messages. For more information, see the Menu Warnings section below:


• Click a day to access the Daily Menu page for that day. You can also click an empty date to add a meal to a day where meals have not yet been planned or served.
• Menu warnings display for menus that have been entered, but need additional information or have problems that may cause the meal to be disallowed. These warnings are specific to the menus you entered and have no correlation to any claims processing errors.


• Click and move between months. You can also click Today to return to today's date.
Menu warnings always display in the following order:
• Menu Incomplete: This warning displays when a meal is scheduled for the day and does not have all of the required components to be creditable under CACFP regulations. For example, if a lunch is scheduled and does not have all five (5) menu components, this alert displays on the calendar. Also, the affected meal is outlined in red on the calendar.


• Menu Incomplete: This warning displays when a meal is scheduled for the day and does not have attendance estimated.

• Quantities Insufficient: This warning displays for only those centers who are required to enter actual quantities served when a meal is/was scheduled for the current day or for a prior day, and actual quantities served have not been recorded or there was not enough served. This never displays for future dates, and it does not display for those centers who are not required to enter actual quantities served.


• From the menu to the left, click Menus/Attendance.
• Click Daily Menu.
• Click on the Non-Infants or Infants tab at the top depending on which menu you are building.

• Click to expand a meal. Click to collapse it again.

• Select the appropriate meal components. You can also click Menu to select a saved menu template.
The Daily Menu screen is where you will go to build the menu components for each meal you serve. Keep in mind that your state team manages the food components that are available on this screen. You will see components listed out as they are in the Food Buying Guide. Video

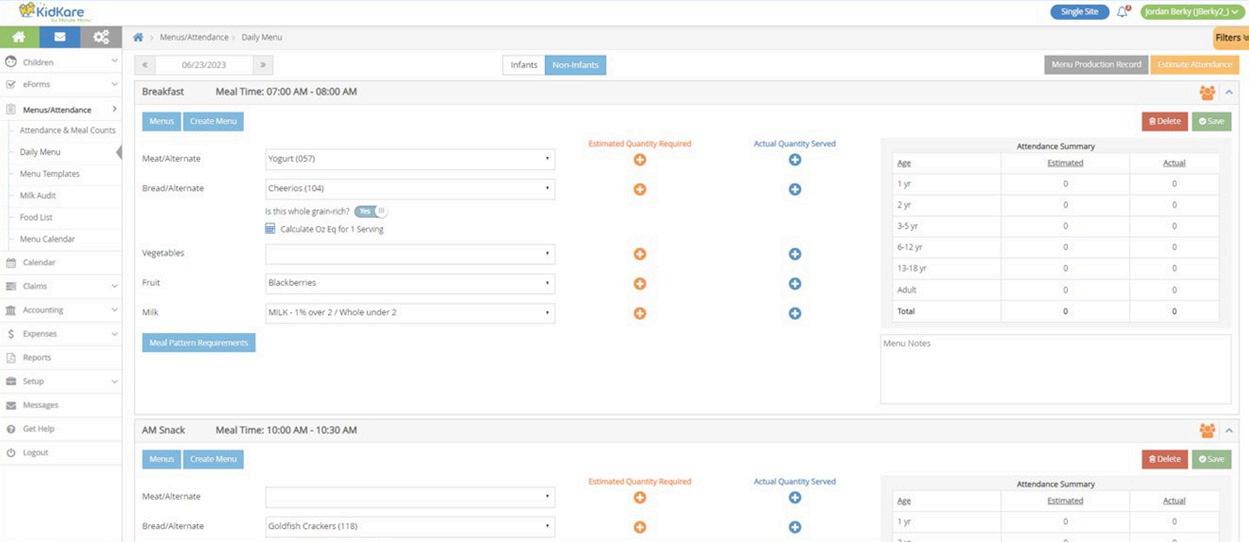
• A message displays when the meal pattern requirements for the meal type have not been fulfilled by the menu. Once the meal pattern guidance has been satisfied, and the required number/types of components are associated with the meal, the error no longer displays. You can click Create Menu to save this meal as a menu template.
• Click the Menu Notes box and enter any notes about this meal, if needed.
• Click Save.
Recording Actual Quantities Served is required by your state and must be done for each meal prior to submitting your claims.
• Go to the Daily Menu page. There are two ways to do this:
- From the menu to the left, click Menus/Attendance. Then, click Daily Menu.
- From the menu to the left, click Calendar. Then, double-click the day for which to estimate attendance.
• Click Non-Infants at the top of the page to show the correct menu.
• Click in the Actual Quantities Served column. The Enter Quantities Served pop-up opens and only displays those menu components where a food item was selected on the Daily Menu


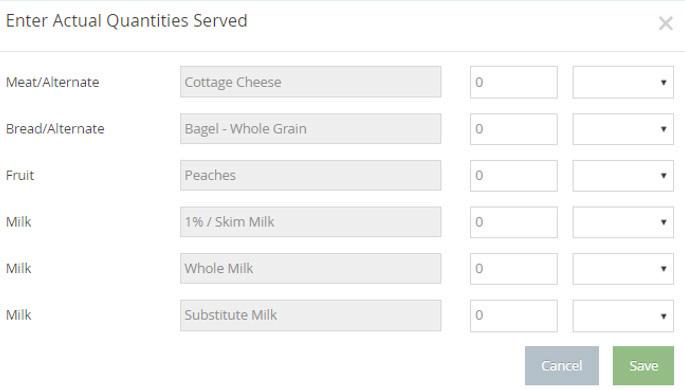
• Click each box and enter the quantity served.
Note: The Non-Infant pop-up shows three milk types: Whole Milk, 1%/Skim Milk, and Substitute Milk. This allows you to enter quantities served by milk type so they are properly calculated and reflected on the Menu Production Record and the Milk Audit.
• Click the corresponding drop-down menu and select the unit of measurement.
• Click Save.
If you save your Actual Quantities Served and it shows in red text, this means that the quantity you is not enough based on the number of participants in attendance and their required serving amount. Check your math to ensure the correct number and measurement were entered, or adjust the measurement type to be consistent with the Actual Quantities Required.


Note: You must enter Actual Quantities Served in a similar measurement type to the Actual Quantities Required.
Example: If the Actual Quantities Required shows cups, you can enter your Actual Quantities Served in cups, ounces, pints, gallons, etc. You cannot enter them as pounds because the software cannot convert a “volume” measurement to a “weight” measurement.
When selecting your food components, it’s important to use the primary components that make your meal creditable. For any “extra” items, you can use the Menu Template Name or the Menu Notes section.
Below are some examples of menu names and components to help guide you.


Crackers & Assorted Fruits


Shortcut: This can be created as an Infant Breakfast, Lunch, and Snack Template and then copied for all meals, every day. This way, Infant Teachers don’t have to select components for each infant and can just enter the amounts served.


The Menu Production Record lists the amount of food centers need to serve and purchase to adequately serve children in their care. It may also include actual quantities served and leftover quantities, if recorded (subject to policy M.01 and policy M.01f). Before printing this report, centers/sponsors should record center menus and estimate attendance (at least). Estimating attendance allows centers to plan ahead of time so they can purchase the appropriate quantities of food (as listed on the report). If you print this report after recording actual attendance and/or actual quantities served, the quantities needed based on actual attendance display on this report, as do the actual quantities prepared.


Sponsors can use this report when auditing centers to ensure that the correct amounts of food are being prepared and served.
Note: Sponsors should ensure that they have selected the correct Food Quantity Type in the Food Tool, as this affects the units of measure used on the Menu Production record when calculating quantities. If you are recording individual infant menus, the Menu Production Record for infants only shows quantities for the default infant menu. Ensure that centers have either recorded or estimated attendance.
• From the menu to the left, click Reports.
• Click the Select a Category drop-down menu and select Menus.
• Click the Select a Report drop-down menu and select Menu Production Record.
• Click the Select Center drop-down menu and select the center for which to print the report. You can also select All Active Centers to print this report for all centers.
• Click the next drop-down menu and choose from the following: Both, Non-Infant, or Infant.
• Click the From box and select the report start date.
• Click the To box and select the report end date.
• Click Run . The report downloads as a PDF.
We recommend you periodically review your sites’ planned menus to ensure that they meet meal pattern requirements each day.
When reviewing center menus, make sure that:
• Juice is only planned for once per day.
• There is a vegetable planned at each lunch and dinner.
• From the menu to the left, click Reports.
• Click the Select a Category drop-down menu and select Menus.
• Click the Select a Report drop-down menu and select Center Monthly Menu plan.
• Click the Date box and select the month for which to run this report.
• Click the Select Center drop-down menu and select the center for which to run this report. You can select All Active Centers to print this report for all active centers, or you can click Select Multiple Centers and set filters for the centers to include.
• Click Run. The report downloads as a PDF.

• A whole grain-rich food is planned for at least once per day. There are no grain-based desserts present.

• When recording menus, click Calculate Oz Eq for 1 Serving under the Bread/Alt food item. The Ounce Equivalent Calculator pop-up opens. The Bread/Alt you selected displays in the drop down.
Note: KidKare is pre-programmed with the most used grain ounce equivalent serving sizes. Use this to verify and update the serving information if your bread component is different than what is programmed into KidKare.
• Click the Serving Size box and update the common serving size, if needed. Following our example above, we'll leave this set to 1 Slice.
• Click the Serving Weight box and update the serving weight as stated on the nutritional label for your food. In our example, we need to change this to 45.
• Use the corresponding drop-down menu to select the weight unit. This will typically be grams (g), but some labels may give the serving weight in ounces. If this is the case, select ounce (oz). Once you set the new weight, the 1 Serving = box updates and displays the total ounce equivalents in one serving of your food item. Continuing our Brand B example, you'll see that Brand B contains 1.5 oz eq in one serving vs the 1 oz eq saved to the food list for Brand A.


• Click Save.
Once you save this override, it will apply to all quantities reported for this Bread/Alt on the menu. If you copy this menu for future use or save this menu as a template, this override is retained so you do not have to enter it again.
Please note that this only applies to menus saved on the Daily Menu page—templates created on the Menu
Templates page will use the food list calculation until you override it after applying it to Daily Menu.

Note that the footer will also print on the center version of these reports. To add menu footers: You can add footers to infant and non-infant menus from the Manage Menu Footers CDT dialog box. The text you enter here prints on the following reports:
• From the menu to the left, click Administration.
• Select Manage Menu Footers.
• Center Monthly Menu Plan
• Center Weekly Menu Plan
• Center Weekly Menu - Non-Infants Only
• Center Weekly Menu - Infants Only
• Master Menu Monthly Plan - Non-Infants Only
• Master Menu Monthly Plan - Infants Only
• Click the Noninfant Menu Footer box and enter the text to display on non-infant menus.
• Click the Infant Menu Footer and enter the text to display on infant menus.
• When finished, click.
Use the Manage Formula Types window to create formula options you can select when creating child records and recording infant menus.
• From the menu to the left, click Administration.
• Select Manage Formula Types. The Manage Formula Types page opens.
• To add a formula type:
- Click Add Formula Type . The Add Formula Type pop-up opens.
- Click the Formula Type box and enter the formula name.
- Click Save.
• To edit a formula type:
- Click the type to edit. The Edit formula Type pop-up opens.
- Update the name, as needed.
- Click Save.
• To delete a formula type:
- Click the type to remove. The Edit Formula Type pop-up opens.
Note: Ensure that you have selected the correct formula type to remove. There is no confirmation message, and the formula type is removed immediately.
- Click Delete.


You can record Daily Attendance and Meal Counts for any selected center, if needed. Note that at Step 4 these are the same steps a center would follow to record attendance and meal counts themselves.
• From the menu to the left, click Menus/Attendance.
• Click Center Daily Attendance/Served Meals.
• Select the center you are entering data for in the top right drop down.
• Make sure the correct date, classroom, and meal are selected at the top.

• Check the box next to each participant's name to mark attendance.


• Click to record a meal count. A participant must be marked in attendance before you can access this option.


Note: Participants with special diets or allergies noted on their record display with a red outline around their photo and (SD) next to their name for Special Diet.
You can record individual infant menus on the Attendance & Meal Count page. If you have already recorded an infant menu on the Daily Menu page, this menu is used as the default for all infants, and you can make adjustments here.
• From the menu to the left, click Menus/Attendance.
• Click Center Daily Attendance/Served Meals.
• Select the center you are entering data for in the top right drop down.
• Make sure the correct date, classroom, and meal are selected at the top of the page.

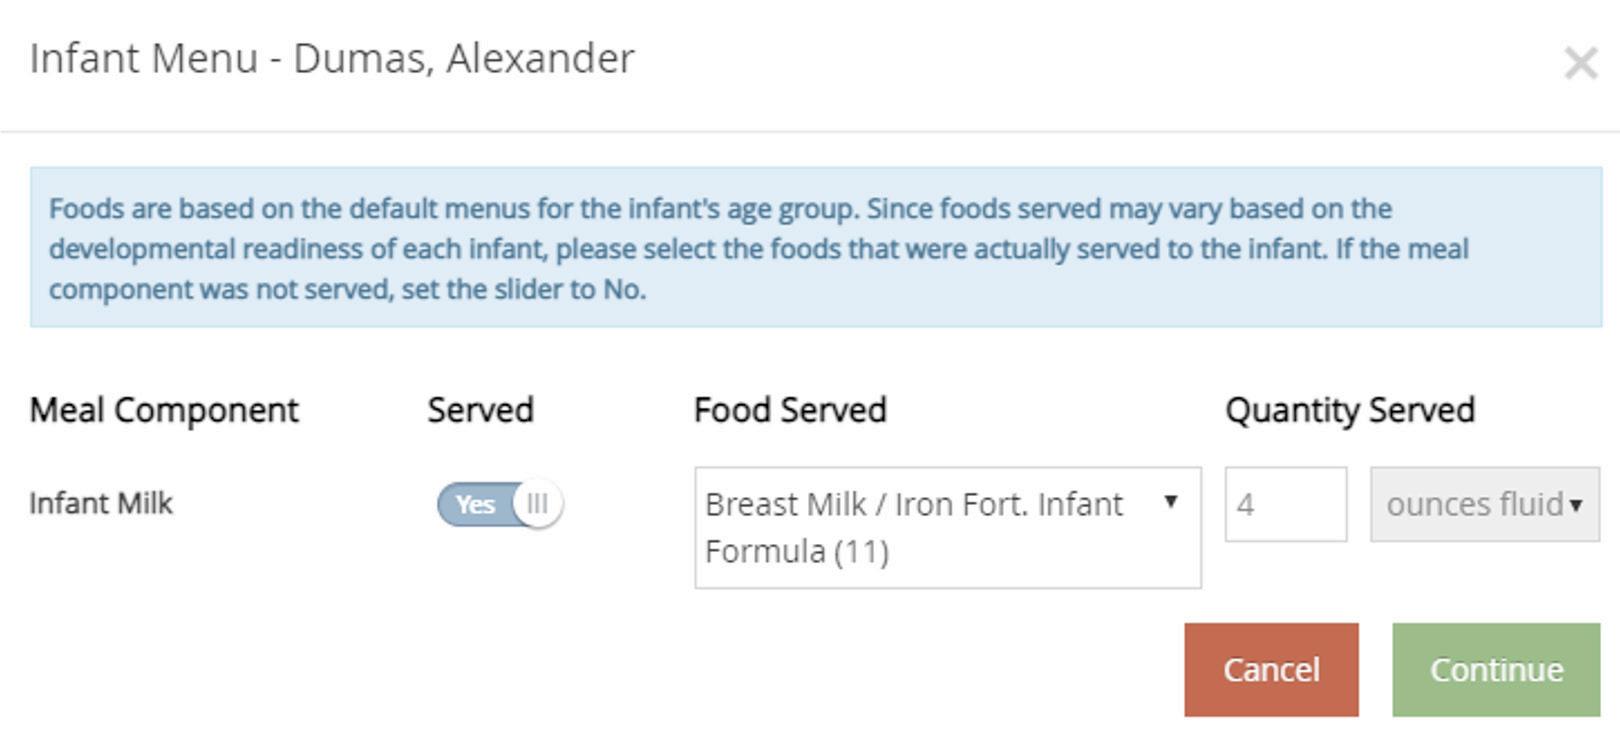
• Click to record a meal count for an infant. The infant must be marked in attendance before you can access this option. The Infant Menu pop-up opens.


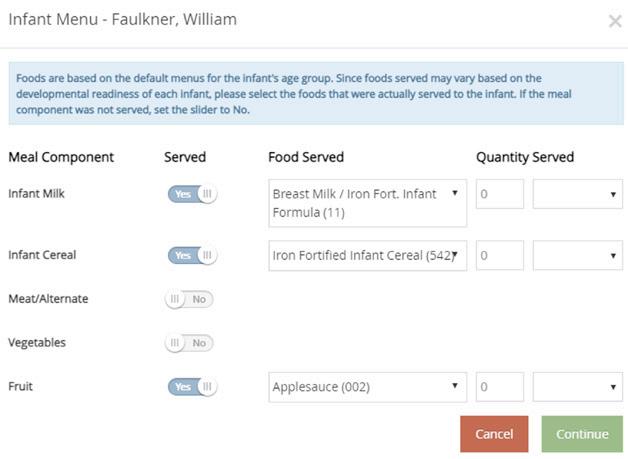
• If the infant is served something outside of the default menu (if one exists), follow the steps below. If the infant is served the default menu, go to the next step.

- Click next to each food component to enable or disable for this infant.
- Click the Food Served drop-down menu to select the food this infant is eating.
• If you are required to record quantities served, use the Quantity Served boxes to enter the amount served to this infant.
Note: If the infant is being served the default menu and the unit of measure used for recording quantities has already been set, you cannot change the unit used. For example, if the default menu has quantities recorded in tablespoons, you cannot switch the quantity to ounces. This ensures that KidKare can accurately calculate the quantities served for the default menu. The figure below shows the locked quantity for an infant in the 0-5 months age group.

• Click Continue.
• Repeat Steps 4-7 for each infant present at the meal.
• When finished, click Save.

If you have enabled individual infant menu reporting, you can print individual infant menus. The Infant Feeding Report lists menus for each infant served and includes the following for each meal: This report also includes information such as, the center's name and site number, whether the parent accepts center formula and/or food, the infant's age in months, the infant's date of birth, and more.
• Meal Components
• Food Served by Component
• Quantity Required by Component
• Quantity Served by Component
Each infant is listed on a separate page. This report is sorted by child name, and you can print it for all active centers or for your selected center.
To print this report:
• From the menu to the left, click Reports.
• Click the Select a Category drop-down menu and select Menus.
• Click the Select a Report drop-down menu and select Infant Feeding Report.
• Click the Select Center drop-down menu and select the center for which to print the report. You can also select All Active Centers to print the report for All Active Centers.
• Click the From and To boxes to set the date range for which to print this report.
• Click Run. The report downloads as a PDF.

The School Calendar page allows you to add school out days for your sites. This is useful for setting up summer vacation, holidays, or extended school closures. Adding school out dates to the calendar removes the requirement that sites select School Out when checking children in for the day.
You can add school out days per child, center, school, or school district. You can also add school out days for all children and all centers at once.
• From the menu to the left, click Menus/Attendance.
• Select School Calendar. The School Calendar page opens.
• Choose from the following options:
- All Children, All Centers: Create a school out event for all sites and chidlren.
- Center: Create a school out event for a single site. If you select this option, you must select a center at the top of the window.
- Child: Create a school out event for a specific child. If you select this option, you must select a center (top of the window) and a child (to the right of the calendar options).
- School District: Create a school out event for an entire school district. If you select this option, you must select a center (top of the window), a state (if you operate in multiple states), and a school district (to the right of the calendar options).
- School: Create a school out event for a single school. If you select this option, you must select a center (top of the window) and a school (to the right of the calendar options).
• To add School Out days:
- From the Draggable Events section, click and drag School Out to the calendar, and drop it on the first date of the event. If you are adding a single day, the process is complete.
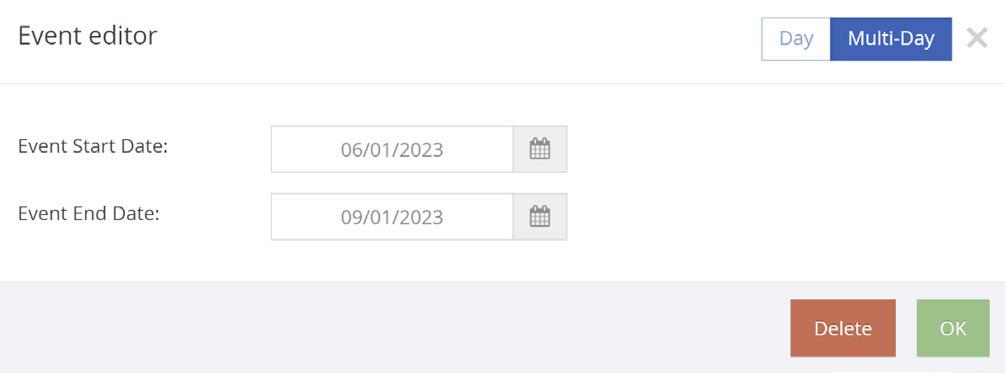
- If you need to add a date range, double-click the school out event you placed on the calendar. The Event Editor pop-up opens.
- Select Multi-Day.
- Use the Event Start Date and Event End Date boxes to update the date range. The Event Start Date defaults to the date on which you placed the event originally.
- Click OK. The event is added to the dates you specified.


• To remove School Out days:
- Double-click the event on the calendar. The Event Editor opens.
- Click Delete.
- At the Are You Sure prompt, click Delete.


If you sponsor centers who participate in the ARAS program, set ARAS Program school dates on the school calendar:
• On the School Calendar page, select All Children, All Centers, or select Center. If you select Center, click the drop-down menu at the top of the page to select a s specific center.
• In the At-Risk Program School Dates section, click the Start box and enter the program start date.
• Click End and select the program end date.
Click Save.
◦ Children
◦ Attendance
◦ Centers
◦ Claims
◦ Menus
◦ Receipts
You can find all of these reports by clicking on Reports from the menu to the left and selecting the appropriate category.

• Child Roster: This report lists all children for a selected center or for all centers. It includes F/R/P counts and percentages, F/R/P basis, as well as basic demographic information and enrollment dates for the listed children.
• Child Roster [Center Version]: This report lists children for a selected center or for all centers. However, it does not include information beyond basic demographics and enrollment dates.
• Child List Export: This is a CSV list of all children. Use this report when looking for a report on allergies or special needs.
• IEF List: This report summarizes income eligibility form information saved to child records for a selected claim month. It includes household information if such information was saved to the child profile. Each center included prints on a new page.
• Child IEF/Enrollment Report: This report prints enrollment and/or income eligibility forms for selected children. You must select a center before you print this report.
• Verify FRP Consistent Within Family: This report lists the FRP status of related children enrolled in the selected center.
• Child Racial Count Summary - Per Center: This report provides a count of children broken down by race and ethnicity for a specific center.
• Children Claimed Without Absence: This report lists children claimed for the selected claim month without any absences.
• Children Not Claimed: This report lists active children who were not claimed for a selected claim month. Note that this report does not take attendance into consideration—it only checks whether an active child was claimed for that month.
• Weekly Attendance + Meal Count Report: This report lists weekly attendance and meal counts for multiple center or a specific center
• Monthly Claimed Attendance Only Report: This report includes claimed attendance for the selected claim month.
• Monthly Paid Attendance Only: This report lists paid attendance for a selected claim month. It also includes classroom totals.
• Monthly Paid Meal Counts by Age Group: This report lists paid meal counts for a selected claim month by age group. It also includes totals for each age group.
• Monthly Paid Meal Counts by Child: This report lists paid meal counts for a selected claim month by child. It includes totals for Free/Reduced/Paid meals, as well as At Risk Totals.

• Monthly Paid Meal Count Summary: This report lists all paid meals for a selected claim month. It is broken down by meal type.
• Weekly Paid Attendance + Meal Counts: This report lists weekly attendance, broken down by attendance and meal.
• Actual vs Estimate Meal Count Summary: This report compares actual meal counts with the estimated meal counts, broken down by meal.
• Daily FRP Report: This report provides a Free, Reduced, and Paid breakdown of all meals claimed each day in the selected claim month.
• Center Info Report: This PDF report lists centers and center details.
• Center Enrollment Statistics: This is a CSV list of centers that includes enrollment statistics broken down by Free/Reduced/Paid. It also includes numbers for missing enrollments, as well as total enrollment.
• Centers Disallowance Export: This is a CSV list of centers with disallowances for the selected claim month. It lists the center name, disallow reason, and the total number of disallowances for that center.
• Centers Error Summary Export: This report provides a summary of errors for your centers for a specific claim month.
• Centers Summary Export: This is a CSV list of centers that includes any assigned monitors, number of pending children, expiring enrollments and enrollment forms, and so on.
• Claims List Export: This is a CSV list of claims and claim details.
• Office Error Report: This report provides a quick claim overview and lists specific errors that occurred when processing the claim. This report also prints after you process claims. For detailed information about the errors that may appear on this report, see Error Codes.
• Center Error Letter: This report provides a quick claim overview and lists certain errors that occurred when processing claims for a specific center.
• Monthly Milk Audit Summary: This report summarizes milk totals entered via the Milk Audit feature. You can print this report as a PDF, or you can export it to a spreadsheet file.
• Claims Roster: This report lists children, enrollment information, FRP status, basis, and so on.


• Center Monthly Menu Plan: This report prints your centers' menu plans for the selected claim month.
• Center Weekly Menu/Non-Infants
Only/Infants Only: This report prints a single center's weekly menu plan. You can print this for a single week or the entire month.
• Master Monthly Menu Plan/Non-Infants
Only/Infants Only: This report prints master menus for the selected claim month.
• Menu Production Record: This report lists the amount of food centers need to serve and purchase to adequately serve children in their care.
• Menu Notes Report: This report prints any notes centers entered when recording menus. It is divided into non-infant notes and infant notes.
• Non-Profit Status Report: Use this report to ensure that centers are running a non-profit food service.
• Center Receipts Journal Report: View a list of all receipts. This report includes vendor, description, and expenses broken down by category.
• Monthly Receipt Totals: View a list of centers that submitted receipts, the total number of receipts submitted by each center, and the total of each expense category.
• Receipt List Export: Export receipt data to a spreadsheet file (XLSX). Use filters to select the exact data you need to export.

• Manage Vendors
• Manage & Verify Receipts
Vendors are typically stores from which sites purchase food. You can also add center staff as vendors to track their labor as receipts. You must add vendors before you can enter receipts for your sites.
• From the menu to the left, click Tools.
• Select Manage Vendors.
- To add a vendor:
- Click Add Vendor. The Add Vendor pop-up opens.
- Click the Name box and enter the vendor's name.
- Enter the remaining vendor information, as needed. Only the Name box is required.


- Click the Center drop-down menu and select the center to which to apply this vendor. All Centers is selected by default.


- Click Save.
• To delete a formula type:
- Click the type to remove. The Edit Formula Type pop-up opens.
Note: Each vendor you add must be unique. KidKare will notify you if a vendor already exists. Update the vendor's name to proceed.
• To edit a vendor:
- Click the vendor to edit. The Edit Vendor pop-up opens.
- Make changes to the information here, as needed.
- When finished, click Save.
• To delete a vendor:
- Click the vendor to delete. The Edit Vendor pop-up opens.
- Click Delete. The vendor is set to Inactive.

• To re-activate a vendor, click in the Reactivate column.
Vendors must be unique. You can merge duplicate vendors to single vendor records for ease of management.
• From the menu to the left, click Tools.
• Select Merge Vendors. The Merge Vendors page opens.
• In the Source Vendor section, select the vendor to merge.
• In the Destination Vendor section, select the merge destination.


• Click Merge.
Video Link: Manage Vendors
This section covers receipt entry and verification. The steps to add receipts are the same as those your centers use to enter their receipts.
Video Link: Manage & Verify Receipts
You will use Quick Entry to add expenses, you enter receipt items into category fields by dollar amount. The category fields calculate the total for the category by taking the sum of all numbers entered for the category. The running total is then compared to the receipt total.
• From the menu to the left, click Administration.
• Select Manage Verify Receipts.
• Click the Select Center drop-down menu at the top of the window and select the center with which to work.

• Click Add Receipt. The Add Receipts page opens.
• Click the Quick Entry tab.
• Complete the Expense Detail section.
- The Date, Vendor, and Receipt Total boxes are required.
- We recommend you also enter a Description for reporting purposes.
• Enter your milk quantities in gallons. You can also use the Gallons Converter:
- Click the Gal link next to the milk type, or type + (plus sign) in the milk quantity box.


- Enter the number of pints, quarts, half-gallons, and/or ounces of milk you purchased.
- Click Save.
• Enter your expenses in the Expenses Items section.
- Click the box next to the category to record, and enter the dollar amount. All expense categories except Unapproved count towards reimbursement for the food program.
- Press Tab to enter multiple, separate dollar amounts in each category.
- Click X next to a dollar amount to remove it.
- Type / (forward slash) in a box to populate it with the remaining difference.
• Click Save in the top-right corner. You can also click Save/Add Another to save your entry and begin adding another one.
Note: You cannot save your entry if the receipt and running total do not match. The receipt and running total must also both be greater than zero. You must also complete all required fields before saving.
Verifying receipts allows you to track which sites have sent you receipts and confirm the data is correct. Even though this step is optional, we recommend you complete it if you allow sites to enter their own receipts.
• From the menu to the left, click Administration.
• Click Manage Verify Receipts. The Manage Verify Receipts page opens.
• Use the drop-down menu and select a date range to view. You can choose from the following:
- Last 90 Days
- Last 60 Days
- Last 30 Days
- Current Month
- Previous Month
- Custom Date
• Click the link in the Date column to view the receipt details. The Edit Expense pop-up opens.
• Make any changes, as needed. When finished, click Save.
• Click Verify.
Note: You can click Verify All from the Manage Verify Receipts page to verify all receipts listed for the selected center for the selected date range. Also, to remove receipts you cannot verify, access the Edit Expense pop-up and click Delete. Deleting receipts is permanent.

You can now run the Milk Audit in KidKare, in addition to running it in Minute Menu
CX. Sponsors accomplish this through Observer Mode.
• Select Calculated to view view milk audit information based on calculated quantities (attendance x required quantities), or select Calculated + Actual Served to view milk audit information based on calculated and actual served quantities.
Note: This option may not display according to your settings. If this is the case, the numbers you are viewing are the Calculated numbers.
• The following information displays in the table for the selected month:
• From the menu to the left, click Claims and select Milk Audit.
• Click the Select Center drop-down menu at the stop of the page and select the center for which to view the Milk Audit. The Milk Audit displays.
• Click the Month box and select the claim month to view.
Note: According to your display settings, this option may be called something else, such as Children Expiring Within. For more information, see Set Display Settings.

- Previous Month Carry Over/Starting Balance: This may be the ending balance from the previous month (depending on your specific policy settings). To edit starting balances, click , enter the new amount, and click . Note that this option may not be available according to your preferences or the preferences your food program sponsor set (if you are a sponsored center).

- Purchased: This is the amount of milk purchased, based on receipt date.
- Required: This is the amount of milk required based on menus and meal counts.
- Written Off: This is the amount of milk written off for the month. For example, this number accounts for cases in which the milk was spilled, spoiled, and so on.
- End of Month Balance: This is the amount of milk leftover at the end of the month.
- Actual Served: This is the actual total of milk served during the selected month based on meal records. This row only displays if you select Calculated + Actual in Step 4.
- Actual End of Month Balance: This is the actual end of month balance based on the following formula: Carry Over + PurchasedWritten Off Actual Served. This row only displays if you select Calculated + Actual in Step 7.
• Click Print and choose a report to print. You can choose Summary Report or Detailed Report. Both reports download as PDFs.

Use the Daily Calendar to view and/or add milk events, such as purchases or write offs.
• Click Show Daily Calendar. The Daily Calendar displays at the bottom of the window. The Calculated version is shown in the figure below.


• Click the drop-down menu and select the milk type. You can choose from Whole, 1%/Skim, or Substitute.
• To add a write off:
- In the Draggable Events section, click the Write Off event and drag it to the calendar.
- Drop it on the day on which to apply it. The Milk Write Off pop-up opens.


Note: A day can only have one write off event at a time. You cannot change the date in the Milk Write Off pop-up. If you are a sponsored center, your food program sponsor must enable this feature.
- Click the text box and enter the amount of milk you are writing off.
- Click the corresponding drop-down menu and select Gallons, Pints, or Quarts. All units of measure are converted to gallons once you save.
- Click Save.
- To add a purchase:
◦ In the Draggable Events section, click the Purchase event and drag it to the calendar.
Note: You must have the Vendor/Receipts permission enabled on your account to access and work with Purchase events. If you are a sponsored center, your food program sponsor must enable this feature.
◦ Drop it on the day on which to apply it. The Add Expenses pop-up opens.


◦ Select Quick Entry or Itemized Entry.
◦ Enter your milk quantities. For instructions, see Add Receipts: Quick Entry.
◦ Click Save.
- To edit an event:
◦ Click the event to edit. A pop-up opens.
◦ Enter new information over the existing information. Note that you cannot change the event date.
◦ Click Save.
- To remove an event:
◦ Click the X in the right corner of the event banner.
◦ Respond to the confirmation prompt.
Items
The following items also display on the calendar:
• Required: Required amounts display for each day where an calculated or calculated + actual calculation is present. You cannot add, move, or remove these markers.

• Milk Shortage (Calculated): This icon displays on each day for which the daily ending balance value is calculated to be negative. Click this icon to view the anticipated shortage amount.

• Milk Shortage (Actual): This icon displays on each day for which the daily ending balance based on the calculated values is negative. Click this icon to view the actual shortage amount.
• Shortage Analysis: This section displays the calculated total amount of gallons you are short by day or by claim. This is determined by how your system is set up. For sponsored centers, your food program sponsor makes this distinction. If you selected Calculated + Actual at the top of the page, the actual shortages display as well.

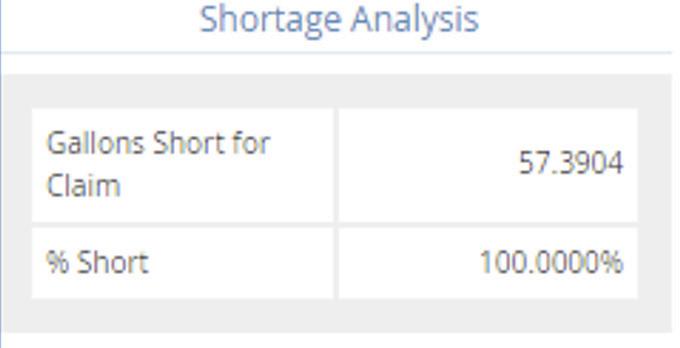

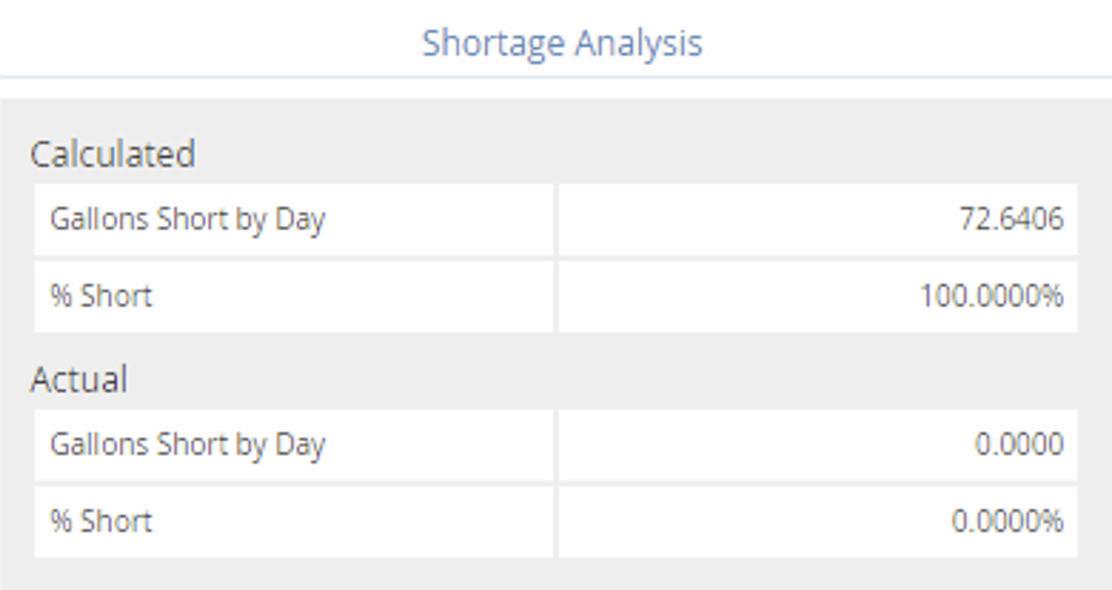


◦ Prepare to Process Claims
◦ Track Received Claims
◦ Process & Reprocess Claims
◦ Submit Claims to State
◦ Review & Manage Claims
KidKare tracks claim month-specific information independent of your computer’s date. This should be the month immediately before the calendar month (in most cases) and is the claim month on which you are working.
Only one person needs to advance the claim month for each account. Once the month has been changed in the account, other users must log out and log back in to the software before they see the change.
To change your current claim month:
• From the menu to the left, click Claims.
• Select Advance Claim Month. The Advance Claim Month page opens.


• Click to advance the claim month, and click to move the claim month back.

• Check the Automatically Withdraw Expired Enrollments option to mark all children with expired enrollments as withdrawn as of their enrollment expiration date
Note: Enrollment expiration dates ensure that children who aren't re-enrolled are not reimbursed more than one year after their date of enrollment (subject to policy D.1). However, children remain active even once their enrollment expires, unless you withdraw them in the Manage Child information window. Checking the Automatically Withdraw Expired Enrollments box when changing the claim month automatically marks children with expired enrollment as withdrawn.
• Click Save.
Video Link: Advance Claim Month
When centers enroll children, the children are automatically set to Pending status. Sponsors must then review and activate these children. There are two ways to enter categorical eligibility (FRP rates) and activate children: One at a time or multiple at a time.
• From the menu to the left, click Activate Children.
• Use the Find Records section to filter the records that display.
- Choose whether to activate children for All Active Centers or the Selected Center. If you choose the Selected Center option, click the Select Center drop-down menu at the top of this page and select the center.
- Click the E xclude Children if Enrollment Finalized drop-down menu, select Before or After, and then select a date in the corresponding date field.
- Check the Include Withdrawn Children Who Were Never Activated box to include withdrawn children who were never activated.
- Click Go to apply your filters.
• Check the box next to each child to activate. You can also check the box in the table header to select all displayed children. Double-check your selections before proceeding, as this action cannot be undone.

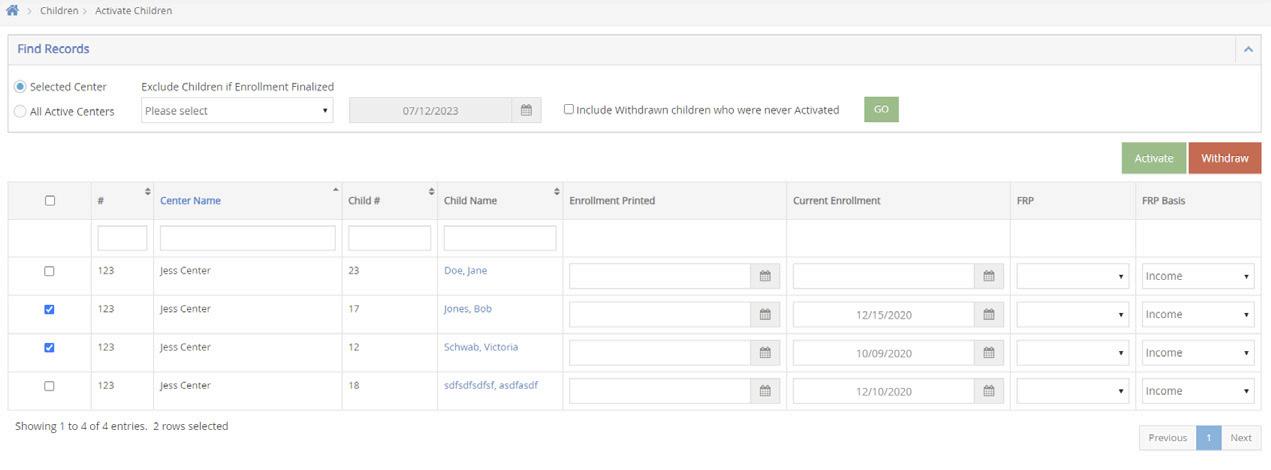
• Click Activate.
• From the menu to the left, click Activate Children.
• Use the Find Records section to filter the records that display.
- Choose whether to activate children for All Active Centers or the Selected Center. If you choose the Selected Center option, click the Select Center drop-down menu at the top of this page and select the center.
- Click the Exclude Children if Enrollment Finalized drop-down menu, select Before or After, and then select a date in the corresponding date field.
- Check the Include Withdrawn Children Who Were Never Activated box to include withdrawn children who were never activated.
- Click Go to apply your filters.

• Click a child's name to access the Manage Child Information page.
• Review the child's information and select Active at the top of this page. Your changes are saved automatically.

The Track Received Claims feature allows you to see which centers have submitted claims for processing. You can print or export this information and use the resulting data to contact centers who are not claiming and act accordingly.
• From the menu to the left, click Claims and select Track Received Claims. The Track Received Claims page opens.
• In the Find Records section, click the Claim Months drop-down menu and select the claim month(s) to view.
• Click the Not Received tab. Centers who have not submitted claims for the selected month(s) display in this tab. You can also see whether attendance was recorded, meals were recorded, and the last month in which you processed a claim for the listed centers.


• Print or export the report:
- Click Print to send the report to your printer.
• Click Submit.
• If an Inconsistent Claim Info box pops up, review the Number or days with children claimed and Number of days with menus again. These numbers might be different if a menu was entered but the center was closed for a holiday or other various reasons. If these numbers are correct, click YES to continue submitting. If a center does not submit their claim, the sponsor can mark it as submitted on the centers behalf to being processing.
• From the menu to the left, click Claims and select Mark Center’s Claim for Processing. The page opens.


• Select the center that needs to be submitted in the top right corner.
• Choose the claim month. Some claim data populates for the month selected. Review this data for accuracy prior to moving on to the next step.


Once a site submits a claim, process it in KidKare. When a claim is processed, KidKare looks at the data entered into the program and ensures that it meets CACFP requirements.
Before you begin processing claims, make sure that:
• Center data is accurate.
• Pending children have been activated (if the signed enrollment form has been received).
• Receipts have been entered and verified.
• School out days have been entered on the school calendar (if applicable).
It is okay if these tasks are not complete by processing time, as errors display for any disallowances once the claim is processed.
However, you will save time by ensuring that all data is entered and accurate before you process claims.
• From the menu to the left, click Claims and select Process Claims. The Process Claims page opens. If you do not operate in multiple states, go to Step 3.
• Click the State drop-down menu and select the state for which to process claims. You can select multiple states, or you can select All.
• Click the Claim Month drop-down menu and select the correct claim month.
• Click the Processing Actions drop-down menu and select Process New Claims.
• Clear the box next to each claim you do not need to process. All claims are selected by default.
• Click Process. or, to print the OER, click the down arrow next to Process and select Process and Print OER.
Review each error on the OER. Each error results either in an Allow/Warn or Disallow message. Errors resulting in a disallowance are deducted from the reimbursement. Errors resulting in a warning are notification messages that do not deduct from the reimbursement but need to be researched. If there are no claim errors, a Congratulations message displays. You can correct some errors and re-process the claim.
• From the menu to the left, click Claims and select Process Claims. The Process Claims page opens. If you do not operate in multiple states, go to Step 3.
• Click the State drop-down menu and select the state for which to process claims. You can select multiple states, or you can select All.
• Click the Claim Month drop-down menu and select the correct claim month.
• Click the Processing Actions drop-down menu and select Reprocess Existing Claims.
• Click Process . or, to print the OER, click the down arrow next to Process and select Process and Print OER.
Re-processing claims is sometimes necessary if you process a claim, but some piece of information was incorrect when the claim was processed initially.
• From the menu to the left, click Claims and select Process Claims. The Process Claims page opens. If you do not operate in multiple states, go to Step 3.
• Click the State drop-down menu and select the state for which to process claims. You can select multiple states, or you can select All.
• Click the Claim Month drop-down menu and select the correct claim month.
• Click the Processing Actions drop-down menu and select Reprocess Existing Claims.
• Click Process. or, to print the OER, click the down arrow next to Process and select Process and Print OER.


If a center submits their claim but needs to edit it for some reason, you can unsubmit the claim for that center.
If the center claim has NOT been processed, follow the steps below:
• From the menu to the left, click Claims.
• Select Un-Submit Center Claims. The Un-Submit Center Claims page opens.
• Select the claim month for the claim that needs to be sent back to the center, click GO.
• Check the box next to the center for which to un-submit claims.
• Click Unsubmit. The center can now access and edit their claim again. The center must submit their claim again once they are done making changes.
If the center claim HAS already been processed follow the steps below:
• From the menu to the left, click Claims.
• Select List Claims. The View Claims page opens.
• Set filters for the claims to view:
- Select the All Centers option or the Selected Center option. If you choose Selected Center, you must select a center at the top of the page.
- If you operate in multiple states, click the State drop-down menu and select the state(s) to view. You can also select All States.
- Click the Claim Month drop-down menu and select the claim month to view. You can also select All Months.
• Click Go.
• Click the link in the Month column to open the Claim Details page for the claim to un-submit.
• Click Delete.
• At the confirmation prompt, choose Claim ONLY option and then click Delete.


- Next, click Tools from the menu to the left and select Un-Submit Center Claims. The Un-submit Center Claims page opens.
- Check the box next to the center for which to un-submit claims.
- Click Unsubmit. The center can now access and edit their claim again. The center must submit their claim again once they are done making changes.
Video Link: Unsubmit Centers Claim
• From the menu to the left, click Reports.
• Click the Select a Category drop-down menu and select Claims.
• Click the Select a Report drop-down menu and select Office Error Report.
• Click the Month box and select the month for which to print the report.
• Click the Select Center drop-down menu and select the center for which to print the OER. You can also select All Active Centers to print the OER for all currently active centers.
• Click Run. The OER downloads as a PDF.
• From the menu to the left, click Claims.
• Select List Claims. The View Claims page opens.
• Set filters for the claims to view:

• Select the All Centers option or the Selected Center option. If you choose Selected Center , you must select a center at the top of the page.
- If you operate in multiple states, click the State drop-down menu and select the state(s) to view. You can also select All States.
- Click the Claim Month drop-down menu and select the claim month to view. You can also select All Months.
• Click Go.
• Click the link in the Month column to open the Claim Details page for the claim to view.
• Click the Claim Actions drop-down menu and select Office Error Report. The OER downloads as a PDF


Once you have created claims in KidKare via the Process Claims function or by manually entering claims, they are added to the View Claims page. Access this page to review, manage, and update claims as needed.
• From the menu to the left, click Claims.
• Select List Claims. The View Claims page opens.
• Set filters for the claims to view:
- Select the All Centers option or the Selected Center option. If you choose Selected Center, you must select a center at the top of the page.
- If you operate in multiple states, click the State drop-down menu and select the state(s) to view. You can also select All States.
- Click the Claim Month drop-down menu and select the claim month to view. You can also select All Months.
• Click Go . Claims matching the filters you set display.


• You can do the following in this window:
- Click the link in the Month column to view claim details.
- Click each column header to sort information in ascending or descending order.
- Click Filters to customize the columns displayed on this page.
The following is a definition of specific columns found on the View Claims page:
• #: This column displays the number assigned to the center who submitted the claim.
• Center Name: This column displays the name of the center who submitted the claim. Month: This column displays the claim month for which the claim was submitted.
• License: This column displays the center's license for which the claim was submitted.
• Details: Click View in this column to view claim details.
• Free %/Reduced %/Paid %: These columns indicate the percentage of children on the claim who are reimbursed at Free, Reduced, or Paid rates.
• ADA: This column lists the average daily attendance reported on the claim.
• Total: This column lists the total dollar amount of the claim.

• Submitted: This column indicates whether or not you've marked this claim as submitted to the state.
• Paid: This column indicates whether the listed claim has been paid.
• Adjusted: This column indicates whether you've made any adjustments to this claim.
The Claim Details window displays detailed information about claims you have processed. This includes the claim source, totals, and rates. You can also reprocess claims, print the Office Error Report, and adjust claim counts in this window.
• From the menu to the left, click Claims.
• Select List Claims. The View Claims page opens.
• Set filters for the claims to view:
- Select the All Centers option or the Selected Center option. If you choose Selected Center, you must select a center at the top of the page.
- If you operate in multiple states, click the State drop-down menu and select the state(s) to view. You can also select All States.
- Click the Claim Month drop-down menu and select the claim month to view. You can also select All Months.
• Click Go. Claims matching the filters you set display.
• Click the link in the Month column to open the Claim Details page for the claim to view.


• You can do the following in this window:
- Reprocess the claim.
- Delete the claim.
- Adjust claim counts.
- Print the Office Error Report.
- View the Claim Summary, Claim Status, Claim Totals, the Claim Error List.
Typically, when you delete a claim it is the result of a data entry error. If the claim you need to remove has not yet been submitted to the state, you can completely delete the claim from your system.
WAIT: Has this claim been submitted and/or paid? If so, do not delete it. You must zero the claim amounts, instead.
• From the menu to the left, click Claims.
• Select List Claims. The View Claims page opens.
• Set filters for the claims to view:
- Select the All Centers option or the Selected Center option. If you choose Selected Center, you must select a center at the top of the page.
- If you operate in multiple states, click the State drop-down menu and select the state(s) to view. You can also select All States.
- Click the Claim Month drop-down menu and select the claim month to view. You can also select All Months.
• Click Go.
Video Link: List Claims
• Click the link in the Month column to open the Claim Details page for the claim to un-submit
• Click Delete.
• At the confirmation prompt, choose Claim ONLY option or the Attendance and Claim option.


• Click Delete.

After claims are processed and reprocessed as needed, and the claims are ready to be submitted, you will generate an upload file to enter into the CNP site. Note: KidKare does not automatically put your data into CNP, you will run a report in KidKare and upload it to the state site.
• From the menu to the left, click Claims.
• Select Submit Claims to State . The Submit Claims to State page opens.
• Ensure that the correct claim month is selected. To access the upload file and/or to view claim reports:


• Click Generate and select the location in which to save the file. Do not change the name of the file.
• Once you have generated and saved the upload file, log in to your state agency's website and upload it.
Remember you must have your Sponsor Name and ID and Site Name and IDs entered correctly in order for the upload to work. Reference Update Your Company Information and Enroll & Manage Centers.
When you have filed a claim or are about to file a claim with your state agency, mark the claim as submitted in KidKare. When you mark claims as submitted, all processed claims are bundled together in a submission batch with the current date. If you later need to adjust any of these claims, or if any claims come in late, those claims are kept in a separate submission batch. This way, you can easily separate your original claim from any amended claims submitted to the state agency. This is helpful for audits. To mark claims as submitted:


• Click Mark as Submitted.
Once you mark a claim as submitted, all claim records associated with the claim are locked. Any changes made to the claim after you mark it as submitted are considered adjustments.
• From the menu to the left, click Claims.
• Select Submit Claims to State. The Submit Claims to State page opens.
• Ensure that the correct claim month is selected.
• Click the Submission Batch drop-down menu and select Not Yet Submitted.


◦ About eForms
◦ Add a Signature for eForms
◦ eForms Settings for Center Sponsors
◦ Enable SNAP Validation for eForms
◦ Enable Centers for eForms
◦ Customize eForms Email Templates
◦ Send Renewal Invitations with eForms
◦ Send New Enrollments with eForms
◦ View eForm Invitation Statuses
◦ Approve & Renew Enrollment with eForms
◦ Print Completed eFormd Records
eForms is an all-in-one enrollment process for the food program that eliminates paper forms for centers and your back-office. With this feature, you can send enrollment invitations directly to parents, track enrollment status, and approve and renew child enrollment with a single click
• Add a Signature to KidKare: Each form you approve and renew through eForms requires your signature. Before you approve and renew forms, add your signature to KidKare.
• Adjust eForms Settings: When you allow your centers to use eForms for enrollments, you can further customize the actions they can take. For example, you can specify that your centers must review and approve enrollments before forms are sent to you for final approval/renewal. These settings are located on the Settings page in KidKare.
• Enable Centers for eForms: Give centers access to the eForms feature. Centers remain enabled until you disable them.

• Send Invitations: Send invitations to parents/centers to update child enrollment forms. Use filters to select the centers/children to which to send invitations. Parents with an email address on file automatically receive an email that invites them to update child enrollment and/or income eligibility information online.
• Centers: Centers can view a list of all sent invitations, which allows them to follow-up with parents, have parents update enrollments online using a device at the center, cancel invitations (if needed), or even fill out paper forms (centers can then mark the form as completed on-site). Depending on your settings, centers must approve each enrollment before sponsors can renew it.
• View Invitation Status: You can see how many new enrollment forms and/or income eligibility forms have been completed, started (but not finished), canceled, and so on. The eForms feature provides an overview of all statuses across all centers who use the eForms feature.
• Approve & Renew: Once the enrollments are complete, review them by comparing the old forms to the new forms. You can also view parent signatures. Once you've reviewed the data, update the information in Minute Menu CX with the click of a button.
Each form you approve and renew through eForms requires your signature. Before you approve and renew forms, add your signature to KidKare in the Add Signature popup. To do so:
• Click Welcome in the top-right corner, and select Add Signature.

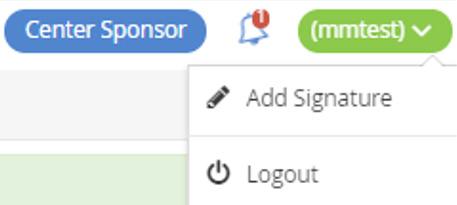
• Click the Type Signature box and type your name.
• Using your mouse, finger, or stylus, sign the E-Signature box.


• Click Accept & Sign.


When you allow your centers to use eForms for enrollments, you can further customize the actions they can take. These settings are located on the Settings page.

• Click . The Settings page opens.
• In the Center Access section, set eForms to Yes to allow your centers to access eForms in KidKare. If you need to customize this permission for specific centers, you can do so on the Enable Centers page. For more information, see Enable Centers.


• In the eForms Settings section, click next to each option to enable it. You can change settings for the following:
- Would you like to require sites to approve enrollment forms?
- Would you like to require sites to approve enrollment forms?
- Would you like to require sites to approve income eligibility forms? Who can send new enrollment requests?
- Are sites allowed to send new enrollment requests to parents?
- If a parent completes infant feeding details, do you want to indicate that the infant form is on file for the child?
- If a parent indicates they participate in SNAP, would you like to require them to provide their SNAP number for validation?
- Would you like to require SNAP/TANF number validation for parents to submit their forms?
◦ If so, would you like to disallow or warn the parent of incorrect formatting?

Note: If you require your sites to approve either form type, ensure that they add a signature to KidKare. Direct them to this help article for instructions. If you select "SITE" under the first two approval settings, the sponsor will not be able to approve or renew any eForms. If you select "SPONSOR" under the first two approval settings, the site will not be able to approve or renew any eForms. Use the option "BOTH" in order to allow the sites and/or sponsor to make final approvals on eForms.

• Your changes are saved automatically.
Note: You can only change the approval dropdown options in eForms settings if there are no current eForms pending. If there are eForms pending, those must be approved or cancelled in order to adjust these settings.


You can require that SNAP/TANF numbers be validated before parents can submit their forms. Validation ensures that the parent provided a correctly formatted SNAP/TANF number when completing income eligibility information.
When you enable this feature, you can also specify whether the parent is warned and able to submit their forms or whether parents cannot continue completing their forms until the number is formatted correctly.
To do so:

• Click . The Settings page opens.

• In the eForms Settings section, click next to Would you like to require SNAP/TANF number validation for parents to submit their forms? This enables SNAP/TANF validation.

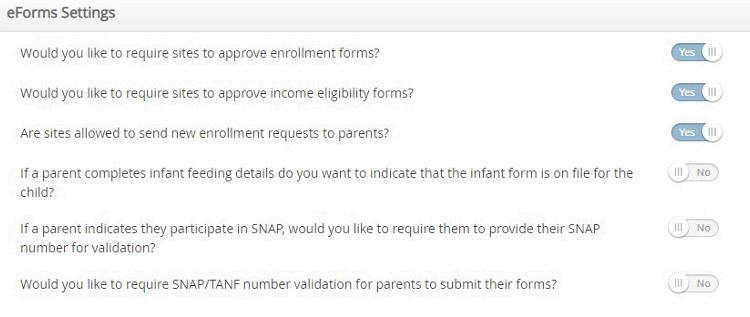
• Next, specify what to do when a parent inputs an invalid SNAP/TANF number:
- Set this to Disallow: The parent will receive a message advising them that the provided SNAP/TANF number is invalid, and they will be unable to complete and submit the form until they correct it
If you have not done so already, access the Settings page and ensure that eForms is enabled in the Center Access section. Click here for more information. If this setting is not enabled, none of your centers can access eForms in KidKare.
• From the menu to the left, click eForms.
• Click Enable Centers.
• Use the Center and Status boxes to filter the centers that display.

• Click in the Status column to enable or disable eForms status for the listed center.

• Click Review Changes.
• Ensure that your changes are correct.
• Click Save.


Customize the emails parent/guardians receive when you send enrollment invitations, send forms back for revision, and approve enrollments. You can also customize the Thank You email sent when the parent submits their information to you or your center.
• From the menu to the left, click eForms.
• Click Send Invitations. The Send Invitations page opens.
• Click Edit Email. The Initial Invitation Template page opens by default.
• Click the drop-down menu at the top of the page and select the template to edit. For example, select Thank You for Your Submission Template to edit the automated email parents/guardians receive upon form submission.

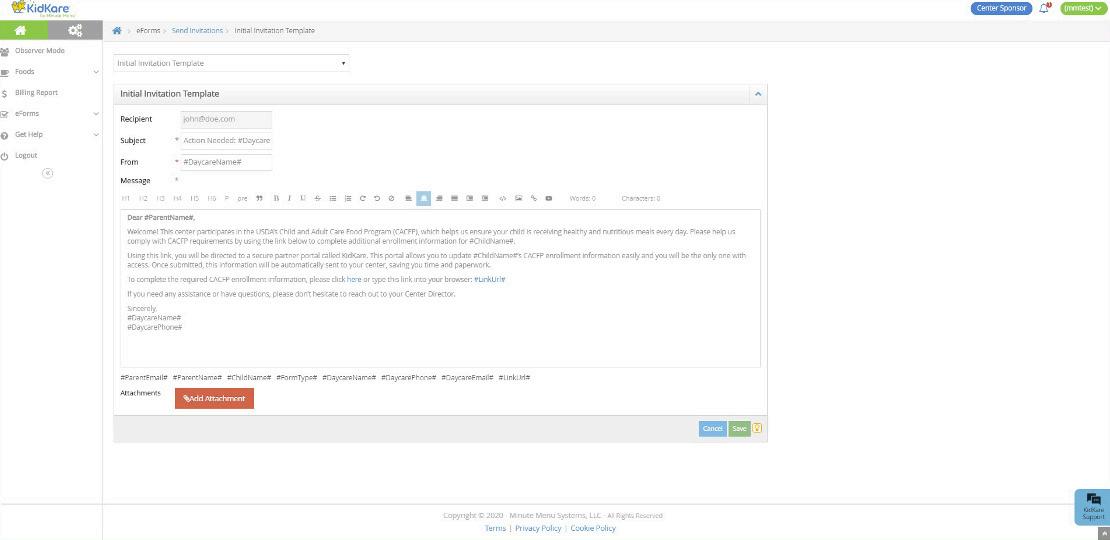
• Click Edit in the bottom-right corner. The Rich Text Editor (RTE) opens. You can edit the Subject, From , and Message fields.
• Variables you can use are listed at the bottom of the editor. To use this variables, click in the message and type the variable exactly as it appears. These will populate user-specific information in the message when it is sent. For example, #ParentName# will display as John Smith if this email is sent to John Smith.
• Click Add Attachment to add an attachment to this message.
• When finished, click Save.
Video Link: Edit eForms Email Templates
• From the menu to the left, click eForms.
• Click Send Invitations.
• Set filters for the centers/children to include.
- Click the State drop-down menu and select the state(s) to view. This option is only available if you are set up for multiple states.
- Click the Centers drop-down menu and select the specific center(s) to view.
- Click the Child Expired and Expiring Within drop-down menu and select 30 Days, 60 Days, 90 Days, or Custom Date. If you select Custom Date, set a date range in the From/To boxes.

- Click next to Hide Invitations That Are Currently Open to hide open invitations. This is set to No by default.
- In the What Forms Would You Like to See section, click elect Enrollment, Income Form, or both.

- Click Go.
• Check the box next to the child/center to which to send an invitation. You can also check the box at the top of the column to select all displayed records.


• Click and select All, EF, or IEF. Parents with an email address are emailed directly. displays next to children for whom there is no email address on file.

Video Link: Send Enrollment Renewal Invitations
Sending enrollment forms to new participants can be completed at the sponsor level, or at the site level as long permissions are set. Note that at Step 3 , these are the same steps a center would follow to send an enrollment form to a new participant.
• From the menu to the left, click Observer Mode.
• Select the Center in which you are wanting to enroll the new participant.
• From the menu to the left, click Children.
• Click List Children.
• Click and select Send eForms . Note that the Add button defaults to this selection upon page revisit.


• Complete the Participant Details section.
- Click the First Name and Last Name boxes and enter the participant's first and last name.
- Click the Birth Date box and enter the participant's birth date.
- Click the Classroom drop-down menu and select the classroom to which to assign the participant. You can select Unassigned to assign the participant to a classroom later. You can also click to add a new classroom.
- If you need to enroll a sibling at the same time, click Add Participant. Repeat Steps 3a - 3c for the additional child. You can add as many siblings, as needed. Adding children this way ensures that the parent only needs to complete one income eligibility form for the household.
• Complete the Guardian Details section.
- Click Existing to select an existing parent/guardian. Then, select the contact.
- Click New to add a new parent/guardian and enter their information.
• Click Send Invitation.
If the guardian does not have an email address, they can complete the form on-site.
• From the menu to the left, click eForms.
• Click View Status.
• Locate the appropriate record. For instructions, see View Status. If you are a sponsored center, see Work with eForms for Sponsored Centers.
• Click in the column to the far right. This opens the form on the device you are using.
• Have the guardian complete and sign the form.

Once parents complete the necessary enrollment and income eligibility forms, you must approve and renew participants on the Approve & Renew page. For more information, see Approve & Renew. You can also monitor enrollment status on the View Status page. For more information, see View Status.

The View Status page provides an overview of your centers' invitation statuses. You can see how many invitations have been sent, how many are complete, and so on.
• From the menu to the left, click eForms.
• Click View Status

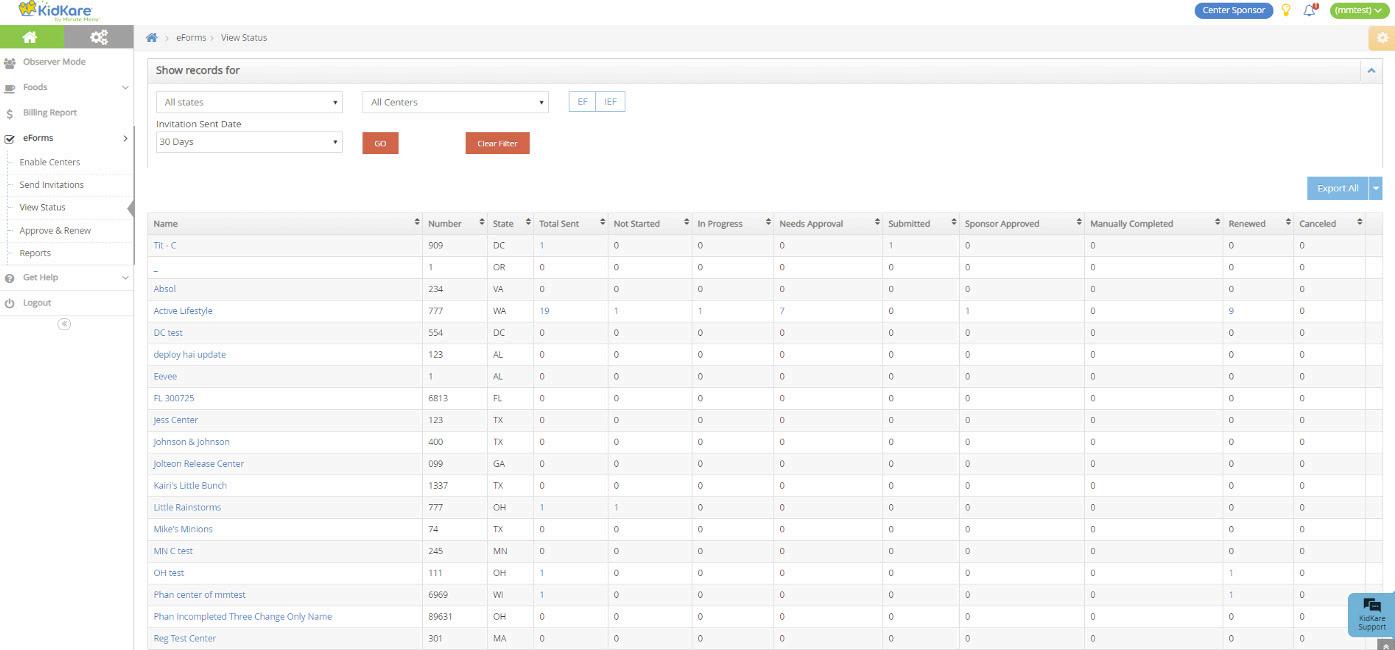
- Set filters for the information to view.
◦ Click the State drop-down menu and select the state(s) to view. This option is only available if you are set up for multiple states.
◦ Click the Centers drop-down menu and select the specific center(s) to view.
◦ Select EF, IEF, or both.
◦ Click the Invitation Sent Date drop-down menu and select 30 Days, 60 Days, 90 Days, or Custom Date. If you select Custom Date, set a date range in the From/To boxes.
◦ Click Go.
- Click each column to sort information in ascending or descending order.
- Click a center name to view that center in Observer Mode.
- Click next to Export and View or All to export eForms status information.
◦ Export View: This exports the information displayed on the View Status page.
◦ Export All: This exports complete invitation status details.
Once you have invitations in the Submitted status, you can approve and renew them. For more information, see Approve and Renew.


Click Filters in the top-right corner to choose which columns to display. You can also filter by access to the eForms feature. Possible columns include:
• Name Number
• State
• Total Sent
• Not Started
• In Progress
• Needs Approval

• Submitted
• Sponsor Approved
• Manually Completed
• Renewed
• Canceled
Not Started
In Progress
Needs Approval
Submitted
Sponsor Approved Manually Completed Renewed Canceled
The parents have not started filling out the form yet.
The parents have started filling out the form, but have not yet finished.
The form needs to be approved (by you or the center).
The parent or the center has submitted the form to you.
You have approved the forms.
The parent completed a paper form.
You have updated the system with the new date.
The invitation was canceled.
Video Link: View Status
Enrollment information is not updated in KidKare until you approve and renew enrollments on the Approve & Renew page. This allows you to control when enrollment information for your centers is updated. However, remember that children updated with a future enrollment date may be disallowed from the current claim.
In most cases, it is better to wait until the current claim is processed before renewing enrollments. For example, if your new enrollment start date is 10/1, you should wait until the September claim is processed before renewing enrollments.
When you have forms ready to review, a notification displays in the top-right corner of the page over the bell icon. The example below shows a notification that some centers have forms ready for approval and renewal.


You can approve and renew forms at the same time, or you can approve and renew the forms as two completely separate steps. Each step is described below:
• Approve: Review forms and check for errors. For example, check numbers for categorically eligible forms, verify parent signatures, review changes, compare last year's information with the updated information, and so on.
• Renew: Once you approve the forms, renew them. This updates the data in Minute Menu CX. Remember to keep timing in mind for this step.


• Approve and Renew: Approve and renew forms in one step.
Before you renew forms and update data in CX:
• Review and approve forms.
• Verify that the new dates will not cause disallowances on the current claim.
Verify that you have added your signature to KidKare. For more information, see Add a Signature for eForms.
• From the menu to the left, click eForms.
• Click Approve & Renew. The Approve & Renew page opens.

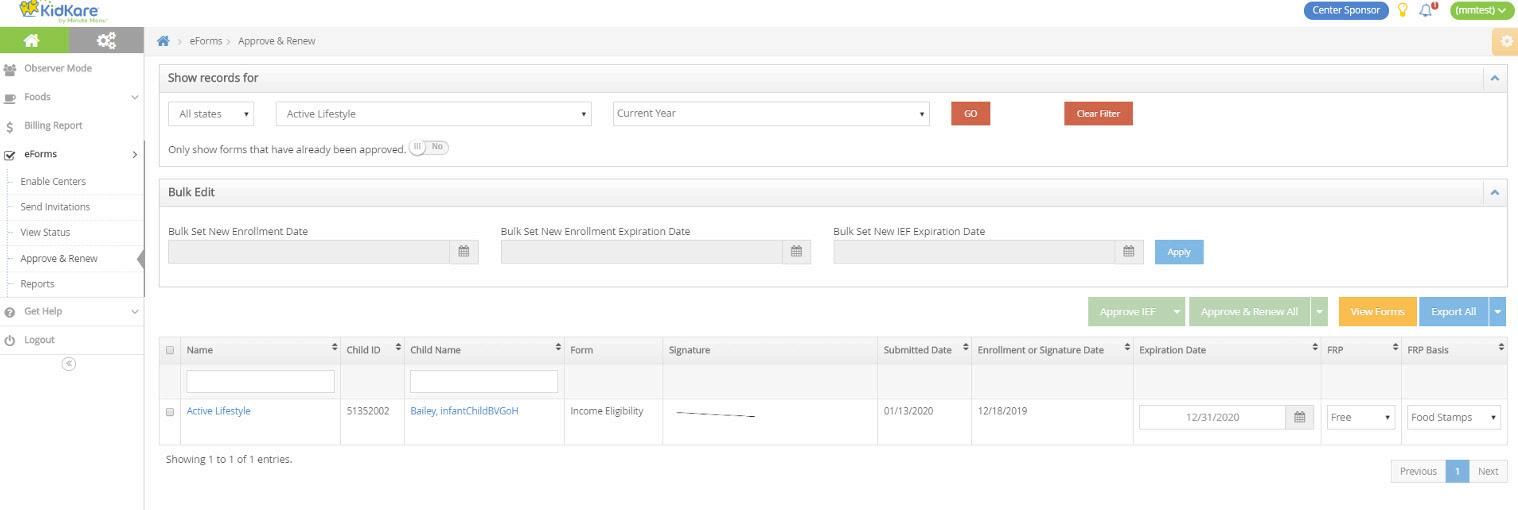
• In the Show Records For section, set filters, as needed.
- Click the State drop-down menu and select the state(s) to view. This option is only available if you are set up for multiple states.
- Click the Centers drop-down menu and select the specific center(s) to view.
- Click the Date drop-down menu and select 30 Days, 60 Days, 90 Days, Current Year, or Previous Year.

- Click next to Only Show Forms That Have Already Been Approved to filter to only those forms that have already been approved.
- Click Go.
Note: You can also click Filters in the top-right corner to set additional filters and sorts, as well as to specify which columns display on the page.
• Check the box next to the record(s) to update.
Note: Click View Forms to view the forms you are approving/renewing.
• Do one of the following:
- Bulk Edit: In the Bulk Edit section, set new dates in the Bulk Set New Enrollment Date, Bulk Set New Enrollment Expiration Date, and Bulk Set New IEF Expiration Date boxes. Click Apply . Click Approve or Approve & Renew.
- Accept Parent Signature Dates: Click Approve or Approve & Renew.
Notes: If you do not have a signature set up in KidKare, you are prompted to add one once you click Approve/Approve & Renew. You can also click a child's name to view their record and edit information, as needed. When finished, click Approve or Approve & Renew.
If a form requires revision, you can send it back to the parent for changes. To do so:
• On the Approve & Renew page, locate the appropriate child.
• Click the child's name. The Child Information page opens.
• Click Send Back for Revision.


• Select the form(s) to send back (EF, IEF, or both).
• Click the text box and enter notes for the parent. This information is included in the email sent to the parent.
• Click Send.
• Click next to Export and View or All to export approval information.
- Export View: This exports the information displayed on the Approve & Renew page.
- Export All: This exports complete approval data. Video Link: Approve & Renew Forms
Completed eForms are stored within KidKare. You can retrieve and print these forms, as needed. However, we do recommend that you simply store a digital copy, if needed. Remember, you can retrieve these forms from KidKare at any time.
• From the menu to the left, click eForms.
• Click Reports. The Reports page opens.


• In the Show Records For section, set filters for the forms to view.
- Select Enrollment or Re Enrollment.
- Select the form type. You can choose from EF, IEF, or All Form Types.
- Select the center(s) to view. You can select as many centers, as needed, or you can select All Centers.
- Select the date range to view. You can select Current Year, Previous Year, or Custom Date. If you select Custom Date, use the From/To boxes to set a date range.
• Click Run. Reports meeting the limits you set display.
• To download an individual form, click View Form. A PDF downloads. You can then print this PDF, as needed.
• To print multiple forms at once:
- Check the box next to each form to print.
- Click Combine & Print Forms. The forms you selected download.
Before you can use KidKare's messaging features, you must enable center messaging on the Settings page.

• Click . The Messages page opens to the Received tab by default.
• Click Send Message. The Message Editor opens.

• Click . The Settings page opens.

• In the Center Access section, click next to Messages. Your changes are saved automatically.


KidKare's messaging feature allows you to send messages directly to your centers in KidKare. Your sites can then review and respond to these messages, allowing both of you to keep a record of communications online.


• Click the Send To drop-down menu and select the center(s) to message. You can use the Search box in this menu to search for specific centers. To message all centers, select All Centers.
• Click the Subject box and enter a subject for this message.
• Click the Message box and enter the contents of your message.
• To add an attachment to your message:
- Click Add Attachment and select File.
- Browse to the location on your computer where the attachment is stored.
• Click the Signature box and enter your email signature.


• When finished, click Send.
Received messages display in the Received tab on the Messages page. It is divided into the following columns: Received From, Subject, and Date. You can also see the total number of messages, as well as the number that are unread, at the bottom of this page.

• Click . The Messages page opens and displays the Received tab by default. Your messages display in a table. Unread messages display in bold.
Note: You can only change the approval dropdown options in eForms settings if there are no current eForms pending. If there are eForms pending, those must be approved or cancelled in order to adjust these settings.
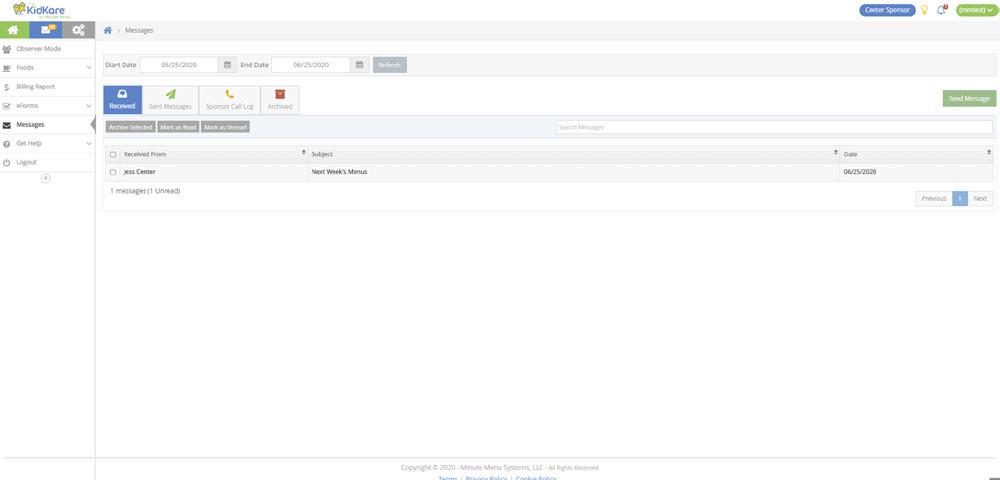

• Click a message to view the message content.


• If your center has attached a file, click the file name in the Attachments section to view and download it.
• When finished, click the Received tab to return to your received messages list.
• Use the Search Messages box to filter the messages that display. The message list is updated as you type.

• To mark messages as read/unread:
- Check the box next to the messages to mark as read/unread. You can also check the box at the top of the column to select all messages.
- Click Mark as Read or Mark as Unread.
• To archive messages:
- Check the box next to the messages to archive. You can also check the box at the top of the column to select all messages.
- Click Archive Selected. The messages you selected are moved to the Archived tab.
You can view messages you have sent in the Sent Messages tab. Like the Received tab, the Sent Messages tab is divided into the following columns: Sent To, Subject, Reports, and Date. The total number of messages and unread reports display at the bottom of the table.
• Click the Sent Messages tab.

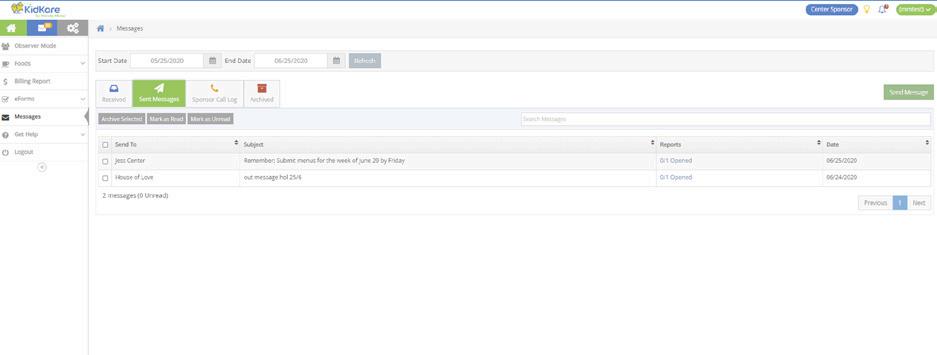
• To mark sent messages as read/unread:
- Check the box next to the message(s). Check the box at the top of the column to select all messages.
- Click Mark as Read or Mark as Unread.
• To archive messages:
- Check the box next to the message(s) to archive. Check the box at the top of the column to select all messages.
- Click Archive Selected. The messages are moved to the Archived tab.
To view message reports, click the link in the Reports column. For more information about message reports, see View Message Reports.

Note: You can also send messages from this tab. Click Send Message and select the recipients.
• Click . The Messages page opens.
Message reports provide useful data for your sent messages, such as the number of recipients who opened the message.
- Message Details: This section displays the message subject, content, and sent date. It also provides the number of recipients who have opened the message and the number of recipients who have responded to any attached survey.
To view this report:
• Click . The Messages page opens.

• Click the Sent Messages tab.
• Click the link in the Reports column for the message to view. The message report opens.

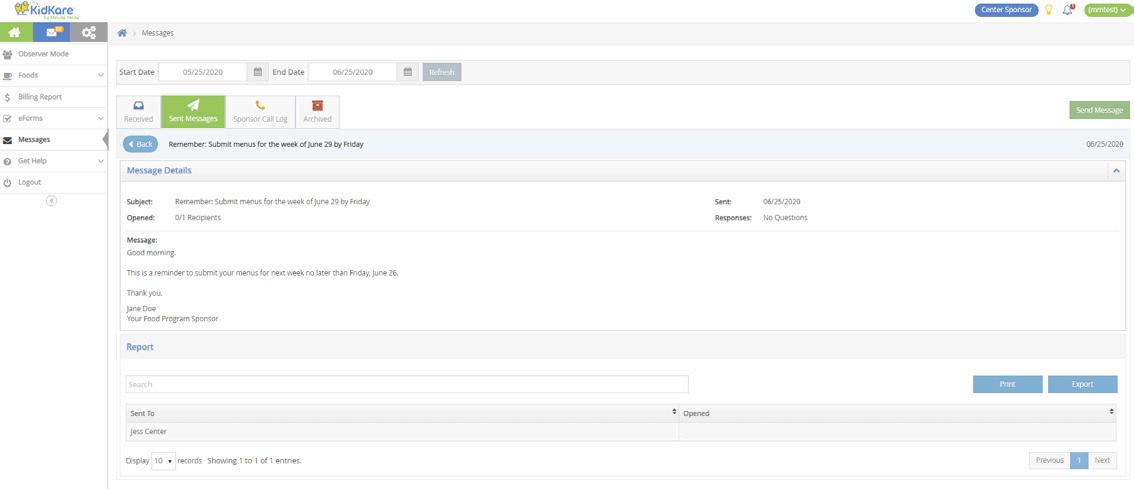
• This report is divided into the following sections:

- Questions: This section displays any survey questions you included in your messaging. If you did not include a survey in your message, this section does not display.
- Report: This section provides a review of recipients who have opened the message.


To review all training videos for your sites
click the button below:
Here are the first 4 set of videos you should have your centers watch:






We constantly strive to enhance our customer support and ensure that you have access to the appropriate resources when you require our assistance. This resource guide will assist you in identifying the most effective procedures for obtaining the necessary support for you and your team.
Our Training Hub and Knowledge Base are filled with every resource you may need to help with all of our products and features. We suggest starting here first:


Contact Support through Email or Chat
• Live chat with us by clicking the icon in the lower left corner of any KidKare screen (login to app.KidKare.com with your HX or CX username).

• For technical assistance, email support@kidkare.com and mention that you are located in Louisiana.
• You may request someone call with the solution after you provide details of your issue in email or chat.

Call us at 972-671-5211 press option 2 for support and then 1 for sponsors.
Contact Support through Email or Chat
• Note anything you have tried to fix the issue, like the below general tips, so we know not to suggest them again.
• Clarify the urgency in the subject line (can't submit my claim, question about OER).
• Reply to our email so that we know all the information you have already shared with us instead of sending a new email on the same topic.
• Detailed description of the issue including:
◦ Your name, login, and state: your account name, number, and Louisiana.
◦ Who is impacted (name and login).
◦ Are multiple users impacted or just one that you know of.
◦ Do you have the same issue when using different computers.
◦ Details of issue. Example: specific report name, claim date, provider, or participant name.
◦ Screenshots (hold down the shift and windows keys and type ‘s’. Drag your cursor over the area where you want a screenshot).
General Tips
• Some issues may be with your computer or internet, not necessarily our software. Try the tips at this link to resolve these issues: Troubleshoot Login Issues.
◦ Accessing a different website (google your local grocery store) to determine if there are issues with your internet connection.
◦ Refresh your browser.
◦ Clear your browser cache (be sure to clear for 'All Time').
◦ Restart your computer.
