eForms
Single-SiteManual







Your KidKare Food Program package includes a subscription to eForms. eForms is an all-in one enrollment process for the food program that eliminates paper forms. With eForms, you can:
• Send Invitations: Send forms to guardians via email. Guardians can then fill out and submit the forms from their computer or mobile device. Guardians can only submit completed forms, so you only receive forms that are 100% complete.
• Track Enrollment Status: Track form completion on the View Status page, resend invitations, and open forms for guardians to complete onsite.
• Approve & Renew Enrollment: Once forms are submitted, review them directly from your computer or device, approve them, and renew enrollment.
All forms are stored digitally, and you can retrieve them at any time. This saves time and space by eliminating the need to print and re-print forms.
Click here to print a useful checklist for getting started with eForms. Follow along with the steps, and check each item off as you complete it.
You can use eForms to enter basic information about a participant and then send an invitation to their guardian to complete and sign the enrollment form.
• From the menu to the left, click Children.
• Select List Children.
• Click on Send eForms in the top right corner. If is shows Add Manually instead of Send eForms, Click and select Send eForms.


• Complete the Child Details section.
◦ Click the First Name and Last Name boxes and enter the participant's first and last name.
◦ Click the Birth Date box and enter the participant's birth date.
◦ Click the Classroom drop-down menu and select the classroom to which to assign the participant. You can select Unassigned to assign the participant to a classroom later. You can also click to add a new classroom.

◦ If you need to enroll a sibling at the same time, click + Add Child. Repeat Steps 4a - 4c for the additional child. You can add as many siblings, as needed. Adding children this way ensures that the parent only needs to complete one income eligibility form for the household.
• Complete the Guardian Details section
◦ Click Existing to select an existing parent/guardian. Then, select the contact.
◦ Click New to add a new parent/guardian and enter their information.
• Click Send Invitation.
If the guardian does not have an email address, they can complete the form on-site.
• From the menu to the left, click eForms.
• Click View Status.
• Locate the appropriate record.

• Click in the column to the far right. This opens the form on the device you are using.
• Have the guardian complete and sign the form while on site.
Once parents complete the necessary enrollment and income eligibility forms, you must approve and renew participants on the Approve & Renew page. You can also monitor enrollment status on the View Status page. For more information.
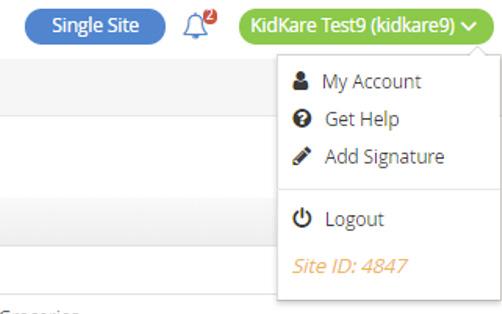
You must add a signature to KidKare when using eForms. This signature is added to all eForms you approve or approve and renew.
• Click Welcome in the top-right corner, and select Add Signature.
• Click the Type Signature box and type your name.

• Using your mouse, finger, or stylus, sign the E-Signature box.

• Click Accept & Sign.
Video Link: Add Signature for eForms
When you send eForms invitation, revision request, etc. to a guardian, they receive it via email. You can customize these emails to suit your business.
• From the menu to the left, click eForms.
• Select Send Invitations.
• Click Edit Email. The template page opens and displays the Initial Invitation template.

• Click the Template drop-down menu and select the email template to change.
• Click Edit.
• Update the Subject, From, and Message boxes, as needed.
◦ Variables you can use to fill-in certain information are listed at the bottom of the editor (#ParentName#, #ChildName#, and so on).
◦ When editing the Message, use the toolbar to format your text. You can also insert URLs, insert images, embed videos, and switch to an HTML editor.
• Add attachment if needed.
• When finished making edits, click Save.
Video Link: Edit Email Templates
Participant records that do not have an associated email address are indicated by on the View Status page. You can quickly add an email address to these records without leaving this page.
• From the menu to the left, click eForms.
• Click View Status.
• Click the participant's name in the Child Name column. A pop-up opens and displays the guardian's contact information.
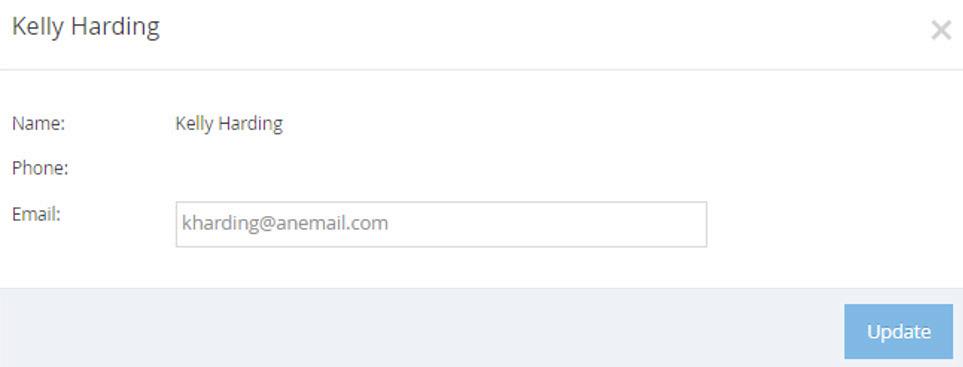

• Click the Email box and enter a valid email address.
• Click Update.
The Send Invitations page is where you send invitations to renew enrollment with your center.
• From the menu to the left, click eForms.
• Click Send Invitations

• Set filters for the participants to include.
◦ Click the Children Expiring Within drop-down menu and select a date range (30 Days, 60 Days, 90 Days, or Custom Date).
Note: According to your display settings, this option may be called something else, such as Children Expiring Within. For more information, see Set Display Settings.
◦ Click the slider next to Hide Invitations That Are Currently Open to hide open invitations. This is set to No by default.
◦ In the What Forms Would You Like to See section, click Enrollment, Income Form, or both.
◦ Click Go.
• Check the box next to the participants to which to send forms. You can also check the box at the top of the table to select all displayed participants.
◦ Only the records on the page you are viewing are selected. You can click the Display Records drop-down menu to display additional records (10, 25, 50, or 100).
• Send the form(s).
◦ To send both enrollment forms and income eligibility forms, click Send All.

◦ To send a specific form, click next to Send All and select the form to send.
Video Link: Send Renewal Invitations & The Guardians View of an Enrollment
The View Status page provides a central place for you to view enrollment status for all participants at your center. You can quickly see who has started their forms, completed their forms, what forms are ready for approval, and so on. You can also take action on invitations, such as re-sending them, opening forms for onsite completion, cancelling invitations, and marking invitations as manually completed.
• From the menu to the left, click eForms .
• Click View Status. The View Status page opens.
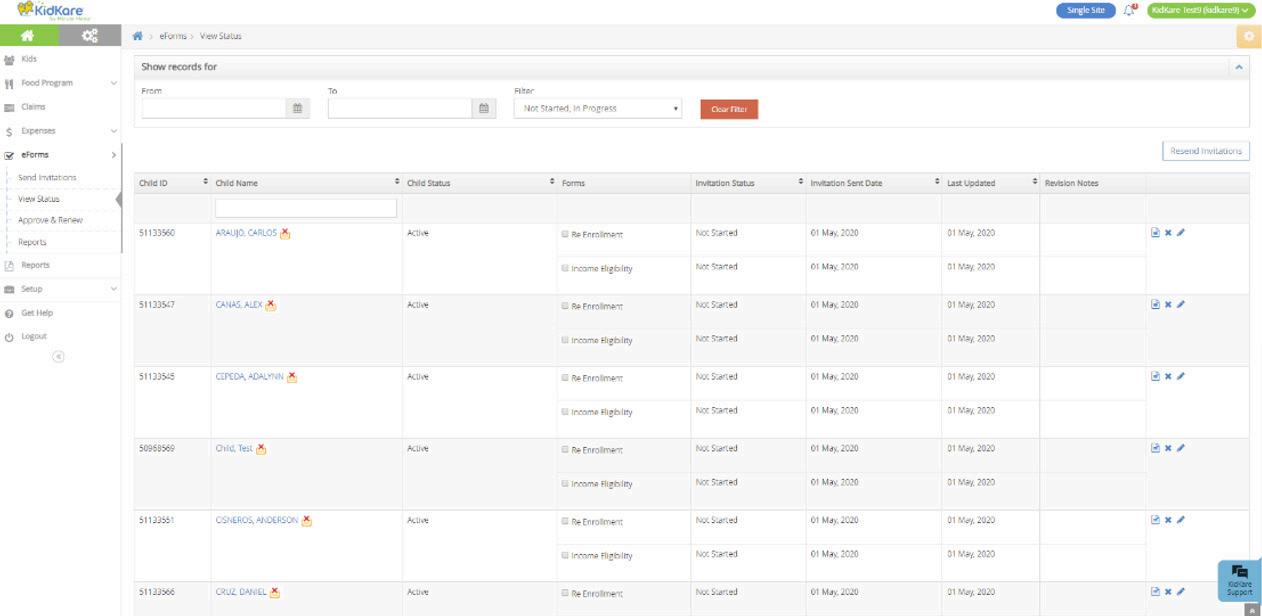

• Use the From and To boxes to select a date range to view.
◦ To view forms from a specific date to the current date, select a date in the From box and leave the To box blank.
◦ To view forms up to a specific date, leave the From box blank and select a date in the To box.
◦ To view forms for a single day, select the same date in the From and To boxes.
• Click the Filter drop-down menu and select the form status to view. You can select multiple statuses, if needed.
• To filter to a specific participant, click the Child Name box, and begin typing the participant's name.
• You can sort information in ascending or descending order by the following columns:
◦ Child ID
◦ Child Name
◦ Child Status
◦ Invitation Status
◦ Invitation Sent Date
Status Definition
◦ Last Updated Not Started In Progress Submitted (Parent) Manually Completed Sponsor Approved Renewed
Note: Some of the columns listed above may not display. To customize which columns display, click Filters in the top-right corner, and click each column to select it. You can also change the default sort options.
Canceled
The guardian has not started filling out the form yet.
The guardian has started filling out the form, but has not yet finished.
The guardian has completed and submitted the form. It is now ready for approval.
The guardian completed a paper form, and you flagged the record accordingly (pencil icon).
You have approved the form.
You have updated the system with the new enrollment date.
The invitation was canceled.
Video Link: View Status and Status Definitions
If a guardian advises they did not receive their eForms invitations, resend them from the View Status page. You may also consider confirming and updating the guardian's email address.
• From the menu to the left, click eForms.
• Click View Status.

• To resend invitations individually, click on the row for the appropriate participant.
• To resend invitations in bulk:
◦ Click Resend Invitations.
◦ Click Yes at the confirmation prompt. All invitations at Not Started or In Progress status are sent out again.

You can cancel enrollment invitations from the View Status page.
• From the menu to the left, click eForms.
• Click View Status.
• Locate the participant for whom to cancel an invitation.

• Click in the column to the far right.
• Click Delete at the confirmation prompt.

If a guardian advises they do not have access to the Internet, their own device, or email address to complete enrollment forms, you can open the forms for them to complete on-site.
• From the menu to the left, click eForms.
• Click View Status.
• In the Show Records For section, set filters, if needed.
◦ Use the From and To boxes to set a date range to view.
◦ Click the Filter drop-down menu and select the status to view.

• Click . The form opens.
• Have the guardian use the computer/device to complete the forms, beginning with the participant's date of birth.
• Once the guardian has completed each page of the form, you are returned to the eForms page. The completed form has the status of Submitted (Parent). You can now Approve the form.


Some guardians may have completed their forms on paper. You can mark these forms as complete in KidKare.
• From the menu to the left, click eForms.
• Click View Status.
• Locate the participant to update.

• Click in the column to the far right.
• Respond to the confirmation prompt.

If
you are a single-site center, you may choose to approve forms without renewing them. Forms that you approve receive a status of Submitted (Sponsor):
• From the menu to the left, click eForms.
• Select Approve & Renew.
• Click on the participants name to review the forms their guardian has submitted.
• Review the information and signatures provided. Information that has been updated since the last enrollment is outlined in red for you to quickly identify.
◦ Approve IEF – If the Income Eligibility form is complete, but the Enrollment form needs to be sent back to the guardian for revisions.
• If the enrollment form or income eligibility form needs revision:
◦ Click Send Back For Revision.

• Click and choose from the following:
◦ Approve All – If both forms are complete and need to adjustments from the guardian.
◦ Approve EF – If the Enrollment form is complete, but the Income Eligibility form needs to be sent back to the guardian for revisions.

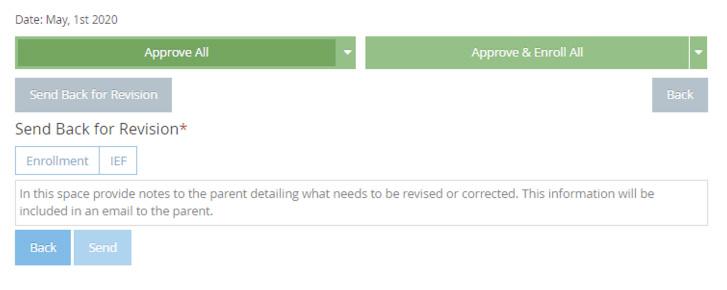
◦ Select Enrollment, IEF, or both.
◦ Click the text box and enter any notes for the parent regarding the revisions that are needed.
◦ Click Send.
Video Link: Approve vs Approve & Renew
Once guardians complete the necessary enrollment and income eligibility forms, you must approve and renew participants on the Approve & Renew page. This gives you control over when your database is updated. However, keep in mind that participants with future enrollment dates may be disallowed from your current claim. In many cases, it is better to wait until the current claim is processed before you renew enrollments. For example, if your new enrollment start date is October 1st, you should wait until the September claim is processed before renewing your enrollments.
• From the menu to the left, click eForms.
• Click Approve & Renew. The Approve & Renew page opens.
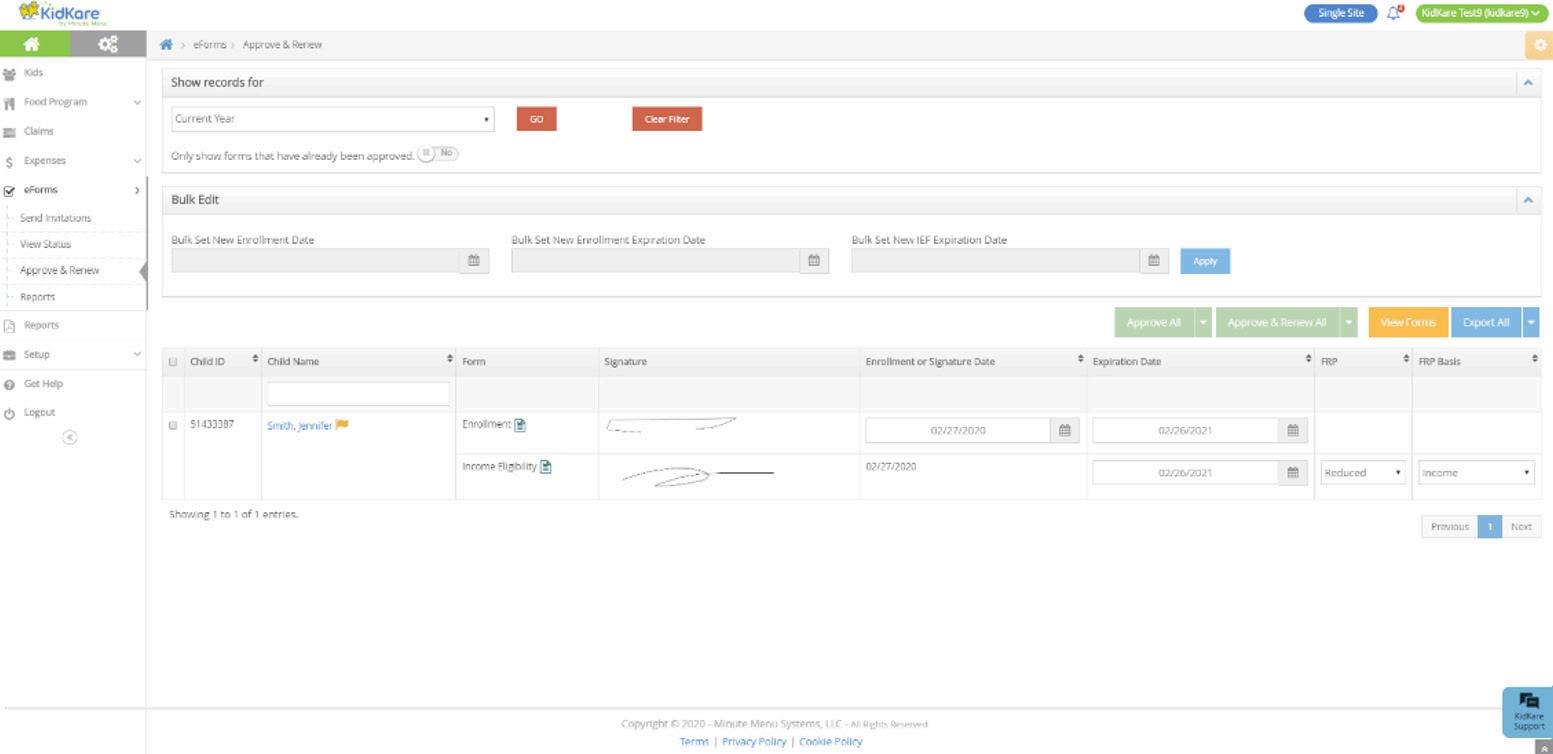
• Filter to the records to renew.
◦ Click the drop-down menu in the Show Records For section and choose from the following:
- 30 Days - 60 Days - 90 Days - Current Year
- Previous Year
• There are three ways to approve and renew enrollments:
◦ Accept the dates generated by the system (parent signature dates).
◦ Use the Bulk Edit feature to set enrollment dates.
◦ Approve and renew enrollments individually.
the System
• Check the box next to the records to update.
• Choose one of the following:
◦ Click Approve All to approve the enrollment form (EF) and the income eligibility form (IEF) for the selected records. Respond to the confirmation prompt.
◦ Click Approve & Renew All to approve and renew enrollment and income eligibility for the selected records.

◦ Click next to Approve All/Approve & Renew and select a specific form type to approve/approve and renew (EF, IEF, or All).

• Check the box next to the records to update.
• In the Bulk Edit section:
◦ Click the Bulk Set New Enrollment Date box and enter a new enrollment date. You can also click to select the date from a calendar.

◦ Click the Bulk Set Enrollment Expiration Date box and enter a new enrollment date. You can also click to select the date from a calendar.

◦ Click the Bulk Set New IEF Expiration Date box and enter a new IEF expiration date. You can also click to select the date from a calendar.

◦ Click Apply.
• Click Approve or Approve & Renew All.
• Click the participant's name to view participant details.
• Make changes, as needed. For example, you can update the new enrollment date and the new enrollment expiration date.
• Click Approve or Approve & Renew. You can also click Send Back For Revision if revisions are required.
You can export enrollment renewal data to an Excel® spreadsheet (.XLSX). When you export enrollment data, you can either export all data or the current view. Exporting the current view means that your filters are applied to the export.
• From the menu to the left, click eForms.
• Click Approve & Renew.
• Filter to the records to export, if needed.
• Click Export All or Export View. Click the down arrow next to the Export button to change between Export All and Export View.


The eForms Reports page lets you retrieve, view, and print enrollment records. This includes both enrollment forms (EF) and income eligibility forms (IEF). Each form type is listed on a separate line.
• From the menu to the left, click eForms.
• Select Reporting-eForms. The Reporting page opens.
Note: You can also access this page from the Approve & Renew page. To do so, click View Reports.
• In the Find Records section, enter your report criteria.
◦ First drop-down menu: Select Enrollment or Re-Enrollment.
◦ Second drop-down menu: Select the form type (EF or IEF).
◦ Third drop-down menu: Select the date range (Current Year, Previous Year, Custom Date Range).
◦ Fourth drop-down menu (optional): Select a particular child to view. You can also type the child name to filer the list. If you want to view all children, leave this blank.
◦ From/To boxes: If you selected Custom Date Range in the third drop-down, use these boxes to set a date range.
• Click Run.
• To view individual forms for a particular record, click View Form on the appropriate row. A PDF downloads.
• To view multiple forms together:
◦ Check the box next to the records to view.
◦ Click Combine & Print Forms. A combined PDF downloads.
