9 minute read
Overviewof controllingmodules


Switch Matrix cable harness for diagnostics
For use of the cable harness, it is essential that the key is turned to OFF when the SD3 is activated, until the ECU to be diagnosed has been selected. Thisis because in certain conditions, some errors may occur on the CAN lines, which would cause the warning lights on the instrument panel to flash.
EOBD socket connections
IntroductiontoMaserati
Locking/unlocking the vehicle using the remote control:
Door lock button:
Button pressed once: If the alarm system fails, the siren will emit a long beep and the red LEDswill start flashing quickly. If one of the doors has not been closed properly, the doors do NOT lock and the alarm system is NOT activated. The directionindicators and the red LEDsflash nine times (three seconds).
Button pressed at length: the windows close.
Releasing the button: the windows stop closing .
Door unlock button:
Button pressed twice: All the doors are unlocked (if enabled by the NIT, only the driver’s door is unlocked), Low beams activated for 30 seconds
Button pressed at length: the windows open.
Releasing the button: the windows stop opening.
Locking/unlocking the vehicle using the internal buttons: Luggage compartment opening button: button pressed at length: the luggage compartment is opened (when the vehicle speed is below 4 Km/h or when the vehicle is off)
Locking/unlocking the vehicle using the button on the external revolving pawls:
Key turned anticlockwise in DRIVER’S door lock (Opening): all doors are unlocked (or driver’s door only if set through the NIT) If the alarm is enabled: the red LEDswill turn off for 4 seconds (when this time has elapsed, they will start flashing again). When a door is opened the acoustic alarm is activated.
Key turned clockwise in PASSENGER'S door lock (opening): all doors are unlocked. If the alarm is enabled: the red LEDswill turn off for 4 seconds (when this time has elapsed, they will start flashing again)
NOTE: When the vehicle is unlocked from the outside with the key, the alarm system is not deactivated. To deactivate the alarm system, simply insert the key in the ignition block. The immobilizer acknowledges the code automatically.
IntroductiontoMaserati
Locking/unlocking the doors and the luggage compartment
Inertia switch: the activation of the inertial switch unlocks all the doors andthe luggage compartment and turns on the internal dome light and the four direction indicators. This is located underneath the driver’s seat.
Vehicle speed over 20 Km/h : when the vehicle speed exceeds 20 Km/h the doors are locked if this function has been previously set through the IT Info Node (NIT) user menu
Dead battery: vehicle closing. The two front doors must be locked.
Vehicle setup: From the NIT user menu, you may decide whether to unlock both the doors or just the door on the driver’s side.
From the relative menu, you can choose whether the luggage compartment should be connected to the door locking or whether it should be operated independently.
Alarm System
The alarm system of the Maserati GranTurismois identical to the system used in the Quattroporte.
Activation:the direction indicators will turn on permanently, and the alarm siren will emit a synchronised beep. A red LED will now start flashing intermittently to indicate a "surveillance" status.
Deactivation: the direction indicators will flash twice, the alarm siren will emit a double beep. NOTE: The alarm system is also deactivated by inserting a key with an ID code in the ignition key barrel, so that the immobilizer can recognise it.
Motion-sensing and anti-inclination alarm: when the alarm system is deactivated, the motion-sensing and anti-inclination alarm can be turned off using the buttons provided on the front dome lamp.
Luggage compartment opening: the luggage compartment can be opened using the remote control; in this case, the motion and inclination sensorsare temporarily deactivated. If the luggage compartment is then closed, the sensors will be reactivated.
ECU self learning:
Every time the battery is removed, a self-learning cycle is required so that certain ECUs can operate correctly.
•Motor-driven throttle: turn the ignition switch to the ON position (Key ON) and wait for at least 30 seconds.
•Locking/unlocking the doors and luggage compartment: lock and then unlock the doors using the remote control or the key.
•NIT (IT Info Node): reset the correct time using the specific NIT service menu
External lights
(1) The side markers, provided as a standard equipment for all the markets, improve driving safety and are also an attractive aesthetic element
(2) Front direction indicator repeater
(3) Position light
(4) Bi-xenon headlight –low-beam + highbeam
(5) Additional low-beam (Flash to Pass ) –the bi-xenon lamps take some time to reach maximum efficiency, therefore, while the bixenon headlights are off, the flashing function is assured by a conventional light.
(6) Front headlight cleaning system
(7) Fog light
Adaptive light adjustment
The Maserati GranTurismois fitted with a set of self-levelling bi-xenon headlights with fully automatic adjustment system. The high performance of the bi-xenon headlights is enhanced even further by the rotation function which, by improving the illumination of the road and surrounding areas, contributes to increasing driving safety during night-time on particularly twisty roads. The high-beam and low-beam control unit instantaneously receives and processes the information on steering, camber and driving speed and acts on special electric motors that turn the light cones in order toincrease side illumination.
Operating strategy:
•The system is activated at a speed of 5 km/h.
•The maximum headlight rotation inside a curve is 15°and for the headlight outside a curve 7.5° (always half);

•From 90 km/h to 120 km/h the rotation is less
•Over 120 km/h and in reverse, the system is deactivated for safety reasons.
IntroductiontoMaserati
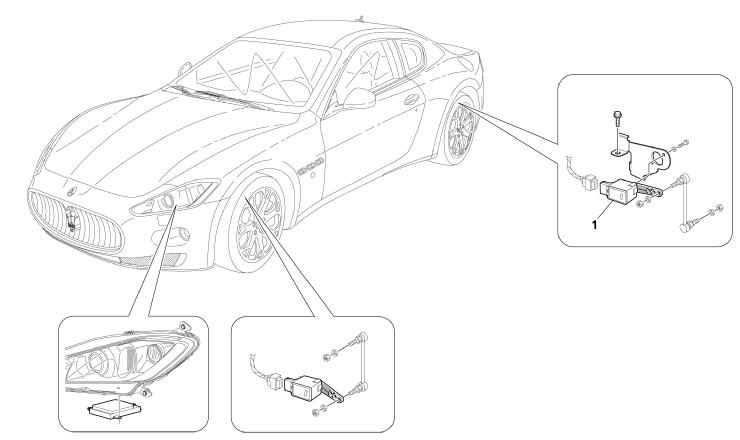
When replacing the left-hand headlight, perform the two calibration cycles on both NFA ECU.
•Connect the diagnostic tester to the EOBD socket on the Body Computer Node and calibrate the Self-adaptive Headlight Node (NFA). This cycle involves the calibration of the left-hand headlight (MASTER) and subsequently of the right-hand one (SLAVE).
•The two cycles are independent, therefore you will have to launch first the MASTER calibration cycle and then the SLAVE one.
•In the event of a collision involving the left-hand headlight, the signal connector for the CAN line may be damaged. The damaged connector may interfere with proper vehicle starting. Therefore, if the vehicle cannot be used after a collision and the headlight is damaged, detach the CAN line connector and check engine starting.
If replacing the battery, the PROXY alignment procedure does nothave to be performed; when the key is next turned to on and with the headlights on, the node performs a selflearning process as calibration.
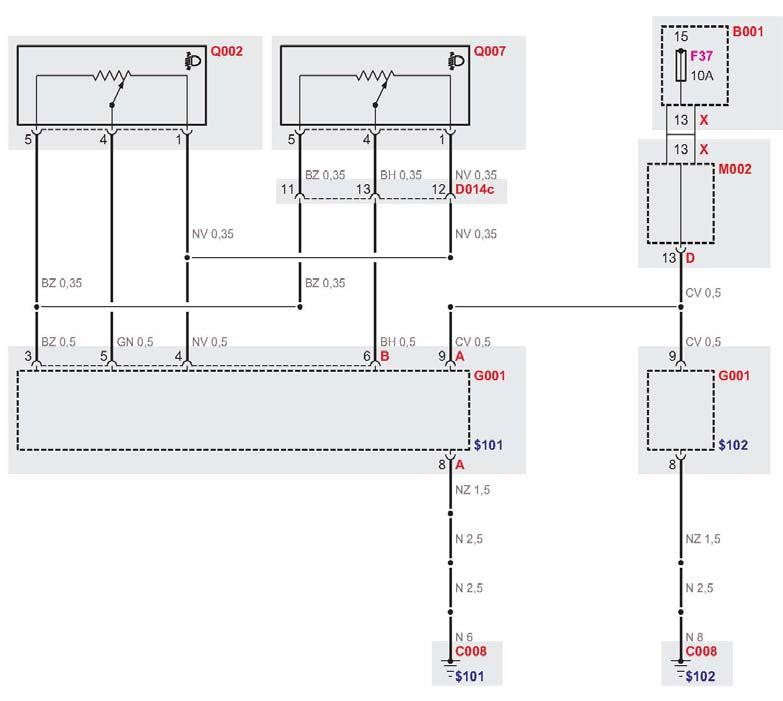
Q007:Rear potentiometer for headlight aiming adjustment
Q002:Front potentiometer for headlight aiming adjustment
G001:Headlight cluster
M002:Body Computer node (NBC)
Lights managed by the twilight sensor (AUTO mode): the external lights are activated automatically by the twilight sensor. From the NIT user menu, you can set the twilight sensor’s sensing range (3 levels).
Follow me home
This control enables the position lights and low beams to switch on automatically for a timed period, immediately after the vehicle is turned off (Key-OFF).
Activation: After turning the key to OFF, you must operate the control forflashing the headlights, found on the steering column stalk. The instrument panel activates the ‘followme-home’signal and displays the time (in seconds) during which the lights will remain on. (Signal active for 20 sec.)
Activation time increase: When this function is active, every time you flash the headlights, the time the lights remain on is extended for a further 30 seconds (max. 210 sec.)
Deactivation:
-keep the control for flashing the headlights active for over 2 seconds.
-turn the ignition key from OFF to ON.
Taillights
Maserati GranTurismo
(1) Position light –LED technology (the function of the rear side marker is performed by the external section of the lighting device)

(2) Rear fog light
(3) Reverse light
(4) Stop –LED technology
(5) Direction indicator –LED technology
(6) Side reflector
(7) Reflector
Internal lights
Day/night condition. This is determined by:
-the light switch
-“night condition”detected by the vehicle’s twilight sensor. Therefore, the fact that the position lights are on does not necessarily mean the internal lights will be turned on.
Timing:
3 minutes : Step lights under the door and andfront dome light.
15 minutes : Glove compartment light, diver’s glove compartment light, sun visors' light, spot light, front and rear central dome lights if activated using the specific control or by the inertia switch.
20 minutes : Luggage compartment light.
Multi Media System (MMS)
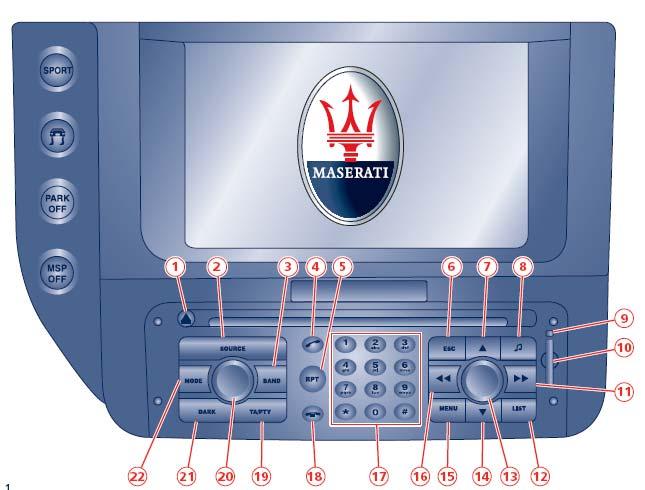
1) CD eject.
2) SOURCE Mode selection: Radio, CD or Jukebox.
3) BAND Radio mode: Frequency band selection FM1–FM2 –FMAST –AM.
Radio mode: Automatic storage of the stations in FMAST (Autostore).
4) Telephone mode activation. Send call. Answer call.
5) RPT Activates repetition of the navigation message.
6) ESC Exits from a selection list
7) Radio mode: Radio frequency shift in fixed steps to the next station
MP3 CD and Jukebox mode: album selection previous.
8) With basic HI Fisystem: Radio, CD and Jukebox mode: audio adjustment (music ambience, bass, treble, F-R balance, L-R balance, loudness, automatic volume adjustment).
With Bose Hi-Fisystem (optional): Radio, CD and Jukebox mode: audio adjustment (bass, treble, F-R balance, L-R balance, CenterPoint ).
9) SIM card adapter eject button.
10) SIM card adapter 40
11) Radio mode: Automatic search of the next radio station.
CD and Jukebox mode: Goes to the next track.
Menu: scrolls through the menus.
CD audio mode: track fast forward
12) LIST Radio mode: displays the list of stations receivable in alphabetical order.
CD audio mode: displays the list of tracks.
CD, MP3 and Jukebox mode: displays the list of albums and tracks.
Radio mode: updates the list of stations
13) Telephone, Navigation, Audio mode (Radio, AUDIO CD, MP3 CD Jukebox) and Trip: opens the function-related menu. Menu: turn the knob to select the function, the item and the value, which are then confirmed by pressing the same knob.
14 Radio mode: radio frequency shift in fixed steps to the previous station starting from the station you are currently tuned into.
MP3 CD and Jukebox mode: selects the next album.
15 MENU Access to main menu
16 Radio mode: Automatic search of previous radio station.
CD and Jukebox mode: goes to the previous track if pressed within the first 3 playing seconds, otherwise restarts playing the track.
CD audio mode: track fast rewind.
17 Radio mode: recalls the stations stored (1–6) Telephone mode: Dial phone number: (1 – 12) or input text. Quick selection of a name in the directory and on the SIM card that starts with the selected letter. Stores the station you are listening to (1 –6).
18 Telephone mode: Reject incoming call. Drop call.
19 TA/PTY TA (Traffic Announcements): enables automatic reception of traffic information. Functions available only in the countries where RDSis available.
20 With the key in position MAR or the engine on: Audio OFF/ON Withthe key in STOP position or the gearshift lever in PARK position: activation / deactivation of the system. Rotation: to adjust the volumes.
21 DARK 1st pulse: partial display darkening. 2nd pulse: total display darkening. 3rd pulse: back to normal display brightness. System reinitialisation.
22 MODE Changes the current display on the right-hand side of the screen (radio, map, onboard computer (TRIP), telephone).
Audio adjustments
With the key in position MAR you can turn the audio section on and off by pressing the switch. Depending on the system installed, the audio adjustmentsmay be:
Basic: Radio, CD and Jukebox mode: audio adjustment (music ambience, bass, treble, F-R balance, L-R balance, loudness, automatic volume adjustment, automatic volume adjustment).
Bose: Radio, CD and Jukebox mode: audio adjustments (bass, treble, F-R balance, L-R balance, Centerpoint).
To adjust the audio, press the AUDIO button (8) repeatedly to adjust the bass tones (BASS), treble tones (TREB), loudness (LOUD), fader (FAD), balance (BAL), automatic volume and sound type (musical ambience). The system stores the data and deactivates audio adjustment when the ESC button is pressed or after a few seconds if no adjustment is made.
WARNING: Bass and treble tone adjustment is specific to each source, and they can therefore be adjusted differently in the RADIO, CD or JUKEBOX modes.
Loudness function (LOUD)
This function is not available with the Bose®Surround Sound System (optional), since it is automatically controlled by the system. This function automatically amplifies the bass and treble tones when the volume is low. To activate or deactivate the function, turn the knob (13).
Automatic volume correction
This function is not available with the Bose®Surround Sound System (optional), since it is automatically controlled by the system. This function automatically adjusts the volume in relation to the vehicle speed. To activate or deactivate the function, turn the knob (13).
Musical ambience
This function is not available with the Bose®Surround Sound System (optional), since it is automatically controlled by the system. This function allows theuser to set the various types of sound desired (classic, jazz, pop, etc). Select the desired sound by turning the knob (13). After setting the desired sound, select and confirm ("OK") bypressing the knob and the system will automatically return to the previous menu.
Centerpoint
This function is available only with the Bose®Surround Sound System (optional) and when the CD source is active. Equalizing system that converts the stereo recordings into 8 separate channels, thus assuring absolute precision with any volume level. The automatic output frequency balancing makes manual adjustments through switches or knobs unnecessary. To activate or deactivate this function, select andconfirm the corresponding options by turning and pressing the knob (13).