
4 minute read
Section 8. Wire Guidance Toyota Orderpicker Model 7BPUE15 Service Manual


Set-Up Procedure
Learn Guide Wire Frequency
NOTE: Make sure the line driver is set up and adjusted properly.
1. In manual steer mode, position the truck to center the tractor end and the load end sensors over the guide wire (+ 0.75 " [19 mm]).Make sure the drive unit is centered.
NOTE: The horn chirps at approximately 10 chirps per second when the truck is centered over the guide wire and if the present frequency has been learned previously.
2. Without moving the truck, turn the key switch off.
3. Enter horn code 3,3.
a. Hold down the horn button and turn the key switch on. Do not release the horn yet.
b. Wait for the steer LEDs to stop flashing, and release the horn button.
c. Press and release the horn button 3 times. Each time you press the button, an additional BDI LED will light.
d. Wait for the BDI LEDs to turn off.
e. Press and release the horn button 3 more times.
f. Wait for the BDI LEDs to turn off.
4. Wait 10 - 15 seconds for the truck to learn the guide wire frequency. During this time, the following occurs: BDI LEDs scroll up and down Horn does not chirp
5. After the BDI stops scrolling, verify the truck has learned the guide wire frequency. Observe the following pattern:
Learn Wire Guidance Offsets
NOTE: Make sure the line driver is set up and adjusted properly.
1. In manual steer mode, position the truck to center the tractor end and the load end sensors over the guide wire (+ 0.75 " [19 mm]). Make sure the drive unit is centered.
NOTE: The horn chirps at approximately 10 chirps per second when the truck is centered over the guide wire and has previously learned the present guide wire frequency.
2. Without moving the truck, turn the key switch off.
3. Enter horn code 3,4.
a. Hold down the horn button and turn the key switch on. Do not release the horn yet.
b. Wait for the steer LEDs to stop flashing, and release the horn button.
c. Press and release the horn button 3 times. Each time you press the button, an additional BDI LED will light.
d. Wait for the BDI LEDs to turn off.
e. Press and release the horn button 4 more times.
f. Wait for the BDI LEDs to turn off.
4. Wait for the center steer LED to start flashing. (The LED should start flashing in approximately 8 seconds.)
5. Step on the deadman pedal and wait for the drive unit to center.
6. Flip the auto/manual switch to auto.
7. Drive tractor - first for approximately 20 feet (6.1 m) and coast to a stop.
NOTE: Do not apply the brake, or drive forks - first at any time during this procedure. Center steer LED flashes continuously
Horn chirps at approximately 10 chirps per second
6. If the truck fails to demonstrate the pattern listed in step 5, repeat the procedure.
Travel speed is limited to 2 mph (3.2 kph).
The chirp pitch changes slightly. Left and right steer LEDs flash.
8. Flip the auto/manual switch to manual.
Set-Up Procedure
9. Drive the truck away from the guide wire. The truck has now learned the offsets and stored them in memory.
NOTE: You must drive the truck completely off the guide wire for the truck to learn the offsets correctly.
If you need to re - learn the wire guidance offsets, you do not need to re - learn the guide wire frequency, unless the frequency has changed.
Guidance Check
Verify the truck can automatically steer by the guide wire.
1. Make sure steps 1 - 6 of the Set - up Procedure have been completed. See "Set-Up Procedure" on page 8 - 9.
2. Flip the auto/manual switch to manual and drive away from the guide wire.
3. Flip the auto/manual switch to auto.
4. To prove that the frequency has been learned correctly:
Verify the horn chirps approximately 20 chirps per second
One steer LED flashes in conjunction with the drive unit position
5. Travel tractor - first at full throttle. Verify travel is speed-limited.
6. Travel forks - first at full throttle. Verify travel speed is slower than the tractor - first travel speed.
7. Drive tractor - first toward the guide wire at an approximate 20" angle. Verify the following: a. All steer LEDs flash and the horn becomes silent as the tractor sensor reaches the guide wire. b. The truck locks onto the guide wire without operator assistance before traveling 20 feet (6.1 m). c. All steer LEDs stay lit continuously to show the truck is locked on the wire.
8. Flip auto/manual switch to manual.
9. Verify the horn chirps approximately 10 chirps per second and the center steer LED flashes.
10. Drive the truck completely off the guide wire.
11. Flip the auto/manual switch to auto.
12. Verify the horn chirps approximately 20 chirps per second.
13. Drive forks - first toward the guide wire at a very slight angle less than 3". Verify the following:
The horn becomes silent as the load antenna reaches the guide wire. The truck locks onto the guide wire without operator assistance before traveling 20 feet (6.1 m).
All steer LEDs stay lit continuously to show the truck is locked on the wire.
Codes and Tests
Codes and Tests
Operator Display Fault Codes
The codes listed in this section that appear on the operator display pertain only to wire guidance. All other operator display codes are listed in the Codes and Tests section.
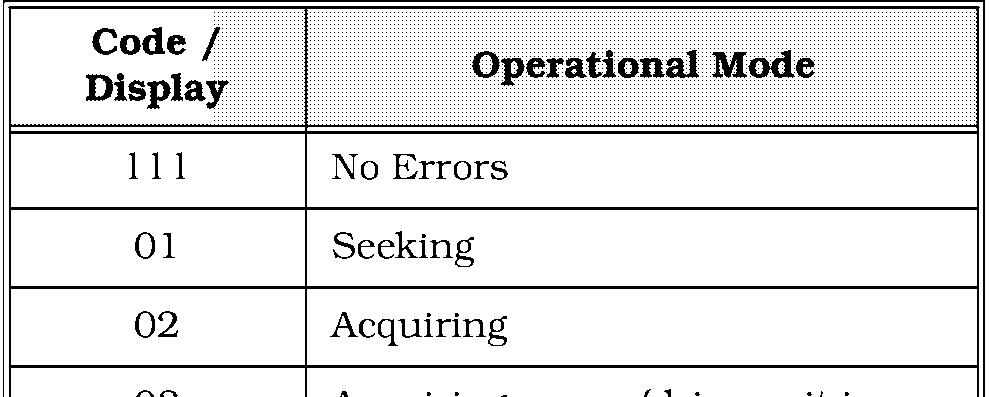
Guidance Manager Operational Codes
The following codes will appear on the guidance manager display during normal operation of the wire guidance. See "Corrective Actions and Checks" on page 8-12. Acquiring
Corrective Actions and Checks
Code I I I

Code 0,7
Code 0,7
Guidance Manager Fault Codes
The fault codes on the following pages appear on the guidance manager display whenever a code 6,2 or 6,3 appear on the operator display.


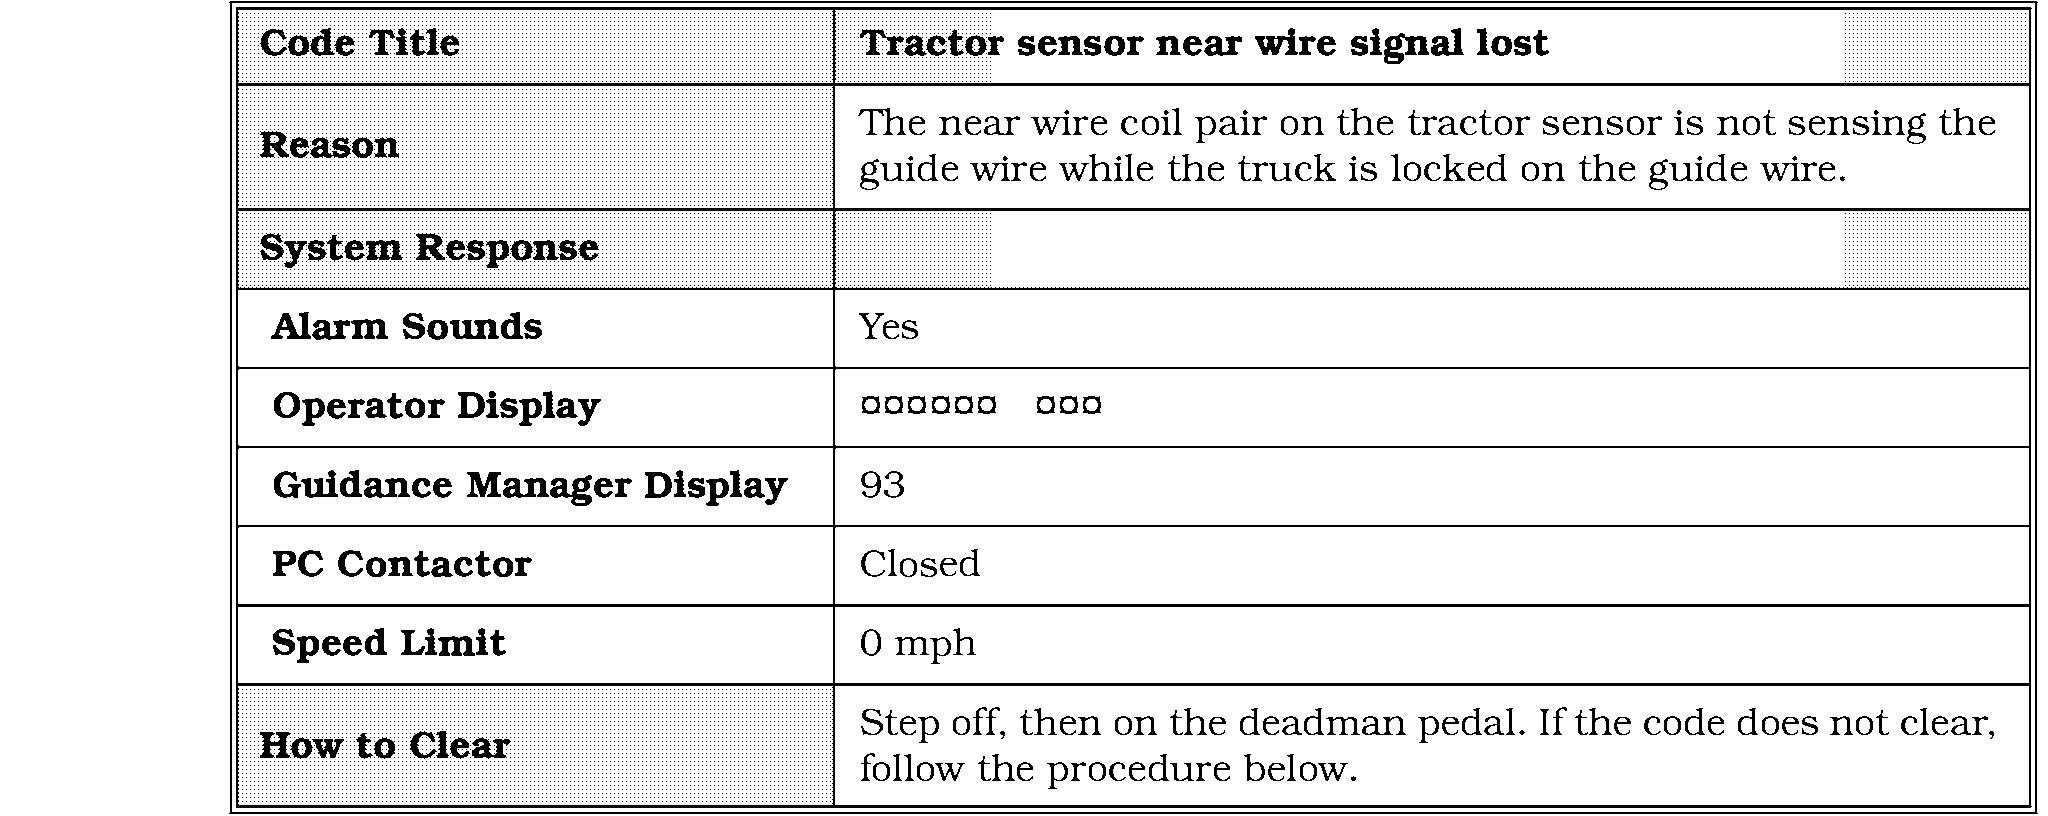
Code 9,2
Code 9,2
Corrective Actions and Checks
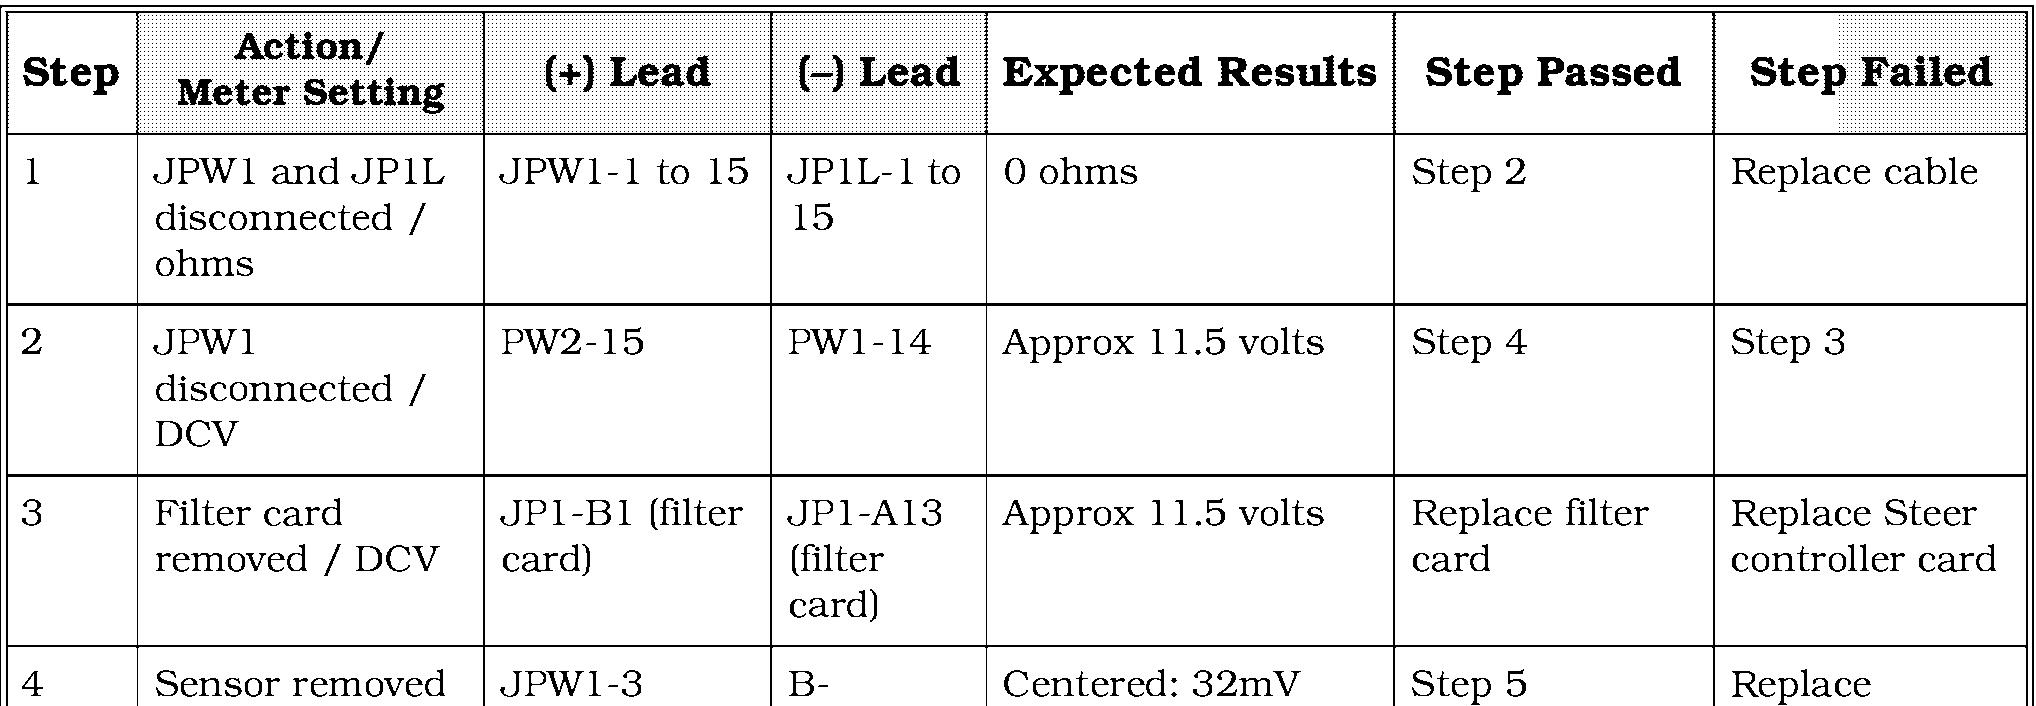
NOTE: Check the adjustment of the line driver. Check for mechanical binding in the Drive Unit and Steering Gear Box. Run Learn for Guidance. Check settings for Heading Angle and Distance from wire in configure. If intermittent check for shorts to frame.

Corrective Actions and Checks


Code 9,6
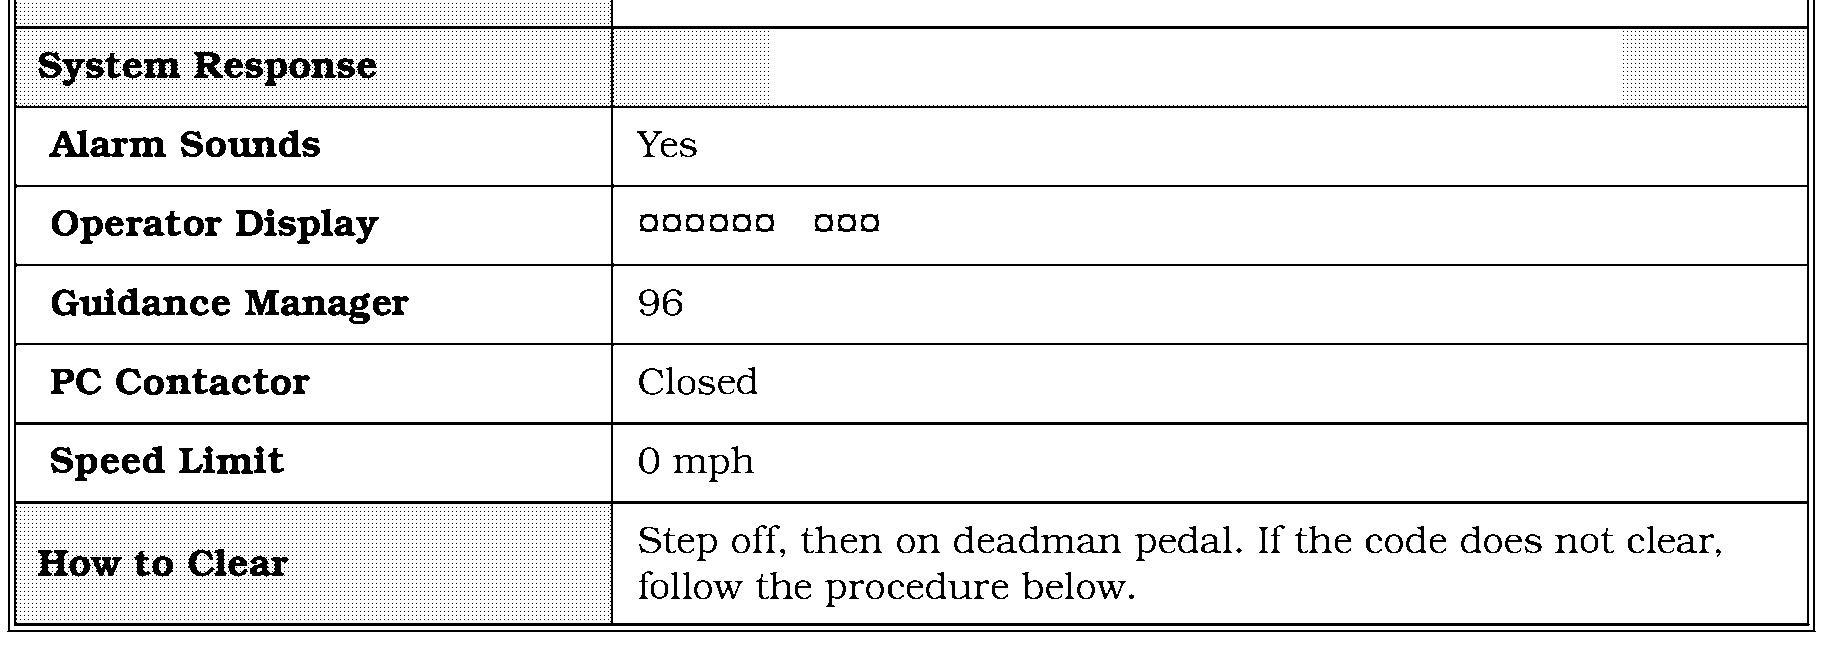
either the load or tractor sensors.
Corrective Actions and Checks

Code 9,8
Corrective Actions and Checks

No troubleshooting steps required.
00700-CL222-05, 1 5 March 2005


