2 minute read
Section 7.Component Procedures
Model 9600/9700 Swing-Reach ® Lift Truck
Drive Unit Drive and Brake
Drive Unit
Radial Ring Inspection

If a worn radial ring is suspected to be the cause of play in the drive unit, perform the following steps to determine if the rings should be replaced.
Use extreme care when the lift truck is jacked up. Never block the lift truck between the operator platform and the floor; this presents a tipping hazard. Keep hands and feet clear while jacking the lift truck. After the lift truck is jacked, place solid blocks or jack stands beneath it to support it. Do not rely on the jack alone to support the lift truck. See “Jacking Safety” on page2-9.
1.Jack the rear of the truck up until the drive tire clears the floor.
2.Place a magnetic base dial indicator on the tractor bumper. Place the indicator pin on top of the ring gear. See Figure7-36.
NOTE: When positioning the indicator, try to align it with a featur e on the truck (such as a grease fitting). This helps maintain consistent results between trucks.
3.Zero the indicator and lower the truck to the floor. Observe the new indicator reading.
4.If the reading exceeds 0.090 in. (2.3 mm), replace the radial rings.
Axle Seal and Bearing Removal
1.Remove the drive wheel.
2.Reconnect the battery connector and turn the key switch ON. Turn the steering tiller completely clockwise (to the right). The drive unit cover plate now faces the tractor bumper. Turn the key switch OFF and disconnect the battery connector.
3.Place a drain pan under the drive unit. Remove the drain plug and drain the drive unit. Drive unit capacity is 7.1 quarts (6.75 liters).

4.Apply gasket sealant (P/N 990-520) to the drain plug and reinstall drain plug.
5.Remove the cover plate from the drive unit housing.
Publication: 1089040, Issued: 08 Apr 2016
Model 9600/9700 Swing-Reach ® Lift Truck Section 7.Component Procedures
Drive and Brake Drive Unit
6.Remove the set screw in the clamp nut securing the axle to the bevel gear.
7.Remove the axle clamp nut.
8.Using a brass drift, drive the axle out of the bevel gear. (The bevel gear could come loose when the axle is removed.)
9.Use a bearing puller to remove the bearing cone from the axle. Inspect the bearing for wear, pitting, or damage. Replace if necessary.
10.Remove the old axle seal. Inspect the axle for nicks, burrs, damage, and wear. Replace if necessary.
11.If you are replacing the axle bearing, drive the bearing cup out of the drive unit housing, working from the cover plate side of the drive unit.
Installation
1.If you are replacing the axle bearing, place the new bearing cup in the housing.
2.Lubricate the lip of the new axle seal and place seal onto axle.
3.Place the bearing cone onto the axle.
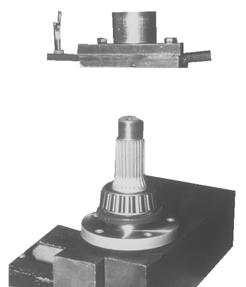
4.Using a bearing press, press the bearing onto the axle. See Figure7-39 and Figure7-40
Publication: 1089040, Issued: 08 Apr 2016 7-33
Section 7.Component Procedures
Model 9600/9700 Swing-Reach ® Lift Truck
Drive Unit Drive and Brake

8.Push the axle out of the housing just enough to remove the seal pressing tool.
9.Push the axle back in until bearing cone and cup make contact.
10.Apply thread-locking compound (P/N990-544) to the axle clamp nut. Install clamp nut and tighten to 18 ft. lb. (24 Nm) while rotating the wheel flange to seat the bearings.

11.Loosen the axle nut until hand tight.

12.Retighten the axle clamp nut to 40 in. lb. (4.5 Nm) in steps, rotating the axle a full turn between steps, until 40 in. lb. (4.5Nm) torque no longer turns the nut. This could require as many as six turns. You should feel no end play in the axle.
13.Make sure the clamp nut set screw is marked grade 12.9 in the face of the screw head. Apply thread-locking compound (P/N 1013829) to the threads of the clamp nut set screw. Install the set screw and torque to 140 in. lb. (15.8 Nm).
Publication: 1089040, Issued: 08 Apr 2016


