4 minute read
Operation


Locking: attachments without hydraulic function
Secure the attachment with lock pins H of the quickhitch. To do this:
☞ Pull control lever 10 to the rear C
➥ Lock pin H engages in the mounting holes of the attachment.
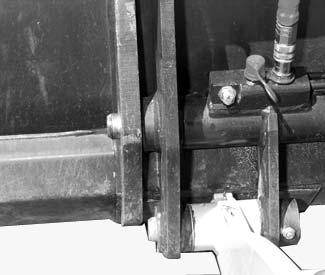
➥ Make sure the attachment is safely locked with lock pins H
☞ Lock the 3rd control circuit.
➥ –see Operation of 3rd control circuit on page81.
IMPORTANT!
You must be able to see lock pins H on the left and right of the mounting holes on the attachment. The attachment is not safely locked unless you can see the lock pins.
Locking: attachments with hydraulic function
☞ Turn off the engine.
➥ Do not turn off the ignition.
☞ Apply the parking brake.
☞ Unlock the 3rd control circuit.
➥ –see Operation of 3rd control circuit on page81.
☞ Depressurize the 3rd control circuit.
➥ –see Depressurizing the quick-couplers on the loader unit on page82.
☞ Attach the hydraulic and electrical connections (if used) for the attachment by following its Operator’s Manual.
Removinganattachmentfromthe quickhitch
WARNING!
The attachment must be placed on the ground so that it will not fall over when removed –

Risk of personal injury.
☞ Position the attachment so that after unlocking it will not tip over.
Take the attachment off the quickhitch as follows:
☞ Be sure that the attachment is empty and up.
☞ Tilt in the quickhitch by pushing control lever 9 to the left A.
☞ Lower the lift arms until the attachment is about 2–4in. (5–10cm) above the ground by pushing control lever 9 forward C, and tilt forward the attachment by pushing control lever 9 to the right B.

Forattachmentswithhydraulicfunction
☞ Turn off the engine.
➥ Do not turn off the ignition.
☞ Engage the parking brake.
☞ Unlock control lever 10 for the 3rd control circuit:
–see Operation of 3rd control circuit on page81.
☞ Depressurize the quick couplers
–see Depressurizing the quick-couplers on the loader unit on page82.

☞ Change over the quick couplers on the lock cylinder:
• Connect flexible line A onto the right plug D of the quickhitch.
• Connect flexible line B onto the left plug C of the quickhitch.
• Remove electrical connections (if necessary).
☞ Start the engine.
☞ Slightly tilt the quickhitch forward. To do this:
➥ Push control lever fig. 85/9 to the right B.
☞ Lower the loader unit. To do this:
➥ Push control lever 85/9 forward C.
As soon as the pin shanks of quickhitch F are beneath the catch hooks of attachment E:
☞ Release the parking brake.
☞ Reverse the machine away from the attachment.
Operation
Working with the Standard Bucket
This section describes work operations for the machine equipped with the standard bucket. The standard bucket is mainly used for digging, loosening, lifting, transporting and loading loose or solid materials.
ApplicationsoftheStandardBucket
The standard bucket is mainly used for digging earth, and for loosening, picking up, transporting and loading loose or solid materials.
Safetyinstructionsforworkingwiththebucket
•Never drive up to the edge of a dropoff - riskofcave-in.
•Never compromise wall foundations - riskofcollapse.
•Operation of the machine by unauthorized staff is prohibited.
•When working with the machine, look out for high-voltage cables, underground cables, gas and water pipes.
•When using lifting gear such as pallet forks, follow the load diagram that apply to the machine.
•Follow all applicable local legal regulations, which may prohibit driving on public roads with a full bucket.
•Also, –see Fields of Application, Attachments on page9.
Digging tips
When completing digging work, the following is recommended:
• Exit the pit, as level as possible, from outside the digging line.
• Dig by removing adjacent strips.
• Drive forward when transporting a full bucket out of the digging area.
• Drive reverse when transporting a full bucket down a steep slope.
Loading trucks
When loading trucks, the following is recommended:
• The truck and machine working direction should form an angle of 45°.
• Only raise a full bucket to the dump height when you are driving in a straight line toward the truck.
• Dump with the wind behind you to keep the dust away from your eyes, air filters and fans.
Practicalhintsfordigging
Freeing the wheel loader from soft ground
If the machine gets stuck in soft ground:
☞ Dump the bucket until the cutting edge is vertical above the ground.
☞ Completely lower the lift arm.
☞ Gradually tilt back the bucket.
➥ The machine is pushed rearward.
☞ Move slowly in reverse.
☞ Repeat this procedure until the wheels reach firm ground.
•Exits from pits must be outside the digging line and be as level as possible.
•If possible, dig by removing adjacent strips.
•Make sure you can drive forward with a fully loaded bucket when driving out of the digging area.
•Whenever possible, drive in Reverse when transporting a full bucket down a steep slope.
Checking the tilt position of the bucket
Note
Angle of mark A = angle of blade B
Checking the transport position of the bucket
Note
The bucket is in the transport position if:
•Bucket is tilted back completely A
•Marks on the loader unit and the machine frame are lined up 90/C
The distance of the bucket (with standard tires) to the ground B is about 8” (250 mm).
IMPORTANT!
In order to avoid damage to the machine or tires, do not move the machine with the bucket fully tilted forward.
☞ Lower the attachment to the transport position and tilt it back.
Operation
Transporting with a full bucket
WARNING!
Transporting full buckets in the raised position is an –Accident risk.
Pay attention to this when cornering or driving on slopes. The lower the bucket and center of gravity, the less risk there is of tipping over.
To avoid accidents:
☞ Tilt the bucket all the way back A
☞ Raise the bucket to the transport position: ➥B and C.
Loading loose material
☞ Align the blade flush with the ground A.
☞ Lower the bucket to the ground B. To do this: Push control lever forward C.

Ac Db
☞ Drive forward into the material A. When the engine speeds decreases due to too much material:
☞ Slightly raise the bucket B. To do this: Pull control lever rearward D.
Ac Db
Loading if the material is hard to penetrate
☞ Proceed as for loading loose material.
☞ Tilt the bucket back and out slightly by moving control lever to the left and right A and B.
Ac Db
Ending loading
☞ Tilt back the bucket C by pushing control lever to the left A.
☞ Reduce engine speed.
☞ Reverse out of the material A
☞ Raise the bucket to the transport position B