3 minute read
Fuel System


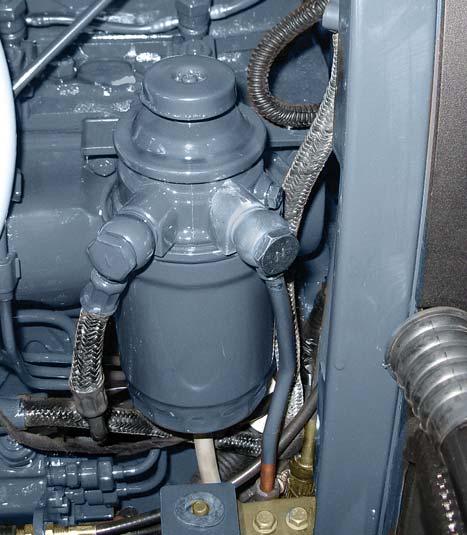
F.FUEL FILTER
1.Function
This filter provides clean, moisture free fuel for the injection process. A hand primer is provided to manually remove excess air from the fuel filter and fuel lines.
Major Components:
•Hand Primer (F)
•Air Bleeding Screw (G)
•Fuel Filter (D)
2.Theory of Operation
Fuel enters the filter at inlet (A) and flows through the filter element separating water if contents before flowing through outlets (B) to the fuel injection pump.
Since water and contaminants settle at the bottom of the sediment bowl, a drain plug is provided at the bottom of the filter. Drain water in fuel, by loosening drain plug once every 50 hrs. of operation.
Drain water in fuel, by loosening this plug once every 50 hrs. of operation.
3.Bleeding Fuel System
1.Loosen the air bleeding screw (G-3) on the filter and push hand primer (F-3) down. The hand primer automatically retain it’s original position due spring & fuel will suck from the fuel tank.
2.Repeat priming till flow of fuel free of air is not observed.
3.Loosen fuel inlet connection on the injection pump and operate the hand primer pump untill all air is displaced. Tighten the connection.
4.Release the air bleed screw on the injection pump and again use the hand primer untill all air is displaced. Tighten the connection.
5.Repeat operation ‘1’ to expel and air which may have been drawn in.
6.Turn the engine for one half revolution and repeat item 2 to ensure complete scavenging of transfer pump.
Do not hold key at engine start position for more than 10 seconds continuously. If more engine cranking is needed try again after 30 seconds.
Always close the air vent screw except for bleeding fuel lines other wise, engine will run irregularly or stall frequently.
7.Loosen the connections on the high pressure pipes at the injection nozzle. Turn over the engine until fuel flows from pipe free of air, then re-tighten the connections.
4.Servicing the fuel filter
1.To drain water in fuel, loosen the drain plug upto 1 or 2 turns. During loosening drain plug, place a small tray to collect the water coming from pipe (C). Retighten the drain plug by hand.
2.It is recommended to replace the fuel filter every 500 hrs.
3.To remove Filter, unscrew the filter (D) from Adapter (E).
4.Check O'rings of fuel filter for any crack / damage. Smear oil on the new O'ring before installation.
5.Clean the Adapter with clean diesel from inlet and outlet. Ensure no dirt, foreign particles entangled in flap valves or filter head.
6.Assemble the new filter. Do not over tighten.
7.Prime the system and bleed the filter. Tighten the bleeding screw.
5.Removal
1.Close the fuel tap at the tank end.
2.Disconnect all fuel pipes at the filter.
3.Remove the cap screws securing the filter to the manifold and remove the filter.
6.Installation
1.Reverse the removal procedure.
2.Bleed the fuel system.
G.INJECTORS
1.Description
The performance of the modern High speed engine depends largely upon proper functioning of its fuel injection system. For efficient combustion and optimum engine performance it is imperative that the injection nozzles are always in functionally satisfactory condition so that accurately metered quantities of fuel from the injection pump are injected into the engine combustion chamber as follows : a.A perfectly atomized condition for proper mixing of the fuel with compressed air. The fuel delivery is exactly timed. b.Correct spray dispersion and pattern. c.Under proper specified opening pressure & temp. The injection nozzles are designed to ensure that fuel injected into the combustion chamber mixes with the compressed air. At the end of the injection the nozzles must not only close instantly but completely as otherwise any after - injection will lead to coking and will affect atomization and induce on irregular exhaust beat. Nozzle coking can also disturb spray from the prescribed directions.
The needle seat of the nozzle body, which is exposed to exceedingly high pressures and temperatures, must not develop noticeable wear under the constant hammering action of the nozzle needle.
Although the nozzles have been designed to bear these severe working conditions, the nozzle needle and body seats affected over a prolong period of operation. Dribbling, incorrect opening pressures, improper spray patterns and leaky nozzles affect the engines performance. The clearly visible symptoms are:
1.Smoky exhaust i.e black or in some cases white.
2.Increased fuel consumption.
3.Overheating.
4.Loss of power.
5.Engine knocking, misfiring and uneven running However, complaints of the above nature may not be solely due to malfunctioning of the nozzles. Other contributory factors such as poor compression, injection timing cooling problems, exhaust / intake restriction, Lubrication systems problems, operating conditions, etc. should also be investigated.
6.Fuel filtration.
7.Quality of high pressure pipes.
8.Careless installation of injectors on the engine.
2.Injector Nozzle Removal
a.Disconnect the high pressure pipes connecting the nozzles and injection pump.
b.Disconnect the fuel leak off pipe assembly from the nozzle.
c.Remove the injector retaining nuts and conical washers securing the injector clamps.
d.Remove the injectors carefully and the sealing copper washer from the cylinder head.
NOTE: Cover the cylinder head openings and plug the inlet and leak - off openings of injectors with protection caps.
Wipe off dirt and loose carbon from each injector with a cloth and clean the tip with a brass wire brush.


