7 minute read
6. TRANSPORTING BACKHOE


6.1. Transporting Backhoe on Tractor
CAUTION: To avoid possible injury, observe the following safety rules:
1. Always install transport locking pins into transport position. Refer to page 46.
2. Travel slowly over rough terrain, on hillsides, and around curves to prevent tipping.
3. Do not drive the tractor near the edge of a ditch or excavation.
4. Use accessory lights and SMV emblem when traveling on highways.
IMPORTANT: To prevent serious damage to the tractor, read and follow the instructions on decal shown at right:
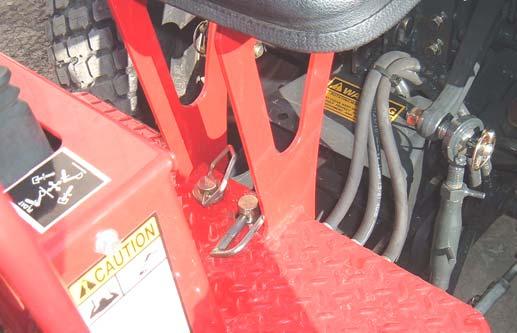
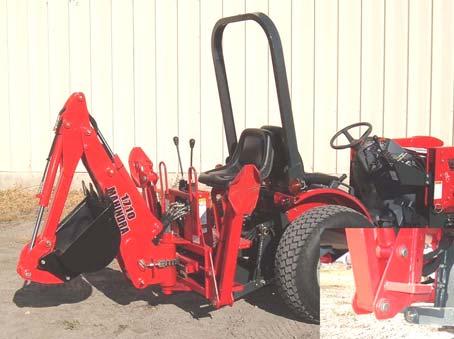
6.1.1. Before leaving backhoe operator's seat, position the backhoe for transport by raising boom assembly, crowding dipper assembly in, swinging to center and raising the stabilizers.
IMPORTANT: When transporting for long distances, periodically examine the backhoe and raise stabilizers and bucket back up to the full transport height. It is normal for the backhoe to slowly settle while being transported.
6.2. Transporting Backhoe and Tractor on Truck or Trailer
CAUTION: Do not attach hold down chains to backhoe in order to secure tractor to trailer. Block and secure tractor only. Bucket should be lowered to bed when possible.
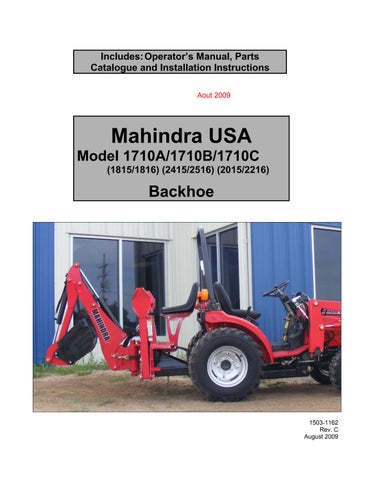
6.3. Transport Locking Pins
CAUTION: Always install transport locking pins into transport position when transporting or storing unit. This will prevent accidental movement of unit.
CAUTION: Always remove transport locking pins from transport position before attempting to operate the backhoe.
Transport Locking Pins in Transport Position
6.3.1. Position backhoe in transport position as follows:
♦ Raise boom assembly all the way up by retracting boom cylinder.
♦ Curl bucket back into dipper assembly by extending the bucket cylinder.
♦ Retract dipper assembly by extending the dipper cylinder.
♦ Center backhoe by operating the swing cylinder.
♦ Remove the transport locking pins from the storage position.
♦ Install the transport locking pins in the transport position and secure with snap pins provided.
IMPORTANT: To prevent damage to backhoe boom assembly, always curl bucket back into dipper assembly by extending bucket cylinder with dipper assembly extended slightly. Then retract dipper assembly by extending dipper cylinder. Do this in reverse when getting ready to operate backhoe. This procedure is required to prevent bucket teeth from contacting boom assembly when folding and unfolding backhoe.
6.3.2. Place transport locking pins in storage position during backhoe operation and secure using locking pins provided.
Swing Transport Locking Pin in Storage Position
Boom Transport Locking Pin in Storage Position
7. GENERAL OPERATION
CAUTION: To avoid possible injury, observe the following safety rules before operating the backhoe:
1. Be sure area is clear of underground utilities or other hazards.
2. Position barricade around work area.
3. Provide adequate front end weight to counter-balance tractor at all times. 20% minimum of the total tractor, loader and backhoe weight must be on the tractor front axle.
4. Keep bystanders a safe distance away.
5. While operating backhoe, keep your body in operator's area only. Do not place any part of your body in front of console area. Failure to follow these instructions could cause operator to be injured
CAUTION: DO NOT operate backhoe without front loader and Roll Over Protection System (ROPS) mounted on tractor. Loader provides front ballast for better steering control and makes tractor/backhoe more stable during backhoe operation.
DIRECTIONS: The terms right, left, front, and back shall be determined from the position of the operator when seated in the operating position on the backhoe looking toward backhoe.
IMPORTANT: To prevent damage to backhoe boom assembly, always curl bucket back into dipper assembly by extending bucket cylinder with dipper assembly extended slightly. Then retract dipper assembly by extending dipper cylinder. Do this in reverse when getting ready to operate backhoe. This procedure is required to prevent bucket teeth from contacting boom assembly when folding and unfolding backhoe. Damage to these components caused by operator error are not covered under warranty.
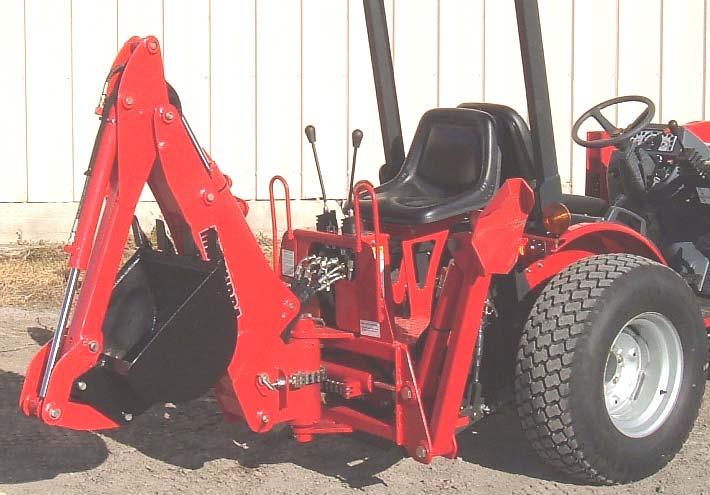
7.1. Stabilizer Pads
The backhoe is supplied with flip-over stabilizer pads as standard equipment. They are suitable for most backhoe work and generally are all that is ever required.
IMPORTANT: The backhoe bucket is capable of contacting stabilizers and/or stabilizer cylinders. Careful operation will avoid backhoe damage. Damage to these components caused by operator are not covered under warranty.
7.2. Entering And Leaving Backhoe Operator Area
Operator must always enter and leave backhoe operator area using the area between tractor tire and backhoe stabilizer on either RH or LH side of the backhoe,
Operator must always use steps and hand rails for support while entering and leaving backhoe operators area. Do not use stabilizers as a step.
Following these instructions will allow the operator a safe means of entering and leaving backhoe operator area.
Handrails: Use handrail instead of control levers for support
Steps: Located on each side of backhoe
Operator must always enter and leave backhoe operator area using the area between tractor tire and backhoe stabilizer
CAUTION: Never use backhoe control levers for a handhold. Accidental movement of backhoe could result in serious injury or death.
CAUTION: Do not use the stabilizers as a step. Use the steps and handrails when entering and leaving the operator console area. Failure to do so could cause a fall.
7.3. Placing the Backhoe Stabilizers for Digging
Set the stabilizers to remove weight from the rear tractor wheels. The wheels are to remain touching the ground as this provides for the widest stabilizer stance and the lowest center of gravity. Raising the wheels off the ground will not only reduce stability and digging depth, but also will impair performance and impose unnecessary stress on the unit.
NOTE: It is normal to have to readjust stabilizer during digging operation. This is caused by valve spool leakage.
NOTE: Keep top of stabilizer pads and arms free of dirt and debris. When stabilizers are folded upwards dirt and debris located on the stabilizer pads and arms can fall and collect between backhoe mainframe and stabilizer cylinder becoming compacted and potentially cause damage to the hydraulic fittings, hoses or cylinder.
Keep this area free of dirt and debris
Dirt and debris can collect in this area and become compacted possibly causing damage to hydraulic fittings, hoses and cylinder
7.4. Engine Speed
The speed at which the backhoe operates is partially dependent on engine RPM. Use a moderate engine speed to start and increase it as your experience permits. When powering from tractor systems with higher output, reduce engine RPM to obtain acceptable backhoe operating speed.
8. GENERAL OPERATION INSTRUCTIONS
8.1. Filling The Bucket
Control the bucket altitude throughout the digging cycle to keep teeth at the proper angle for best penetration. This will minimize dragging and scraping the bucket through the ground.
When digging in hard-packed soil, bucket penetration can be increased by applying down pressure with the boom while crowding in and curling the bucket. If the crowd action “stalls” it may be necessary to apply lift occasionally during the digging cycle to correct the bucket depth.
To obtain a cleaner trench and avoid the buildup of material directly in front of the backhoe, crowd out and completely curl the bucket while starting to lift it from the excavation. In this way, excess material will fall back into the excavation. NOTE: Be careful while operating bucket close to boom arm. Be alert! Bucket can contact bottom of boom arm causing damage not covered under warranty.
8.2. Dumping The Bucket
To dump the bucket at the end of the digging cycle, lift the bucket clear of the trench while crowding it out and swinging it to the spoil pile.
As the pile is approached, dump the bucket. When the bucket is empty, the dipper assembly and bucket are in position to resume digging upon return to the trench.
IMPORTANT: Avoid constant jarring or hammering-type contact between the spoil pile and the loaded bucket, as this may cause premature wear to the backhoe pins and bushings.
8.3. Trenching Between A Building And Open Excavations
Start the trench at the building. Trench out halfway to the excavation. Then start trenching from the excavation to the first trench. Dig toward the first trench until there is just enough room to move the unit out between the two trenches.
Position the unit so the backhoe swing post is over the centerline of the trench connection. Dig with the backhoe at extreme swing positions, and in as close to the stabilizers as possible. Pile the spoil on the opposite side of the trenches.
Position the unit forward with the boom and crowd controls so the two trenches can be connected. Pile the spoil on the opposite side of the trench.
8.4. Side Slope Excavating Or Trenching Dig with the backhoe uphill whenever possible.
Level the backhoe on slopes with the stabilizers to dig plumb trenches or use the backhoe or loader to cut a level slot for the uphill wheel and stabilizer. Pile the spoil from the slot on the high side. When on the side of a steep slope, cut a level surface along the uphill side of the trench with the loader. Pile the spoil of the cut downhill. When digging, pile the spoil of the trench uphill.
Dig field trenched progressively. As soon as one trench is completed, have the workmen lay the tile. Start the next trench, using the spoil to fill the previous trench.
8.5. Miscellaneous
When finishing straight walls or bellholes in sandy soil, use a platform under the rear tires and the stabilizers. The platform distributes the load over a larger area and lessons the possibility of a cave-in. The platform also tends to keep the unit from creeping rearward if hard digging is encountered.
8.6. Finishing Straight Walls
Finish the far wall by crowding out while forcing the bucket down from the boom. Actuate the bucket (curl out) to keep the bottom of the bucket vertical.
To finish the near wall, lift up and crowd in. Keep the edges of the bucket horizontal
8.7. Backfilling
Backfill by lifting the bucket over the spoil pile and then crowding in. Pull both the crowd and boom controls for smooth, even backfilling.
IMPORTANT: Do not backfill by using the swing circuit and dragging the bucket sideways. Doing so can cause damage to the bucket, dipper, boom, and swing cylinders or mainframe.