4 minute read
LCD SCREEN CONTRAST RATIO CAUTION


The LCD screen may be illegible when it is set too light or too dark, which may prevent correct operations. Adjust its contrast adequately for a comfortable read.
Adjust the contrast ratio of the LCD screen:
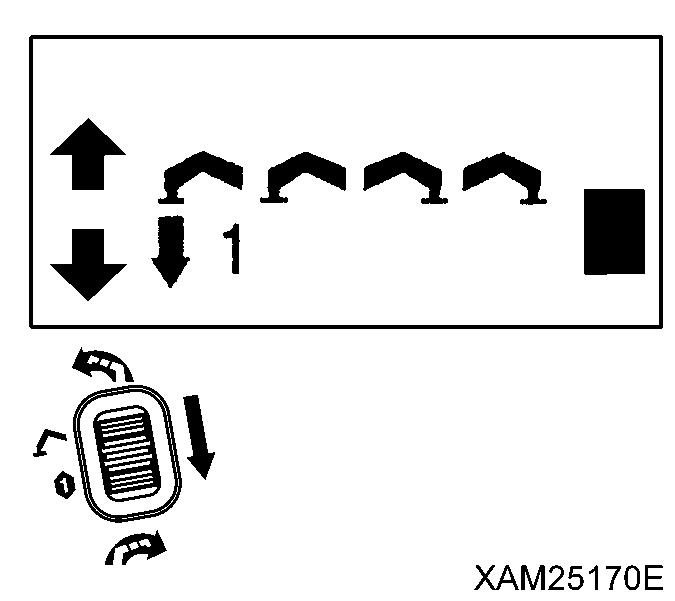
1. Shift the cursor ( or ) using the Hook raising and lowering lever.
• To darken: Push the upper end of the Hook raising and lowering lever.
• To lighten: Push the lower end of the Hook raising and lowering lever.
2. When the desired contract is obtained, push the Setting button
The condition obtained in above 1 will be fixed and the display returns to the A MODE screen.
[2] LOUDNESS CONTROL (available only for units with optional voice message)
Select either to use or to cancel the voice message.
1. Shift the cursor ( or ) using the Hook raising and lowering lever and select “ON” or “OFF”. When the voice message is required, select "ON", otherwise, select "OFF" to cancel it.

The factory setting for this function is “OFF”.
2. When the mode of the voice message is determined, push the Setting button. The condition obtained in above 1 will be fixed and the display returns to the A MODE screen.
[3] ACCELERATION
Adjust the engine speed limit, controllable by the Accelerator lever:
1. Shift the cursor ( or ) using the Hook raising and lowering lever. When all the bars light, the speed limit is at maximum, otherwise, when the all are OFF, it is at minimum

2. When the suitable rev limit is obtained, push the Setting button
The value obtained in above 1 will be fixed and the display returns to the A MODE screen.
[4] LCD BACKLIGHT
Adjust the length of time in which the LCD backlight is lit, after your finger is released from each of the lever.

1. Shift the cursor ( or ) using the Hook raising and lowering lever and select the preferred time
The elapse time adjust is by 4 steps, OFF, 1 sec., 3 sec., or 4 sec.
The factory setting for this function is “1 second”
2. When the desired time is obtained, push the Setting button. The elapse time in above 1 will be fixed and the display returns to the A MODE screen.
[5] OFF TIMER
Adjust the Auto shut-OFF time of the Transmitter power.
1. Shift the cursor ( or ) using the Hook raising and lowering lever and select the preferred time
The Auto shut-OFF adjust is by 3 steps, 5 min., 10 min., or 15min.
The factory setting for this function is “5 minutes”
2. When the desired time is obtained, push the Setting button. The time in above 1 will be fixed and the display returns to the A MODE screen.


[6] LOW IDLING UP CAUTION
The low idling rate regulated by this idling-up function is valid only during crane operation when levers are manipulated. Once the lever is released, the low idling rate is reset to the normal rate.
Adjust the engine„s low idling rate to higher than the normal rate, whilst the crane operation levers are manipulated.
1. Shift the cursor ( or ) using the Hook raising and lowering lever. When all the bars light, the idling up is in the maximum, otherwise, when the all are OFF, the idling up is canceled.
2. When the suitable idling up rate is obtained, push the Setting button. The value obtained in above 1 will be fixed and the display returns to the A MODE screen.
[7] MICRO SPEED MODE RESET
Select either to reset or preserve the value at the micro speed mode.
1. Shift the cursor ( or ) using the Hook raising and lowering lever and select “N” or “Y”.

To reset, select “Y”, otherwise, select N” to preserve.

2. Whether reset is fixed or not, push the Setting button. The status in above 1. will be fixed and the display returns to the A MODE screen.
[8] VERSION INFORMATION
Push the Setting button, so that version information of the Transmitter hardware is displayed. Another push of the same button makes the display returns to the A MODE screen.
Caution
Once setting-up the desired function items are completed, do not forget to practice the termination procedure, below. Otherwise, when this process is not correctly terminated, the latest setting will not become valid.
1. Once setting-up the desired function items are completed, ensure that the display has returned to the A MODE screen.
2. Shift the cursor ( or ) using the Hook raising and lowering lever and select “EXIT”.

3. Push the Setting button, which will terminate the “A MODE” and turn the mode to “the “CRANE MODE”.
6.1.3 AN EXAMPLE FOR SETTING IN THE A MODE
Hereunder is a procedure to change the time of the “OFF timer”, from “5 minutes” of the factory setting, to 10 minutes:
1. Use the Hook raising and lowering lever and shift the cursor ( or ) to the side of the function item to be changed.
2. When the cursor comes to the side of the “OFF timer”, push the Setting button.

Now, the “OFF timer” is selected and the cursor ( ) appears next to ”5 minutes”, as the current value.
3. Use the Hook raising and lowering lever so that the cursor ( ) comes to the side of “10 minutes”, then push the Setting button. Now, the “OFF timer” setting is 10 minutes.
4. Shift the cursor ( or ) using the Hook raising and lowering lever and select “EXIT”, then push the Setting button

Now the mode exits from the “A MODE” and is turned to the “CRANE MODE”.
Caution
• Once setting-up the desired function item are completed, do not forget to practice the termination procedure, above. Otherwise, when this process is not correctly terminated, the latest setting will not be valid.
• Change of the other function item setting is available by the same procedure. In such event, correctly exit from the A MODE, without fail.
6.2 PROCEDURE IN THE OPERATION MODE CAUTION
When the Main switch of the Receiver is turned ON, its abnormal signal detector automatically starts, first. Please allow it for 3 to 4 seconds, without using any levers, buttons and the Accelerator lever.
Notes
• For changes between the modes, always turn OFF the power, once, then push the Power button again to power ON
• While using a mode other than the “CRANE MODE”, when you turn OFF the power by the Power switch and turn it ON, again (i.e., you keep waiting for 2 seconds or more), the mode is automatically set to “CRANE MODE”.

When you want to continue the operation in the previous mode, call the appropriate mode, again.
6.2.1 CALL OUT CRANE MODE
1. Push the Power button to turn ON the Transmitter. The “Crane mark” is displayed in the LCD screen for about 2 seconds.

Notes
In case the power is already ON, turn OFF once, and then push the Power button again for power ON.
2. When the “Crane mark” in the LCD screen disappears in 2 seconds, the “CRANE MODE” is automatically called out.