3 minute read
7.2.3 CHECKING “CRANE MODE” OPERATION


• Ensure that all the outriggers are securely settled, before starting crane operations Any crane operations where outriggers are improperly used may cause the crane to tip over or other serious accidents.
• The Crane is inoperable at such times where the LCD screen in the Transmitter shows an error message or the Monitor display in the Receiver shows an error code. Without fail, examine the cause of the error and perform appropriate service when any fault is identified, or contact us or our agents for services
1. Start the engine by the Starter switch of the Crane.
Caution
Prior to starting the engine, perform the following practices with the Crane.
1. Set the Acceleration Lever to the medium speed (about middle of its stroke).
2. Pull out the choke knob.
3. Return the choke knob to its initial position, when the engine starts.

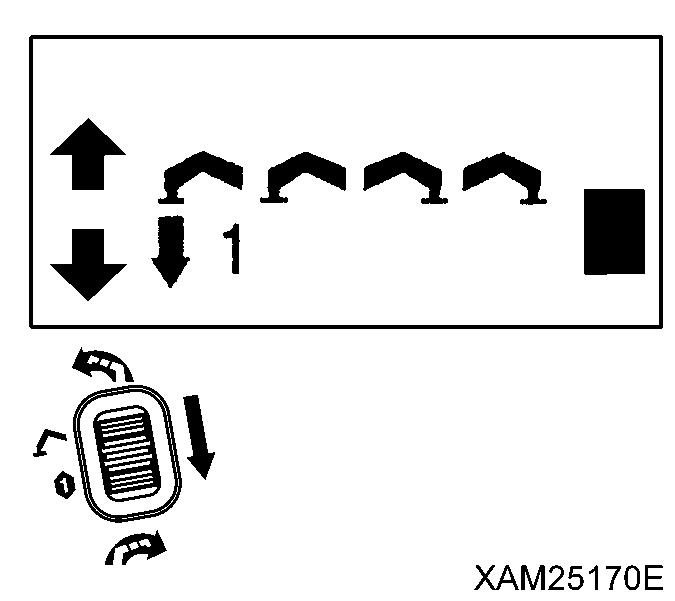
2. Refer to the contents of “OPERATION 2.15 Operations before Crane Operations” and “OPERATION 2.16 Crane Operation Position” and configure the Crane as shown in the figure, right.


3. Then turn ON the Main switch of the Receiver.
4. Push the Power switch of the Transmitter to power ON.
5. Enter into “CRANE MODE”; confirm that the indication as “CRANE MODE” is displayed in the LCD screen.

6. Use the Boom derricking lever to the both “Raise (upper)” and “Lower (lower)” area, pull the Accelerator lever and check that the boom follows the lever operation.
7. Raise the boom to a sufficient angle (approximately 60 degree) using the Boom derricking lever, pushing to the “Raise (upper)” area.
8. During the Hook raising and lowering lever manipulation, of the “Raise (upper)” and “Lower (lower)” area respectively, pull the Accelerator lever and check that the hook follows the lever operation.
9. Using the Hook raising and lowering lever to the “Lower (lower)” area, lower the hook as much as possible.
10. During the Boom telescoping lever manipulation, to the “Extend (upper)” and “Retract (lower)” area respectively, pull the Accelerator lever and check that the boom follows the lever operation.
11. Using the Hook raising and lowering lever to the “Raise (upper)” area, hoist the hook.


12. During the Slewing lever manipulation, to the “Counter clockwise (upper)” and “Clockwise (lower)” area respectively, pull the Accelerator lever and check that the Crane follows the lever operation. In addition, practice a slew around 360 degrees or more to check for any abnormal conditions


13. During each control lever manipulation of 6. through 12., above, slowly pull and release the Accelerator lever and confirm that the speed of each action follows the acceleration ratio.

14. During each control lever manipulation of step 6 through step 12, above, push the Speed/Mode button, then try both “Micro speed command” and “Enhanced speed command” and confirm the speed of each operation corresponds to respective controls of “Micro speed command” and “Enhanced speed command”

8. OPERATION
• Never attempt to disassemble or modify the Transmitter or Receiver, which may cause an electrical shock or a fire.
• Avoid making an impact to the Transmitter by dropping or hitting. A damaged part of the enclosure allows water to enter inside that can cause trouble or failures and may result in a serious hazard, such as a malfunction or electrical shock. In the event of dropping and damage, send the Transmitter to us or our agents for services.
• Never water-wash the Transmitter or Receiver; that allows water to enter inside and can cause trouble or failures and may result in a serious hazard, such as a malfunction or electrical shock.
• Both remote control operation and manual operation at the same time are not allowed. That may cause un-expected behavior of the Crane and result in a serious hazard. The Crane must be operated by only one method. (Manual operation is not available, when the remote control is active.)
• Prior to starting the remote control operations, always conduct inspections of both the Transmitter and Receiver, in accordance with “INTERACTIVE REMOTE CONTROL 7. Checking before Operation”.
8.1 CAUTIONS BEFORE OPERATION
1. So that dropping the Transmitter is prevented, hook one end of the hook belt (16) to the Transmitter and attach another end to the operator‟s waist belt & etc

2. Always conduct inspections of both the Transmitter and Receiver, in accordance with “REMOTE CONTROL 7. Checking Before Operation”.
3. Make sure that the receptacles (14) at the both ends of the connection cable are secured to both the Transmitter and Receiver, respectively.

Notes
• When it is required to change the initial values of settings such as the contrast of the Transmitter LCD screen, the light, or the OFF timer, first switch to “A MODE” for adjustment.
• In the event that the remote control operation is discontinued for the length of the “Auto shut -OFF time” or longer, during the crane operation, the Transmitter power will be automatically cut. To resume the remote control operation, turn ON the Transmitter and set each item of the operation mode again.