
10 minute read
CHECKING/CLEANING ENGINE SPARK PLUG CAUTION

Make sure that the specified plug is used. Those other than specified may cause deficiency in or shorten the useful life of engine.
• Specified spark plug: NGK BPR6HS
• Box wrench and handle for spark plug removal
• Plug cleaner or wire brush for cleaning
1. See “Operation 1.6 Machinery Cover” to remove the machinery cover.
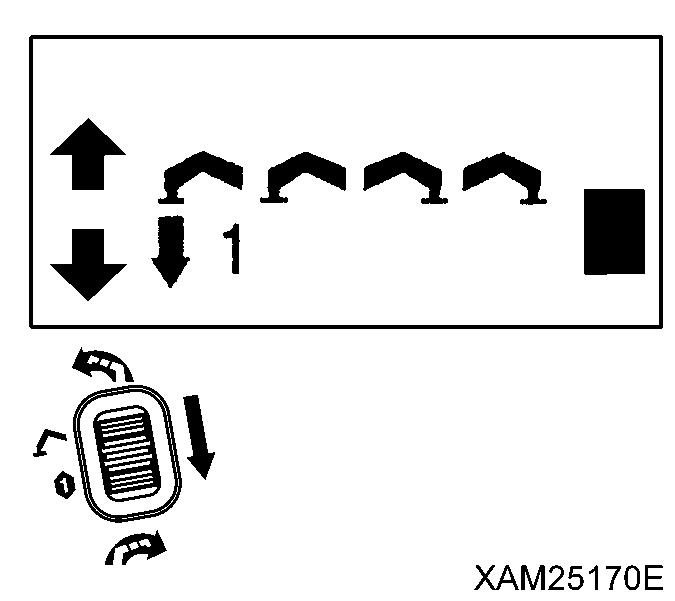
2.Remove the spark plug wiring socket (1) (1 peace).
3.With the handle threaded through the hole in spark plug box wrench, remove the spark plug.
4.Remove carbon off the spark plug by means of the plug cleaner or the wire brush.
Notes
Do not use a file or the like for this purpose as it wears electrode.
5.Measure the gap of the spark plug. Standard value of the gap: 0.6 to 0.7mm

6.If the gap is off the standard, change the bending of negative side to place the gap in the standard range.
7.Install the spark plug to the original position and connect the spark plug wiring socket (1).
8 See “Operation 1.6 Machinery Cover” to install the machinery cover.

8.8 MAINTENANCE EVERY 100 HOURS
Perform this maintenance in tandem with maintenance every 50 hour.
[1] CLEANING OF CARBON IN THE COMBUSTION CHAMBER
Cleaning of carbon require special tools.
Contact us or our sales service agency to request inspection and repair.
[2] INSPECTION/ADJUSTMENT ENGINE VALVE CLEARANCE

Inspection and adjustment of valve clearance require special tools. Contact us or our sales service agency to request inspection and repair.
8.9 MAINTENANCE EVERY 250 HOURS
Perform this maintenance in tandem with maintenance every 50/100 hours.
[1] CHECKING/REFILLING OIL LEVEL IN TRAVELLING MOTOR REDUCTION GEAR CASE CAUTION
• See “Maintenance 5.1 Use of Lubricating Oil According to Temperature” for which oil to be used.
• Use seal tape, etc. at the thread of the oil level check plug to stop the oil leak and securely tighten the plug after refilling with the oil.
1. Move the machine forward and backward so that drain plug (P) of the travelling motor reduction gear case will come to the bottom.
2. Remove the oil level check plug (G) of the travelling motor reduction gear case to check if the oil will come out of the plug hole.
3. If there is not sufficient oil, pour in engine oil from the plug hole (G)
Notes
Pour in the engine oil until the oil comes out of the oil level check plug (G).
4. Install the oil level check plug (G) and drain plug (P) and securely tighten them after checking and refilling with the oil.
8.10 MAINTENANCE EVERY 500 HOURS
Perform this maintenance in tandem with maintenance every 50/100/250 hours.
[1] REPLACEMENT HYDRAULIC OIL RETURN FILTER CARTRIDGE AND SUCTION FILTER
• All the parts will be at elevated temperatures immediately after engine operation, which urges you not to replace the filter. Always perform replacement with the engine cold.
• The oil may spout out when the cap of the hydraulic oil tank is removed. Loosen the bolts so that the cap is raised a little to allow the release of inner pressure, then remove bolts and remove the cap
• Securely tighten mounting bolts of the oil filler cap after refilling with the oil. If the mounting bolts loose and then filler cap falls during the operation, the hot oil spouts out of the pan, causing burns. Also, when attaching the oil filler cap, always fit a rubber packing, otherwise, when the rubber packing is neglected, the hot oil may spout out of the filler cap fitting, causing burns.
Caution
• See “Maintenance 5.1 Use of Lubricating Oil According to Temperature” for which oil to be used.
• Place the machine in travel position for oil quantity inspection. Oil quantity inspection with the machine in working position may deceive your eyes to deem the quantity of oil low. Owing to improper judgment, the oil may be supplied at an excessive amount.

• The engine must be at halt until piping and hydraulic equipment is filled with oil after replacement of the hydraulic oil filter.
• Avoid that oil exceeds the level point (red point) of the level gauge. When the oil goes beyond the correct level, it may spout out from the air breather, during travelling or crane operation.
• Keep impurities out of the filler cap when replenishing oil.
• Refer to “Operation 1.6 Machinery Cover” and remove the machinery cover in accordance with the instructions in it, when necessary.
1. Place the machine on a level surface.
2. See “Operation 2.5 Machine Travelling Position” and put the machine in the “travelling position”.
3. Remove the 4 mounting bolts (1) and remove the filler cap (F) on top of the hydraulic oil tank.
4. Remove the 8 mounting bolts (5) and remove the flange (2) on top of the hydraulic oil tank and suction filter (3) from inside the hydraulic oil tank.

5. Insert the new suction filter (3) to the inside of the hydraulic tank.
6. Put the flange (2) in place with liquid packing applied to the packing (4). Secure the flange (2) with the 8 mounting bolts (5)
Notes
Wipe off the oil completely if spilled.
7. Remove the 4 mounting bolts (8) and remove the hydraulic oil return filter (6) on top of the hydraulic oil tank.

8. Put the new hydraulic oil return filter (6) in place with liquid packing applied to the packing (7). Secure the hydraulic oil return filter (6) with the 4 mounting bolts (8)
Notes
Wipe off the oil completely if spilled.
9. Check the oil level gauge (G) and ensure that oil is sufficient to reach the level point (red point).

10. After refilling with oil, Set the filler cap (F) and rubber packing to the filler opening position and tighten the 4 mounting bolts (1) securely.
11. Use the following procedure for air bleeding
(1) Start the engine with piping and hydraulic equipment filled with oil. Make sure the engine runs at low idle for 10 minutes.
(2) Move the cylinders and winch motor slowly with a crane control lever at low idle speed. Always stop the boom derricking cylinder and telescoping cylinder approx. 100mm back from the stroke end when operating the cylinders. Repeat this task 4 to 5 times.
(3) Allow all the outriggers to be extended, referring to “Operation 2.13 Outrigger Set Up Operation”. Extend and retract the outrigger cylinder, keeping the machine down on the ground. Always stop the outrigger cylinder approx. 100mm back from the stroke end when operating the cylinder.
Repeat this task 4 to 5 times.
8.11 MAINTENANCE EVERY 1000 HOURS
Perform this maintenance in tandem with maintenance every 50/100/250/500 hours.
[1] OIL REPLACEMENT IN HYDRAULIC OIL TANK
• All the parts will be at elevated temperatures immediately after engine operation, which urges you not to replace the filter. Always perform replacement with the engine cold.
• The oil may spout out when the cap of the hydraulic oil tank is removed. Loosen the bolts so that the cap is raised a little to allow the release of inner pressure, then remove bolts and remove the cap.
• Securely tighten mounting bolts of the oil filler cap after refilling with the oil. If the mounting bolts are loose and then filler cap falls during the operation, the hot oil spouts out of the pan, causing burns. Also, when attaching the oil filler cap, always fit a rubber packing, otherwise, when the rubber packing is neglected, the hot oil may spout out of the filler cap fitting, causing burns.
Caution
• See “Maintenance 5.1 Use of Lubricating Oil According to Temperature” for which oil to be used.
• Place the machine in travel position for oil quantity inspection. Oil quantity inspection with the machine in working position may deceive your eyes to deem the quantity of oil low. Owing to improper judgment, the oil may be supplied at an excessive amount.
• The engine must be at halt until piping and hydraulic equipment is filled with oil after replacement of the hydraulic oil filter.
• Avoid that oil exceeds the level point (red point) of the level gauge. When the oil goes beyond the correct level, it may spout out from the air breather, during travelling or crane operation.
• Keep impurities out of the filler cap when replenishing oil.
• Refer to “Operation 1.6 Machinery Cover” and remove the machinery cover in accordance with the instructions in it, when necessary.
• When replacing oil, use a seal tape to the drain cap screw to prevent leakage and then secure the oil cap tightly.
• Oil drain pan: A 30-litre container
• Quantity of oil for replacement: 20 litres
1. Place the machine on a level surface.
2. See “Operation 2.5 Machine Travelling Position” and put the machine in the “travelling position”.
3. Remove the 4 mounting bolts (1) and remove the filler cap (F) on top of the hydraulic oil tank.

4 Place a drain pan directly underneath the drain plug (P) to receive drained oil.
5. Remove the drain plug (P) slowly to drain the oil, keeping from contact with draining oil.
6. Check the drained oil. If check finds a considerable amount of metal powder and foreign objects, contact us or our sales service agency
7. Put in the drain plug (P) and secure it.
8. Check the oil level gauge (G) and replenish the hydraulic oil until it reaches the level point (red point).
9. After refilling with oil, Set the filler cap (F) and rubber packing to the filler opening position and tighten the 4 mounting bolts (1) securely
10. Use the following procedure for air bleed
(1) Start the engine with piping and hydraulic equipment filled with oil. Make sure the engine runs at low idle for 10 minutes.
(2) Move the cylinders and winch motor slowly with a crane control lever at low idle speed. Always stop the boom derricking cylinder and telescoping cylinder approx. 100mm back from the stroke end when operating the cylinders.
Repeat this task 4 to 5 times.
(3) Allow all the outriggers to be extended, referring to “Operation 2.13 Outrigger Set Up Operation”. Extend and retract the outrigger cylinder, keeping the machine down on the ground. Always stop the outrigger cylinder approx. 100mm back from the stroke end when operating the cylinder.
Repeat this task 4 to 5 times.
The drain plug of the slewing reduction gear case is located directly underneath the machine. Place the outriggers and raise the machine fully from the ground to allow a drain pan to be placed under the machine for draining oil. If the machine becomes unstable and wobbles, insert supports under the front and back of the machine to gain stability.
Caution
• See “Maintenance 5.1 Use of Lubricating Oil According to Temperature” for which oil to be used.
• Use seal tape, etc. at the thread of the filler plug to stop the oil leak and securely tighten the plug after refilling with the oil.
• Oil drain pan: A 1-litre container
• Quantity of oil for replacement: 0.3 litres
1. Place the machine on a level surface.
2. See “Operation 1.6 Machinery Cover” to remove the machinery cover.
3 See “Operation 2.13 Outrigger Set Up Operation” to rotate the rotary of the all outriggers outward.
Check the following before crawling under the machine:

• Ensure that the outriggers are extended at the maximum.
• Visually check the level to make sure the machine is in a horizontal position.

• Insert solid blocks between the crawler and the ground to keep the machine raised.

4 Place a drain pan directly underneath the drain plug (P) of the slewing reduction gear case to receive drained oil
5. Remove the drain plug (P) slowly to drain the oil, keeping from contact with draining oil.
6. Check the drained oil. If check finds a considerable amount of metal powder and foreign objects, contact us or our sales service agency.
7. Put in the drain plug (P) and secure it.
8. Remove 2 mounting bolts (2) and then remove the slewing gear cover (1).

9. Remove the Filler plug (F) of the slewing reduction gear case , and supply the gear oil to the slewing reduction gear case through the filler plug (F) hole
Notes
Oil shall be refilled until it almost reaches the plug hole mouth.
10. Put in the filler plug (F) and secure it after oil replacement.
11. Install the slewing gear cover (1) to the original position and tighten the 2 mounting bolts securely.

12. See “Operation 2.23 Outrigger Stowing Operation” to stow the outriggers.
13 See “Operation 1.6 Machinery Cover” to install the machinery cover.
• For the winch reduction gear case oil, always use "BONNOC M320 (NIPPON OIL EUROPE LIMITED)".
When any oil other than as specified is used, that may cause deterioration of the winch brake capacity to result in unforeseen accidents.
• Before checking the oil level, allow the machine to cool down to a temperature where you can touch the side near the bottom of the winch reduction gear case. Otherwise hot oil will come out and may cause burns.
Caution
• When you can measure "0.8 litre" of the oil specified for the winch reduction gear case using a measuring cup or such, you don't have to remove the oil inspection plug. Just drain the oil from the drain plug and refill the oil from filler plug (F) hole.
• Use seal tape, etc. at the thread of the plug to stop the oil leak and securely tighten the plug after refilling with the oil.
• Oil drain pan: A 1-litre container
• Quantity of oil for replacement: 0.8 litres
1. Place the machine on a level surface.
2. Place a drain pan directly under the plug (P) to receive drained oil
3. Remove the oil inspection plug (G) and filler plug (F) of the winch reduction case (1).

4. Remove the drain plug (P) slowly to drain the oil, keeping from contact with draining oil.
5. Check the drained oil. If check finds a considerable amount of metal powder and foreign objects, contact us or our sales service agency.
6. Put in the drain plug (P) and secure it.
7. Supply the gear oil to the winch reduction gear case through the filler plug (F) hole
Notes
• Pour in the gear oil until the oil comes out of the oil level check plug (G).
• If you can measure the amount of the oil, refill the 0.8 litres of the gear oil from filler plug (F) hole.
8 Check that the oil stops flowing out from the oil inspection plug (G) hole, then tighten the oil inspection plug (G) firmly.
9. Put in the filler plug (F) and secure it after oil replacement.
10 After the oil in the winch reduction gear case is replaced, operate the winch lever to wind up and down (with no load and for a stroke about 1.5 metres) for 40 to 50 times so that the new oil spreads all over the gear case.


