
3 minute read
GREASING BOOM UNITS

Caution
• Grease type varies with greasing points. Failure to grease properly may cause the machine to shorten its useful life. See the following table for grease types.
• Greasing a new machine is required once every 10 hours until the machine attains the first 100 hours of operation that initial fit emerges.
• Use proper grease specified below according to the greasing points.
№ Greasing point Grease type
10 Greasing of top side of the boom slide plate 6 places Molybdenum grease
11 Greasing of both sides and bottom of a boom Each boom
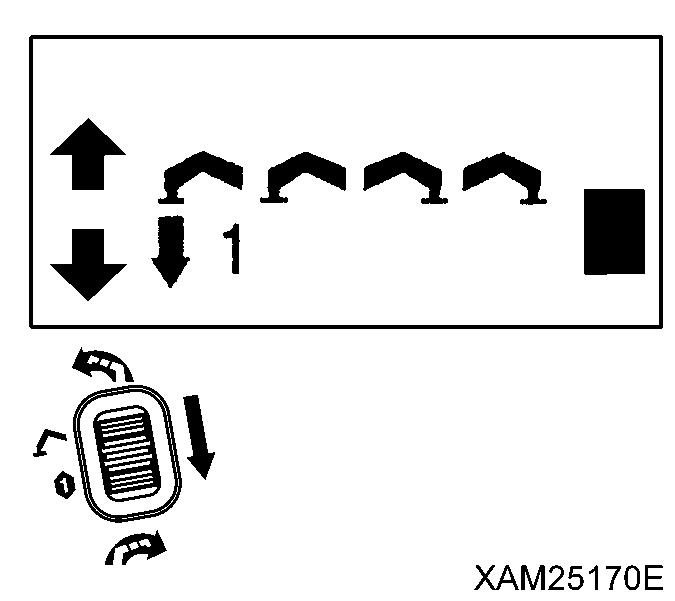
1. Grease the slide plates on the boom top surface using the following procedure.
(1) Place the boom telescoping lever in the “Retract” position (pull it toward you) to retract the boom fully.
(2) With the use of the grease gun, grease the 6 grease plugs.
2. Grease the both sides and bottom of the boom using the following procedure.
(1) Place the boom telescoping lever in the “Retract” position (push it toward the front) to retract the boom fully.
(2) With the use of the scraper, grease both side surfaces and bottom surface of the boom.

• Make sure the oil level gauge is secured properly after inspection and replenishment of the oil. Potential fall of the oil level gauge during operation may occur if disregarded, which could cause boiling oil to gush resulting in burns.
• All the parts will be at elevated temperatures immediately after engine operation, which urges you not to replace oil. Always perform replacement with the engine cold to touch.
Caution
• Be sure to use oil specified in section 5.1 “Use of Lubricating Oil according to Temperatures” in Inspection and Maintenance. Failure to use proper oil may cause the engine to shorten its useful life. Always use the specified oil for replenishment.
• The engine oil level must be maintained at the proper amount.
• The complete draining of oil is disabled if the engine becomes cold completely. Oil draining is allowed when the engine is cold to touch.
• Keep impurities out of the filler cap when replenishing oil.
• Oil drain pan: A 2-litre container
• Quantity of oil for replacement: 1.2 litres
1. Place the machine on a level surface.
2. Place a drain pan directly underneath the drain plug (P) at the bottom of the machine left side to receive drained oil
3. Remove the drain plug (P) slowly to drain the oil, keeping from contact with draining oil.
4. Check the drained oil. If check finds a considerable amount of metal powder and foreign objects, contact us or our sales service agency.
5. Put in the drain plug (P) and secure it.
6. Pull the oil level gauge (G) out and wipe the oil with a disposable cloth.
7. Refill the engine oil to the specified level, from the port where the oil level gauge was attached. When the oil is refilled to near the mouth of the port, the specified level is achieved.


8. Insert the oil level gauge (G) into the oil filler and pull it out.
Notes
Don't screw in the oil level gauge (G) That causes oil to be filled higher than correct level.
9 Make sure the oil level is in the range “H” to “L” marked on the oil level gauge (G).
10. After oil replacement, securely install the oil level gauge (G).
• The fuel filter pot has fuel (gasoline) inside. Be extremely careful of fire such as cigarette when cleaning the fuel filter pot
• If the fuel spills when the fuel filter pot is removed, thoroughly wipe it off.
Caution
Water or dust accumulated inside the fuel filter pot will cause engine failure. Check inside the cup and remove any water or dust accumulated inside.
1. Place the machine on a level surface.
2 See “Operation 1.6 Machinery Cover” to remove the machinery cover.
3. Check the fuel filter pot (1) inside to make sure that there is no water or dust remaining in it
4 If any water or dust is found to remain inside the filter pot, clean the pot internals in the following procedure
(1) Turn the fuel lever (2) to horizontal position (Close) to stop fuel flow.
(2) Turn the filter pot (1) and remove the filter pot (1) from the head (3).
(3) Discard any fuel or water in the filter pot (1).
(4) Detach the filter net (4) in the filter pot (1) and remove all the dirt and dust adhered to the net.
(5) Return the filter net (4) to the filter pot (1), use the packing (5) and fit the filter pot (1) to the head (3).
(6) Turn the fuel lever (2) to vertical position (Open) to open the fuel circuit.

Notes
To fasten the filter pot (1) to the head (3), a retainer ring (6) is used. To unfasten the filter pot (1), turn the retainer ring (6) counterclockwise. To fasten filter pot (1), turn the retainer ring (6) clockwise.
5 See “Operation 1.6 Machinery Cover” to install the machinery cover.


