
7 minute read
2. OPERATIONS

2.1 CHECKS BEFORE OPERATION
2.1.1 CHECKS BEFORE STARTING THE ENGINE (VISIBLE CHECKS)
• This machine has a gasoline engine. If it smells of fuel around the engine, the fuel may be leaking. Carefully check for cracks on the fuel hose or fuel hose connections.
• Buildup of combustibles and oil leakage around the hot engine section such as engine and muffler and around the battery can cause fire in the machine. Carefully check around these areas. Should you find any abnormality, be sure to fix it or contact us or our sales service agency
Check the items shown in this section as routine surveillance before starting the first work of every day.
[1] CHECKING AROUND CRANE
• Look around and below the boom and post and look for any oil leak or similar. Be especially careful to check the derricking cylinder and lower part of the winch motor near the post. If you find any abnormality, repair.
• Check each part of the post for cracks, excessive deformation & contamination etc. In addition, check bolts, nuts, pins and piping joints for any looseness, drop or damage etc. Be especially careful to check for looseness of decelerator mounting bolt of the post, slewing ring or slewing device. If you find any abnormality, repair.
• Check each part of the boom for cracks, excessive deformation, contamination etc. In addition, check bolts, nuts, pins and piping joints for any looseness, drop & damage etc. Be especially careful to check for excessive abrasion and damage of the boom support pin or derrick support pin. If you find any abnormality, repair.
• Check for excessive damage and deformity of the over hoist weight wire rope of the overwinding alarm device at the tip of the boom. If there is any abnormality, repair.
• Check for sagged electrical wire, loosened connection and trace of burns. If you find any abnormality, repair.
[2] CHECKING WIRE ROPES
See "Inspection and Maintenance 8.6 [2] Replacement winch wire rope".
• Check the wire ropes for damage, deformation, wear, twists, kinks, corrosion, etc. If you find any abnormality, replace
• Check the bound condition of the wire rope ends. If you find any loosened wire rope end, replace.
• Check for irregular winding of the wire ropes (wind drum). If you find any irregular winding, rewind.
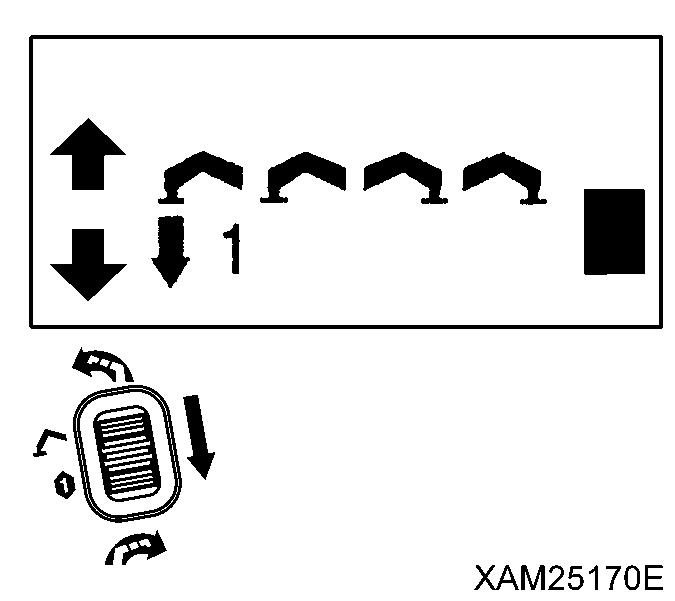
[3] CHECKING HOOK BLOCK
• Verify that the wire rope latch (1) of the hook block functions normally. If there is any abnormality, repair.
• Rotate the hook and verify that the hook rotates smoothly and that trunnion does not emit any abnormal sound. If there is any abnormality, repair.
• Check the hook for any crack or excessive deformation. If there is any abnormality, repair.
• If dimension a between the punch marks punched on the hook became "105 mm or more" or the hook lower part dimension b became "49.5 mm or less", replace the hook.
[4] CHECKING AROUND OUTRIGGERS
• Look below each of the outriggers and check for any oil leak etc. Be especially careful to check below the outrigger cylinders. If you find any abnormality, repair.
• Check each of the rotaries, outriggers, holders and outrigger cylinders for cracks, excessive deformation & contamination etc. In addition, check bolts, nuts, pins and piping joints for any looseness, drop or damage etc. If you find any abnormality, repair.
• Pull out the position pin of each of the outriggers, rotate the relevant outrigger rotary and verify that the operation is smooth. If you find any abnormality, repair.


[5] CHECKING UNDERCARRIAGE PARTS
Check each of the frames, rubber tracks, rollers, idlers and sprockets for cracks, excessive deformation & contamination etc. In addition, check bolts, nuts and pins for any looseness, drop or damage etc. If you find any abnormality, repair.
[6] CHECKING AROUND TRAVELLING DOLLY
• Look around and below the machine and check bolts, nuts, pins and piping joints for any looseness, drop or damage etc. If you find any abnormality, repair.
• Look around and below the machine and look for any oil leak or similar. Be especially careful to check below the hydraulic oil tank, travel/crane operation section and each travelling motor. If you find any abnormality, repair.
• Look around and below the Machine and check for breakage, excessive deformation, contamination etc, Also check lights such as the headlights and the working status lamp. If you find any abnormality, repair.
• Look around and below the machine and check for sagged electrical wire, loosened connection and trace of burns. If you find any abnormality, repair.
• Check each of the frames, machinery covers and other parts for cracks, excessive deformation & contamination etc. If you find any abnormality, repair.
[7] CHECKING AROUND ENGINE
• Check for fuel, oil or water leaking from the engine. If you find any abnormality,
repair.
• Check the hot engine sections such as the engine muffler and around the battery for the buildup and deposit of combustibles such as dead leaves, paper wastes, dust, oil, and grease. If there is any, remove them.
• Check the starter, alternator, around battery and similar parts for sagged electrical cables, piping joints, and the trace of burn. If you find any abnormality, repair.
[8] CHECKING AROUND TRAVEL OPERATION SECTION
• Verify that all of the travelling levers, acceleration lever, travelling lever stand lock lever and travelling lever stand operate smoothly. If you find any abnormality, repair.
• Check the hour meter on the instrument panel for damages and dirtiness. If you find any abnormality, repair. If dirty, clean.
• Verify that all of the switches on the instrument panel operate smoothly. If you find any abnormality, repair.
• Check for sagging electrical wire, loosened connection and trace of burns. If you find any abnormality, repair.
[9] CHECKING AROUND CRANE OPERATION SECTION
• Verify that all of the operation levers and acceleration lever operate smoothly. If you find any abnormality, repair.
• Check the moment limiter display for damages and dirtiness. If you find any abnormality, repair. If dirty, clean.
• Verify that all of the switches on the outrigger operation panel and the instrument panel operate smoothly. If you find any abnormality, repair.
• Check for sagging electrical wire, loosened connection and trace of burns. If you find any abnormality, repair.
2.1.2 CHECKS BEFORE STARTING THE ENGINE
Check the following in this section without starting the engine and before starting work every day.

[1] CHECKING/REFILLING OIL LEVEL IN ENGINE OIL PAN
Securely install the oil level gauge (filler cap) after checking the oil level and refilling with the oil. If the oil level gauge falls during the operation, the hot oil spouts out of the pan, causing burns.
Caution
• See “Maintenance 5.1 Use of Lubricating Oil According to Temperature” for which oil to be used. Using other oil than those specified may shorten the life of the engine. Be sure to refill with the specified oil.
• Keep the engine oil at the appropriate level. The oil level being too high will result in too much oil consumption and this tends to increase the oil temperature, deteriorating the oil faster. The oil level being too low may burn out the engine.
• Be careful not to let any foreign substance go into the filler opening when refilling with the oil.
1. Stop the machine on a level surface.
2. Pull the oil level gauge (G) out and wipe the oil with a disposable cloth.
3. Insert the oil level gauge (G) into the oil filler and pull it out.
Notes
Don't screw in the oil level gauge (G) That causes oil to be filled higher than correct level.
4. If the oil level is between the “H” mark and “L” mark on the oil level gauge (G), the oil level is normal.

5. If the oil level is lower than the “L” mark, refill with the engine oil from the filler opening.
Notes
Refill the engine oil until it almost reaches the oil filler port.
6. After refilling with the oil, securely install the oil level gauge (G).
• This machine uses gasoline (Octane number between 89 and 92). Be extremely careful with fire such as cigarette.
• Be sure to stop the engine when refueling. If refueling was done with the engine in operation, the fuel spilled on the section where it gets hot such as muffler can catch fire.
• Over-refilling may cause fuel spill. Refuel to the level slightly lower than the specified upper limit level. If the fuel spills, be sure to thoroughly wipe it off.
• Be sure to close the tank cap after refuelling.
Caution
• See “Maintenance 5.1 Use of Lubricating Oil According to Temperature” for which fuel to be used.
• Be careful not to let any foreign substance enter the filler opening when refueling.
1. Looking at the fuel gauge (G) on the top of the fuel tank, check if the fuel is filled to almost full (around “F”).

2. If the fuel level is low, remove the tank cap (F) on the top of the fuel tank and refuel from the filler opening while watching the fuel gauge (G)
3. After refueling, turn the tank cap (F) to securely close it.

Notes
Fill the fuel tank to full after finishing the work for the day.
• The oil may spout out when the cap of the hydraulic oil tank is removed. Loosen the bolts so that the cap is raised a little to allow the release of inner pressure, then remove bolts and remove the cap.
• Securely tighten mounting bolts of the oil filler cap after refilling with the oil. If the mounting bolts are loose and then filler cap falls during the operation, the hot oil spouts out of the pan, causing burns. Also, when attaching the oil filler cap, always attach a rubber packing, otherwise, when the rubber packing is neglected, The hot oil may spout out of the filler cap fitting, causing burns.

Caution
• See “Maintenance 5.1 Use of Lubricating Oil According to Temperature” for which oil to be used.
• Be sure to put the machine in the travelling position when checking the oil level. Checking the oil level in the working position will cause overfilling since the oil in the cylinders has not returned to the tank.
• Avoid the oil exceeding the level point (red point) of the level gauge. When the oil goes beyond the correct level, it may spout out from the air breather during travelling or crane operation.

• Be careful not to let dust enter the filler opening when refilling with oil.
1. Stop the machine on a level surface.
2. Check the oil level gauge (G) in the left side of the machinery cover and ensure that oil is sufficient to reach the level point (red point).
3. If there is not sufficient oil, refill with the hydraulic oil using the following procedure.
(1) Remove 4 mounting bolts (1) and the filler cap (F) on the top of the hydraulic oil tank.
(2) Refill with the hydraulic oil from the filler opening (F) while looking at the oil level gauge (G).
(3) After refilling with oil, Set the filler cap (F) and rubber packing to the filler opening position and tighten mounting bolts securely


