7 minute read
INTRODUCTION


Fuel System Checks
Fill the fuel tank with the recommended fuel. Keeping tanks full reduces water condensation and helps keep fuel cool, which is important to engine performance. Full tanks also reduce the chances for microbe (black slime) growth. Make sure fuel supply shutoff valves (if used) are open.
To ensure proper starting and even running, the fuel system must be primed if air has entered the fuel system. Priming is done by using the hand primer mounted on the injection pump.
Priming is not normally necessary if the filter elements are filled with fuel when installed.
Prolonged use of the starting motor and engine fuel pump to prime the fuel system can result in damage to the starter, fuel pump and injectors, and cause erratic engine operation due to the amount of air in the lines and filters from the supply tank to the cylinder head.
Under no circumstance should a starting aid such as ether be used to run the engine until the fuel system is primed. Injector damage will occur if this method is used. The heat generated by the external fuel source will cause the injector tips to be damaged when the fuel cools them. Plunger and bushing assemblies can be scored from running without lubrication.
If the engine is equipped with a fuel/water separator, drain off any water that has accumulated. Water in fuel can seriously affect engine performance and may cause engine damage. MackPower™ recommends installation of a fuel/water separator on marine units.
General Engine System Checks
Check drive belts to make sure they are in good condition (not cracked, torn, worn or glazed) and properly adjusted.
Make sure cable connections to the storage battery are clean and tight and battery electrolyte level is normal.
Check the oil level in the auxiliary generator set (if equipped). Add lubricant recommended by the manufacturer.
Check coolant level in the auxiliary generator set and top off, if necessary.
Check turbocharger(s) for signs of oil, coolant or exhaust leaks. Leaks should be corrected before starting the engine.
Check for matted, crushed or oil-soaked turbocharger or riser insulation blankets, if so equipped. Have damage or oil-soaked blankets replaced.
Check engine mounting bolts for tightness. Retighten if necessary.
Starting The Engine
Before starting the engine for the first time, perform the operations listed.
Initial Engine Start
1.Position the marine gear in neutral and set the speed control lever at idle.
2.Press the starter switch firmly.
To prevent starter motor damage, do not press the starter switch again after the engine has started.
If the engine fails to start within 15 seconds, release the starter switch and allow the starting motor to cool for 15 seconds before trying again. If the engine fails to start after four attempts, an inspection should be made to determine the cause.
Oil Pressure
Observe the oil pressure gauge immediately after starting the engine. If no oil pressure is indicated within 10 to 15 seconds, stop the engine and check the oil level gauge. If the oil level is OK, the engine lubrication system should be checked. The minimum oil pressure should be at least 25 psi (172 kPa) at 1200 rpm. The oil pressure at normal operating speed and temperature should be 50–70 psi (345–483 kPa). If pressure fails to fall within these guidelines, it should be checked with a manual gauge.
Running The Engine
Warm-Up
Run the engine at part throttle for about five minutes to allow it to warm up before applying a load.
Inspection
While the engine is idling, check to make sure that water is flowing out the exhaust pipe or raw water discharge pipe. Look for coolant, fuel or lubricating oil leaks at this time. If any are found, shut down the engine immediately and have leaks repaired after the engine has cooled.
Cooling System
Entrapped air must be purged after the cooling system is filled. To do this, allow the engine to warm up without the pressure cap installed. With the marine gear in neutral, increase engine rpm above 1000 rpm and add coolant as required. Vent the petcock on the water return line at the water-jacketed turbocharger until coolant (no air) comes out. Caution coolant will be hot. Install the pressure cap after the coolant level has stabilized at the bottom of the heat exchanger tank filler neck. Refill the recovery bottle if coolant is drawn into the engine while purging the air.
If all of the coolant is drawn out of the recovery bottle when the engine cools, remove the pressure cap from the heat exchanger and check to make sure the coolant level is at the bottom of the filler neck. Add coolant as required, replace the pressure cap and fill the recovery bottle to the “Full Cold” level or no more than one-quarter of its volume.
Failure to properly fill the cooling system and purge it of air can result in engine overheating and serious engine damage.
Do not overfill the recovery bottle since this can result in spillage as the coolant expands during engine operation.
Crankcase
If the engine oil was replaced, stop the engine after normal operating temperature has been reached. Allow the oil to drain back into the crankcase for approximately 20 minutes and check the oil level. If necessary, add oil to bring the level to the proper mark on the dipstick. Use only the heavy-duty oils recommended.
Turbocharger
Make a visual inspection of the turbocharger for oil leaks, coolant leaks, exhaust leaks, excessive noise or vibration. Stop the engine immediately if a leak, unusual noise or vibration is noted. Do not restart the engine until the cause of the concern has been investigated and corrected.
STOPPING THE ENGINE Normal Stopping
1.Decrease engine speed back to normal idle and put all shift levers in the neutral position.
2.Allow the engine to run at idle with no load for four or five minutes. This allows the engine to cool and permits the turbocharger(s) to cool down. After idling four or five minutes, shut down the engine.
ENGINE OUT OF FUEL HOW TO RESTART. PRIMING THE FUEL SYSTEM
When an engine has run out of fuel, there is a definite procedure to follow when restarting it.
The only acceptable method of priming the fuel system is the hand-primer pump. The application of air pressure to the fuel tank or the use of an auxiliary pump to prime the fuel system is NOT RECOMMENDED. These priming techniques may result in severe engine damage caused by leakage of fuel past the supply pump seal and into the crankcase.
1.Fill the fuel tank with the recommended grade of fuel. If only partial filling is possible, add a minimum of 10 gallons (38 liters) of fuel to the tank.
Introduction
2.Remove the fuel strainer/water separator from its cover, fill it with fuel and reinstall it.
3.Remove the primary fuel filter (located on the hull of the vessel) from its adapter, fill it with fuel and reinstall it.
4.Remove the secondary fuel filter (located on the engine next to the coolant conditioner canister) from its adapter, fill it with fuel and reinstall it.
To improve engine starting, have replacement elements filled with fuel and ready to install immediately after used elements are removed. This will prevent possible siphoning and fuel system aeration.
5.Disconnect the inlet hose at the secondary fuel filter.
6.Hand-pump until fuel is seen at the inlet hose fitting. This should take approximately 50 hand pumps.
Excessive hand-priming after fuel is seen at the fitting may make the engine difficult to start.
7.Reconnect the inlet hose to the secondary fuel filter.
8.Start the engine and check fuel filter and strainer for leaks.
Under no circumstances should the starting motor and fuel pump be used to prime the fuel filter and strainer. Prolonged use of the starting motor and fuel pump to prime the fuel system can result in damage to the starter, fuel pump and injectors and cause erratic running of the engine due to the amount of air in the lines and filters.
Priming The Fuel System
If the engine does not start, refill both filters and repeat priming procedure outlined in Steps 2, 3 and 4.
Do not crank the engine continuously for more than 30 seconds without allowing the starter to cool for two minutes between engine cranking cycles.
Injection Pump And Governor Settings
Any unauthorized adjustments of the injection pump and governor settings, other than as specified, can cause serious damage to the engine.
Please be aware of the hazards of attempting to increase the power of the diesel engine by adjusting injection pump and governor settings. Standard specifications for injection pump and governor settings permit the maximum allowable engine output. Adjustments of the injection pump and governor settings, other than as specified, can cause serious damage to the engine. In some engines, improper adjustments generally produce visual evidence of overfueling, excessive fuel consumption and smoke. The turbocharged diesel engine usually does not produce visual evidence. The possibility of damage from improper adjustments is greater in the turbocharged diesel engine because the usual warning signs may not be present.
In the event that damage results from such unauthorized adjustments, as evidenced by improper settings in the injection pump and governor assembly or broken fastener seals of the same, the cost of repairing such damage will NOT be covered under the MackPower™ Standard Marine Warranty.
Visual Identification
Engine Model Identification
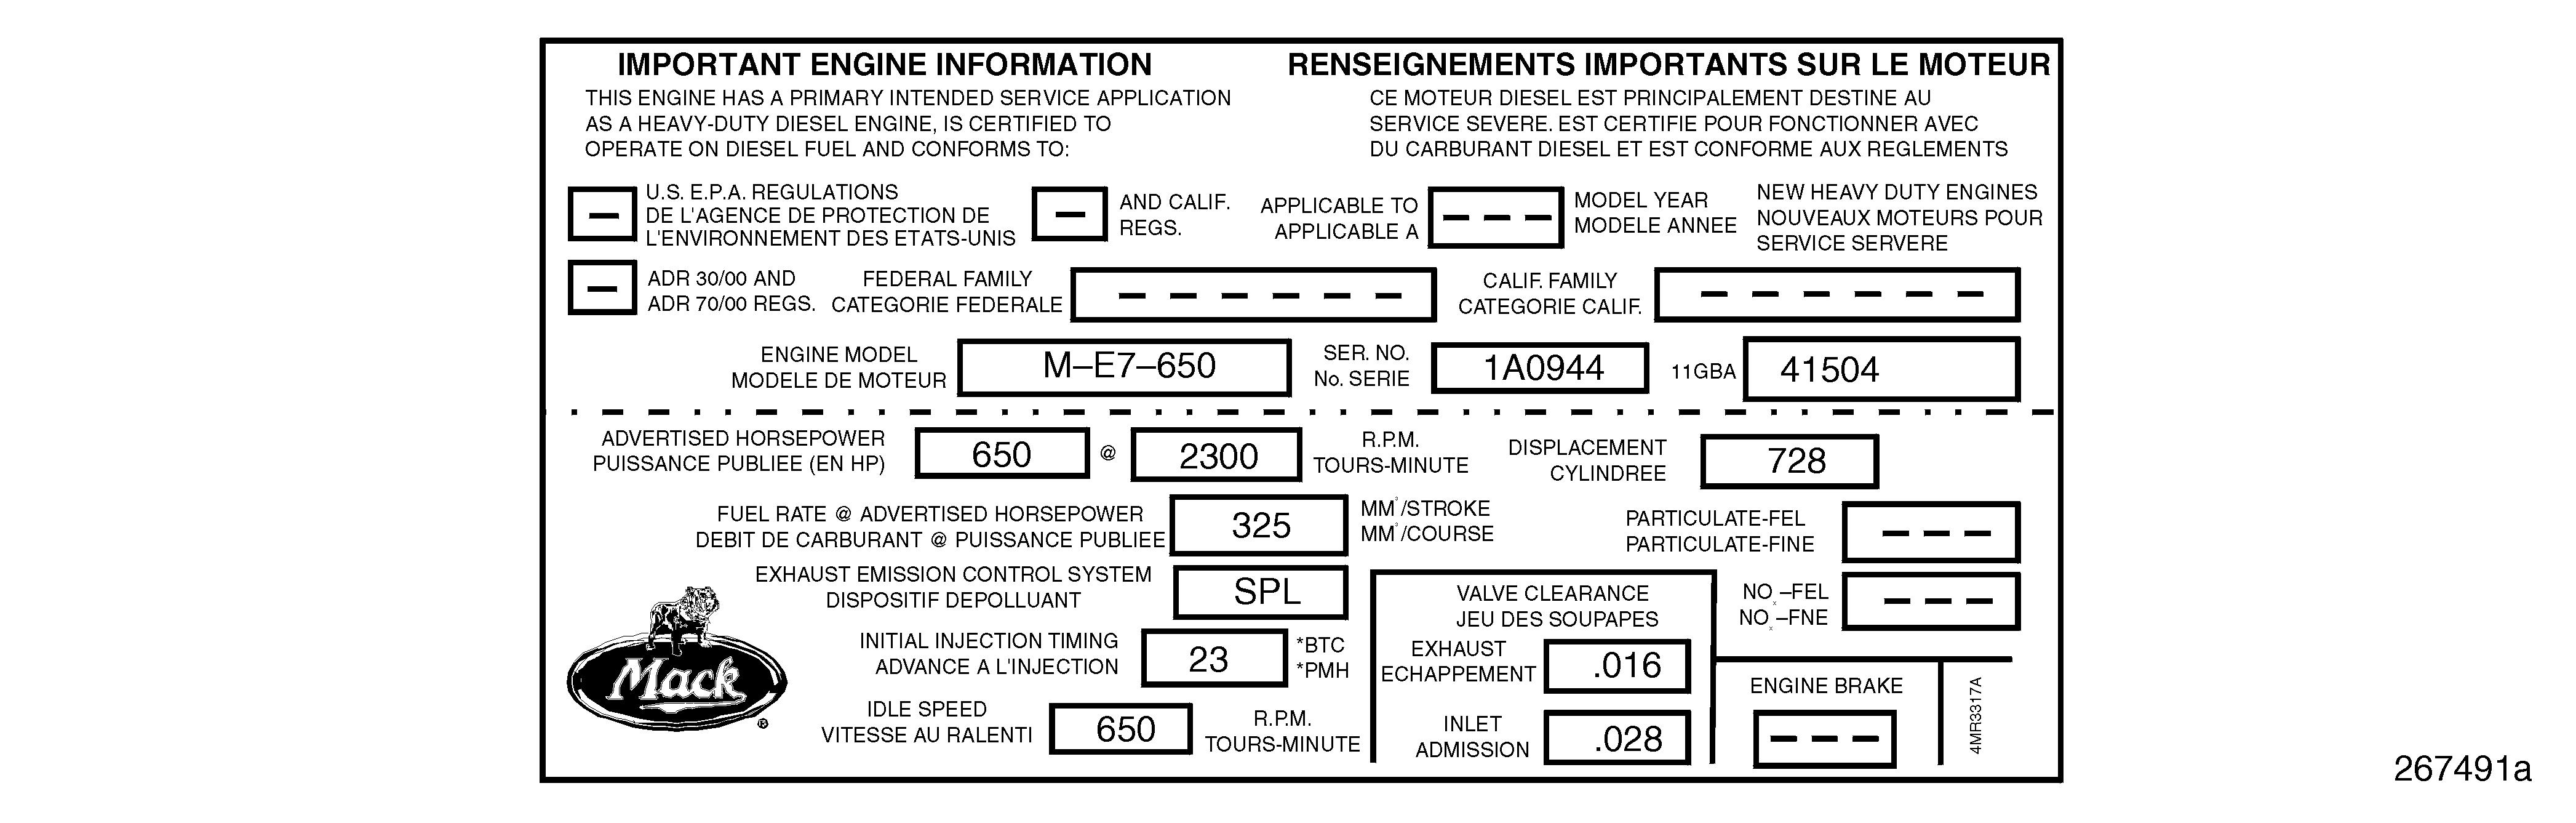
Engine Information Plate
All engines are identified by an engine information plate located on the front valve cover of the engine. This plate indicates the engine
11GBA number, serial number and various engine adjustments. The engine is also identified by the serial number stamped into the cylinder block on a pad just to the rear of the raw water pump.
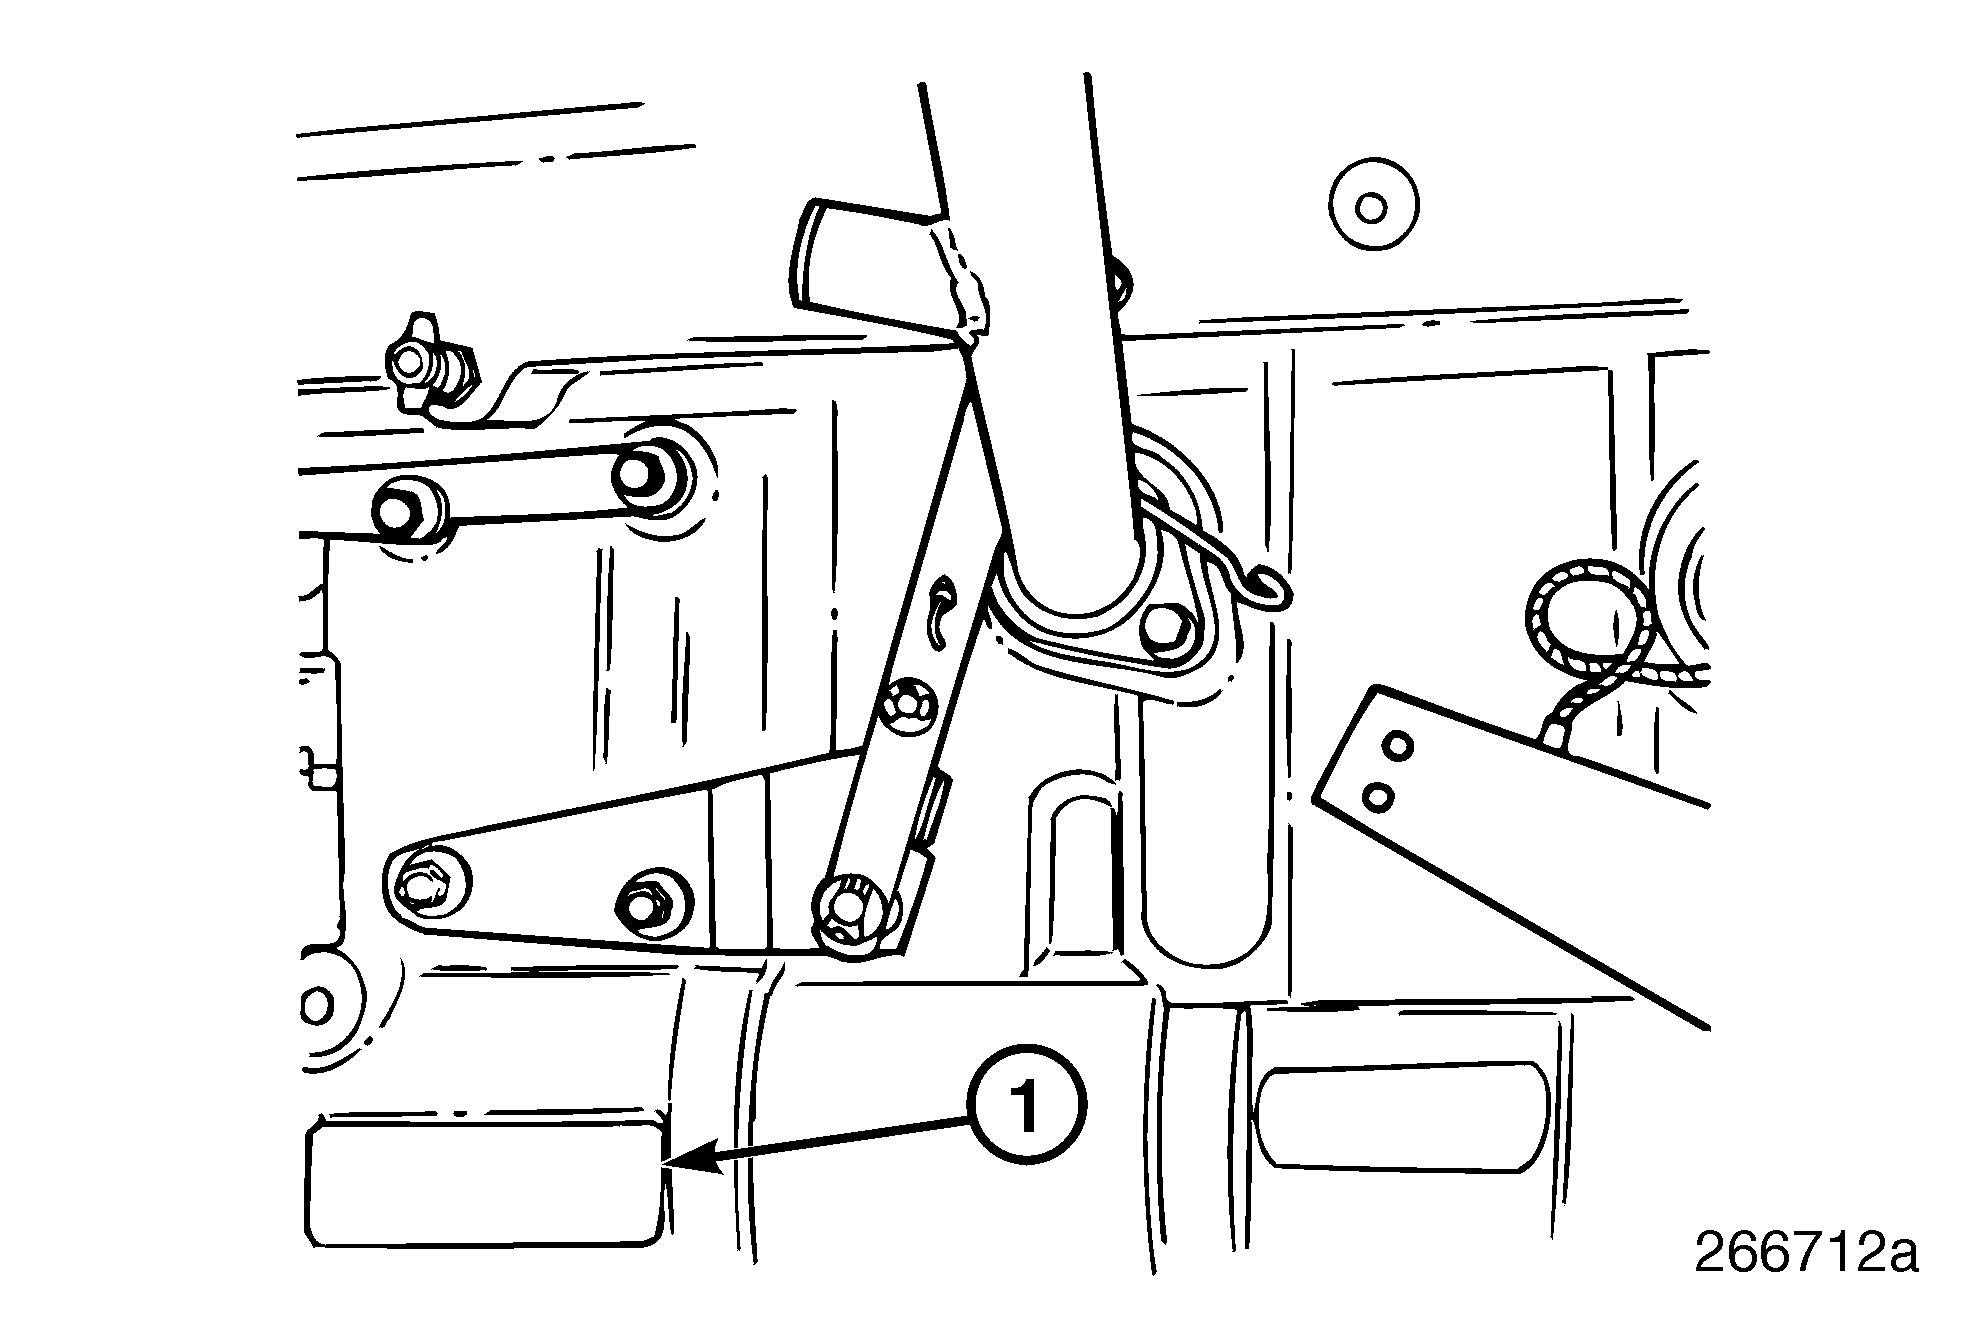
Engine Serial Number Identification
In addition to the engine information plate on the forward cylinder head cover, the engine is also identified by the engine serial number stamped into the cylinder block. This serial number is located on the block right side, below the turbocharger drain flange/fill tube as shown in Figure 3.