12 minute read
CHAPTER 7. OPERATION

from Iseki Front Mower SF224 & SF235 Mower Decks SCMA54 SCMB60 SSM54 Collector SBC950 Operator's Manual

1. BEFORE STARTING THE ENGINE
CAUTION:
・ Before starting the engine, be sure to carry out the pre-operation inspection in accordance with the periodical inspection table.
・Follow instructions given in " CHAPTER 1. FOR SAFE OPERATION. "
・Follow instructions given on the caution labels on the front mower, mower deck and collector.
2. STARTING THE ENGINE
WARNING: Never attempt to start the engine in an enclosed place with poor ventilation. Be sure to provide sufficient ventilation, as exhaust fumes can be lethal.
IMPORTANT:Before starting the engine, close the engine hood securely. Sit down on the operator's seat properly, and depress the brake pedal, otherwise the engine cannot be started.
a. Close the engine hood securely.
b. Sit on the operator's seat properly.
c. Apply the parking brake, 1, securely.
d. Move the mower lift lever, 2, forward to the DOWN position.
e. Lift down and dump down the collector by moving collector lift lever, 3, and collector dump lever, 4, forward.
f. Depress the brake pedal, 5, fully.
g. Insert the starter key into the starter switch, 6, and turn the key to the ON position. Make sure that the charge lamp and oil pressure lamp are both illuminated.
h. Move the throttle lever, 7, to an intermediate speed position between the high speed and low speed positions.
i. Turn the starter switch to the GLOW position and hold it there for five to ten seconds.
IMPORTANT: Never keep on glow position more than 10 seconds, or the glow plugs may burn out.
j. Turn the starter key to the START position, and the starter is activated to crank the engine.
IMPORTANT:Do not hold the starter key more than 10 seconds in the START position. When the engine fails to start, return the key to the OFF position and wait at least 20 seconds before the next starting operation. If you do not, the battery will be discharged too fast.
k. As soon as the engine starts, release the starter key. The key will return automatically to the ON position.
l. Release the brake pedal gradually.
m. Make sure that the charge lamp and oil pressure lamp turn off.
IMPORTANT: If the oil pressure remain illuminate, stop the engine immediately and check the engine lubrication system.
n. Continue the warming up of front mower at least for 5 minutes.
IMPORTANT:・Never turn the starter key to the START position after the engine starts, otherwise the starter motor will be damaged. ・Insufficient idling time will cause poor lubrication of the engine due to high viscosity of engine oil, which will lead to a shorter life of the engine.
CAUTION: During engine warming up, be sure to apply the parking brake to avoid the front mower travelling unexpectedly.
NOTE: Warming up criteria and atmospheric temperatures:
Atmospheric temperaturesRequired warming up
Higher than 0 ℃ (32°F)5 to 10 minutes
0 ℃ to -10℃ (32°F to 14°F)10 to 20 minutes
-10℃ to -20℃ (14°F to -4°F)20 to 30 minutes
Lower than -20℃ (-4°F)more than 30 minutes
WARNING: Never start travelling with the parking brake applied, otherwise the brake performance will deteriorate soon or, even worse, the brake system could break down.
In the worst case, the brake system may cause fire by heated brake drum if inflammable around the brake system is not properly removed.
A: Charge lamp
B: Oil pressure lamp
FIG. 43
(5) Starter switch
FIG. 44
A: OFF position
B: ON position
C: GLOW position
D: START position
3. TRAVELLING
CAUTION: a. Start the engine. (Refer to Chapter 7.2) b. Depress the brake pedal,1, fully.
・Before having become sufficiently familiar with the operation of the front mower, be sure to operate it in a spacious, flat and unobstructed place with good visibility, and confirm the function of each control.
・ Check the place to mow beforehand for bumps, ditches, mounds, steps, slopes, inclination, softness, water pools and etc. in order to avoid accidents such as turnover, fall, side-sliding of the front mower.
CAUTION: c. (When mowing) : Move the throttle lever, 2, to the HIGH speed position to accelerate the engine. d. Shift the mower lift lever, 3, to UP position to lift up the mower deck from the ground. e. When front mower is attaching a collector, be sure to lower the container.
・Before having become sufficiently familiar with the operation of the front mower, operate it at the LOW speed position.
・ When travelling on bumps, ditches, mounds, steps, inclination softness, waterhole, etc, select the throttle lever at the LOW speed position.
(When travelling) : Move the throttle lever to the HIGH speed position.
CAUTION: Starting to travel at high speeds without lifting up the mower deck will cause the mower blades to hit stones or stocks, which may result in break-down of the front mower or serious accidents.
CAUTION When starting to travel, be sure to lower the container. Otherwise it may cause the front mower to turn over, which is very dangerous.
(1) Brake pedal
(4) Parking brake lever
(5) HST forward travel pedal
(6) HST reverse travel pedal
(2) Throttle lever A: High speed B: Low speed
(3) Mower lift lever f. Make sure that the parking brake lever, 4, is released. g. Release the brake pedal gradually. h. The steering wheel is very light to turn, for the steering system is assisted hydraulically. Naturally the front mower turns to right when the steering wheel is turned clockwise and vice versa.
IMPORTANT:For your safety, before moving forward the front mower, check the conditions in front of and around the front mower.
WARNING: Never start travelling with the parking brake applied, or the brake performance will deteriorate soon or, even worse, the brake system could break down.
In the worst case, the brake system may cause fire by heated brake drum if inflammables around the brake system is not properly removed.
WARNING: i. Depress the HST forward travel pedal, 5, softly, and then the front mower starts travelling. When reversing the front mower, depress the HST reverse travel pedal, 6, softly, and then the front mower starts reversing slowly. Buzzer sounds when front mower is moving to backward.
・Never attempt to turn the steering wheel abruptly when travelling at high speed, which is very dangerous.
・ Never attempt to make a sharp turn on a slope. Slow down sufficiently and turn the steering wheel slowly to prevent the mower from turning over or falling down.
CAUTION:
・ Never attempt to depress the HST pedal suddenly, otherwise the front mower will dash, which is very dangerous.
・Before changing travelling directions, be sure that the front mower has stopped travelling completely.
・ When reversing, make sure the safety conditions behind the front mower.
4. 4WD LEVER
With this lever, 2WD/4WD automatic change-over and permanent 4WD is selectable.
4WD PERM: Shift(push) the lever to engage permanent 4WD mode.
4WD AUT: Shift(pull) the lever to engage AUTO 4WD mode.
In AUTO 4WD mode, 2WD and 4WD is selected automatically during operation on a level ground, so the lever operation is not required.
When operating on a slope, shift the changeover lever to the 4WD position without fail.
IMPORTANT: Be sure to shift the 4WD lever to the "AUTO" position when operating on level ground, as level ground operation with the 4WD selected leads to a larger turning radius and may cause turf damage.
IMPORTANT: When shifting the 4WD lever, slow down the travelling speed below 1 km/h and make the machine go straight.
WARNING:When operating the front mower on a slope, be sure the 4WD lever is locked in the 4WD position from the reasons mentioned below:
In the AUTO position the mechanism shifts to 2WD automatically when the peripheral speed of the front wheels exceeds that of the rear wheels, which means loss of rear wheel driving power.
For example, when moving uphill if the front wheels slip, the mechanism stays in 4WD. But moving downhill if the front wheels slip and lose grip, and begin to slip down the slope, it shifts to 2WD, that is, braking effect of the HST unit is lost, which means loss of front mower control.
From another point of view, when you try to turn the front mower on a slope, rear wheel driving power is lost and the front mower may slip down the slope, which is also very dangerous.
5. STOPPING
a. Release the HST pedal, 1 or 2.
b. Shift the throttle lever, 3, to the LOW speed position to slow down the engine.
c. Depress the brake pedal, 4, and apply the parking brake, 5, securely.
CAUTION: Park the front mower on flat, level ground and make sure that the parking brake is applied securely. In order to maximize the performance of the parking brake, depress the brake pedal, and then apply the parking brake.
d. Shift the mower lift lever, 6, to DOWN position to lower the mower deck onto the ground.
CAUTION: When stopping the front mower, lower the mower deck onto the ground without fail to avoid unexpected accidents.
6. STOPPING THE ENGINE
a. Move the throttle lever,1, to the low speed position to reduce engine speeds.
b. Turn the starter switch to the OFF position to stop the engine.
IMPORTANT: ・ Never attempt stopping the engine abruptly when it is running at high speeds, except for emergency case.
・ Be sure to let the engine idle for about 5 minutes after a longtime operation and then stop the engine. Abrupt engine stopping may lead to overheating.
d. Remove the starter key from the starter switch.
CAUTION: When you leave the front mower, be sure to stop the engine and remove the starter key to prevent the front mower from starting unexpectedly by children or unauthorised people.
CHAPTER 8. MAINTENANCE
When you inspect the engine room, lift up the collector fully, and lock the lift cylinder by the lift cylinder lock plate, 1.
When you encounter any abnormality or trouble which is not mentioned in this manual, please ask your dealer for service.
WARNING: When lubricating or servicing the front mower:
・Place it on level, and hard ground.
・Stop the engine and remove the starter key.
・Apply the parking brake securely.
・Shift the lift lever forward to DOWN position to lower the mower deck onto the ground.
・Service the front mower after the engine has cooled down sufficiently. With these items in mind, confirm the safety conditions for maintenance operation without fail beforehand.
CAUTION: Lock the lift cylinder without fail. Otherwise, when operator touch the lift lever by accident, it may cause to be caught in the falling container.
1. SERVICE ACCESS Opening / Closing hood
To open the hood, 1, lift up the hood by handle, 2, to upward.
To close the hood, pull down the hood by using handle.
WARNING: When opening / closing the hood, be sure to stop the engine and remove the starter key.
2. ENGINE OIL LEVEL
a. Pull out the engine oil level gauge (dipstick), 1, which is located on the right-side wall of the engine.
b. Wipe the end of the dipstick with dry cloth.
c. Then insert it into the engine properly.
d. Pull it out again. The oil level should be between the upper, A, and lower, B, limits.
e. If the level is lower than the lower limit, replenish through the engine oil filler, 2, to the upper limit with the same kind of oil as that in the engine.
CAUTION: Stop the engine and wait at least 5 minutes before checking the oil level. Engine oil is so hot just after operation as to cause burns and it takes some time as well for all the oil to return to the oil pan.
IMPORTANT:
・Never replenish with a different kind of oil. The addition of different kind of oil will deteriorate the quality of the original oil.
・The oil level should not exceed the upper limit. Excessive oil will cause engine trouble.
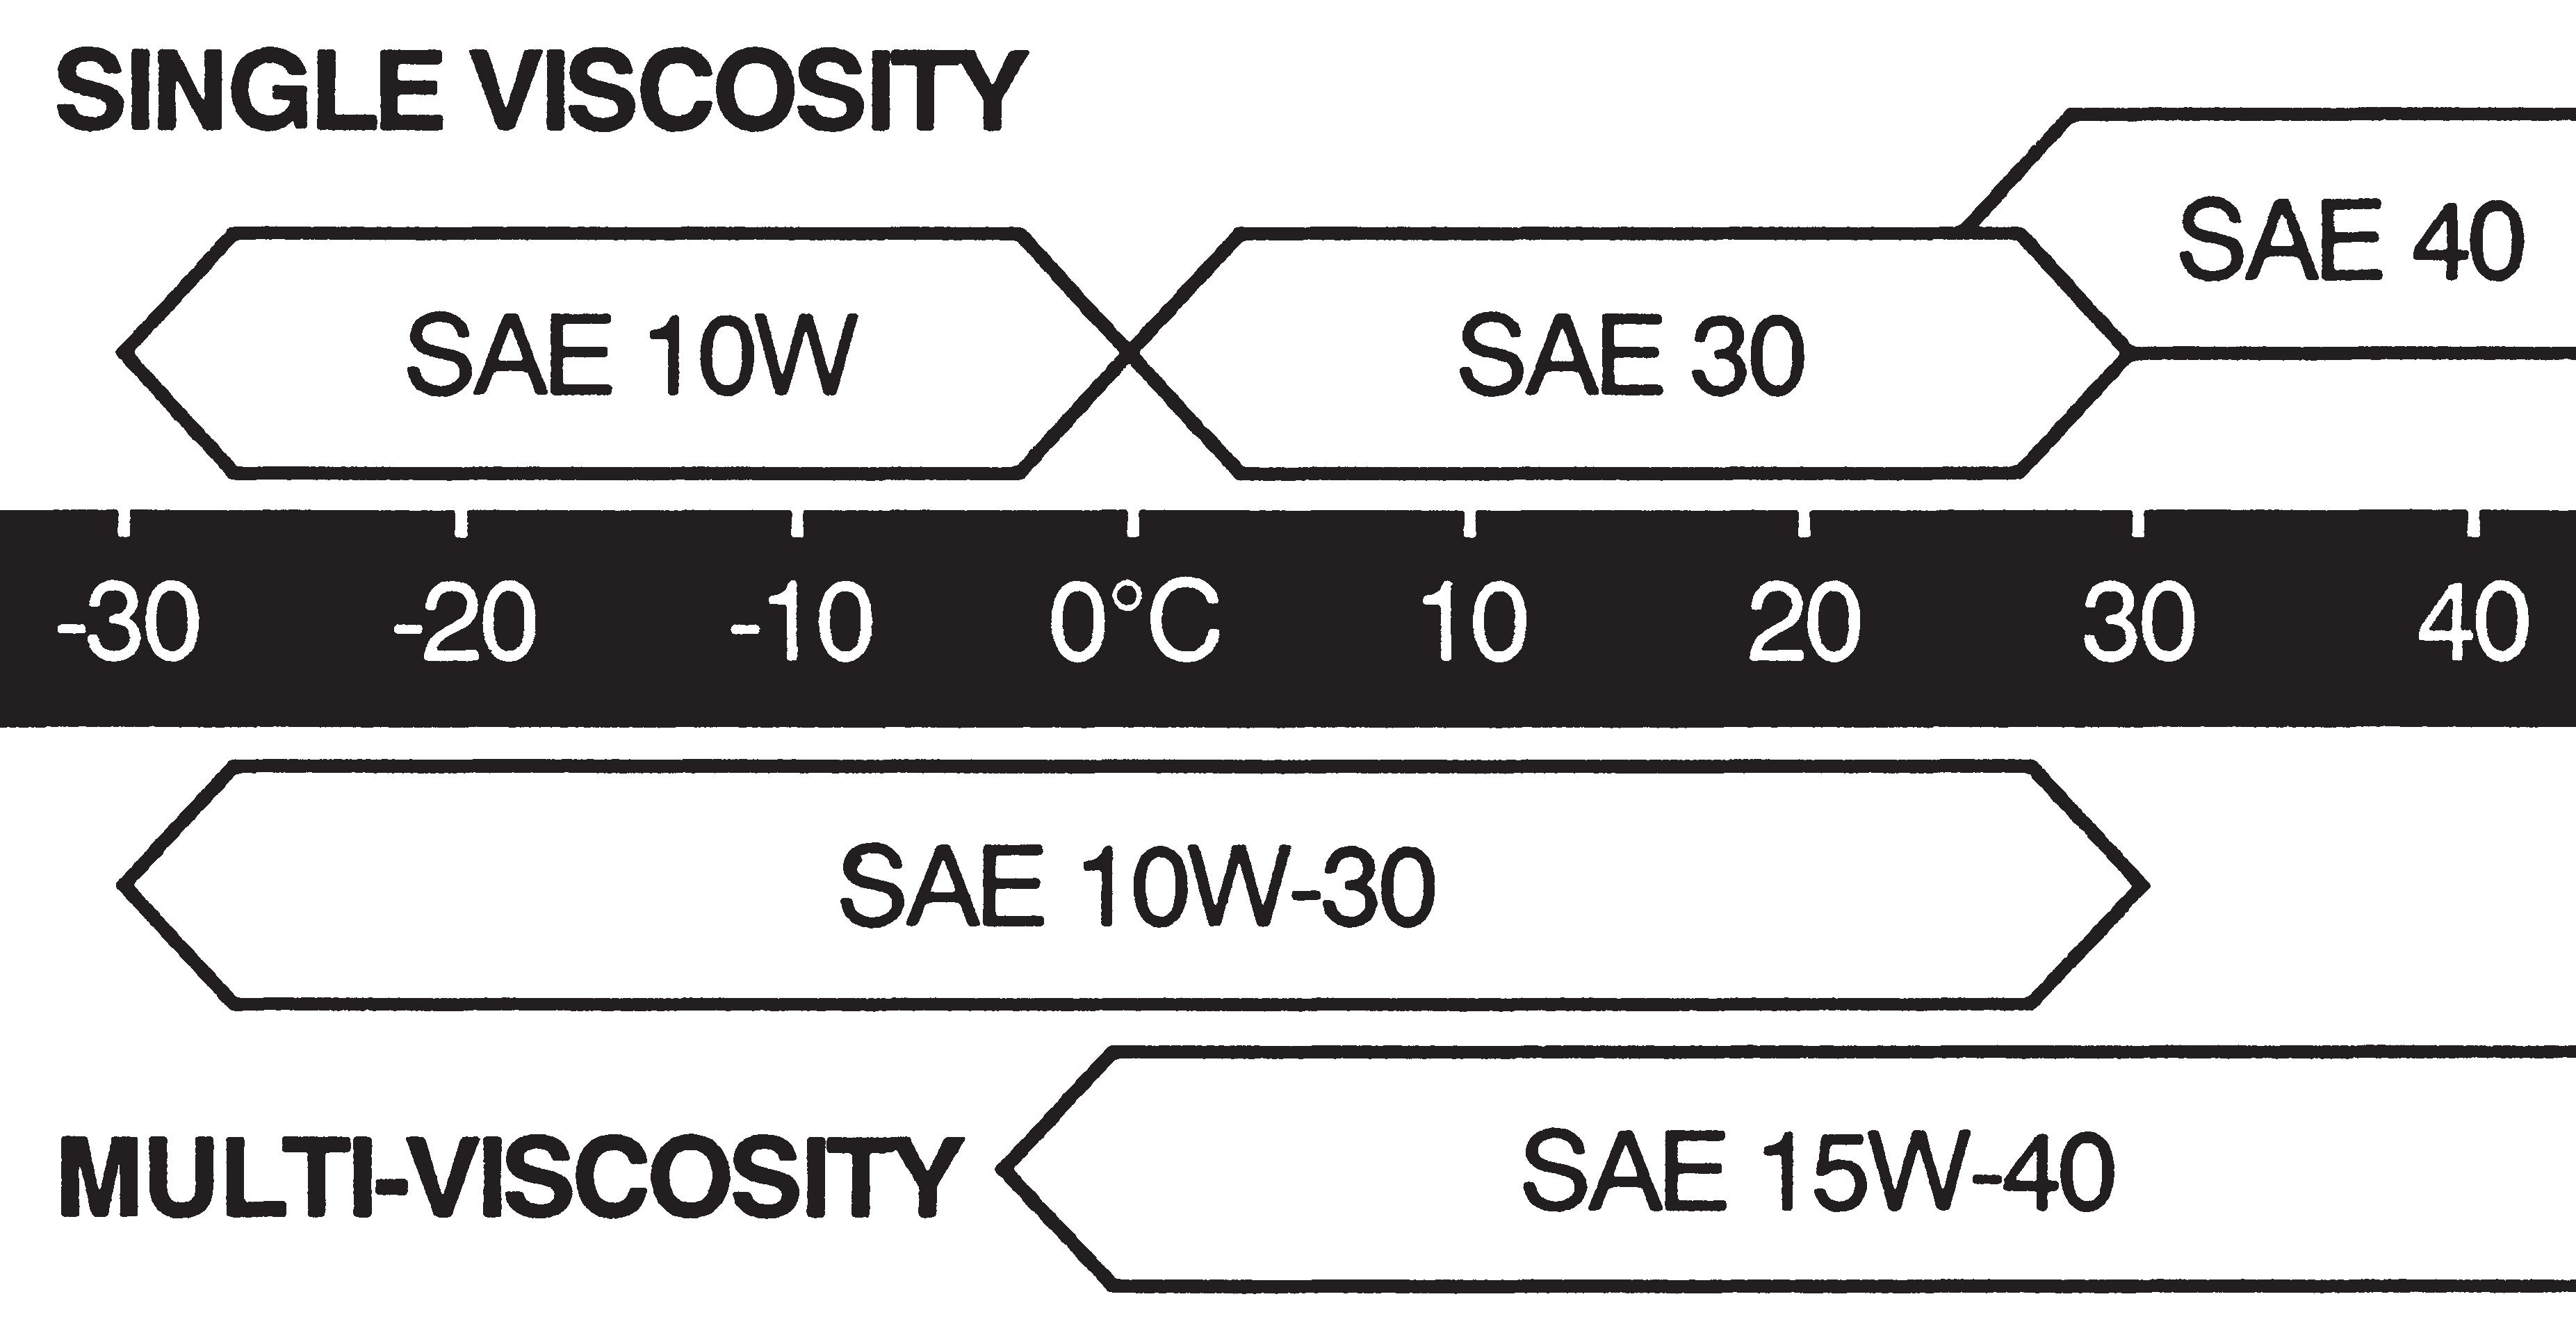
・Use oil of the quality recommended by ISEKI or 10W30 CC grade of SAE classification or higher quality.
・Use oil of proper viscosity in accordance with the atmospheric temperature.
(1) Engine oil level gauge
A: Upper limit B: Lower limit
3. OIL LEVEL (Transmisson, 4WD, chain case and rear axle)
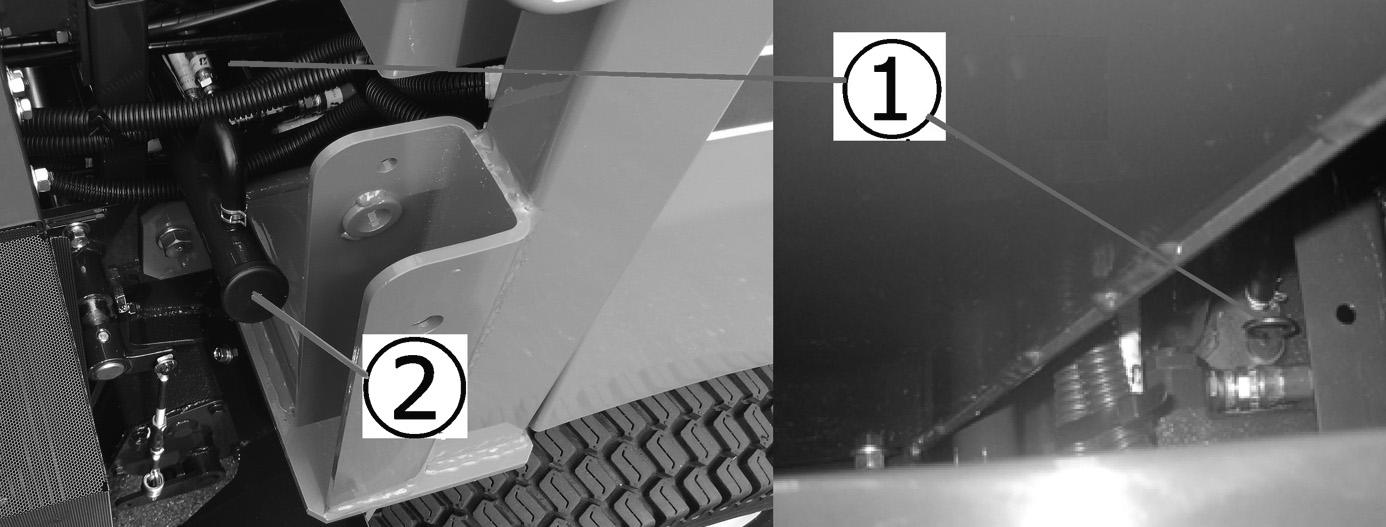
Transmission oil (FIG.57)
Inspection gauge,1, of oil level is located at the under side of the collector. Oil filler,2, is located at the side of the right hand side, and fill in oil by removing cap.
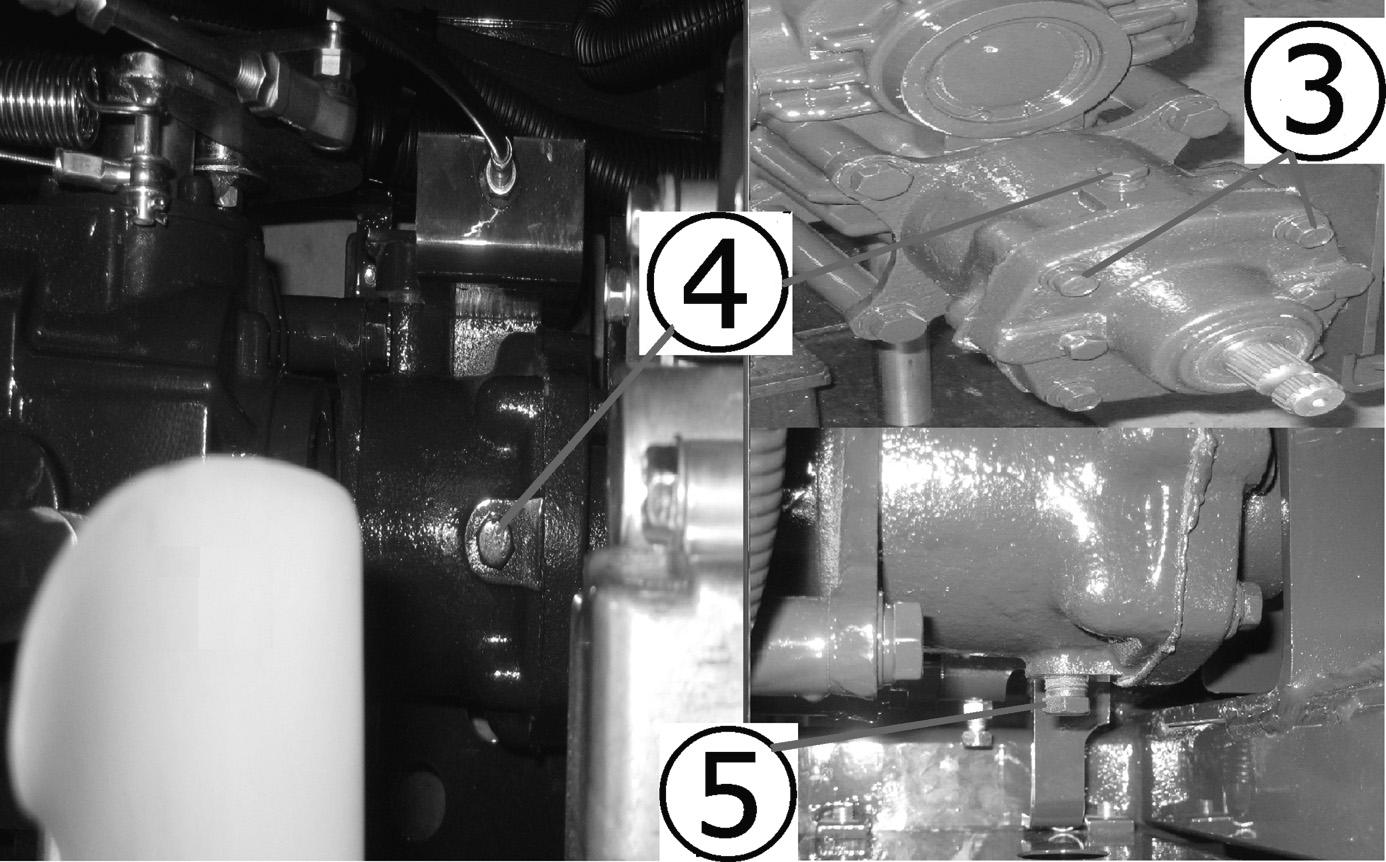
4WD oil (FIG.58)
Inspection plug,3, of oil level is located at the right hand and under side next to the oil cooler. Oil filler,4, is located at next to the drain plug, under side of the engine fan. (Drain plug,5.)
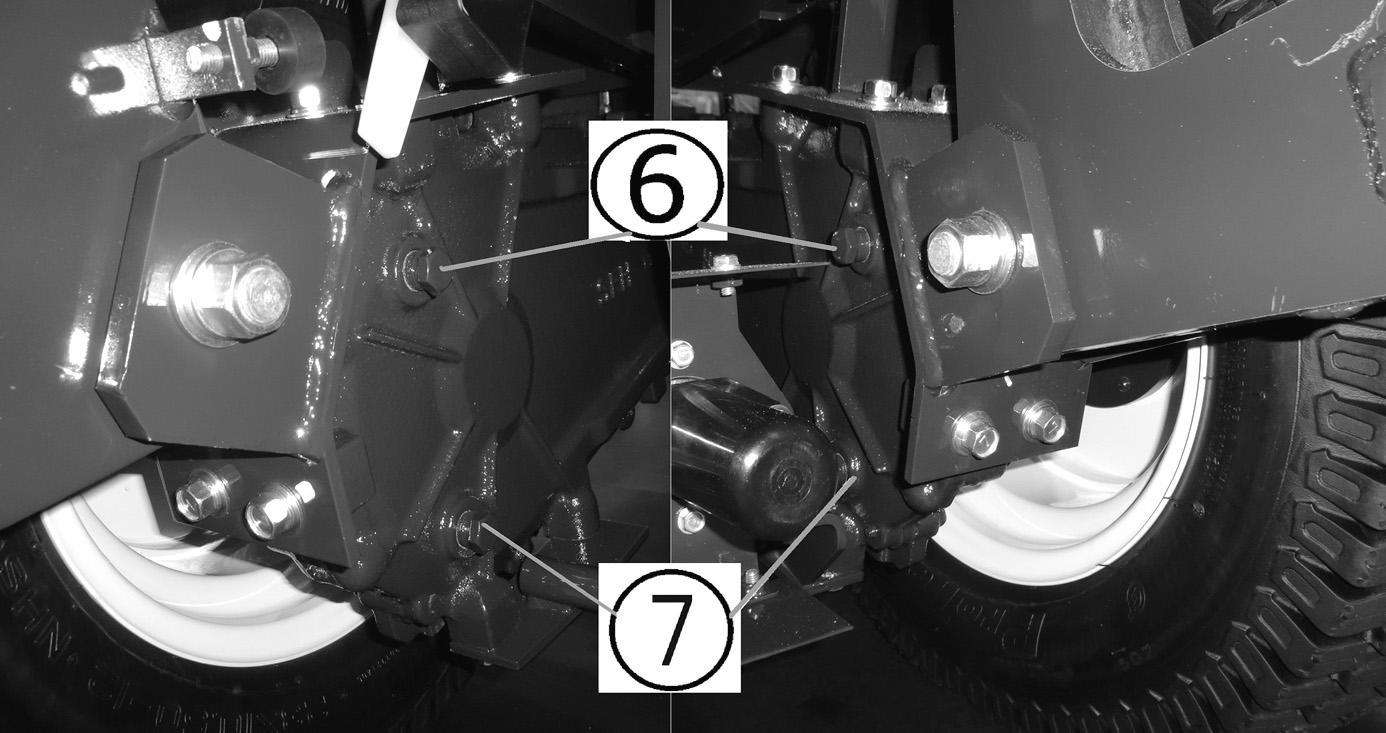
Chain case oil (FIG.59)
Oil filler,6, is located at both LH side and RH side of the chain case. (Drain plug,7.)
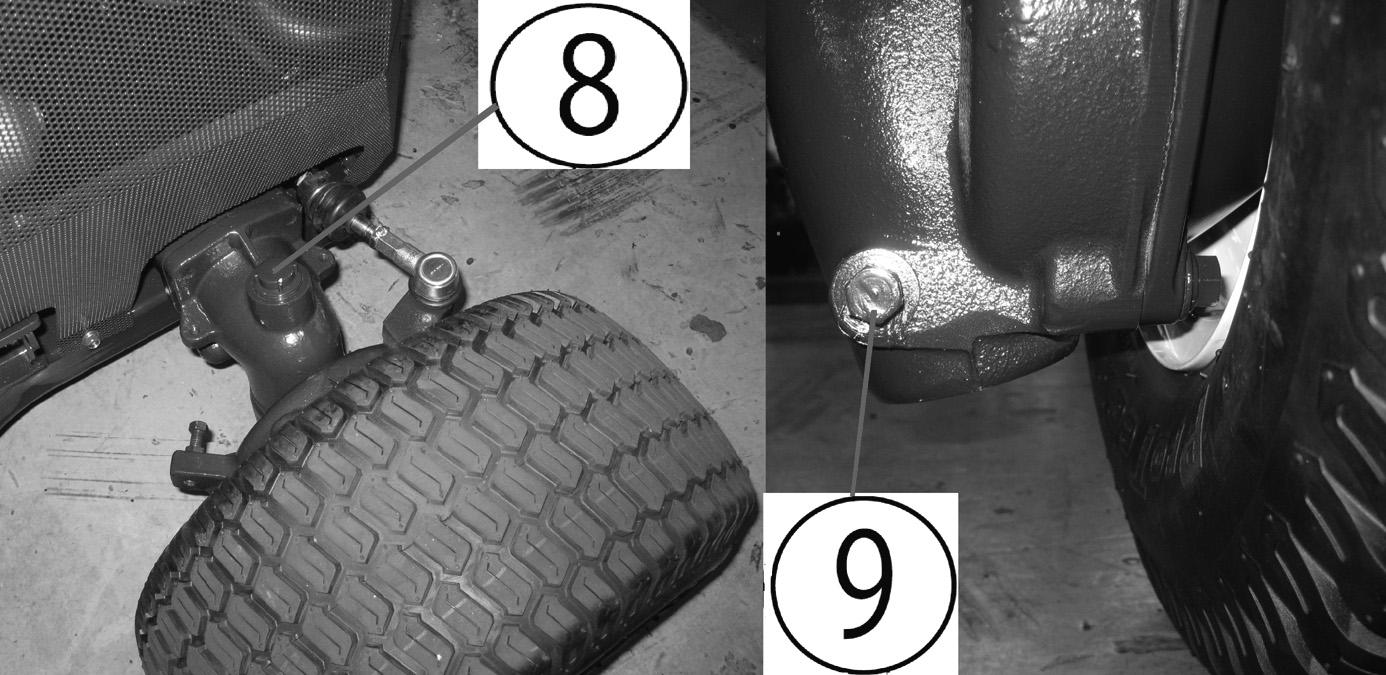
Rear axle oil (FIG.60)
Oil filler,8, is located at RH side of the rear axle and fill in oil by removing cap. (Drain plug,9.)
4. COOLANT LEVEL
WARNING: Never remove the radiator cap and reserve tank cap during or just after operation. The coolant in the radiator is very hot and highly pressurized, so it may cause burns. Cool down the engine sufficiently before inspecting coolant level.
Check the coolant level in the reserve tank,1, is between the upper,A, and lower,B, limits. If the level is lower than the lower limit, replenish the reserve tank with coolant.
(1) Reserve tank A: Upper limit B: Lower limit
5. FUEL LEVEL
Check the fuel level on the fuel gauge,1, on the control panel. When needle is the closer to “F” the more fuel is in the fuel tank. So not let the fuel gauge reach the empty point, "E".

Fuel tank capacity: 40 liters(6.4 gal.)
DANGER: When replenishing fuel, avoid the following items, or a fire may be caused.
・Before replenishing with fuel, be sure to stop the engine and wait until the engine and heated parts cool down sufficiently.
・Keep sparks, open flames, etc. away from the fuel tank.
・No smoking.
・ Spilled fuel should be wiped away immediately.
IMPORTANT:
・As soon as the fuel gauge shows "E", replenish with fuel. Never attempt to keep on operating with fuel level lower than E, or air may be trapped in the fuel system, which will cause hard engine starting and poor engine power.
・Use diesel fuel. Never use heavy oil or gasoline (petrol). Use of fuel other than diesel fuel will cause fuel injection pump trouble.
6. AIR CLEANER
a. The air-cleaner,1, is located to the center left-hand side of the front mower. Remove the air-cleaner cover by hand.
b. Pinch the vacuum valve,2, to eject the dust accumulated inside. When the dust is wet, wipe it off with dry cloth.
c. Remove the element,3, from the air-cleaner ASSY.
d. Dust it off by patting lightly while holding it with the other hand.
e. When the element does not become clean only by patting, blow dust off the element with compressed air. Apply compressed air from inside to outside of the element.
f. When the element does not become sufficiently clean only by blowing, dip it in neutral detergent solution for about 30 minutes and then rinse it in fresh water. Then dry it in the atmospheric temperature.
SF224,235
g. After cleaning install the element in reverse order of disassembly.
IMPORTANT: a. When dust or water is found accumulated in the bottom, turn the fuel cock lever,2. b. Remove the ring nut, to remove the strainer cup and element. c. Wash the inside of the strainer cup and element in diesel fuel.
・Never hit the element against a hard object like a concrete wall.
・An element which has already been washed five times or is damaged should be replaced with new one.
・Never attempt to start the engine without the aircleaner element. Such operation will cause engine trouble.
The fuel filter,1, is located at middle lower on the left side of the front mower. Check the strainer for accumulated dust or water in the bottom of the strainer cup.
DANGER:
・Smoking is prohibited when the fuel strainer is being cleaned or inspected.
・Keep away sparks and open flames from the strainer.
・Spilled fuel should be wiped away immediately.
Check the fuel hoses for cracks and fuel leak after every 100 hours of operation. A damaged hose should be replaced with new one.
WARNING:
・Before checking the fan belt, stop the engine and remove the starter key without fail.
・Wait until the engine and accessories cool down completely to prevent burns.
The fan belt,1, is accessible from the right rear of the engine room by opening the engine hood. Check the belt for tension and damage.
Push down the belt with a finger at the intermediate point between the alternator,2, and crankshaft pulley,3, with a force of 10 kgf (22 lb) and see its deflection, A. If it deflects by about 10 mm (0.4 in.), the tension is proper.
When the belt deflection is improper, correct in the following procedure: a. Loosen the lock bolt,4, and adjust bolt,5, of the alternator. b. Pull the alternator outward to apply proper tension to the belt. Tighten the lock bolt and adjust bolt temporary while pulling the alternator. c. Check for the belt deflection to see if the tension is proper. If so, tighten the lock bolt and adjust bolt securely.
IMPORTANT: When the belt is found to be defective, ask your dealer for replacement.