OWNER SERVICE LUBRICATION Do not let excess grease collect on or around parts. Keep hands and body away from pressurized lines. Use paper or cardboard, not hands or other body parts to check for leaks. Wear safety goggles. Hydraulic fluid under pressure can easily penetrate skin and will cause serious injury or death. NEVER GO UNDERNEATH EQUIPMENT. Never place any part of the body underneath equipment or between moveable parts even when engine has been turned off. Hydraulic system leak-down, hydraulic system failures, or movement of control levers can cause equipment to drop or rotate unexpectedly and cause severe injury or death.
See Figure 9 for lubrication points and frequency for lubrication based on normal operating conditions. Severe or unusual conditions may require more frequent lubrication. Use a lithium grease of #2 consistency with a MOLY (molybdenum disulfide) additive for all locations. Be sure to clean fittings thoroughly before attaching grease gun. One good pump of most guns is sufficient when lubrication schedule is followed.
Service work does not require going underneath implement. Read Operator’s Manual for service instructions or have service performed by a qualified dealer. Never perform service or maintenance with engine running. Before leaving Operator’s seat, follow power unit manual instructions. Lower loader arms and put attachment on the ground. Engage brake, stop engine, remove key, and remove seat belt. Keep all persons away from operator control area while performing adjustments, service, or maintenance. Your dealer can supply original equipment hydraulic accessories and repair parts. Substitute parts may not meet original equipment specifications and may be dangerous.
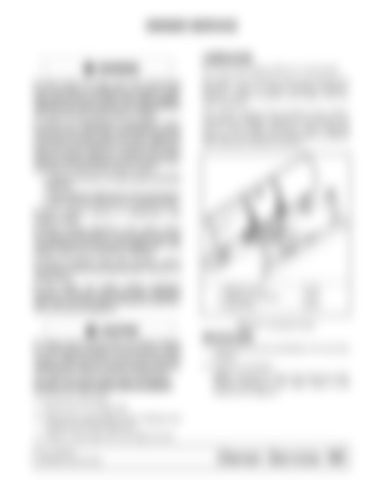
1. Blade Pivot Pin . . . . . . . . . . 10 hrs. 2. Moldboard Trip Pins . . . . . . 10 hrs. 3. Skid Shoes . . . . . . . . . . . . . 20 hrs. Figure 11. Lubrication Points
BOLTS & PINS Always wear relatively tight and belted clothing to avoid getting caught in moving parts. Wear sturdy, rough-soled work shoes and protective equipment for eyes, hair, hands, hearing, and head; and respirator or filter mask where appropriate.
BLADE CUTTING EDGE REPLACEMENT To reverse the cutting edge:
1. Check bolts and pins periodically to be sure they are tight. 2. Replace as necessary. NOTE: Replacement bolts must have the same strength markings on the heads. Refer to bolt torque chart on page 24.
1. Remove the 1/2” carriage bolts. 2. Remove the cutting edge from the moldboard and reinstall with the sharp edge down. 3. Replace cutting edge when both edges are worn. (Rev. 7/05/2018)
5WPMAN1182 (9/1/2016)
Owner Service 15


