4 minute read
How to Assemble the Shift Bar Housing .... How to Remove the Input Shaft Assembly


How to Assemble the Shift Bar Housing
Special Instructions
Steps 1 for overdrive models only.
Special Tools
• Torque Wrench 50 lb. ft. capacity
1
Procedure -
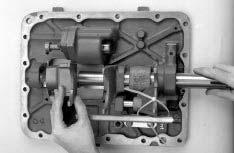
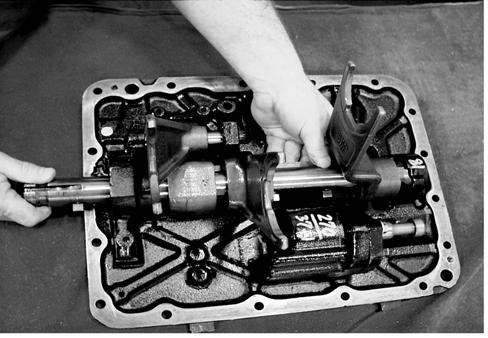
1. Install the actuator arm over the pivot pin, and secure it with the snap ring.
Note: On overdrive models, if the direct/overdrive yoke was not previously removed, install the oil trough and temporarily tie the yoke to the trough to prevent the yoke from falling toward the shift shaft and interfering with assembly.
2. Position the housing with the bottom facing upward and the front of the housing (marked FRONT) toward you.
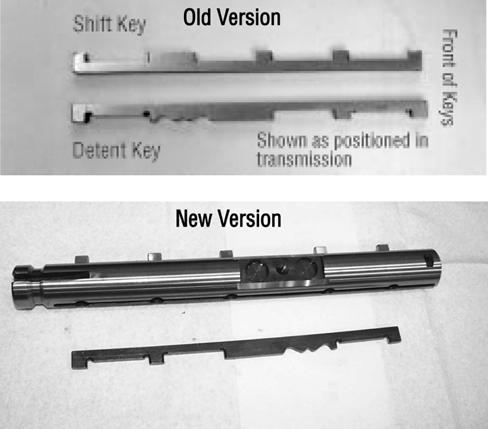
3. To aid assembly, lightly oil the inside of the shift yokes, overdrive shift block, shift key, detent key, shift key, and the inside of the shift shaft bores on the shift bar housing.
Note: The shift key is part of the shift bar on newer models. The two housings have different parts, which requires a complete shiftbar housing, shiftbar and shift key if anything
4. Position the shift yokes (and actuator shift block for overdrive models) in the approximate position in the shift bar housing that they will be in when the shift shaft is installed.
Make sure the yokes are installed with the word FRONT facing the front of the shift bar housing.
5. Install the detent key (it has rounded, protruding notches) from the front of the shift bar housing. Install the key with the word FRONT facing the front of the shift bar housing. To install the key, slide it down the left side of the shift shaft bore and through each shift yoke (and Actuator shift block).
One of the rectangular notches should fit in each yoke (and the shift block). The key fits between the front and rear bores of the shift bar housing. The three notches face away from the centerline of the bore.

CAUTION
Do not hammer or force the shift shaft into position. The shift bar housing components will be damaged. When all the components are in the proper positions, the shift shaft will slide in easily.Try to keep the shift yokes in the neutral position when installing the detent key.
6. Starting at the front of the shift bar housing, slide the shift shaft into position, making sure the capscrew hole in the shift shaft faces downward. Use one hand to hold and position the detent key and yokes and the other to insert the shift shaft. The detent key fits in the groove on the shift shaft.
7. Newer models have the shift key built into the shift bar. Installation procedures are the same except with the exception of installing a separate shift key. 5
6
CAUTION
A new shift bar housing and shift bar are required if either part is being replaced with the new updated version.
Note: Do not allow the detent key to slide rearward into the shift bar housing bore. It should butt against the boss.
8. If necessary, reposition the shift shaft yokes (and actuator shift block) in the Neutral position by aligning the detent key notches with the yokes (and actuator shift block).

9
10
9. On the shift bar front, install the bias plate and snap ring. To properly install the bias plate and snap ring, the shift shaft or shift key (depending on housing type) may need to be pushed rearward. Install with letters facing out
10.Apply Eaton®Fuller® thread sealant #71205 or equivalent to the Allen head plug threads, and install the bias plunger, bias spring(s), and Allen head plug. Torque the Allen head plug to 84-120 lb. in. (9.5-13.6 N•m).
11.If previously removed, position the direct/overdrive shift yoke and yoke bar in the shift bar housing.
12.Install the yoke bar roll pin, and drive it into place.
13.If previously removed, position the oil trough, and install the oil trough retaining capscrews. Torque the capscrews to 2023 lb. ft. (27-31 N•m).
14.Turn the shift bar housing over so the shift block can be installed.
15.Place the detent spring(s) and detent plunger in the shift block.
11
16.Place the shift block on the shift shaft using the following procedure: a. Tilt the shift block so the plunger faces slightly upward. b. Place the plunger in the center of the detent notch, and press the plunger in to compress the spring(s). c. While the spring(s) are compressed, roll the shift block into place on the shift shaft.
Note: The shift shaft and shift key may (depending on housing type) require repositioning to allow the shift block to fit into place.

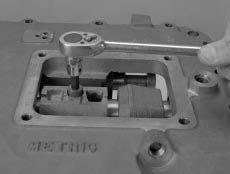
17.Apply Eaton Fuller thread sealant #71205 or equivalent to the capscrew. Install the shift block capscrew. Torque the screw to 40-45 lb. ft. (54-61 N•m).
18.Install the following components: reverse pin and switch, neutral pin and switch, breather, and air module. 16
Optional Spring Design
17