6 minute read
Cylinder Block


Balancer and Camshaft
Removal and Installation
Advertisement
-65-

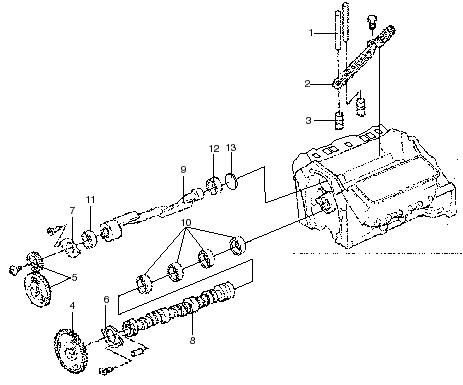
Removal steps
1.Rod 2.Guide 3.Lifter 4.Camshaft Gear 5.Gear Kit 6.Retainer 7.Retainer 8.Camshaft 9.Balancer 10.Bearing Kit - Camshaft 11.Bearing 12.Bearing 13.Plug
Balance Shaft Removal
Tools Required
• MCF-1086 (J 23523-F) Crankshaft Balancer Remover and Installer • MCF-1076 (J 38834) Balancer Shaft Bearing Service Kit 1. Remove the radiator. Check camshaft timing chain free play.Replace the camshaft timing chain if it can be moved back and forth in excess of 16 mm (0.625 in.). 2. Remove the valve lifter retainer. 3. Remove the camshaft sprocket bolts. 4. Remove the camshaft sprocket. Important: The balance shaft drive and driven gears are serviced as a set.The set includes the balance shaft driven gear bolt.
5. Remove the balance shaft drive gear.Inspect the NO TE sprockets for chipped teeth and wear. Worn sprockets will wear a new chain. 6. Remove the bolt and the balance shaft driven gear. Inspect the balance shaft drive and driven gears for nicks and burrs. 7. Remove the bolt and the balance shaft retainer. NO TE


-66-
NO TE
Important: The balance shaft and the front bearing are serviced only as a package.Do not remove the front bearing from the balance shaft.
8. Use a soft-faced hammer to remove the balance shaft and the front bearing.
Camshaft Removal
Tool Required
• MCF-1086 (J23523-F) Crankshaft Balancer Remover/Installer 1. Remove the camshaft retainer bolts and retainer.
9. Use the MCF-1076 (J 38834) to remove the balance shaft rear bearing.
MCF-1076 (J 38834)
2. Remove the camshaft. a.Install the three 6/16 x 4.0 inch bolts in the camshaft front bolt holes. b.Carefully rotate and pull the camshaft out of the bearings.
-67-
Camshaft Bearing Removal
Tools Required
• MCF-1093 (J 33049) Camshaft Bearing Replacer 1. Use the MCF-1093 (J 33049) to remove the inner camshaft bearing. 2. Inspect the camshaft bearings for scratches, pits or a loose bearing fit in the bores. Replace the camshaft bearings if necessary. 3. Remove the rear camshaft plug. 4. Disassemble all the camshaft bearings.Use MCF1093 (J 33049). a.Insert the tool with the correct collet into the camshaft bearing being replaced. b.Turn the tool until the collet has tightened in the bearing. c.Push the center cone against the block and into the first bearing bore to center the tool. d.Drive the bearing from the block.Repeat this procedure to remove the remaining inner camshaft bearings. e.Remove the rear bearing from the front of the block. f.Remove the front bearing from the rear. 5. Clean the camshaft bearing bores in the block.
MCF-1093 (J 33049) Camshaft and Bearings Clean and Inspect
Tools Required
• MCF-1091 (J 7872) Magnetic Base Indicator Set 1. Measure the camshaft journals with a micrometer.
If journals are more than 0.025 mm (0.0010 in.) outof-round, replace the camshaft. 2. Measure camshaft runout. a.Mount the camshaft in V-blocks or between centers. b.Check the intermediate camshaft journal for runout. c.If runout exceeds 0.065 mm (0.0026 in.), camshaft is excessively bent and should be replaced.
MCF-1091 (J 7872)
-68-
Camshaft Bearing Installation
Tools Required
• MCF-1093 (J 33049) Camshaft Bearing Removal/Installer 1. Use the MCF-1093 (J 33049) to install the front and rear camshaft bearings. 2. Install the outer camshaft bearings first.These bearings serve as guides for the pilot, and these bearings help center the inner bearings during installation. 3. Fit the correct cam bearing into the bore.The cam bearing bores vary in size. 4. Assemble the outer camshaft bearings.Drive the bearings into place using MCF-1093 (J 33049). NO TE Important: The camshaft bearing hole (holes) must align with the oil hole (or holes) in the block.On some engines the oil holes may be difficult to see.If these oil holes are difficult to see use a piece of 2mm (3/32 in.) rod to check the alignment.Rod length should be 762mm (30 in.). 5. Inspect the alignment of the camshaft bearing hole to the oil hole (or holes) in the block. 6. Assemble the inner camshaft bearing.Use MCF1093 (J 33049). a.Assemble the tool with the pilot engaged in the front bearing and the pilot flange against the front face of the block. b.Slide the puller screw (with the nut and the washer) through the pilot.
MCF-1093 (J 33049)
c.Place the new bearing on the bearing tool.Hold the bearing tool and bearing against the bearing bore.Align the bearing hole in the block. d.Thread the puller screw into the bearing tool enough to hold the tool and the bearing in place. e.Holding the puller screw with a wrench, turn the nut with a second wrench to pull the camshaft bearing into place. f.Remove the puller screw, the pilot, and the bearing tool. 7. Install a new camshaft rear bearing hole plug.Coat the outside diameter of the plug with (MCF P/N 12346004)(GM P/N 2I4256) sealant or equivalent. a.Install the plug flush to 0.80 mm (1/32 in.) b.Install the plug while RTV is still wet.
Camshaft Installation
Tool Required
• MCF-1086 (J 23523-F) Crankshaft Balancer Remover/Installer 1. Install the camshaft. 2. Install the timing chain and sprocket. 3. Install the valve lifters. 4. Install the radiator.
-69-
Balance Shaft and Bearing Clean and Inspect
1. Inspect balance shaft front roller bearing and rear sleeve bearing for damage or excessive wear.The bearings are serviced as an assembly.Use the proper tools for properly servicing the bearings. 2. Inspect balance shaft drive and driven gears for nicks or burrs.Replace gears that are damaged. 3. Inspect front and rear bearing journal diameters.
Replace the balance shaft if the diameter exceeds specifications.
Balance Shaft Installation
Tools Required
• MCF-1086 (J 23523-F) Crankshaft Balancer Remover and Installer • MCF-1076 (J 38834) Balance Shaft Bearing Service Kit • MCF-1075 (J 36996) Balance Shaft Installer • MCF-1070 (J 8092) Universal Driver Handle • MCF-1074 (J 36660) Torque/Angle Meter 1. Install the balance shaft and gears. 2. Install the valve lifter retainer. 3. Install the timing chain and the camshaft sprocket. 4. Install the radiator.
MCF-1070 (J 8092) MCF-1075 (J 36996)
-70-
Crankshaft,Flywheel,Rear Seal,and Bearings
Removal and Installation
2
6 4
7 5
9
8
-7113
12 3 1
11
10
Removal steps
1.Bolt 2.Bushing - Flywheel 3.Flywheel Assy 4.Housing 5.Seal 6.Gasket 7.Hub 8.Bolt 9.Balancer 10.Crankshaft Bearing Cap 11.Lower Bearing Kit 12.Crankshaft 13.Upper Bearing Kit
Engine Flywheel Removal
1. Remove the transmission. 2. Remove the flywheel.
Crankshaft Rear Oil Seal and Housing Removal
1. Remove the crankshaft rear oil seal housing nuts and bolts. 2. Remove the crankshaft rear oil seal housing, seal, and gasket. 3. Remove the crankshaft rear oil seal from the crankshaft rear oil seal housing.Insert a screw driver into the notches provided in the rear seal retainer and pry out the seal.
Crankshaft,Bearings and Bearing Cap Removal
1. Remove the crankshaft bearing cap bolts. 2. Remove the crankshaft bearing caps. 3. Remove the crankshaft. 4. Remove the crankshaft bearings from the bearing caps and from the engine block. 5. Clean and inspect upper and lower bearings for damage and wear.


-72-