21 minute read
Wipers and washers (Wipers and Washers on
Wipers
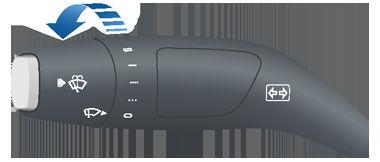
To wipe the windshield, rotate the end of the left-hand steering column lever away from you. The steering column lever has five positions: • 1st: Off. • 2nd: Auto with low rain sensitivity.* • 3rd: Auto with high rain sensitivity.* • 4th: Continuous, slow. • 5th: Continuous, fast.
For a single wipe, press and release the end of the lever.
If the wipers are set to Auto and Model S detects no liquid on the windshield, the wipers do not wipe. When you operate the wipers, headlights automatically turn on (if they are not on already). *To enable the Auto settings, touch Controls > Vehicle > Autowipers (Beta). When wipers are set to an Auto setting, Model S detects whether or not it is raining. The frequency at which they wipe depends on how much rain is detected on the windshield. When wipers are set to high rain sensitivity, the wipers turn on when Model S detects a light mist. Note: The Auto setting is currently in BETA. If uncertain about using the Auto setting while in the BETA phase, Tesla recommends operating the wipers manually, as necessary.
Caution: Ensure the wipers are in the Off position before washing Model S to avoid the risk of damaging the wipers. To extend the life of wiper blades, remove ice from the windshield before turning wipers on. Ice has sharp edges that can damage the rubber on the blades.
Periodically check and clean the edge of the wiper blade. If damaged, replace the blade immediately. For details on checking and replacing wiper blades, see Wiper Blades and Washer Jets on page 162. Caution: In harsh climates, ensure that the wiper blades are not frozen or adhered to the windshield.
De-icing Wipers To make wiper blades easy to access so you can remove any ice and snow, shift Model S into Park, turn the wipers off, then use the touchscreen to move them to the service position. Touch Controls > Service > Wiper Service Mode. When parking in cold outdoor climates, it is helpful to leave Model S with the wipers in the service position. In this position, they are closer to the defrost vent, allowing you to thaw them by directing air from the climate control system towards the windshield.
Note: Wipers automatically return to their normal position when you shift Model S out of Park.
If Model S is equipped with the optional cold weather package, you can de-ice wipers by touching the climate control on the touchscreen (see Climate Controls on page 116). Wiper heaters automatically turns off after 15 minutes.
Washers
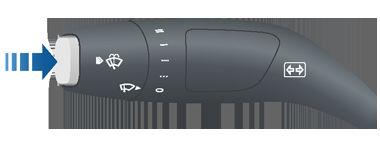
Press the button on the end of the left steering column lever to spray washer fluid onto the windshield. You can press this button at two levels. Press partially for a single wipe, without any washer fluid. Press fully for both wipe and wash. When washing the windshield, the wipers will perform two wipes after you release the button, then a third wipe a few seconds later.
Periodically top up washer fluid (see Topping Up Washer Fluid on page 166).
De-icing Washer Nozzles If Model S is equipped with the optional cold weather package, washer nozzles have deicers that turn on whenever the ambient temperature nears freezing, or when you turn on the heated wipers (see Climate Controls on page 116). The washer de-icers turn off when the heated wipers turn off (after 15 minutes), provided the temperature is warm enough to prevent freezing.
Braking Systems
Warning: Properly functioning braking systems are critical to ensure safety. If you experience a problem with the brake pedal, brake caliper, or any component of a Model S braking system, contact Tesla immediately. Model S has an anti-lock braking system (ABS) that prevents the wheels from locking when you apply maximum brake pressure. This improves steering control during heavy braking in most road conditions. During emergency braking conditions, the ABS constantly monitors the speed of each wheel and varies the brake pressure according to the grip available. The alteration of brake pressure can be felt as a pulsing sensation through the brake pedal. This demonstrates that the ABS is operating and is not a cause for concern. Keep firm and steady pressure on the brake pedal while experiencing the pulsing.
The ABS indicator flashes briefly on the instrument panel when you first start Model S. If this indicator lights up at any other time, an ABS fault has occurred and the ABS is not operating. Contact Tesla. The braking system remains fully operational and is not affected by an ABS failure. However, braking distances may increase.
If the instrument panel displays this indicator at any time other than displaying briefly when you first start Model S, a brake system fault is detected or the brake fluid level is low. Contact Tesla immediately.
Emergency Braking In an emergency, fully press the brake pedal and maintain firm pressure, even on low traction surfaces. The ABS varies the braking pressure to each wheel according to the amount of traction available. This prevents wheels from locking and ensures that you stop as safely as possible.
Warning: Do not pump the brake pedal.
Doing so interrupts operation of the ABS and can increase braking distance.
Warning: Always maintain a safe distance from the vehicle in front of you and be aware of hazardous driving conditions.
While the ABS can improve stopping distance, it cannot overcome the laws of physics. It also does not prevent the danger of hydroplaning (where a layer of water prevents direct contact between the tires and the road). Automatic Emergency Braking is designed to automatically brake in situations where a collision is considered imminent (see Automatic Emergency Braking on page 103).
Warning: Automatic Emergency Braking is not designed to prevent a collision. At best, it can minimize the impact of a frontal collision by attempting to reduce your driving speed. Depending on
Automatic Emergency Braking to avoid a collision can result in serious injury or death.
Brake Wear
Model S brake pads are equipped with wear indicators. A wear indicator is a thin metal strip attached to the brake pad that squeals as it rubs against the rotor when the pad wears down. This squealing sound indicates that the brake pads have reached the end of their service life and require replacement. To replace the brake pads, contact Tesla Service. Brakes must be periodically inspected visually by removing the tire and wheel. For detailed specifications and service limits for rotors and brake pads, see Subsystems on page 175.
Warning: Neglecting to replace worn brake pads damages the braking system and can result in a braking hazard.
Regenerative Braking
Whenever Model S is moving and your foot is off the accelerator, regenerative braking slows down Model S and feeds any surplus energy back to the Battery. By anticipating your stops and reducing or removing pressure from the accelerator pedal to slow down, you can take advantage of regenerative braking to increase driving range. Of course, this is no substitute for regular braking when needed for safety. Note: If regenerative braking is aggressively slowing Model S (such as when your foot is completely off the accelerator pedal at highway speeds), the brake lights turn on to alert others that you are slowing down.
Warning: In snowy or icy conditions
Model S may experience traction loss during regenerative braking, particularly when in the Standard setting and/or not using winter tires. Tesla recommends using the Low setting (see To Set the
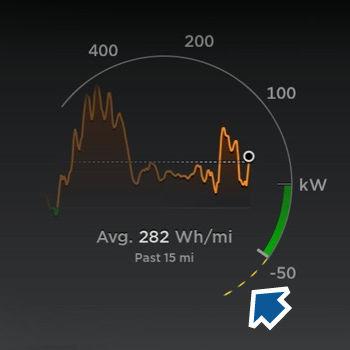
Regenerative Braking Level on page 66) in snowy or icy conditions to help maintain vehicle stability. The Energy app displays real-time feedback on the amount of energy being gained by regenerative braking. You can also display the power meter on either side of the instrument panel by choosing Energy using the scroll button on the steering wheel (see Steering Wheel on page 45). The amount of energy fed back to the Battery using regenerative braking can depend on the current state of the Battery and the charge level setting that you are using. For example, regenerative braking may be limited if the Battery is already fully charged or if the ambient temperature is too cold. Note: If regenerative braking is limited, a dashed yellow line displays on the power meter.
To Set the Regenerative Braking Level You can use the touchscreen to change the level of regenerative braking: 1. Touch Controls > Driving > Regenerative
Braking. 2. Choose from two levels: • Standard: Provides the maximum amount of regenerative braking. When you release the accelerator, Model S slows down, reducing the need to use the brakes. • Low: Limits regenerative braking.
When you release the accelerator,
Model S takes longer to slow down and coasts further than if set to
Standard.
Parking Brake
The parking brake automatically engages when you shift Model S into Park, and releases when you shift into any other gear.
Note: The parking brake operates on the rear wheels only, and is independent of the pedaloperated brake system.
Warning: In snowy or icy conditions the rear wheels may not have sufficient traction to prevent Model S from sliding down a slope, particularly if not using winter tires. Avoid parking on hills in snowy or icy conditions. You are always responsible for parking safely.
Warning: Your Model S may display an alert if the road is too steep to safely park on or if the parking brakes have not properly engaged. These alerts are for guidance purposes only and are not a substitute for the driver’s judgment of safe parking conditions, including specific road or weather conditions. Do not depend on these alerts to determine whether or not it is safe to park at any location. You are always responsible for parking safely. Use the touchscreen to manually release the parking brake (which also shifts Model S into Neutral): 1. Touch Controls > Safety & Security. 2. Press the brake pedal, then touch Parking
Brake. If Model S was previously in Park, it shifts into Neutral.

The parking brake indicator lights up on the instrument panel whenever you use the touchscreen to manually apply the parking brake.
If an electrical issue occurs with the parking brake, an amber parking brake fault message displays at the top of the instrument panel.
Caution: In the unlikely event that Model S loses electrical power, you cannot access the touchscreen and are therefore unable to release the parking brake. Contact Tesla.
How It Works
The traction control system constantly monitors the speed of the front and rear wheels. If Model S experiences a loss of traction, the system minimizes wheel spin by controlling brake pressure and motor power. By default, the traction control system is on. Under normal conditions, it should remain on to ensure maximum safety.
This indicator flashes on the instrument panel whenever the traction control system is actively controlling brake pressure and motor power to minimize wheel spin. If the indicator stays on, a fault is detected with the traction control system. Contact Tesla Service.
Warning: If the above indicator remains illuminated in situations in which you have not enabled Slip Start (described next), the traction control system may not be operating correctly. Contact Tesla Service immediately. Warning: Traction control cannot prevent collisions caused by driving dangerously or turning too sharply at high speeds.
Allowing Wheel Slip To allow the wheels to spin at a limited speed, you can enable Slip Start. Slip Start can be enabled only when Model S is moving 30 mph (48 km/h) or slower. Slip Start automatically disables when the speed exceeds 50 mph (80 km/h). Under normal conditions, Slip Start should not be enabled. Enable it only in circumstances where you deliberately want the wheels to spin, such as: • Starting on a loose surface, such as gravel or snow. • Driving in deep snow, sand or mud. • Rocking out of a hole or deep rut. To allow the wheels to spin, touch Controls > Driving > Traction Control > Slip Start.
The instrument panel displays an alert message when Slip Start is enabled. Although Slip Start is automatically disabled the next time you start Model S, it is strongly recommended that you disable it immediately after the circumstances that required you to enable it have passed. Note: Slip Start cannot be enabled when you are actively using Traffic-Aware Cruise Control.
How Park Assist Works
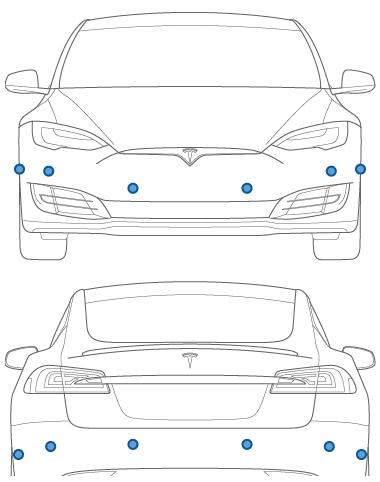
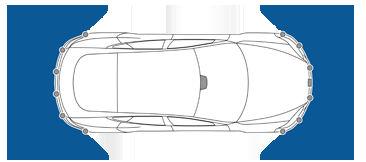
Model S has several sensors designed to detect the presence of objects. When driving slowly in Drive or Reverse (for example, when parking), the sensors alert you if an object is detected in close proximity of your Model S. Objects are only detected in the direction of the gear you selected; front objects in Drive, rear objects in Reverse.
Warning: You may not be alerted if
Model S rolls freely in the opposite direction of the gear you selected (for example, you will not receive an alert if
Model S rolls backwards down a hill while in Drive).
The sensors are activated when driving slower than 5 mph (8 km/h).
Warning: Never depend on Park Assist to inform you if an area you are approaching is free of objects and/or people. Several external factors can reduce the performance of Park Assist, causing either no readings or false readings (see Limitations and False Warnings on page 70). Therefore, depending on Park Assist to determine if Model S is approaching an obstruction can result in damage to the vehicle and/or objects, and can potentially cause serious injury. Always inspect the area with your own eyes. When reversing, perform shoulder checks and use all mirrors. Park assist does not detect children, pedestrians, bicyclists, animals, or objects that are moving, protruding, located too far above or below the sensors, or too close or too far from the sensors. Park Assist is for guidance purposes only and is not intended to replace your own direct visual checks. It is not a substitute for careful driving.
Visual and Audio Feedback
When you shift to Reverse, the Park Assist view displays on the left side of the instrument panel, showing objects that are in close proximity to the front and rear of Model S. This view closes when you shift into Drive unless an object is detected close to the front of Model S, in which case the Park Assist view closes automatically when your driving speed exceeds 5 mph (8 km/h). When reversing, visual feedback also displays on the touchscreen, immediately below the camera view (see Rear View Camera on page 77). You can manually close the park assist view on the touchscreen by touching the X in the upper left corner. When driving with the Camera app displayed on the touchscreen, you can switch to the Park Assist view when driving at speeds below 5 mph (8 km/h). Touch the button located in the upper left corner of the Camera app window. This is useful if you need assistance with parallel parking. If chimes are turned on (see Controlling Audible Feedback on page 70), an audible beep sounds as you approach an object. You can temporarily mute the chime by pressing the scroll button on the left side of the steering wheel or by touching the mute button on the bottom left corner of the Park Assist view.
Note: If a sensor is unable to provide feedback, the instrument panel displays an alert message.
Caution: Keep sensors clean from dirt, debris, snow, and ice. Avoid using a high
pressure power washer on the sensors and do not clean a sensor with a sharp or abrasive object that can scratch or damage its surface. Caution: Do not install accessories or stickers on or near the parking sensors.
Controlling Audible Feedback
You can use Park Assist with or without audible feedback. To turn chimes on or off, touch Controls > Safety & Security > Park Assist Chimes.
To mute the chimes temporarily, press the scroll button on the left side of the steering wheel or touch the mute button in the corner of the Park Assist view. The chimes are muted until you shift into a different gear or drive over 5 mph (8 km/h).
Limitations and False Warnings
The parking sensors may not function correctly in these situations: • One or more of the parking sensors is damaged, dirty, or covered (such as mud, ice, or snow). • The object is located below approximately 8 inches (20 cm) (such as a curb or low barrier). Caution: Shorter objects that are detected (such as curbs or low barriers) can move into the blind spot of the sensors. Model S cannot alert you about an object while it is in the blind spot of the sensors. • Weather conditions (heavy rain, snow, or fog) are interfering with sensor operation. • The object is thin (such as a sign post). • A sensor’s operating range has been exceeded. • The object is sound-absorbing or soft (such as powder snow). • The object is sloped (such as a sloped embankment). • Model S has been parked in, or being driven in, extremely hot or cold temperatures. • The sensors are affected by other electrical equipment or devices that generate ultrasonic waves. • You are driving in a location where the sensors' ultrasonic waves are deflected away from the vehicle (such as driving next to a wall or pillar). • The object is located too close to the bumper. • A bumper is misaligned or damaged. • An object that is mounted to Model S is interfering with and/or obstructing the sensor (such as a bike rack or bumper sticker). • Model S rolls freely in the opposite direction of the gear you selected (for example, you will not receive an alert if
Model S rolls backwards down a hill while in Drive).
Other Parking Aids
In addition to Park Assist, when shifted into Reverse, the backup camera displays a view of the area behind Model S (see Rear View Camera on page 77).
When Model S is stopped, Vehicle Hold can continue to apply the brakes even after you remove your foot from the brake pedal. When driving on a hill or on a flat surface, brake as you normally would. After coming to a complete stop, simply press the brake pedal again (until the instrument panel displays the Vehicle Hold indicator light) to enable Vehicle Hold. You can then release the brake pedal and remain stopped, even on a hill.
This indicator displays on the instrument panel whenever Vehicle Hold is actively braking Model S.
To disengage Vehicle Hold, press the accelerator pedal or press and release the brake pedal. Note: Shifting into Neutral also disengages Vehicle Hold.
Note: After actively braking Model S for approximately ten minutes, Model S shifts into Park and Vehicle Hold cancels. Model S also shifts into Park if it detects that the driver has left the vehicle.
The acceleration settings available on your Model S vary depending on date of manufacture and options chosen at time of purchase: • Chill: limits acceleration for a smooth and gentle ride (available on all vehicles equipped with Autopilot hardware). • Standard: provides the normal level of acceleration (available on non-
Performance All-Wheel Drive vehicles and
Rear Wheel Drive Model S vehicles equipped with Autopilot hardware). • Sport: provides the normal level of acceleration (available on Performance
All-Wheel Drive vehicles). • Insane: increases peak torque by approximately 30 percent (available on
Performance All-Wheel Drive vehicles not equipped with the Ludicrous upgrade). • Ludicrous: increases peak torque by approximately 60 percent (available on
Performance All-Wheel Drive vehicles equipped with the Ludicrous upgrade). Note: Although Chill does not directly improve driving range, using the increased torque and power available in Insane or Ludicrous mode can reduce range and efficiency. Note: When Chill is selected, Chill displays on the instrument panel above the driving speed. In addition, a Performance All-Wheel Drive Model S also features Launch Mode to provide optimum acceleration on surfaces with good traction. For the specific driving instructions required to use Launch Mode, see Launch Mode on page 72. To choose an acceleration mode, touch Controls > Driving > Acceleration.
Max Battery Power
If you choose Insane or Ludicrous, additional power is available immediately. However, to achieve the absolute maximum power (designed for short term use), you can enable Max Battery Power, which heats the Battery to its ideal operating temperature to ensure access to 100% of available power. Heating the Battery can take over an hour, depending on environmental conditions and whether or not Model S is being driven. To enable, touch Max Battery Power, which displays as blue text immediately below the acceleration setting. While the battery is being heated, the touchscreen displays a message providing you with an approximate wait time, and when the additional power is available, the message indicates that Max Battery Power is READY!
Note: Max Battery Power is designed to achieve maximum performance for short term acceleration and is not intended for daily driving. The tradeoff for the additional power boost is extra energy consumption and earlier power fade on long drives. The Insane or Ludicrous acceleration settings provide a significant increase in performance even without Max Battery Power. In fact, in normal driving situations, the additional power that can be achieved using Max Battery Power may not be noticeable.
Note: To support Max Battery Power, the charge level must be 20% or higher. You cannot initiate Max Battery Power if the charge level is less than 20%. In addition, Max Battery Power immediately cancels if at any time during its use, the charge level drops below 20%.
When using Max Battery Power, Model S consumes more energy as it keeps the Battery within an optimal temperature range. To cancel Max Battery Power at any time, change the acceleration level to Chill or Sport (or touch the button in the Max Battery Mode popup). To prevent excess and potentially unnecessary energy consumption (for example, you leave the vehicle and forget to cancel Max Battery Power), Max Battery Power cancels automatically in three hours, regardless of whether you are still driving or have left the vehicle.
Note: Max Battery Power strives to keep the pack within an optimal temperature range. In addition to heating the Battery, Max Battery Power also cools the battery when necessary (for example, while driving at high speeds, during rapid acceleration, driving for long periods, etc.).
Launch Mode
Launch Mode, available on Performance AllWheel Drive vehicles only, provides optimum acceleration on surfaces with good traction. Note: Hard acceleration including, but not limited to, using launch mode, increases stress on the vehicle’s powertrain, and can cause
premature wear and aging of various components. Model S constantly monitors powertrain fatigue and damage, and notifies you if vehicle components need to be serviced.
Warning: Use Launch Mode only in appropriate locations where there is no cross traffic or pedestrians present. Launch Mode is designed for use on closed circuit driving courses. It is the driver’s responsibility to ensure that driving style and acceleration do not endanger or inconvenience other road users.
To Activate Launch Mode
1. Ensure the brakes are slightly warm by driving for a few minutes and using the brakes a few times. 2. If equipped, set the air suspension to Low (see Smart Air Suspension on page 133). 3. Set the acceleration level to Insane or
Ludicrous and enable Max Battery Power (described above).
Note: You can use Launch Mode immediately after enabling Max Battery
Power. There is no need to wait until Max
Battery Power is in its READY state. 4. With Model S shifted into Drive and at a complete stop with the steering wheel straight, fully press the brake pedal with your left foot. 5. While still pressing the brake with your left foot, fully press the accelerator pedal with your right foot, then release the accelerator pedal. The instrument panel displays a message indicating that Launch
Mode is enabled. 6. Within eight seconds, fully press the accelerator pedal a second time to preload motor torque, then within four seconds, release the brake. When you release the brake, Model S launches forward.
Note: Launch Mode is not available if Slip Start has been enabled (i.e. wheels can spin). See Traction Control on page 68. Note: Launch Mode is available only if the ambient temperature is 37° F (3° C) or warmer.
Displaying Trip Information
Trip information displays on the touchscreen when you touch Controls > Trips. For the current trip, you can display distance, duration and average energy usage. You can also show distance and total and average energy used since your last charge and for additional trips. To name or rename a trip, touch the trip's name, enter a new name for the trip, then press Save. To reset a particular trip meter, touch its associated Reset button.
You can display information for up to three trips on the instrument panel. Use the checkboxes to specify the trip(s) you want to display. Then use the scroll bar on the steering wheel to display the chosen trip(s) (see Using Left Steering Wheel Buttons on page 45 or Using Right Steering Wheel Buttons on page 46).
Odometer
To display the odometer, touch the Tesla “T” at the top center of the touchscreen.


