Features
Inertia Brake Relocation Instructions 8 to 6-Bolt PTO Opening Removal CAUTION
Oil may be hot. Note: Drain the lubricant from the transmission. Drain the lubricant from the Inertia Brake. On older product the Inertia Brake will still remain full of lubricant (no drain plug). 1.
Disconnect the Transmission Harness from the Inertia Brake Coil and remove the tie straps restraining this harness branch.
Note: Use care not to damage the harness. 2.
Disconnect the lubricant supply line from the Inertia Brake. CAUTION
Features
The Inertia Brake is heavy. Be prepared to handle the weight of the Inertia Brake when the mounting bolts are removed. 3.
Remove the six (6) mounting bolts from the Inertia Brake.
4.
Remove the Inertia Brake and gasket from the Adapter Plate.
5.
Remove the eight (8) mounting bolts from the Adapter Plate.
6.
Remove and discard the Adapter Plate and gasket from the transmission.
7.
Remove the six (6) mounting bolts from the 6-bolt PTO cover.
8.
Remove and discard the 6-bolt PTO cover and gasket from the transmission.
Push-in anchor point threaded-hole
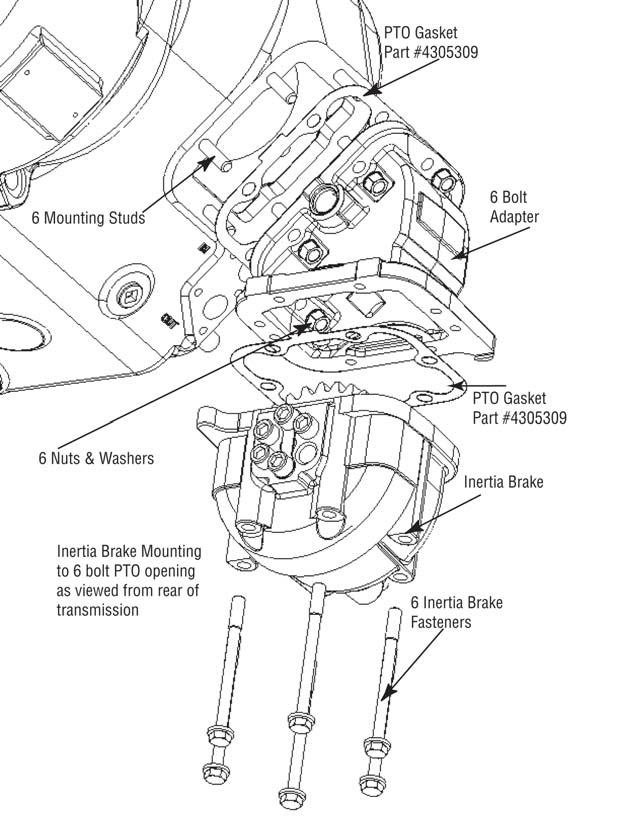
Standard Inertia Brake mounting to 8-bolt PTO opening as viewed from the rear of the transmission Note: Clean and remove all old gasket material from the mating surfaces of the Inertia Brake and transmission PTO openings. Locate the harness push-in anchor point for reference during re-installation to 6-bolt opening.
56