2 minute read
Mounting Transmission to Engine

Use the two transmission lifting eyes provided. The lifting eye position must not be changed on the transmission. Do not remove the Electric Shifter (X-Y Shifter) at any time. Note: For lifting eye and sensor retaining bolt locations, see Appendix. These bolts can not be used for brackets or for any other purpose.
1. Use a two point lift chain or transmission jack with a minimum capacity of 1500 lbs.
2. Inspect the engine to transmission mating surfaces for damage or debris prior to installation. Make sure engine flywheel housing face, transmission clutch housing face, input shaft, etc. are free of paint, debris, rust, and any type of damage before installation.
3. Input Shaft to Clutch Alignment: The transmission is shipped from Eaton with the transmission in gear. The transmission must be in gear in order to rotate the input shaft by turning the output shaft/yoke. In the event that the transmission is not received in gear, the input shaft will have to be manually indexed to mate up with the clutch splines.
4. Adjust the lift chain or transmission jack to obtain the same relative angle as the engine. The face of the engine flywheel housing and the face of the transmission clutch housing must be parallel during installation. If the transmission is properly aligned and the clutch is installed properly, very little force is required to slide the input shaft through the clutch and into the pilot bearing.
5. If interference is encountered, move the transmission away from the engine to investigate the cause. The use of excessive force to overcome misalignment may cause damage to the transmission input shaft and the clutch.
6. Rotate the output shaft/yoke while sliding the input shaft into the clutch to line up the splines.
7. Once the transmission is seated against the engine flywheel housing, align the clutch housing bolt holes with the engine flywheel housing bolt holes and install all capscrews and tighten finger tight. Note: The clutch housing must be flush against the engine flywheel housing before tightening any capscrews. Do not use the capscrews to seat housing.
8. Tighten four capscrews at 90° intervals around the clutch housing, then tighten the remaining transmission mounting capscrews using the recommended torque specifications. Note: Do not tighten any mounting capscrews until all capscrews have been installed and finger tightened. Do not remove the transmission support chain or jack until all mounting bolts have been tightened.
9. Use the pull to neutral box to place transmission in neutral for remaining assembly.
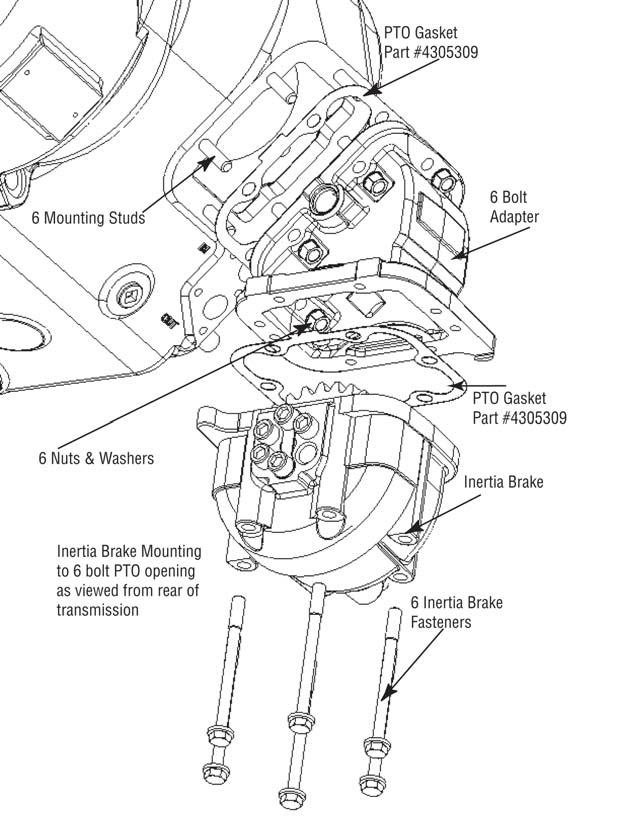
Improper installation of the OEM Start Enable Circuit could result in enabling the vehicle to be started in gear. Therefore, Eaton recommends the use of a Pull to Neutral Box to place the transmissions neutral for remaining assembly.
WARNING