
Workshop Manual
Arteon 2018 ➤ , Polo 2018 ➤ , T-Roc 2018 ➤ , Tiguan 2016 ➤ , Tiguan RUS 2017 ➤
4-cyl. direct injection engine (2.0 l, 4 V, EA 888 gen III
BZ, turbocharger, chain drive)
isnotpermittedunlessauthorisedbyVolkswagen

thgirypocybdetcetorP . icremmocroetavirprofgniypoC
AGdoesnotguaranteeoracceptanyliabilitywith respect t o t h e c o r r e c t n e ss o f ni
GAnegawskloVybthgirypoC.tnemucodsihtninoitamrof
• Thank you very much for reading the preview of the manual.
• You can download the complete manual from: www.heydownloads.com by clicking the link below
• Please note: If there is no response to CLICKING the link, please download this PDF first and then click on it.

List of Workshop Manual Repair Groups
Repair Group
00 - Technical data
10 - Removing and installing engine
13 - Crankshaft group
15 - Cylinder head, valve gear
17 - Lubrication
19 - Cooling
21 - Turbocharging/supercharging
24 - Mixture preparation - injection
26 - Exhaust system
28 - Ignition system
Technical information should always be available to the foremen and mechanics, because their carefulandconstantadherencetotheinstructionsisessentialtoensurevehicleroad-worthinessand safety. In addition, the normal basic safety precautions for working on motor vehicles must, as a matter of course, be observed.
Arteon 2018 ➤ , Polo 2018 ➤ , T-Roc 2018 ➤ , Tiguan 2016 ➤ , Tiguan RU ... 4-cyl. direct injection engine (2.0 l, 4 V, EA 888 gen III BZ, turbocharger, chain drive) -
Arteon 2018 ➤ , Polo 2018 ➤ , T-Roc 2018 ➤ , Tiguan 2016 ➤ , Tiguan RU ... 4-cyl. direct injection engine (2.0 l, 4 V, EA 888 gen III BZ, turbocharger, chain drive) - Edition 02.2019
2018 ➤ , Polo 2018 ➤ , T-Roc 2018 ➤ , Tiguan 2016 ➤ , Tiguan RU ... 4-cyl.
EA 888 gen III BZ, turbocharger, chain drive) - Edition 02.2019
Arteon 2018 ➤ , Polo 2018 ➤ , T-Roc 2018 ➤ , Tiguan 2016 ➤ , Tiguan RU ... 4-cyl. direct injection engine (2.0 l, 4 V, EA 888 gen III BZ, turbocharger, chain drive) - Edition 02.2019
Arteon 2018 ➤ , Polo 2018 ➤ , T-Roc 2018 ➤ , Tiguan 2016 ➤ , Tiguan RU ... 4-cyl. direct injection engine (2.0 l, 4 V, EA 888 gen III BZ, turbocharger, chain drive) - Edition 02.2019
. icremmocroetavirprofgniypoCla rup op s e s , i n p a r t o r in w hole,
AG Volkswagen
th respect t o t h e c o r r e c t n e ss o f ni.GAnegawskloVybthgirypoC.tnemucodsihtninoitamrof
• Thank you very much for reading the preview of the manual.
• You can download the complete manual from: www.heydownloads.com by clicking the link below
• Please note: If there is no response to CLICKING the link, please download this PDF first and then click on it.
00 –Technical data
1Safety information
(VRL012713; Edition 02.2019)
⇒ “1.1 Safety regulations for working on fuel supply”, page 1
⇒ “1.2 Safety measures when working on vehicles with a start/ stop system”, page 1
⇒ “1.3 Safety precautions when using testers and measuring in‐struments during a road test”, page 2
⇒“1.4Safetyprecautionswhenworkingonignitionsystem”,page 2
⇒ “1.5 Safety precautions when working on the cooling system”, page 2
1.1Safety regulations for working on fuel supply
Risk of injury from highly pressurised fuel.
The fuel system is pressurised. Injury from fuel spray possible. Before opening the fuel system:
–Wear protective goggles.
–Wear protective gloves.
– Toreleasepressure,wrapacleanclotharoundtheconnection and carefully loosen the connection.
Danger of fire caused by escaping fuel
Whenthebatteryisconnectedandthedriverdooropens,thedoor contact switch activates the fuel pump. Escaping fuel can ignite and cause a fire.
–Disconnect voltage supply to fuel pump before opening the fuel system.
1.2Safety measures when working on vehicles with a start/stop system
Risk
of injury due to unexpected motor start
If the vehicle's start/stop system is activated, the engine could start unexpectedly. A message in the dash panel insert indicates whether the start/stop system is activated.
–Deactivate start/stop system by switching off the ignition.
Arteon 2018 ➤ , Polo 2018 ➤ , T-Roc 2018 ➤ , Tiguan 2016 ➤ , Tiguan RU ... 4-cyl. direct injection engine (2.0 l, 4 V, EA 888 gen III BZ, turbocharger, chain drive) - Edition 02.2019
1.3Safety precautions when using testers and measuring instruments during a road test
Risk of injury caused by unsecured testing and measuring instru‐ments
When the front passenger airbag is triggered in an accident, in‐sufficiently secured testing and measuring instruments become dangerous projectiles.
–Secure testing and measuring instruments on the rear seat. or
– Have a second person operate the test and measuring equip‐ment on the rear seat.
1.4Safety precautions when working on ignition system
Risk of injury due to electric shock
The ignition system is under high voltage when the engine is run‐ning.Touchingtheignitionsystemmayresultinanelectricshock.
– Do not touch or disconnect ignition cables when the engine is running or being turned at starter speed.
Risk of damage to components
Connecting or disconnecting electric cables or washing the en‐gine while it is running may damage components.
– Switchofftheignitionbeforeconnectingordisconnectingelec‐tric cables.
–Switch off the ignition before washing the engine.
1.5Safety precautions when working on the cooling system
Danger of scalding by hot coolant
On a warm engine, the cooling system is under high pressure. Danger of scalding by steam and hot coolant.
–Wear protective gloves.
–Wear protective goggles.
–Reduce excess pressure by covering cap of coolant expan‐sion tank with cloths and opening it carefully.
Arteon 2018 ➤ , Polo 2018 ➤ , T-Roc 2018 ➤ , Tiguan 2016 ➤ , Tiguan RU ... 4-cyl. direct injection engine (2.0 l, 4 V, EA 888 gen III BZ, turbocharger, chain drive) - Edition 02.2019
1.6Safety precautions when working on exhaust system
Risk of poisoning due to chemical substances
Exhaust gas temperature senders may contain chemical sub‐stances. There is a risk of poisoning or injuries to respiratory system.
–Never open an exhaust gas temperature sender by cutting, sawing or any other means.
Risk of injury due to hot condensate and particles in the exhaust system.
The exhaust system could contain hot condensate and/or parti‐cles. There is a risk of injury to the eyes, skin and respiratory system, as well as poisoning.
–Always wear protective gloves and eye protection when cut‐ting the exhaust system.
–When cutting, use an extraction system or otherwise ensure sufficient ventilation.
Risk of damage to flexible joint
Do not allow the flexible joint to kink by more than 10°. Install flexible joint so that it is not under tension. Do not damage wire mesh on decoupling element.
Arteon 2018 ➤ , Polo 2018 ➤ , T-Roc 2018 ➤ , Tiguan 2016 ➤ , Tiguan RU ... 4-cyl. direct injection engine (2.0 l, 4 V, EA 888 gen III BZ, turbocharger, chain drive) - Edition 02.2019
2Identification
⇒ “2.1 Engine number/engine data”, page 4
2.1Engine number/engine data
Engine number
The engine number (“code letters” and “serial number”) can be found at the joint between the engine and gearbox.

Theenginecodeisalsostampedonthecylinderblockbehindthe oil filter.
In addition, there is a sticker on the right of the timing chain cover with “engine code” and “serial number”.
The first 3 digits denote the mechanical design of the engine and are stamped on the engine. The fourth digit shows the engine outputandtorqueandvariesaccordingtoenginecontrolunit.The four-digitenginecodecanbefoundontheidentificationplateand on the vehicle data sticker. It can also be read from the engine control unit.
Note
Fittinglocationsofvehicledatasticker⇒Maintenance;Booklet; Vehicledatasticker.
• Thank you very much for reading the preview of the manual.
• You can download the complete manual from: www.heydownloads.com by clicking the link below
• Please note: If there is no response to CLICKING the link, please download this PDF first and then click on it.
Arteon 2018 ➤ , Polo 2018 ➤ , T-Roc 2018 ➤ , Tiguan 2016 ➤ , Tiguan RU ... 4-cyl. direct injection engine (2.0 l, 4 V, EA 888 gen III BZ, turbocharger, chain drive) - Edition 02.2019
Arteon 2018 ➤ , Polo 2018 ➤ , T-Roc 2018 ➤ , Tiguan 2016 ➤ , Tiguan RU ... 4-cyl. direct injection engine (2.0 l, 4 V, EA 888 gen III BZ, turbocharger, chain drive) - Edition 02.2019
3Repair instructions
⇒ “3.1 Rules for cleanliness”, page 6
⇒ “3.2 Foreign objects in engine”, page 6
⇒ “3.3 Contact corrosion”, page 6
⇒ “3.4 Routing and attachment of lines”, page 6
⇒ “3.5 Fitting radiator and condensers”, page 7
⇒ “3.6 Checking vacuum system”, page 7
3.1Rules for cleanliness
Even small amounts of contamination/soiling can lead to defects. Youmustthereforecomplywiththefollowingrulesforcleanliness when working on the fuel supply system, injection system and turbocharger:
♦ Carefully clean connection points and the surrounding area withenginecleanerorbrakecleaneranddrythoroughlybefore opening.
♦ Seal open pipes and connections immediately with clean plugs for example from the engine bung set - VAS 6122- .
♦ Place removed parts on a clean surface. Cover with lint-free cloths only.
♦ If repair work cannot be performed immediately, carefully cov‐er or seal components.
♦ Install clean components only. Do not remove replacement parts from packing until immediately before installing. Do not use parts that have been stored outside their packaging (e.g. in tool boxes).
♦ When the system is open, do not work with compressed air or move the vehicle.
♦ Make sure that no fuel gets onto the fuel hoses. Should this occur, the fuel hoses must be cleaned immediately.
♦ Protectdisconnectedelectricalconnectorsfromdirtandwater, and reconnect them only when dry.
3.2Foreign objects in engine
♦ To prevent the ingress of foreign bodies during work on the engine,sealopenchannelsoftheintakeandexhaustsections with suitable bungs, for example from the engine bung setVAS 6122- .
3.3Contact corrosion
Contact corrosion can occur if non-approved fasteners are used on the vehicle (bolts, nuts, washers etc.).
For this reason, only connecting elements with a special surface coating have been fitted.
In addition, rubber, plastic and adhesives are made of non-con‐ductive materials.
If there is any doubt about the suitability of parts, a general rule is to use new parts ⇒ Electronic parts catalogue (ETKA) .
3.4Routing and attachment of lines
♦ Mark fuel lines, vacuum lines, pipes/hoses for activated char‐coal filter system and electrical wiring etc. before removal so
Arteon 2018 ➤ , Polo 2018 ➤ , T-Roc 2018 ➤ , Tiguan 2016 ➤ , Tiguan RU ... 4-cyl. direct injection engine (2.0 l, 4 V, EA 888 gen III BZ, turbocharger, chain drive) - Edition 02.2019
they can be re-installed in the original positions and correctly connected. Make sketches or take photographs if necessary.
♦ To avoid damaging pipes and wires, ensure adequate clear‐ance from all moving or hot components in the engine com‐partment on account of the confined space.
3.5Fitting radiator and condensers
Even if installed correctly, the radiator, the condenser and the chargeaircoolermayhavesmalldentsintheirfins.Thisdoesnot mean that these components have been damaged. It is not per‐missibletorenewradiators,condensersorchargeaircoolersonly because of such minor dents.
3.6Checking vacuum system
Special tools and workshop equipment required

♦ Hand operated vacuum pump - VAS 6213-
Procedure
– Check all vacuum lines throughout entire vacuum system for:
♦ Cracks
♦ Marten bites
♦ Crushing
♦ Porous areas and other leaks
– Check vacuum line to solenoid valve and from solenoid valve to relevant component.
– If a fault has been entered in the event memory, make sure to check not only all vacuum lines leading to the specified com‐ponent, but also those leading to other components.
– Ifpressurecannotbebuilt-upusinghandvacuumpump-VAS 6213- or pressure immediately drops again, check hand vac‐uum pump and connecting hoses for leaks.
10 –Removing and installing engine
1Removing and installing engine
⇒ “1.1 Removing engine”, page 8
⇒ “1.2 Separating engine and gearbox”, page 20
⇒ “1.3 Securing engine on engine and gearbox support”, page 28
⇒ “1.4 Installing engine”, page 30
1.1Removing engine
Special tools and workshop equipment required
♦ Engine and gearbox jack - VAS 6931-

♦ Engine support - T10359 A-
♦ Pin - T10359/2-

♦ Adapter - T10359/3-
♦ Securing element from gearbox support - 3282-

Arteon 2018 ➤ , Polo 2018 ➤ , T-Roc 2018 ➤ , Tiguan 2016 ➤ , Tiguan RU ... 4-cyl. direct injection engine (2.0 l, 4 V, EA 888 gen III BZ, turbocharger, chain drive) - Edition 02.2019
♦ Release lever - 80 - 200-

♦ Safety glasses
♦ Safety gloves
♦ Stepladder
Note
Theengineisremoveddownwardswithgearbox.Todothis,itis necessarytoremovethesubframewithsteeringrack.
Procedure
CAUTION
On a warm engine, the cooling system is under high pressure. Danger of scalding by steam and hot coolant.
Skin and other parts of the body may be scalded.
– Wear protective gloves.
– Wear protective goggles.
Reduce excess pressure by covering cap of coolant expan‐sion tank with cloths and opening it carefully.

–Open filler cap -arrow- for coolant expansion tank.
– Remove front parts of left and right front wheel housing liners or front wheel housing liner section ⇒ General body repairs, exterior;Rep.gr. 66;Wheelhousingliner;Assemblyoverview – front wheel housing liner .
–Remove subframe together with steering rack ⇒ Running gear, axles, steering; Rep. gr. 40 ; Subframe; Removing and installing subframe with steering rack .
–Detach left drive shaft from flange shaft, and tie in elevated position ⇒ Running gear, axles, steering; Rep. gr. 40 ; Drive shaft; Removing and installing drive shaft .
–Remove right drive shaft ⇒ Running gear, axles, steering; Rep. gr. 40 ; Drive shaft; Removing and installing drive shaft .
Note
Takecarenottodamagethesurfaceprotectionofthedriveshaft.
Arteon 2018 ➤ , Polo 2018 ➤ , T-Roc 2018 ➤ , Tiguan 2016 ➤ , Tiguan RU ... 4-cyl. direct injection engine (2.0 l, 4 V, EA 888 gen III BZ, turbocharger, chain drive) - Edition 02.2019
–Separate connector -1-.
–Place drip tray for workshop hoist - VAS 6208- underneath.
–Lift retaining clip -3-, disconnect coolant hose (bottom right) from radiator and drain off coolant.
–Remove engine cover panel ⇒ page 55
–Remove air filter housing ⇒ page 317
–Remove air duct on lock carrier ⇒ page 317 .

–Remove radiator cowl ⇒ page 266
– Disconnect battery ⇒ Electrical system; Rep. gr. 27 ; Battery; Disconnecting and connecting battery .
–Remove battery tray -1- ⇒ Electrical system; Rep. gr. 27 ; Battery; Removing and installing battery tray .
–If fitted, disconnect vacuum hose -2-.
–Press release tabs on vacuum hose -1-, and remove hose from vacuum pump.
Vehicles without seat heating:
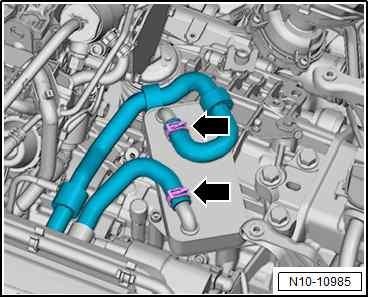
Liftretainingclips-arrows-anddisconnectcoolanthosesfrom heat exchanger for heater.
–Hold coolant hoses downwards to allow coolant to drain.


Arteon 2018 ➤ , Polo 2018 ➤ , T-Roc 2018 ➤ , Tiguan 2016 ➤ , Tiguan RU ... 4-cyl. direct injection engine (2.0 l, 4 V, EA 888 gen III BZ, turbocharger, chain drive) - Edition 02.2019
Vehicles with auxiliary heater:
–Release hose clip -1-, lift retaining clips -arrows-, and discon‐nect coolant hoses.
Continued for all vehicles:
–Detach electrical connectors -1, 2- from bracket, unplug con‐nectors and move electrical wiring clear.
–Loosen clamp -1- for catalytic converter -2-, and push clamp onto turbocharger.
AG Volkswagen
CAUTION
The fuel system is pressurised. Danger of injury through fuel spray.
– Wear protective goggles.
– Wear protective gloves.
– To release pressure, wrap a clean cloth around the connec‐tion and carefully loosen the connection.
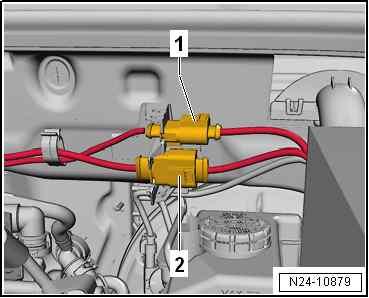
–Disconnect hose couplings -1- and -2- ⇒ Rep. gr. 20 ; Plugin connectors; Disconnecting plug-in connectors . Detach ho‐ses from coolant expansion tank -3-.


• Thank you very much for reading the preview of the manual.
• You can download the complete manual from: www.heydownloads.com by clicking the link below
• Please note: If there is no response to CLICKING the link, please download this PDF first and then click on it.
Arteon 2018 ➤ , Polo 2018 ➤ , T-Roc 2018 ➤ , Tiguan 2016 ➤ , Tiguan RU ... 4-cyl. direct injection engine (2.0 l, 4 V, EA 888 gen III BZ, turbocharger, chain drive) - Edition 02.2019
–Release hose clips -1, 2-, and remove coolant hoses.


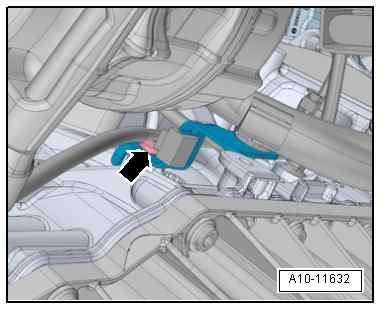
– Liftretainingclip-arrow-anddisconnectcoolanthose(topleft) from radiator.
Note
Fortheworkstepsbelow,useremovallever-80-200-tounclip thebindingclips.
–Separate connector -1- on engine control unit - J623-
⇒ page 340 .
– Remove connectors -2, 3- from retainer and disconnect them. –Move electrical lines free.
GAnegawskloVybthgirypoC.tnemuc
Arteon 2018 ➤ , Polo 2018 ➤ , T-Roc 2018 ➤ , Tiguan 2016 ➤ , Tiguan RU ... 4-cyl. direct injection engine (2.0 l, 4 V, EA 888 gen III BZ, turbocharger, chain drive) - Edition 02.2019
– Release catches -arrows- and detach cover -1- for electronics box in engine compartment.


–Release catch using a screwdriver -arrow- and detach cover -1- for electronics box in engine compartment upwards.


–Remove nut -arrow-, detach electrical wiring and move clear.
Vehicles with manual gearbox:
–Disconnect connector -2-.
–Push back cover for battery positive terminal -1-, and unbolt battery positive cable from starter solenoid switch.
–Unscrew nut -3- and remove earth wire.
Note
Dependingonvehicleversion,theearthwireissecuredtothe starterbolt.
Arteon 2018 ➤ , Polo 2018 ➤ , T-Roc 2018 ➤ , Tiguan 2016 ➤ , Tiguan RU ... 4-cyl. direct injection engine (2.0 l, 4 V, EA 888 gen III BZ, turbocharger, chain drive) - Edition 02.2019
–Disconnect electrical connections at front left of gearbox.

1 -For gearbox neutral position sender - G701-
2 -For reversing light switch - F4-
–Disconnect gear selector cable and gate selector cable from gearbox. Then, unbolt cable support bracket, and lay it to one sidetogetherwithcables⇒ Rep.gr. 34;Selectormechanism; Removing and installing selector mechanism .


–Clamp off pipe/hose line -A- leading to slave cylinder using hose clamp - 3094- .
–Pull out clip -arrow- for pipe/hose line to stop.
–Pull pipe/hose line out of slave cylinder breather.
Vehicles with dual clutch gearbox:
–Separate connector -1-.
–Push back cover for battery positive terminal -3-, and unbolt battery positive cable from starter solenoid switch.
–Loosen nut -arrow-, and remove earth wire.
Note
Dependingonvehicleversion,theearthwireissecuredtothe starterbolt.
– Touch earth connection (without gloves) in order to discharge yourself.
–Do not touch contacts in the gearbox connector with hands.
–Separate connector -2- for mechatronic unit for dual clutch gearbox - J743- . To do this, turn rotary fastener in anti-clock‐wise direction.
–If fitted, release electrical connector for auxiliary hydraulic pump 1 for gearbox oil - V475- -a-, and pull off connector -b-.
–Disconnect selector lever cable from gearbox, and pull it out ofcablesupportbracket⇒ Rep.gr. 34;Selectormechanism; Removing and installing selector mechanism .
• Thank you very much for reading the preview of the manual.
• You can download the complete manual from: www.heydownloads.com by clicking the link below
• Please note: If there is no response to CLICKING the link, please download this PDF first and then click on it.
Arteon 2018 ➤ , Polo 2018 ➤ , T-Roc 2018 ➤ , Tiguan 2016 ➤ , Tiguan RU ... 4-cyl. direct injection engine (2.0 l, 4 V, EA 888 gen III BZ, turbocharger, chain drive) - Edition 02.2019
Continued for all:
–Loosen bolts -arrows- for gearbox mounting approx. 2 turns.
–Loosen bolts -arrows- for engine mounting approx. 2 turns.
–Release hose clip -1- and -2-, and remove right charge air hose.
– Seal open lines and connections with clean plugs from engine bung set - VAS 6122- .


–Lay coolant hose -3- to one side.


–Unscrew bolts -arrows-.
–Release hose clip -2-.
– Separateelectricalconnector-1-fromchargepressuresender - G31- .
–Remove air pipe.
thgirypocybdetcetorP . icremmocroetavirprofgniypoC
GAnegawskloVybthgirypoC
Arteon 2018 ➤ , Polo 2018 ➤ , T-Roc 2018 ➤ , Tiguan 2016 ➤ , Tiguan RU ... 4-cyl. direct injection engine (2.0 l, 4 V, EA 888 gen III BZ, turbocharger, chain drive) - Edition 02.2019
–Open hose clip -arrow- on charge air cooler and pull off left charge air hose -A- from charge air cooler.
– Before removing the poly V-belt, use a piece of chalk or a felt pen to mark the running direction.
–To relieve tension on poly V-belt, swivel tensioning device in clockwise direction -arrow-.


–Remove poly V-belt from poly V-belt pulley of air conditioner compressor and release tensioning device. Remove locking pin - T10060 A- if necessary.

CAUTION
Risk of freezing injury caused by refrigerant.
– Do not open refrigerant circuit of air conditioning system.

–Separate connector -1- on air conditioning compressor regu‐lating valve - N280- .
–Unscrew bolts -arrows-.
– Detach air conditioner compressor with refrigerant hoses con‐nected from bracket, and tie it up on the right side. Do NOT stretch, kink or bend refrigerant lines and hoses while doing so.
–Remove nut -2-.
Arteon 2018 ➤ , Polo 2018 ➤ , T-Roc 2018 ➤ , Tiguan 2016 ➤ , Tiguan RU ... 4-cyl. direct injection engine (2.0 l, 4 V, EA 888 gen III BZ, turbocharger, chain drive) - Edition 02.2019
–Loosen clamp -arrow-, and push it to rear.
–Detach catalytic converter with front exhaust pipe.
Vehicles with all-wheel drive:
–Unscrew bolts -A- and -B- from bevel box and remove heat shield -1-.
–Mark position of propshaft relative to bevel box flange.

AG
–Counterhold at rear final drive when loosening or tightening propshaft.


Arteon 2018 ➤ , Polo 2018 ➤ , T-Roc 2018 ➤ , Tiguan 2016 ➤ , Tiguan RU ... 4-cyl. direct injection engine (2.0 l, 4 V, EA 888 gen III BZ, turbocharger, chain drive) - Edition 02.2019
–Unbolt front of propshaft from bevel box -arrows-.
–Secure support - T10323- with a bolt on inside rear threaded hole for subframe.
–A securing bolt from the subframe is suitable for this.
–Put a cloth -A- on support .
–Pull propshaft off bevel box, and lay it to one side.
Continued for all vehicles:
–Remove bolt -arrow- and push bracket for electrical wiring harness to one side.
–Secure adapter -T10359/3- to engine support - T10359- , as shown in illustration.


–Use locking element -A- from gearbox support - 3282- to se‐cure pin -T10359/2- to engine support.
–Insert engine support - T10359- in engine and gearbox jackVAS 6931- .
Arteon 2018 ➤ , Polo 2018 ➤ , T-Roc 2018 ➤ , Tiguan 2016 ➤ , Tiguan RU ... 4-cyl. direct injection engine (2.0 l, 4 V, EA 888 gen III BZ, turbocharger, chain drive) - Edition 02.2019
–Fit engine support - T10359- to cylinder block. Screw bolt -Awith spacer sleeve into cylinder block. Specified torque: 20 Nm.

– Secureenginewithlockingelement-B-,andslightlyliftengine with gearbox.
–Remove bolts -arrows- for engine mounting.
–Remove bolts -arrows- securing gearbox mounting.
Arteon 2018 ➤ , Polo 2018 ➤ , T-Roc 2018 ➤ , Tiguan 2016 ➤ , Tiguan RU ... 4-cyl. direct injection engine (2.0 l, 4 V, EA 888 gen III BZ, turbocharger, chain drive) - Edition 02.2019
– Carefully lower engine/gearbox assembly. Check that all vac‐uum lines and electrical wiring between engine, gearbox and body have been detached while doing so.
1.2Separating engine and gearbox
⇒ “1.2.1 Separating engine and gearbox, vehicles with manual gearbox”, page 20

⇒ “1.2.2 Separating engine and gearbox, vehicles with 7-speed dual clutch gearbox”, page 22
⇒ “1.2.3 Separating engine and gearbox, vehicles with 6-speed dual clutch gearbox”, page 25
1.2.1Separating engine and gearbox, vehi‐cles with manual gearbox
Special tools and workshop equipment required
♦ Hook - 10 - 222 A /2-

la rup op s e s , i n p a r t o r in w hole,
♦ Workshop hoist - VAS 6100-
GAnegawskloV

Arteon 2018 ➤ , Polo 2018 ➤ , T-Roc 2018 ➤ , Tiguan 2016 ➤ , Tiguan RU ... 4-cyl. direct injection engine (2.0 l, 4 V, EA 888 gen III BZ, turbocharger, chain drive) - Edition 02.2019
♦ Lifting tackle - T40013-
Procedure
• Engine/gearbox assembly removed and attached to engine bracket - T10359- .


– Release electrical wires from retainer -arrow- and lay them to one side.
–Unscrew bolts -1 and 2-, and remove starter from gearbox.

–Move electrical wiring harnesses -1, 2- clear at air pipe.
–Loosen screw-type clip -3-.
–Remove bolts -arrows- and detach air pipe.

Arteon 2018 ➤ , Polo 2018 ➤ , T-Roc 2018 ➤ , Tiguan 2016 ➤ , Tiguan RU ... 4-cyl. direct injection engine (2.0 l, 4 V, EA 888 gen III BZ, turbocharger, chain drive) - Edition 02.2019
Unscrew bolts -arrows- and detach gearbox support.
–Attach lifting tackle - T40013- to gearbox and close lock.
–Attach workshop hoist - VAS 6100- with hooks - 10 - 222 A / 2- to lifting tackle.
AG. Volkswagen AGdoesnotguar
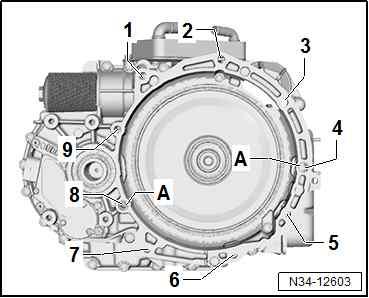
–Remove bolts -1, 2, 3, 6, 7, 8, 9- securing gearbox to engine.


Note
Disregard-items4,5-and-A-.
–Pull gearbox off engine.
1.2.2Separating engine and gearbox, vehi‐cles with 7-speed dual clutch gearbox

Special tools and workshop equipment required
thgirypocybdetcetorP
GAnegawskloVybthgirypoC.tnem
• Thank you very much for reading the preview of the manual.
• You can download the complete manual from: www.heydownloads.com by clicking the link below
• Please note: If there is no response to CLICKING the link, please download this PDF first and then click on it.
Arteon 2018 ➤ , Polo 2018 ➤ , T-Roc 2018 ➤ , Tiguan 2016 ➤ , Tiguan RU ... 4-cyl. direct injection engine (2.0 l, 4 V, EA 888 gen III BZ, turbocharger, chain drive) - Edition 02.2019
♦ Lifting tackle - 2024 A-
♦ Eye-head bolt - 3368-
♦ Workshop hoist - VAS 6100-


♦ Puller for ATF-supply - T40123 A-

NOTICE
Secondary damage from defective needle bearing.
– If engine and gearbox are separated, needle bearing in crankshaft must be renewed ⇒ page 80
1. Removing and installing engine
Arteon 2018 ➤ , Polo 2018 ➤ , T-Roc 2018 ➤ , Tiguan 2016 ➤ , Tiguan RU ... 4-cyl. direct injection engine (2.0 l, 4 V, EA 888 gen III BZ, turbocharger, chain drive) - Edition 02.2019
Procedure
• Engine/gearbox assembly removed and attached to engine bracket - T10497- .
–Move electrical wiring harnesses -1, 2- clear at air pipe.
–Loosen screw-type clip -3-.
–Remove bolts -arrows- and detach air pipe.
–Remove starter ⇒ Electrical system; Rep. gr. 27 ; Starter; Removing and installing starter .

–Unscrew coolant pipe from gearbox.
–Unscrew nuts -arrows-, and remove bracket at front of sump.
Note
Thestudsareweldedtothefrontofthesump.
Vehicles with all-wheel drive:
–Unscrew bolts -1, 2-, and remove bracket for bevel box.
Continued for all vehicles:
– Open hose clips -arrows-, and disconnect coolant hoses from gear oil cooler.

Note
Useaclothtocatchtheescapingcoolant.
• Thank you very much for reading the preview of the manual.
• You can download the complete manual from: www.heydownloads.com by clicking the link below
• Please note: If there is no response to CLICKING the link, please download this PDF first and then click on it.
Arteon 2018 ➤ , Polo 2018 ➤ , T-Roc 2018 ➤ , Tiguan 2016 ➤ , Tiguan RU ... 4-cyl. direct injection engine (2.0 l, 4 V, EA 888 gen III BZ, turbocharger, chain drive) - Edition 02.2019
– UnscreweyeonpullerforATF-supply-T40123A-,andscrew it to stop into lower threaded hole for starter bolt.
–Secure eye-head bolt - 3368- with two counter-locked nuts -1- in hole in gearbox housing.
–Attach lifting tackle - 2024 A- to both eyes and to workshop hoist - VAS 6100- as shown in illustration.


• Inordertomatchtheliftingtackletothecentreofgravityofthe gearbox,theholesinthehookrailmustbeallocatedasshown in the illustration.
CAUTION
Danger of injury caused by falling of the raised engine. Crushing of body parts possible.
– The support hooks and pins on the lifting tackle must be se‐cured with locking pins.
– Thesupporthooksandpinsmustbeinsertedwithlockingpins -arrows-.
–Unscrew bolts -1 to 9- securing gearbox to engine.
Note
Disregard-itemA-.
–Pull gearbox off engine.
–Before assembling, renew needle bearing in crankshaft ⇒ page 80 .
1.2.3Separating
Special tools and workshop equipment required
♦ Adapter - 10 - 222 A /20-
1. Removing and installing engine
Arteon 2018 ➤ , Polo 2018 ➤ , T-Roc 2018 ➤ , Tiguan 2016 ➤ , Tiguan RU ... 4-cyl. direct injection engine (2.0 l, 4 V, EA 888 gen III BZ, turbocharger, chain drive) - Edition 02.2019
♦ Hook of -2024 A /1- lifting tackle - 2024 A-

♦ Workshop hoist - VAS 6100-
♦ Engine bung set - VAS 6122-

NOTICE
Secondary damage from defective needle bearing. – If engine and gearbox are separated, needle bearing in crankshaft must be renewed ⇒ page 80 .
Arteon 2018 ➤ , Polo 2018 ➤ , T-Roc 2018 ➤ , Tiguan 2016 ➤ , Tiguan RU ... 4-cyl. direct injection engine (2.0 l, 4 V, EA 888 gen III BZ, turbocharger, chain drive) - Edition 02.2019
Procedure
• Engine/gearbox assembly removed and attached to engine bracket - T10497- .
–Remove starter ⇒ Electrical system; Rep. gr. 27 ; Starter; Removing and installing starter .


isnotpermittedunlessauthorisedbyVolkswagen AG Volkswagen AGdoesnotguaranteeoracceptanyliabilitywi
–Unscrew nuts -arrows-, and remove bracket at front of sump.
Thestudsareweldedtothefrontofthesump.
Vehicles with all-wheel drive:
–Unscrew bolts -1, 2-, and remove bracket for bevel box.
Arteon 2018 ➤ , Polo 2018 ➤ , T-Roc 2018 ➤ , Tiguan 2016 ➤ , Tiguan RU ... 4-cyl. direct injection engine (2.0 l, 4 V, EA 888 gen III BZ, turbocharger, chain drive) - Edition 02.2019
Continued for all vehicles:
–Separate electrical connector -2-.
Note
♦ Useaclothtocatchtheescapingcoolant.
♦ Disregard-3094-.
–Loosen hose clips -arrows- and remove coolant hoses from gear oil cooler.
– Unscrew bolts -1- and lay coolant valve for gearbox - N488- to one side.
– Seal open lines and connections with clean plugs from engine bung set - VAS 6122- .
– Attachhookofliftingtackle-2024A-togearboxliftingeyeand secure with pin -arrow-.
–Attach hook -2024 A- to workshop hoist - VAS 6100- with adapter - 10 - 222 A /20- .
–Unscrew bolts -1 to 8- securing gearbox to engine.
Note
Disregard-itemA-.
–Pull gearbox off engine.


–Before assembling, renew needle bearing in crankshaft
⇒ page 80
1.3Securing engine on engine and gearbox support

Arteon 2018 ➤ , Polo 2018 ➤ , T-Roc 2018 ➤ , Tiguan 2016 ➤ , Tiguan RU ... 4-cyl. direct injection engine (2.0 l, 4 V, EA 888 gen III BZ, turbocharger, chain drive) - Edition 02.2019
Special tools and workshop equipment required
la p
♦ Lifting tackle - 2024 A-
♦ Workshop hoist - VAS 6100-
♦ Engine and gearbox support - VAS 6095Procedure

• Gearbox detached from engine ⇒ page 20
thgirypocybdetcetorP . icremmocroetavirprofgniypoC
with respect t o t h e c o r r e c t n e ss o f ni
GAnegawskloVybthgirypoC.tnemucodsihtninoitamrof
Arteon 2018 ➤ , Polo 2018 ➤ , T-Roc 2018 ➤ , Tiguan 2016 ➤ , Tiguan RU ... 4-cyl. direct injection engine (2.0 l, 4 V, EA 888 gen III BZ, turbocharger, chain drive) - Edition 02.2019
–Attach lifting tackle - 2024 A- to engine on workshop hoistVAS 6100- .
– Inordertomatchtheliftingtackletothecentreofgravityofthe engine, the holes in the hook rail must be allocated as shown in the illustration.

–The support hooks and pins on the lifting tackle must be se‐cured with locking pins -arrows-.
–Using workshop hoist - VAS 6100- , lift engine off engine and gearbox jack - VAS 6931- .
– Removedowelsleevesforgearbox,and,ongearboxside,bolt engine to engine and gearbox support - VAS 6095- .

1.4Installing engine
Specified torques Note
♦ Thespecifiedtorquesareonlyvalidfornutsandboltswhich havebeenslightlygreased,oiled,phosphate-treatedorblackoxided.
♦ Additionallubricantsuchasengineoilorgearoilmaybeused, butdonotuselubricantcontaininggraphite.
♦ Donotusedegreasedparts.
♦ Renewboltsthataretightenedwithturningfurtherangle.
♦ Renewself-lockingnutsandbolts,andseals,O-ringsand gaskets.
♦ Hoseunionsandairintakepipesandhosesmustbefreeof oilandgreasebeforeinstallation.
♦ Secureallhoseconnectionswiththecorrecttypeofhoseclips (sameasoriginalequipment)⇒ Electronicpartscatalogue.
♦ Attachcabletiesinallthesameplaceswheninstalling.
♦ Toleranceforspecifiedtorques±15%.
Arteon 2018 ➤ , Polo 2018 ➤ , T-Roc 2018 ➤ , Tiguan 2016 ➤ , Tiguan RU ... 4-cyl. direct injection engine (2.0 l, 4 V, EA 888 gen III BZ, turbocharger, chain drive) - Edition 02.2019
♦ Assembly mountings ⇒ “2.1 Assembly overview - assembly mountings”, page 34
♦ Securing gearbox to engine ⇒ Rep. gr. 34 ; Removing and installing gearbox; Specified torques for gearbox .
Procedure
–Check for damage to dowel sleeves in cylinder block for cen‐tring engine and gearbox and renew them as needed.
–Hook intermediate plate onto sealing flange and slide onto dowel sleeves -arrows-.
Vehicles with manual gearbox:
–If clutch release bearing is worn, renew it ⇒ Rep. gr. 30 ; Clutch mechanism; Repairing clutch release mechanism .

Lightly grease input shaft splines using grease as per ⇒ Elec‐tronic parts catalogue (ETKA) .
–Check centring of clutch plate.
–Bolt gearbox to engine.
Vehicles with dual clutch gearbox:
– If engine and gearbox were separated, renew needle bearing in crankshaft ⇒ page 80 .
Continued for all vehicles:
–Bolt gearbox to engine.
–Install bracket for bevel box.
–Install starter ⇒ Electrical system; Rep. gr. 27 ; Starter; Re‐moving and installing starter .
–Guide engine/gearbox assembly into body.
–First screw bolts -arrows- for engine mountings into stop by hand.
Arteon 2018 ➤ , Polo 2018 ➤ , T-Roc 2018 ➤ , Tiguan 2016 ➤ , Tiguan RU ... 4-cyl. direct injection engine (2.0 l, 4 V, EA 888 gen III BZ, turbocharger, chain drive) - Edition 02.2019
–First screw bolts -arrows- for gearbox mountings into stop by hand.
Note
Theboltsaretightenedtofinaltorqueonlyafteradjustingtheas‐semblymountings⇒page34
–Remove engine bracket - T10359- from engine.
–Install drive shafts ⇒ Running gear, axles, steering; Rep. gr. 40 ; Drive shaft; Assembly overview - drive shaft .
Vehicles with manual gearbox:
– Installclutchslavecylinder⇒ Rep.gr. 30;Clutchmechanism; Removing and installing clutch slave cylinder .
–Install cables with cable support bracket ⇒ Rep. gr. 34 ; Se‐lector mechanism; Assembly overview - selector cables .
Vehicles with dual clutch gearbox:
– Installandadjustselectorlevercable⇒ Rep.gr. 34;Selector mechanism; Removing and installing selector lever cable .
Continued for all vehicles:
– Install air conditioner compressor ⇒ Heating, air conditioning; Rep. gr. 87 ; Air conditioner compressor; Assembly overview - drive unit of air conditioner compressor .
–Install poly V-belt ⇒ page 58
–Adjust assembly mountings ⇒ page 53
– Install battery tray ⇒ Electrical system; Rep. gr. 27 ; Battery; Assembly overview - battery .
–Electrical connections and routing ⇒ Electrical system; Rep. gr. 97 ; Relay carriers, fuse carriers, electronics boxes; Over‐view of fitting locations - relay carriers, fuse carriers, electron‐ics boxes and ⇒ Current flow diagrams, Electrical fault finding and Fitting locations.
–Install air filter housing ⇒ page 317
–Fit engine cover panel ⇒ page 55 .
–Check oil level.
–Connect coolant hoses with plug-in connector to heat ex‐changer for heater ⇒ page 257
–Add coolant ⇒ page 207
Note
Neverreuseoldcoolant.
–Install subframe ⇒ Running gear, axles, steering; Rep. gr. 40 ; Subframe; Removing and installing subframe without steering rack .
– Install front wheel housing liners ⇒ General body repairs, ex‐terior; Rep. gr. 66 ; Wheel housing liner; Assembly overview - front wheel housing liner .
If a new base engine or short engine was installed, additional adaptations must be carried out in the engine control unit. Pro‐ceed as follows to do this:
Arteon 2018 ➤ , Polo 2018 ➤ , T-Roc 2018 ➤ , Tiguan 2016 ➤ , Tiguan RU ... 4-cyl. direct injection engine (2.0 l, 4 V, EA 888 gen III BZ, turbocharger, chain drive) - Edition 02.2019
– Connect⇒Vehiclediagnostictester,andselectfollowingfunc‐tions.
♦ 0001 - Engine electronics functions
AG Volkswagen
♦ 0001 - Adaption
♦ Oil pressure for engine inlet and
♦ 0001 - Engine electronics functions
♦ 0001 - Basic setting
♦ Timing chain length compensator, reset after renewing chain
Arteon 2018 ➤ , Polo 2018 ➤ , T-Roc 2018 ➤ , Tiguan 2016 ➤ , Tiguan RU ... 4-cyl. direct injection engine (2.0 l, 4 V, EA 888 gen III BZ, turbocharger, chain drive) - Edition 02.2019
2Assembly mountings
⇒ “2.1 Assembly overview - assembly mountings”, page 34
⇒ “2.2 Removing and installing engine mounting”, page 35
⇒ “2.3 Removing and installing gearbox mounting”, page 36
⇒ “2.4 Removing and installing pendulum support”, page 38
⇒ “2.5 Supporting engine in installation position”, page 39
⇒ “2.6 Checking adjustment of assembly mountings (engine and gearbox mountings)”, page 53
⇒ “2.7 Adjusting assembly mountings”, page 53
2.1Assembly overview - assembly mountings
1 - Bolt
❑Renew
❑Specified torque and tightening sequence
⇒ page 70
2 - Engine support
❑ Removing and installing
⇒ page 69
3 - Engine mounting

❑With support arm
❑ Removing and installing
⇒ page 35
4 - Bolt
❑Renew
❑40 Nm +90°
5 - Bolt
❑Renew
❑20 Nm +90°
6 - Bolt
❑Renew
❑40 Nm +90°
7 - Bolt
❑Renew
❑60 Nm +90°
8 - Pendulum support
❑ Polo: with bonded metal bush
❑ Removing and installing
⇒ page 38
9 - Bolt
❑Renew
kswagen AG Volkswagen AGdoe
❑Specified torque and tightening sequence ⇒ page 38
10 - Bolt
❑Renew
❑Specified torque and tightening sequence ⇒ page 38
isnotpermittedunlessauthorise
Arteon 2018 ➤ , Polo 2018 ➤ , T-Roc 2018 ➤ , Tiguan 2016 ➤ , Tiguan RU ... 4-cyl. direct injection engine (2.0 l, 4 V, EA 888 gen III BZ, turbocharger, chain drive) - Edition 02.2019
11 - Bolt
❑Renew
❑Specified torque and tightening sequence ⇒ page 38
12 - Bolt
❑Renew ❑60 Nm +90°
13 - Bolt
❑Renew ❑60 Nm +90°
14 - Gearbox mounting
❑With support arm
❑Removing and installing ⇒ page 36
15 - Bolt
❑Renew ❑50 Nm +90°
2.2Removing and installing engine mount‐ing
–Separate connector -1-.
–Free hoses -2- from fittings and lay them to one side.
– Usingascrewdriver,releasefasteners-arrow-andmovecool‐ant expansion tank to one side.
–Support engine in its installation position ⇒ page 39

– Takeupweightofengine/gearboxassemblyslightlywithspin‐dle; do not lift.
–Unscrew bolts -arrows- and remove engine mounting -1-.
Installing
Install in reverse order of removal, observing the following:
–Checking adjustment of assembly mountings ⇒ page 53

Specified torques
♦ ⇒ “2.1 Assembly overview - assembly mountings”, page 34
• Thank you very much for reading the preview of the manual.
• You can download the complete manual from: www.heydownloads.com by clicking the link below
• Please note: If there is no response to CLICKING the link, please download this PDF first and then click on it.
Arteon 2018 ➤ , Polo 2018 ➤ , T-Roc 2018 ➤ , Tiguan 2016 ➤ , Tiguan RU ... 4-cyl. direct injection engine (2.0 l, 4 V, EA 888 gen III BZ, turbocharger, chain drive) - Edition 02.2019
2.3Removing and installing gearbox mounting
Removing
–Remove battery tray -1- ⇒ Electrical system; Rep. gr. 27 ; Battery; Removing and installing battery tray .
–Remove engine control unit - J623- from bracket ⇒ page 340 .


