
GoalStationApp-Manual
TableofContents 1.Introduction 1 1.1Supporteddevices 1 1.2IgniteTrainers..............................................................................................................3 1.3Limitationsandrecommendations 3 2.Signupandlogin 4 2.1Signup 4 2.1.1ViaPhone 4 2.1.2ViaE-mail 4 2.1.3ViaGoogleorApple................................................................................................4 2.2Login 5 2.2.1ViaPhone 5 2.2.2ViaE-mail 5 2.2.3ViaGoogleorApple 5 2.3Invitenewusers 6 2.3.1Loginasaninviteduser.........................................................................................6 3.Gettingstarted 7 3.1Frontpage 7 3.2Profile 8 3.3ConnectIgniteTrainers 9 3.4Notifications 11 4.Quickstart....................................................................................................................... 12 4.1Quickstartwithafriend 15 5.Exercises 16 6.Customdrills 17 7.Coaching(TrainingSession) 20 7.1Planning 20 7.2Teams........................................................................................................................ 23 7.3Player 26 8.Statistics 28
1.Introduction
The Goal Station app is developed by Goal Station Digital. All rights reserved.
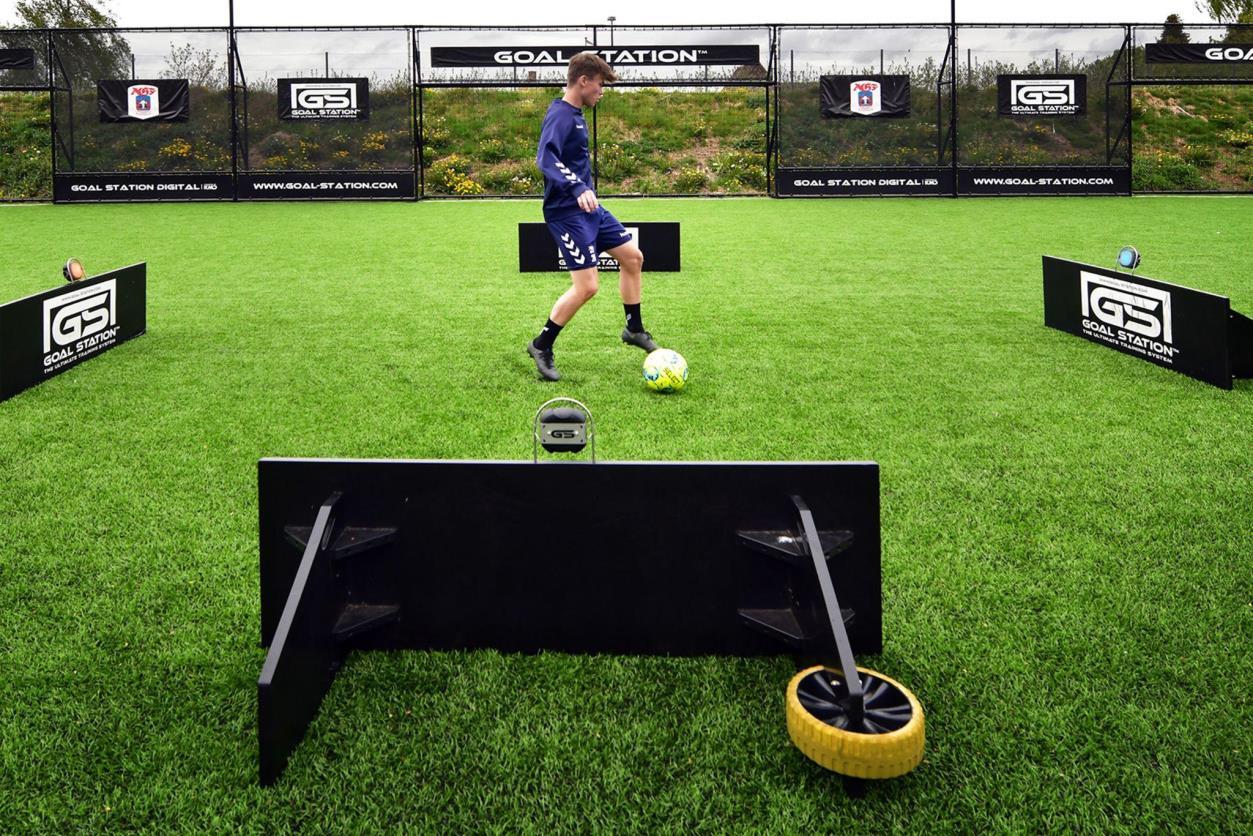
The app supports coaches and players in using Goal Station. The app includes a range of basic exercises that focus on improving fundamental skills such as first touch, short passes, and first-time passes. The exercises are set up with the help of Ignite Trainers (light sensors).
The app allows coaches to create training sessions with exercises and players, create customized exercises, and explore statistics from training sessions.
The app also allows players to perform basic exercises with Ignite Trainers, explore their own statistics, compete with friends, and customize their player profile.
The Goal Station app is available on both tablets and phones (iOS and Android), and the user profile can be used to log in to both platforms.


1
1.1Supporteddevices
iPad
iPhone
Android tablet
Support
iPadOS 13 and above.
iPad Air 2.
iPad Air (3rd generation)
iPad (5th generation)
iPad (6th generation)
iPad (7th generation)
iPad Mini 4.
iPad Mini (5th generation)
Alle iPad Pro modeller.
iOS 13 and above.
iPhone 8
iPhone 8 Plus
iPhone X
iPhone XS
iPhone XS Max
iPhone XR
iPhone 11
iPhone 11 Pro
iPhone 11 Pro Max
iPhone SE (2. generation)
iPhone 12
iPhone 12 Mini
iPhone 12 Pro
iPhone 13
iPhone 13 Pro
Version 6.0 and above.
Notes
Android telefon
GS Ignite Controller
Version 6.0 and above.
IPhone 7 and below is not supported.
The following devices is not supported.
The following devices is not supported.
2
Samsung Lenovo
Huawei
Samsung Xiaomi Sony Lenovo
Huawei
1.2IgniteTrainers
Ignite Trainers are the intelligent sensors used to perform exercises in Goal Station. Ignite Trainers are distributed by Goal Station.
Ignite Trainers are supplied to Goal Station by A-Champs. Ignite Trainers are uniquely configured to match Goal Station's rebounders and are connected to the Goal Station app, which is used in Goal Station exercises.
Ignite Trainers connect via Bluetooth to mobile devices.
1.3Limitationsandrecommendations
The Goal Station app has the following limitations.
Only Ignite Trainers can be used with the Goal Station app. No other sensors can be connected.
Goal Station recommends limiting the number of Ignite Trainers to 6 per device. Due to variations in limitations on Bluetooth components and Bluetooth protocols, the number may vary among supported devices.
Goal Station recommends keeping the distance between mobile devices and Ignite Trainers under 15 meters. Due to variations in Bluetooth components, the distance may vary between 10 and 25 meters.
3
2.Signupandlogin
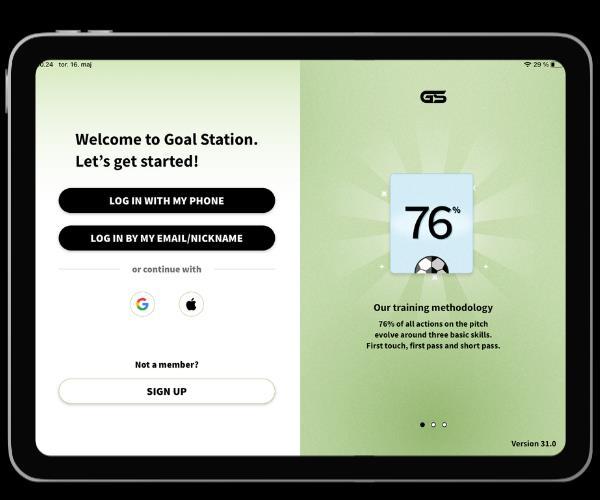
2.1Signup
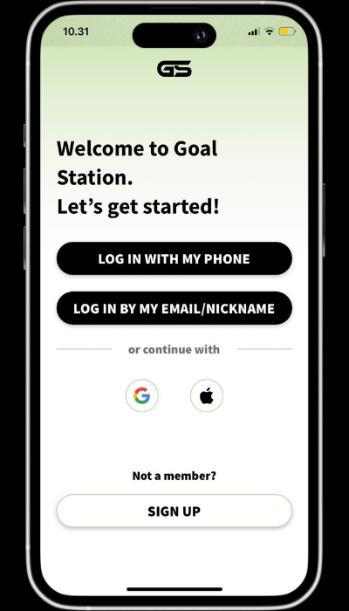
You can sign up as a user in the Goal Station app in various ways.
2.1.1ViaPhone
You can sign up by using your phone number. Click on "Sign up with my phone" and follow the instructions. Once you have entered your phone number, you will receive a confirmation code. Enter the code and log in.
2.1.2ViaE-mail
You can sign up by using your email. Click on "Sign up with my email" and follow the instructions. Enter your email and choose a password of your choice.
2.1.3ViaGoogleorApple
You can sign up as a user using your existing Google or Apple accounts. Choose this option if you prefer to use these credentials.
4
2.2Login
Once you have downloaded the Goal Station app, log in using the following steps:
1. Click on "Log in with my email/nickname."
2. Enter your player name or email address.
3. Add your password
4. Click on ”log in”
If you have forgotten your password, you can request a new one by clicking on "Forgot password"
2.2.1ViaPhone
If you have created your profile using your phone number, or you have added it to your profile, you can log in by clicking on "Log in with my phone." Enter your phone number to receive a confirmation code. Add the code and click on "Log in."
2.2.2
ViaE-mail
If you have created your profile using your email address, or you have added it to your profile, you can log in by clicking on "Log in with my email/nickname." Enter your email and password. Add the code and click on "Log in."
2.2.3ViaGoogleorApple
If you have created your account using your Google or Apple credentials, you can log in using the same credentials.
5
2.3Invitenewusers
*Only available from tablet.
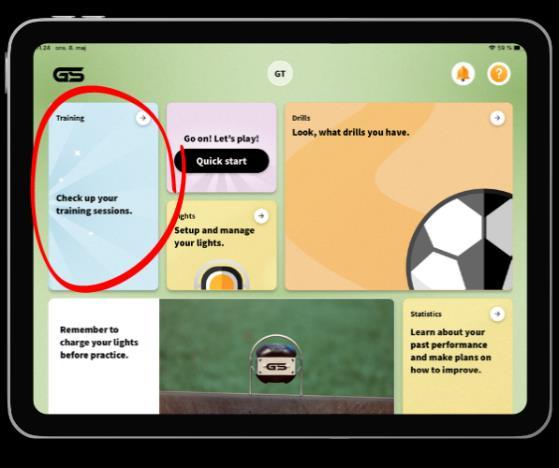
You can invite new users to the Goal Station app. On the main page, go to Training (blue box), click on Players, and then +New Player. Fill in the user's name and provide a working phone number. The invited user will receive an SMS with a download link.
Follow the guide below:


2.3.1Loginasaninviteduser
When you are invited to the Goal Station app, log in with your phone number. Click on "Log in with my phone" and enter the phone number that was used to invite you. You will receive a confirmation code, which is necessary for logging in
6
3.Gettingstarted
3.1Frontpage
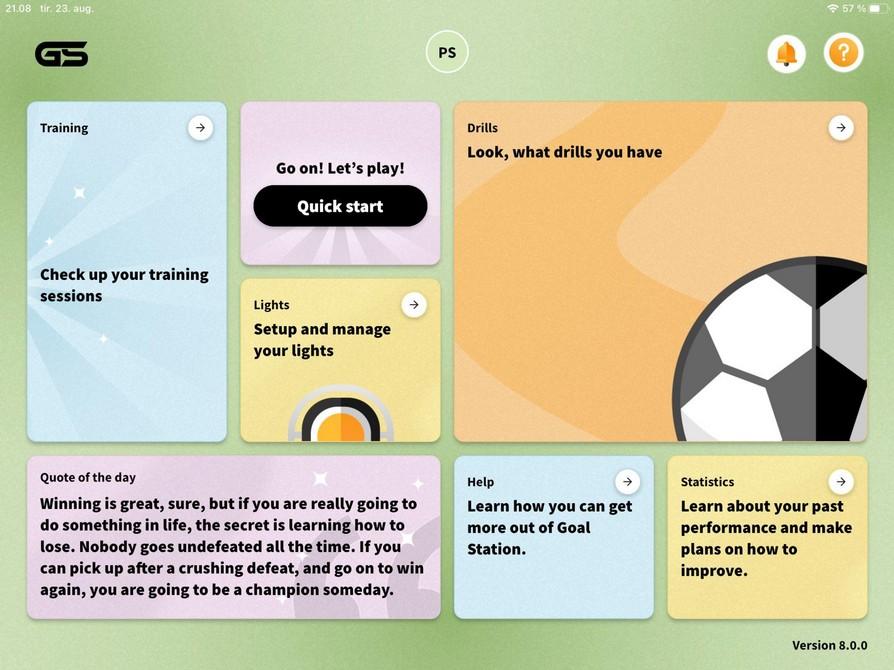
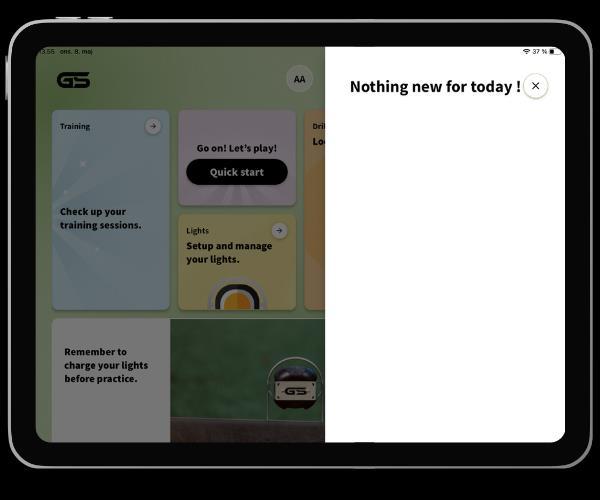
On the front page, you will find access to the features available with the Goal Station App.
Refer to the guide below to see what the different features contain:
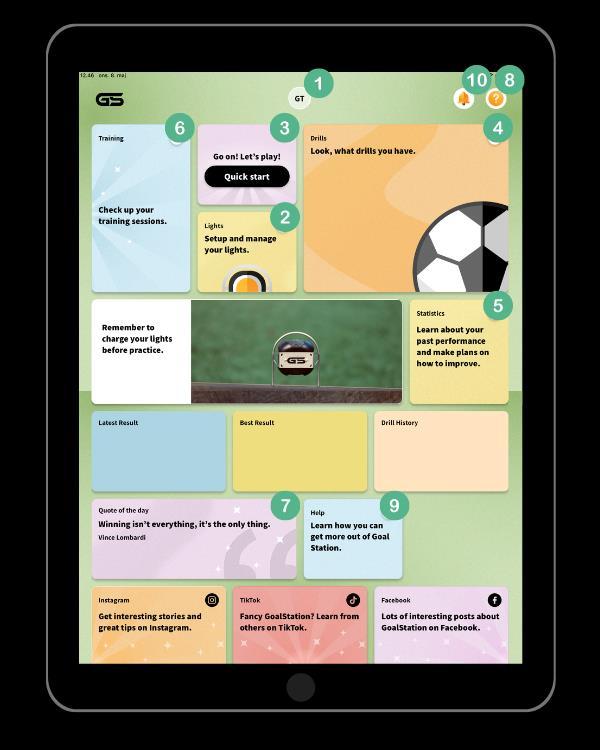
1. Profile – profile
2. Lights – here you connect Ignite Trainers
3. Quick start – start an exercise quickly
4. Drills – look into various exercises
5. Statistics – explore your results
6. Training – create training sessions and invite users
7. Quote of the day – get inspired
8. Quick help – quick help
9. Online help (this document)
10. Notifications – messages
7
3.2Profile
To access your profile, click on the small icon at the top with your initials.
Here, you can add additional information to your profile, making it even more personalized.
Specify a nickname to make it easy for trainers to search for you.
You can also see which teams you are associated with at the bottom.
In the top right corner, you can log out of your account.
Note: To comply with GDPR regulations, all profiles have a default setting that prevents other users from seeing all player information except your name. You can display your personal information by clicking on "Show info".

If you wish to leave the Goal Station family, you can delete your account at the bottom. Please note that data cannot be recovered once deleted.
8
3.3ConnectIgniteTrainers
You can use the Goal Station app to connect Ignite Trainers. This can be done for both tablets and phones. Click on "Lights" to access the menu.


To connect the Ignite Trainer, click on the light icon in the center of the screen. This will activate the Ignite Trainer, causing it to blink blue and then green.
(Please note that if the Ignite Trainer blinks yellow, you need to tap it to establish a connection).

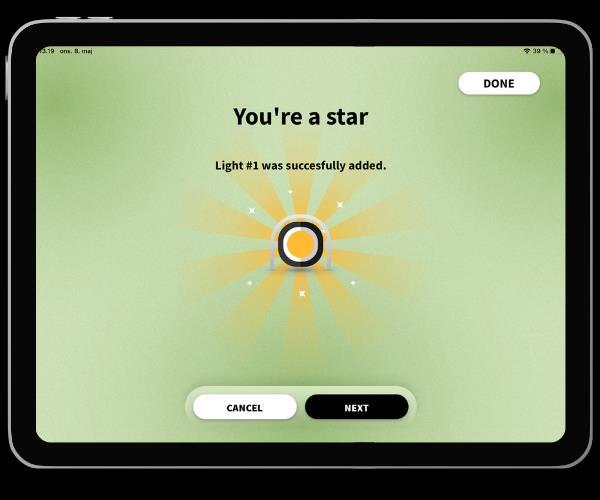
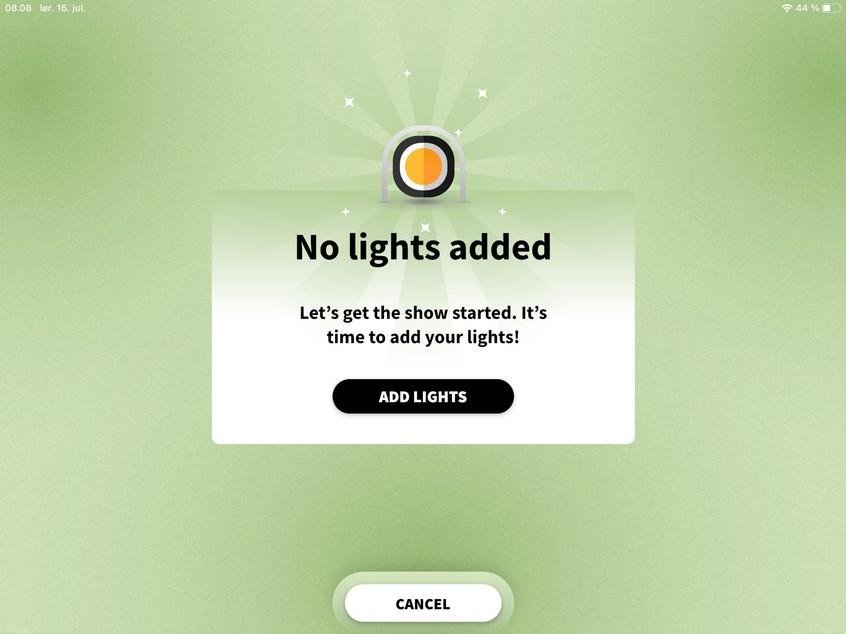
When you enter the "Lights menu," you can see if lights have been added or not. If no lights have been added, click on the "Add Lights" button.
To turn on Ignite Trainers, place your hand over the power button on the side of the Ignite Trainers. Keep your hand on the button until the Ignite Trainer turns green and vibrates twice.
Keep your mobile device (tablet or phone) within a few meters of the Ignite Trainer when establishing a connection.


When the light icon is blinking on the screen, the Ignite Trainer is connected.
You can now click on "Next" to add more lights or click on "Done" to exit the menu.
9

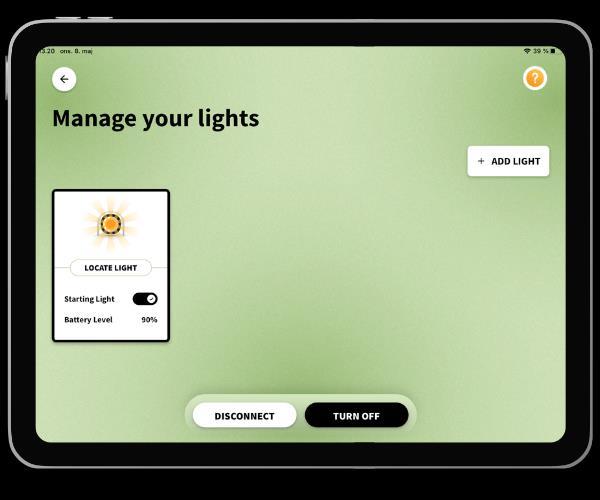
Under "Manage," you can manage your lights and see how many Ignite Trainers you have connected.
To add more Ignite Trainers, click on the "+Add Light" button in the top right corner.


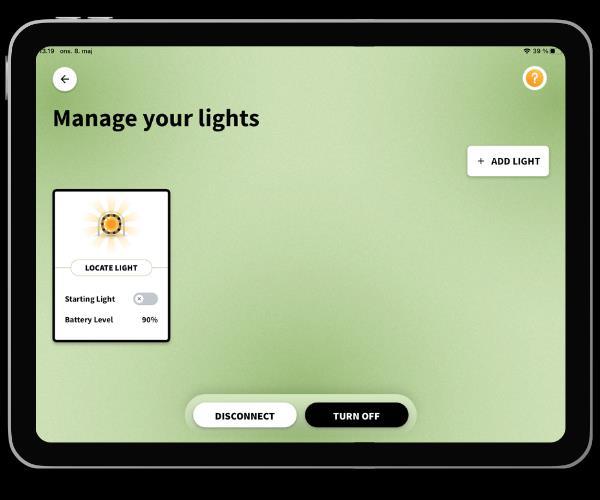
You can designate a light as the "Starting Light" This means that it will always be the light that the exercise starts with.
You can see the battery level of each individual light. When the battery level is low, it will be displayed in red text. In this case, you should turn off the light, charge it, and replace it with another one.
To manage your lights, click on each individual light in the menu. Two buttons will appear at the bottom of the screen.
If you want to keep the Ignite Trainer powered on but not use it for an exercise, you can click on "Disconnect." You can reconnect by clicking on the light again.
If you want to turn off an Ignite Trainer, click on "Turn off." Always do this after each use.
Ignite Trainers automatically turn off after 15 minutes of inactivity.
10
3.4Notifications
You will now be able to receive notifications with the Goal Station app.
In the top right corner, you will find a bell icon that indicates notifications.
Click on the bell, and the notification center will open. If any new messages have been pushed, you will see them here.
As part of notifications, you can also receive push notifications to be alerted about new messages and updates.
11
4.Quickstart
"Quick start" is an easy and fast way to get started with Goal Station exercises. Quick start is designed for users who want to do individual training, play with friends, or explore new possibilities in Goal Station.
All results from a "Quick start drill" will be recorded in the user's statistics (see below).
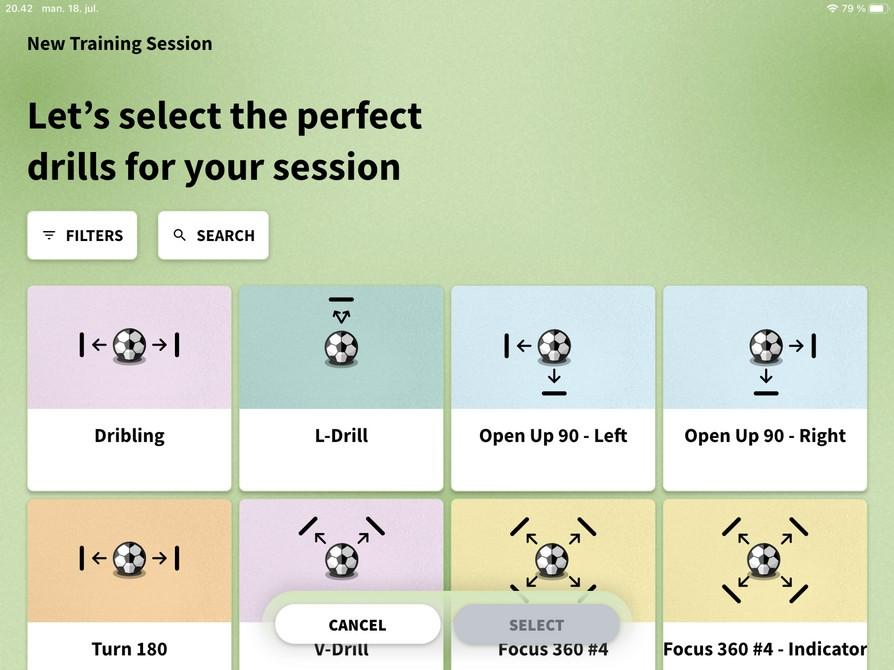
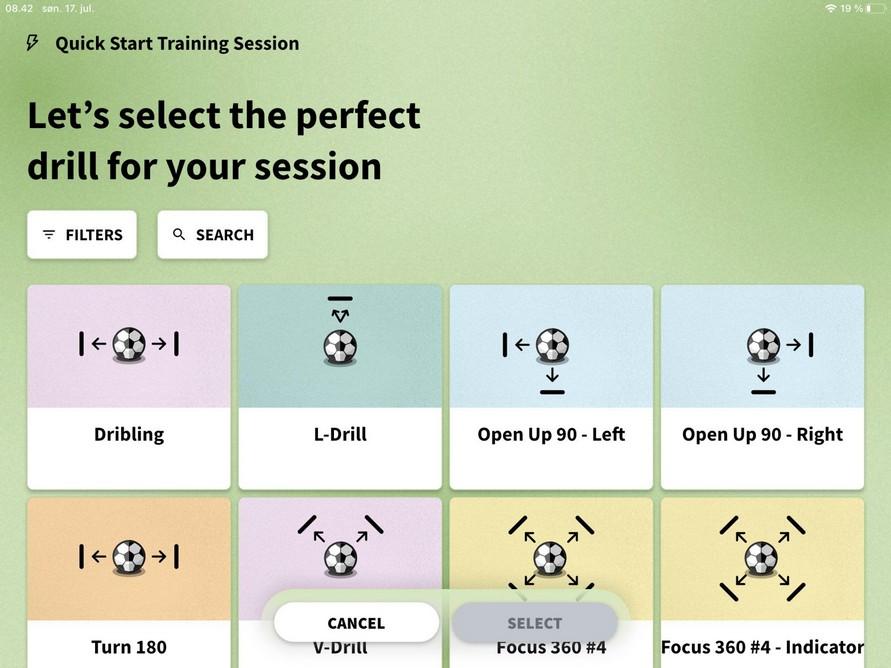
Select "Quick start" on the home screen to access the overview of "Quick start drills".
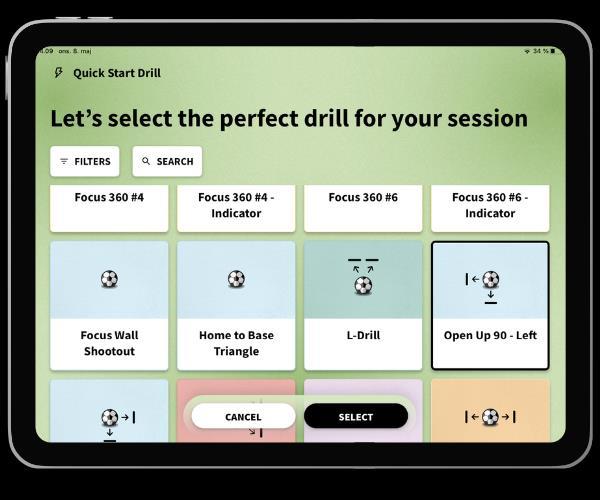
In the exercise overview, select the exercise you want to use. Press "Select" to choose it.
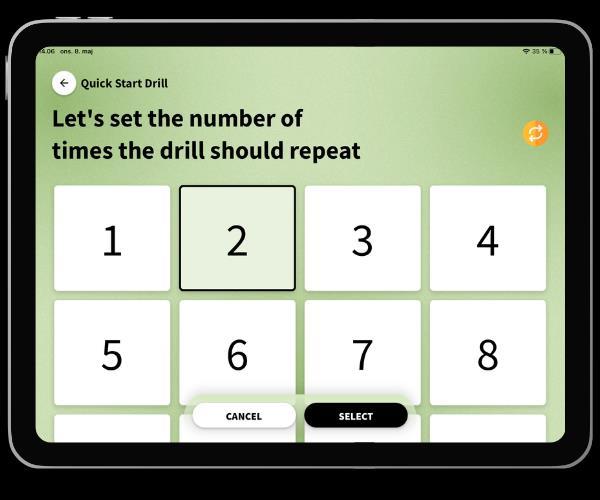
Once you have chosen the exercise you want to use, select the number of rounds you would like to play. Press "Select" to confirm your selection.
12
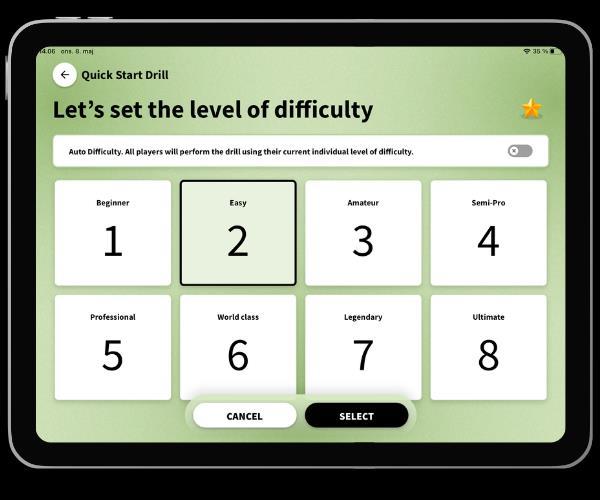

Once the number of rounds is selected, choose the difficulty level you prefer. The higher the number, the more challenging it will be (difficulty level refers to the number of seconds you have from when a light turns on until it turns off again).
You can also choose to enable "Auto Difficulty," as shown in the small picture on the left. This means that each player will get the exercise at their current individual level.
For example, if “Player 1” is at level 6 in the exercise, and “Player 2” is at level 5, they will each get the exercise at their own levels. Players move up a level when they complete the exercise without making any mistakes, and they move down a level when they fail the exercise 10 times (for each failed round, the player goes down by 0.1 points).
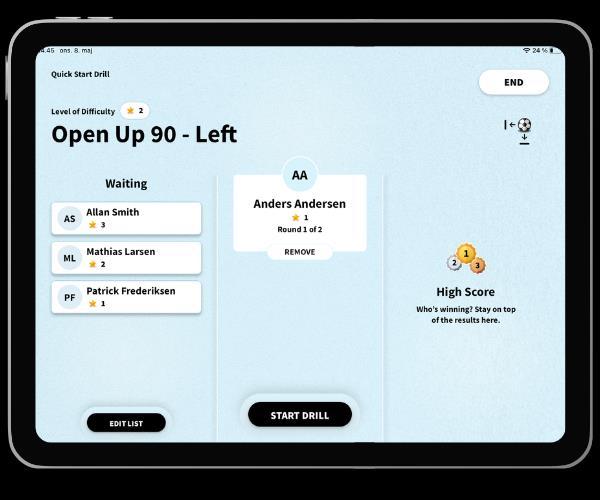
You are now ready to start your drill. Click on "Start drill" to begin the exercise.
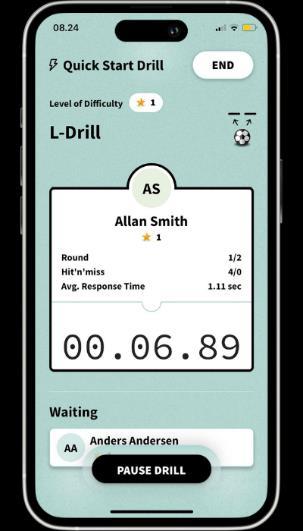
The exercise will count down from 3. Then, a light will start blinking in white. Kick the ball towards the light, and the timer will start while the lights blink in blue. Turn off the light by kicking the ball towards the rebounder.
Note: A light may turn on more than once (for example, twice in a row). Keep your head up to know where to kick the ball next.
13

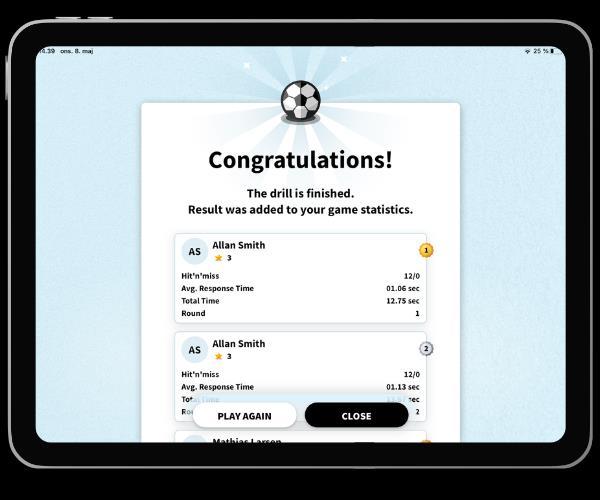
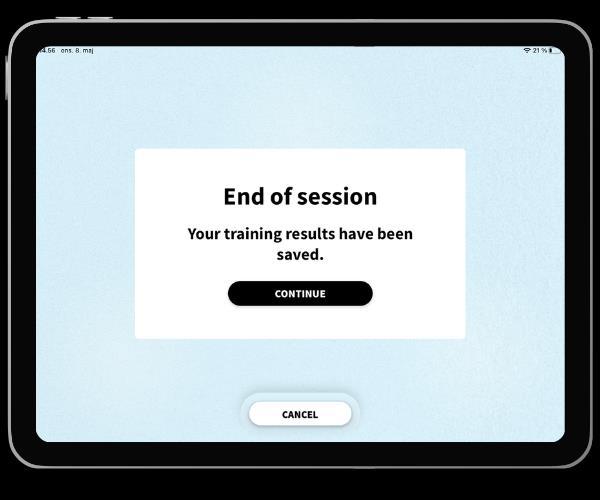
If you choose to end the exercise before completing all rounds, you will be asked if you want to save your results.
If you choose to save your results, they will be stored in the "Statistics" section.
If you choose not to save, your results will be deleted.
During the exercise, you can choose to pause the drill by clicking on "Pause drill." You can resume the exercise when you're ready.
You can see the duration of the exercise and the number of hits and misses. On the right side, you can view the best times of the players you are training with at the moment.
You can also choose to end the exercise, either while running the drill or between rounds. Click on "End" in the top right corner.
Your results from each round will be displayed after the exercise. The best round will be shown first.
14
4.1Quickstartwithafriend
With Quick Start, you can choose one of the basic exercises and not only play it by yourself but also add one or more of your friends to play with you.

Select "Quick Start" from the home screen.
Then, choose an exercise of your choice.


Once you have finished selecting the number of rounds and difficulty level, you will have the option to add one or more friends (other profiles) to the exercise.
It is required that the other players have profiles in the Goal Station app.
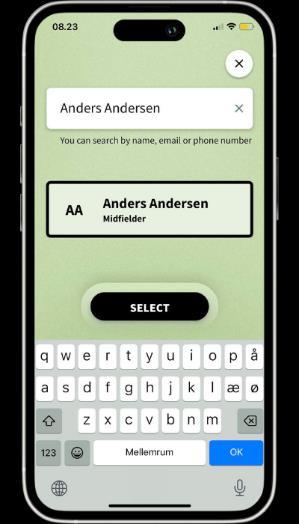
Click on "Search" and start typing the player's name to find the profile you want to add. Click on the name and then click "Select".
You are now ready to start the exercise (remember to have lights connected to the app).
After playing, each player will receive the results in their own profile's "Statistics" section.
Then, select the number of rounds you would like to play.

And choose the difficulty level you would like to use for the exercise.
15
5.Exercises
In the "Drills" menu, you will find all the exercises available in the Goal Station app. Here, you can find brief explanations for each exercise, see the equipment required to perform the exercise, and learn how to set it up.
You can also start each exercise by clicking on "Quick start" in the top right corner. Follow the "Quick start" guide to begin the exercise.
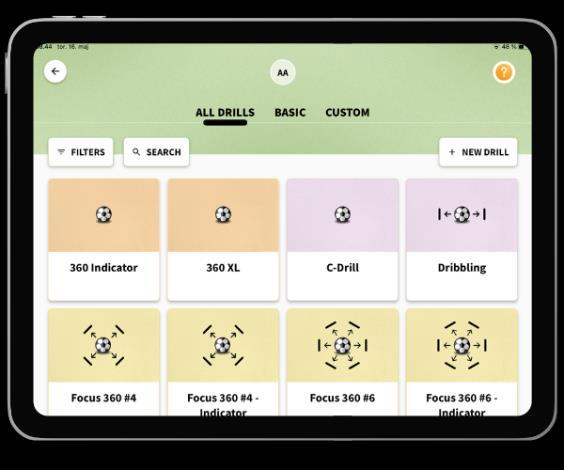
When you enter the "Drills" menu, you will find an overview of the exercises available to you.
You can filter the exercises to find ones that match your needs or search for a specific exercise.
Under "All Drills," you will find all the available exercises.
Under "Basic," you will find only the preprogrammed exercises. Under "Custom," you will find all the exercises you have created yourself.
At the bottom, you will find an illustration that describes how to set up the exercise according to our recommendations.
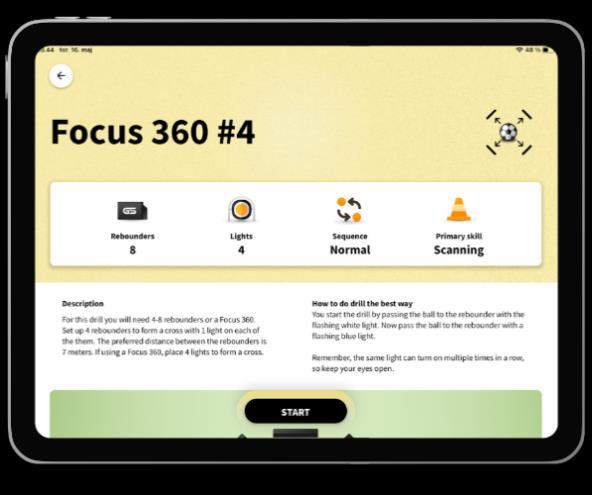
By clicking on an exercise in the overview, you can access it to learn more.
Here, you can find information about the number of rebounders and lights required, the sequence used, and the primary skill being practiced.
It is also described how to set up the drill and how to perform it.

16
6.Customdrills
Custom drills can only be set up on the tablet version of the Goal Station app. However, once you save custom drills, they will be available in the "Drills" section on both the tablet and smartphone versions of the app, as long as you are using the same profile.
Custom drills are used to create new exercises in the Goal Station app.
New exercises can be set up using 3 different sequences:
- Normal Sequence: In this sequence, the lights will be marked in a random order based on the selected number of hits for the exercise.
- Home to Base Sequence: This sequence consists of a base light and a certain number of target lights, depending on the selected number of lights for the exercise. When running the exercise, the player needs to return to the base every time a target light is turned off.
- Indicator Sequence: This sequence includes an indicator to guide the player to the next target light. The indicator is the second light that blinks simultaneously with the target light.
All sequences have a range of settings that can be adjusted to create the drill precisely according to your needs.
See how to create custom exercises below:
To work with custom drills, you need to go to the "Drills" section in your Goal Station app on your tablet.
Here, you will find the option to create a new drill by clicking on the "+ New Drill" button in the top right corner.

17
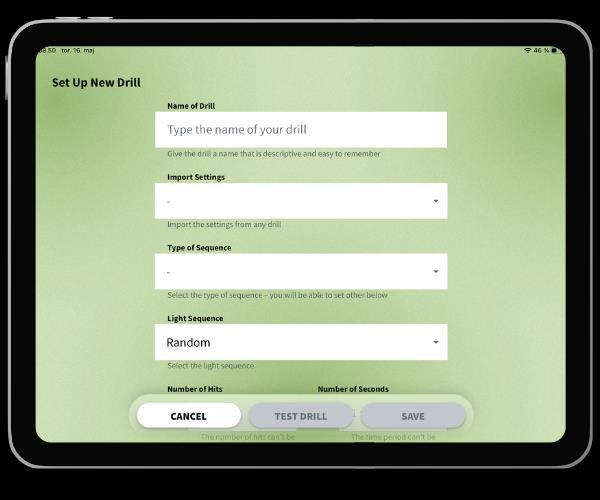
Now, set the number of hits for the exercise.
Set the number of lights and the number of rebounders.
Set the delay (the time from one light turning off to the next one turning on) and set the hold time (the time from a light turning on before it turns off if not hit).
Set the sensitivity and choose the skill being practiced with this drill (used for filtering).
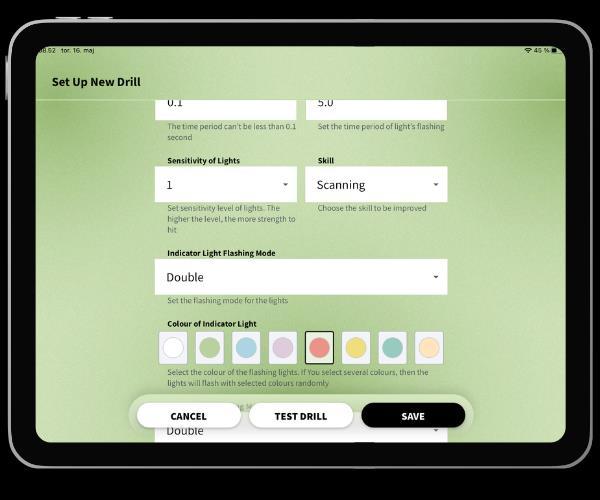
To set up a new drill, start by adding a name for the exercise.
If you only want to make a few changes to an existing drill, you can import the settings from there.
If you don't import settings, you need to choose the sequence you want to base your exercise on.


Next, choose the blinking mode, which determines how the lights will blink during the exercise.
Finally, select the color of the lights.
Once all settings are filled out, click on "Save." Your drill is now ready.
18

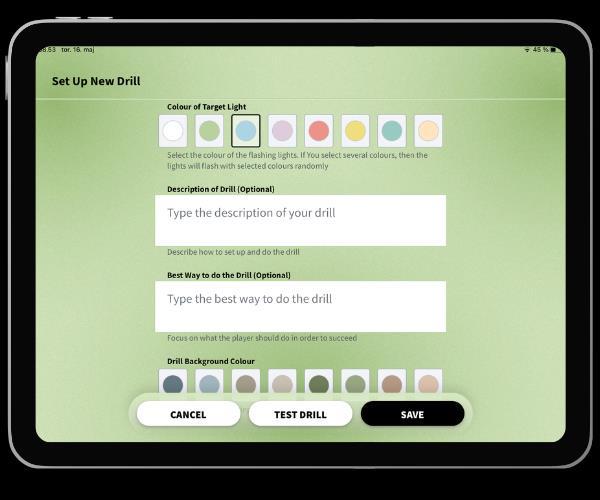
If you choose the "Home to Base" sequence, you need to select the blinking mode and color for both the base light and the target light.
If you choose the "Indicator" sequence, you need to select the blinking mode and color for both the target light and the indicator light.

Once you have saved your drill, you can find it in the drill overview.
If you want to edit it, click on the drill (tablet version only).
If you want to run the drill, go to Quick Start or add it to a training session (tablet version only).
For the smartphone version, you can run drills from Quick Start and from the Drills section.
19
7.Coaching(TrainingSession)
Coaching, or Training Session, is where you as a coach prepare your training activities. Here, you can create training sessions, set up teams, and communicate with the players you are coaching.
You can assign players to specific exercises within the training session, plan ahead, reuse training sessions, and much more.
The Coaching mode is only available in the tablet version of the Goal Station app. You can log in to your account on multiple devices simultaneously.
Note: To add players to your training session, you first need to connect with them under the "Players" section.
7.1Planning
In planning, you can schedule your training by creating training sessions.
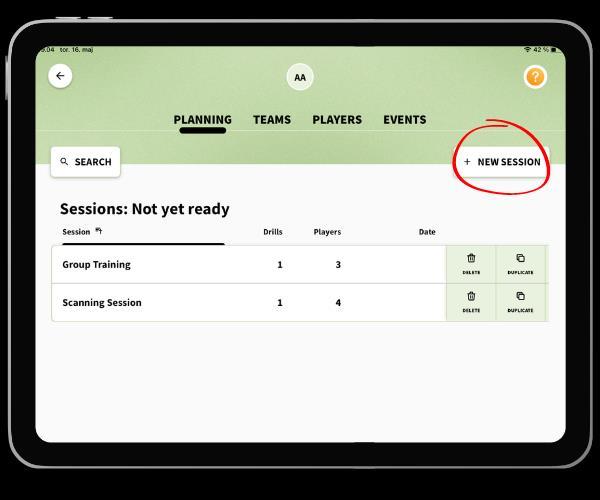
To begin your training, start by adding exercises, players, date/time, or a name to the session.
Go to "Training" by clicking on the blue box on the homepage.
In "Planning," you can view all the training sessions you have created.
Add new training sessions by clicking on "+New Training Session."

20
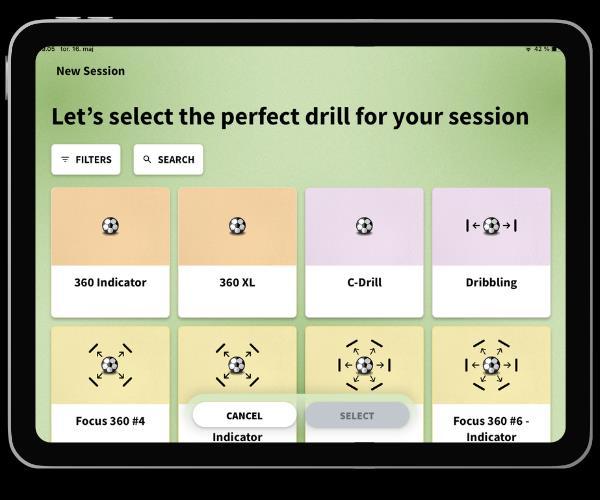
If you choose to add exercises to your training session, you will get an overview of the available exercises.
You can add one or multiple exercises at a time. Click on the exercises you would like to add.
Click "Select" when you are done.

Once you have selected your exercises, you will return to the planning of your training session.
To add players to an exercise, click on "Add Players."
You can also add a name or date/time.
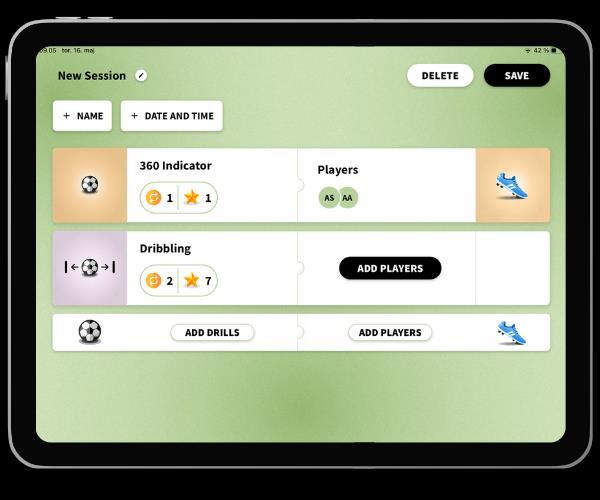
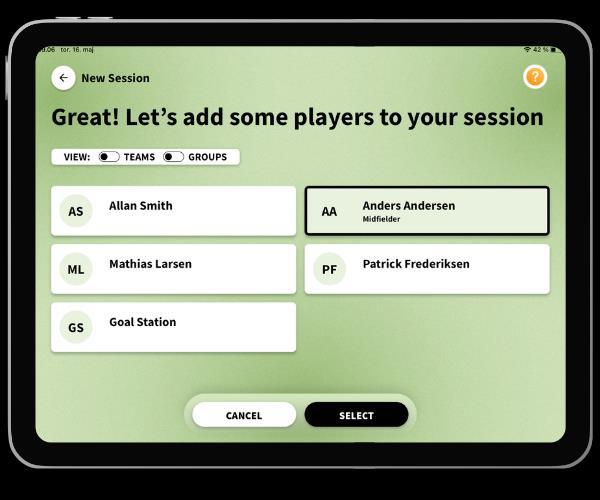
When adding players to an exercise, you will be presented with a list of players that you have already associated with. Click on the players you wish to add and click "Select."
If you have created teams or groups within the teams, you can click on "Teams" or "Groups" to use them for filtering.
Note: To add players to your training session, you need to first connect with them under "Players."
21
After selecting players, you can add more exercises and players.
Once you are finished, click on "Save" in the top right corner.


After creating and saving your training session, you will be redirected back to your planning overview.
If you wish to review or modify a specific training session, click on the training session you would like to change.
22
7.2Teams
“Teams” allow you to organize your players into groups that align with your practical needs.
“Teams” not only enable you to organize squads but also provide the ability to create subgroups within the teams. This means you can add your entire squad to the same team and then create smaller groups, such as defense, midfield, and attack.
In "Teams," you can view all the teams you have created.
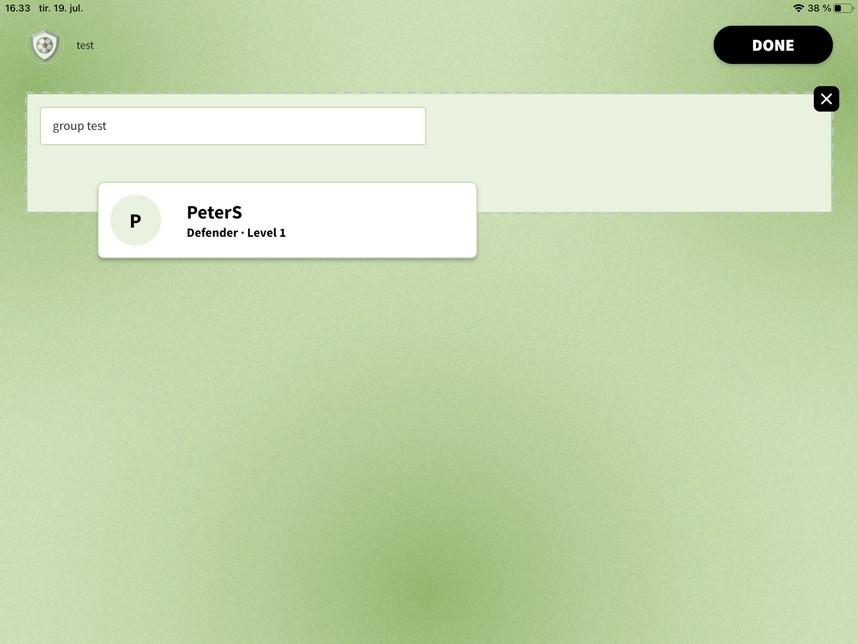
If you would like to add a new team, simply click on "+New team."
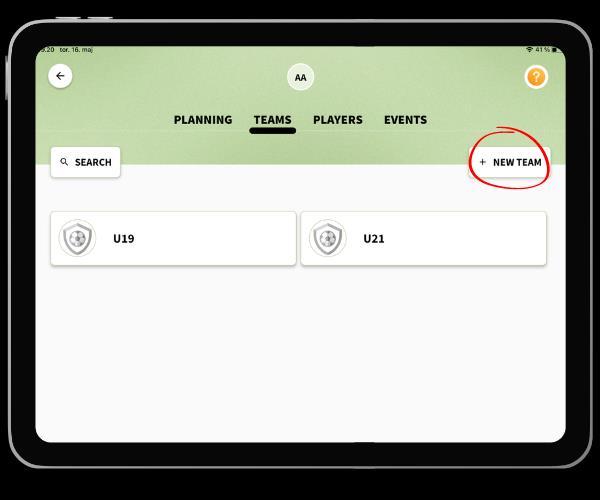
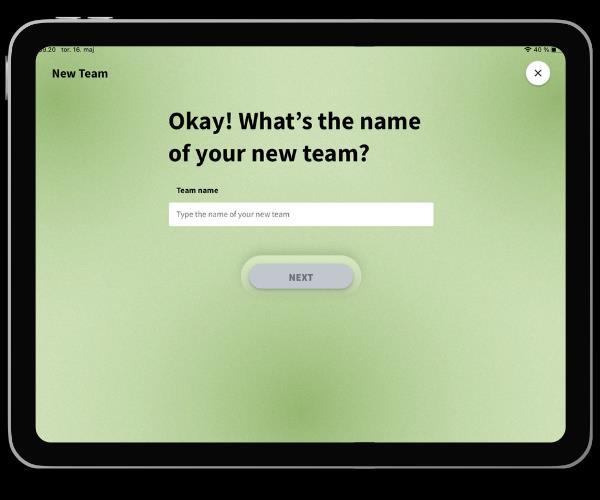
Add a name to your team and click on "Next”.
23
Once you have added a team name, you can start adding players.
You can do this in 3 ways:
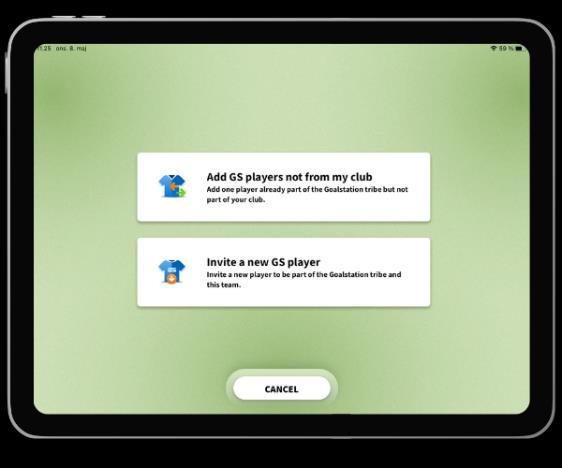
- Add GS players from my club.
- Add GS players not from my club.
- Invite a new player.

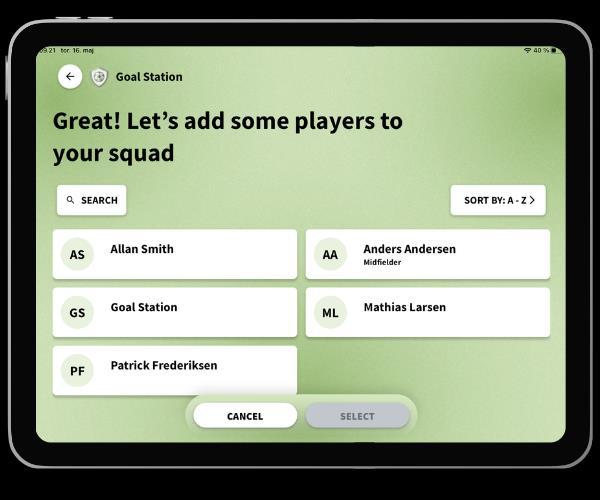
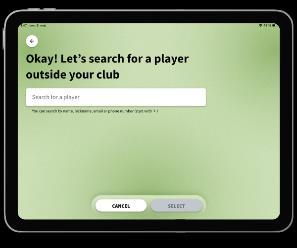
If you want to add players that you haven't connected with yet, click on "Add GS players not from my club."
You can search for players by entering their phone number, email, or you can start typing the player's name to get a list of players.
Click on "Add GS players from my club" if you want to add players from the list of players you have connected with.

24

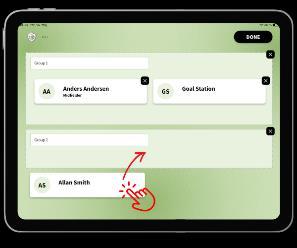
Finally, you can add groups. Use this feature to divide your team into smaller groups.
Click on “Groups”, then "+New group" and provide a name for the group.
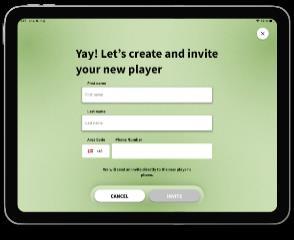
If you want to add a new player to Goal Station, you can invite the player by providing their first and last name, along with a phone number.
When you click on "Invite," the player will receive an SMS with a link to download the app.
You can start using the player as soon as you send the invitation. The results will be saved, and the player will receive them once they log in with the phone number used for the invitation.
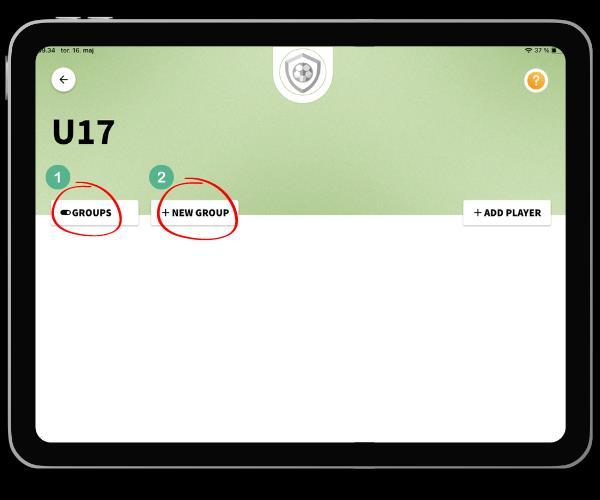

Once you have created the group, press and hold on the group to be able to add players to it.
Here, you can drag and drop the players you want to add to the group.
25
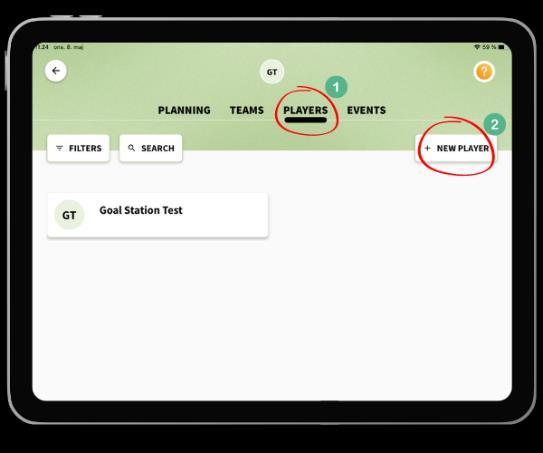
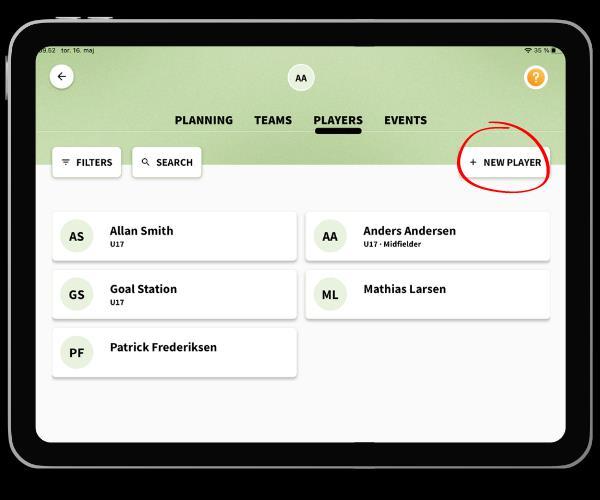
7.3Player
In the "Players" menu, you can see all the players you have connected with. You can utilize these players when setting up teams and creating training sessions.
In "Players", you get an overview of all the players you have connected with.
To add a new player, click on "+New player”.
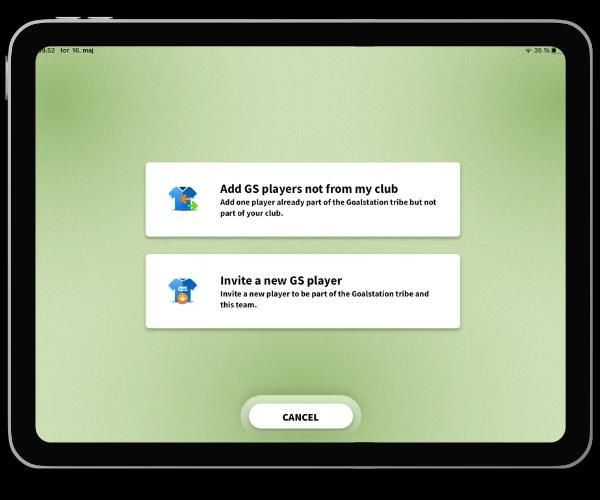
If you want to add players that you haven't connected with yet, click on "Add players" not from my club.
You can search for players by entering their phone number, email, or you can start typing the player's name to get a list of players.
You can add players in two different ways.
Add players not from my club or invite a new player.

26
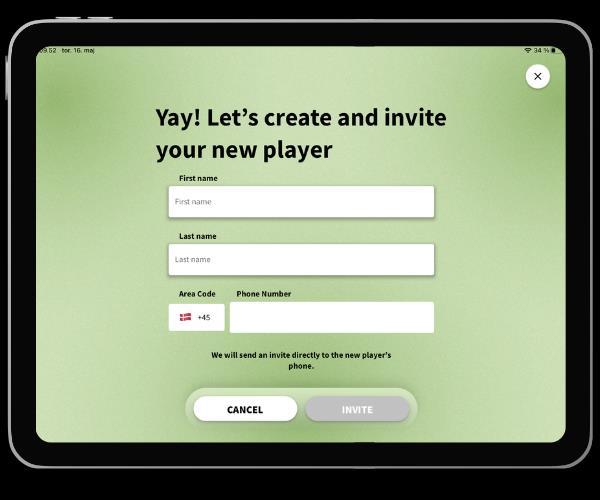
If you want to add a new player to Goal Station, you can invite the player by providing their first and last name, along with a phone number.
When you click on "Invite," the player will receive an SMS with a link to download the app.
You can start using the player as soon as you send the invitation. The results will be saved, and the player will receive them once they log in with the phone number used for the invitation.
27
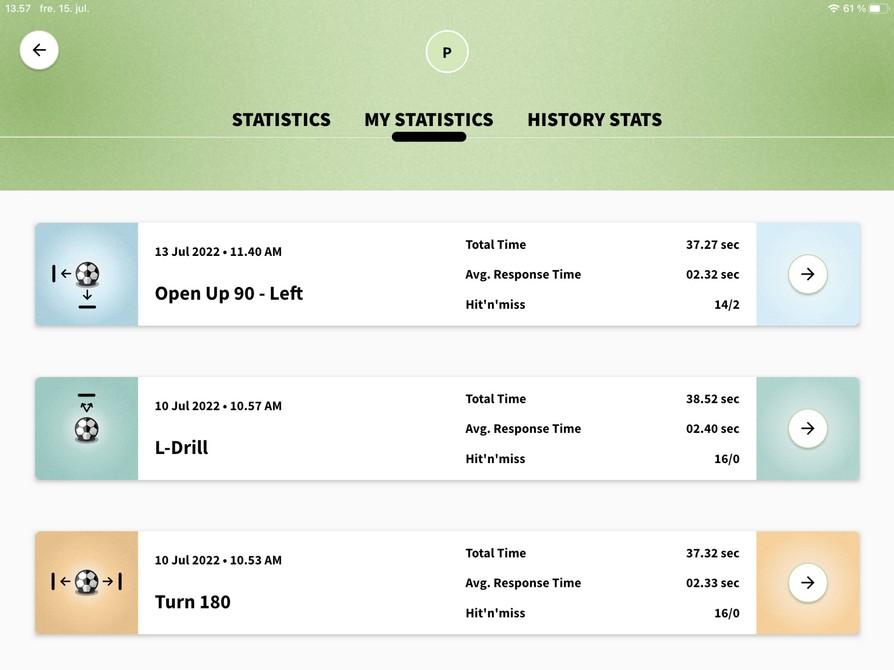
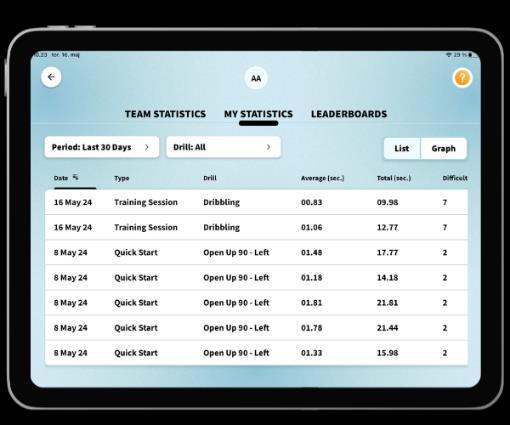
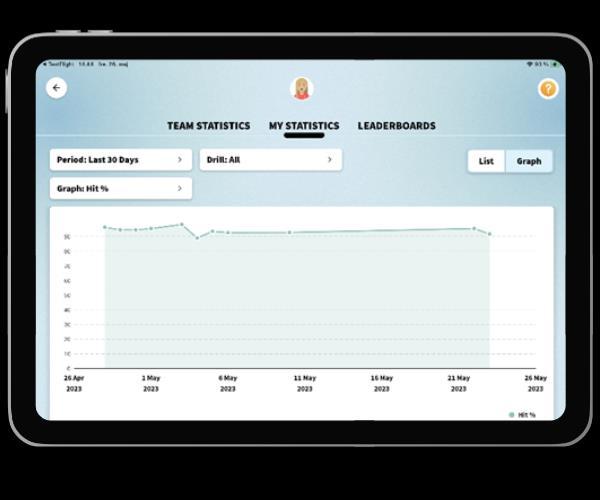
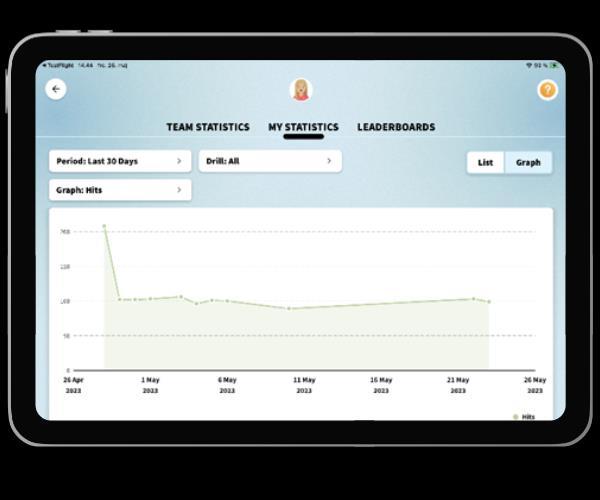
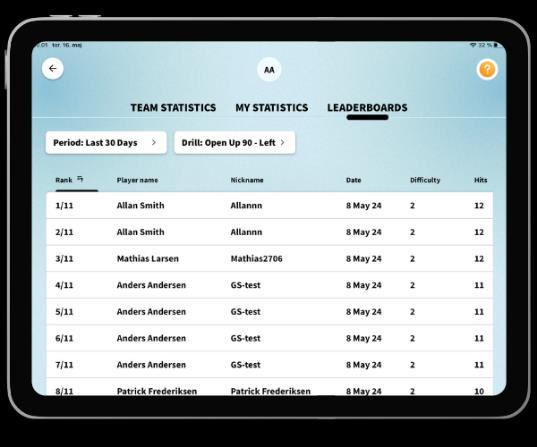
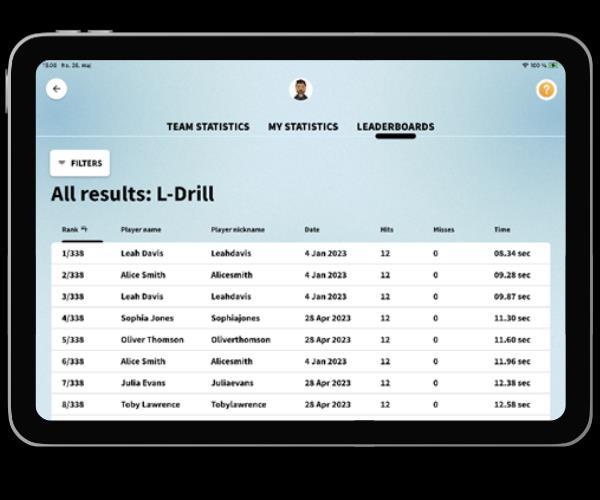
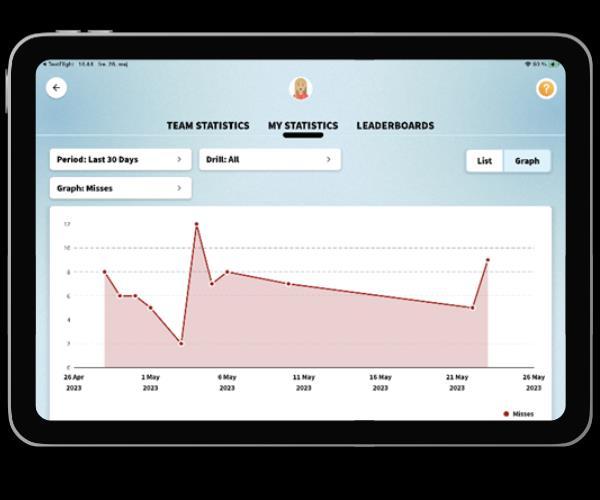
8.Statistics
Indeed, keeping track of your results and monitoring your progress as a player is important. The same goes for coaches who are interested in evaluating how each training session went.
In "Statistics", you can view the results from the training sessions you have conducted.
Click on the training session you want to explore and find the best results from each exercise, each player's performance, and all the rounds performed.
Note: Only available on the tablet version.
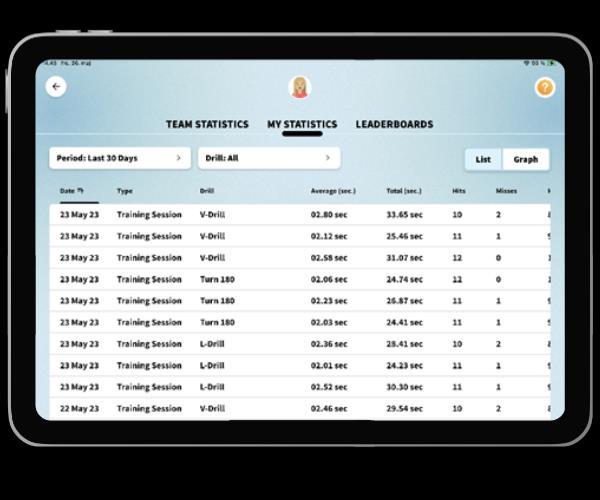


You can also enter your own achieved results as a player.
Click on "My Statistics" to view the results. Explore the best results and see graphs and leaderboards based on your own and your players' training.
See the following pictures for examples:
28

29