OWNER’S MANUAL 車 主 手 冊/取 扱 說 明 書 Competition Purpose Use Only FRONTFORK CARTRIDGES series
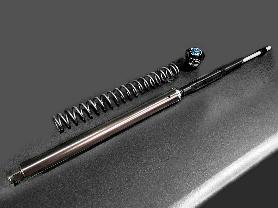
Front Fork Cartridge 200T/TT Series
Gears engineers use high-sensitivity pistons to create a detailed damping force that effectively eliminates low-to-medium speed shocks disadvantages and also provides positive force.
Using damping force adjustment can reduce the shift of the center of gravity that generated by the vehicles' accelerati on and shorten the braking distance. The riders has more confident when they are in the track
It is a right product for intermediate- to-high-end professionals and track engineers.
前叉阻尼系統雙內管匣 (FFC-200T/TT) Gears ⼯程師利⽤⾼感度 活塞創造出細緻的阻尼⼒,有效消彌低中⾼速的衝擊也提供輪胎所 需的正向⼒,善⽤阻尼⼒調整可減少⾞輛因剎⾞及加速所產⽣的 重⼼轉移⼤幅縮短剎⾞距離,給懂得運⽤重⼼轉移去操作⾞輛的 騎⼠或真正的賽道使⽤。
為 款提供中⾼階的專業⾞⼿或賽道⼯程師使⽤的產物。
フロントフォ
クダブルインナ
カ
トリッジダンピングシ
ステム ( FFC-200T/TT ) GEARS オリジナルの⾼感度ピストンは低速 、中速、⾼速の幅広く減衰⼒に作⽤⾛⾏中の衝撃を効果的に吸収させ 、タイヤに最適な⼒を提供します減衰⼒調整により、路⾯状況から 発⽣する⾞両からのピッチングをコントロ ル。
⾞体を安定させ、制動距離を⼤幅に短縮できることでライダ に安⼼ 感を提供しますサ キット⾛⾏での使⽤も可能となっております。
中級から上級レベルのライダ にも満⾜できる仕上がりとなって おります。


 TseriesBottom
Compression(COM.)
Rebound(REB.)
Compression(COM.)
SpringPreload
Rebound(REB.)
TseriesBottom
Compression(COM.)
Rebound(REB.)
Compression(COM.)
SpringPreload
Rebound(REB.)
RACING USA CORP.
SpringPreload GEARS

I N D E X ENGLISH FFC-200T/TTFrontForkCartridges 01 FFC-200T/TT ConventionalForks(CVT) Features Tools FFC-200T/TT InvertedForks(IVT) 02 ‧‧‧‧‧‧‧‧‧‧‧‧‧‧‧‧‧‧‧‧‧‧‧ 03 ‧‧‧‧‧‧‧‧‧‧‧‧‧‧‧‧‧‧‧‧‧‧‧‧‧‧ 04 08 ‧‧‧‧ 索 引 繁 體 中 文 FFC-200T/TT前叉阻尼內�� 11 FFC-200T/TT 正�(CVT) 功 � 簡 介 � � 指 南 FFC-200T/TT ��(IVT) 12 13 14 18 ‧‧‧‧‧‧‧‧‧‧‧‧‧‧‧‧‧‧‧‧‧‧ ‧‧‧‧‧‧‧‧‧‧‧‧‧‧‧‧‧‧‧‧‧‧ ‧‧‧‧‧‧‧‧‧‧ ‧‧‧‧‧‧‧‧‧‧‧
21 FFC-200T/TT 正�式フォーク(CVT) ��ガイド 装�ガイド FFC-200T/TT ��式フォ ク(IVT) 日 本 語 FFC-200T/TTフロントフォークカートリッジ 22 23 24 28 ‧‧‧‧‧‧‧‧‧‧‧‧‧‧‧‧‧‧‧‧‧‧ ‧‧‧‧‧‧‧‧‧‧‧‧‧‧‧‧‧‧‧‧‧‧ ‧‧‧ ‧‧‧
さくいん
FRONTFORK CARTRIDGES series
Competition Purpose Use Only
ENGLISH OWNER’S MANUAL
WARNING◎
1.Duringthedelivery,especiallyinhighambienttemperature,thegrease usedduringassmblymightleakandthenpollutethepackagingmaterial, butitwon’tdamageoraffecttheproducts. Justwipeitofforusesoftdetergent(soapwater)tocleanit,anditwon’t affectperformance
2.ThiskitscanonlybeinstalledbyanauthorizedGearsdealer Theinstallationprocessrequiresspecifictools
3.Whenyouinstallthisproduct,pleasecheckthekitcontents Ifthereisanymissing,pleasecontacttheproductsupplier
4.Pleasereadtheproductmanualbeforeyouinstallthisproduct. Thisproductisanimportantcomponentofvehiclestability
Rebound(Reb.) 24Clicks±1
Reboundand Compressionadjustment
Note: Use3mmallenkey
Compression(Com.) 24Clicks±1
Reboundand Compressionadjustment


Note: Use3mmallenkey.
Springpreloadpdjustment. (1mm/ 1turns Total:11turns)
Note: Use14mmcombination wrench
Springpreloadadjustment (1mm/ 1turns Total:11turns)
Note: Use14mmcombination wrench.
02
Features
Suggestusing MotionProvise

Torquewrench

Socket14/26mm
Hex14mm
Combinationwrench
13/14mm
Impackwrench
Measuringcup
Flatheadscrewdirver
Levelmeasuringtool

Frontforkcapshaft securingtool
Metricallenkeysset
Anaerobic adhesive glue
Heat gun
Inner tube clamping pliers

03
Tools
A1-01
Useratchetwrenchto openthecap.
A1-02
Pourouttheoldfluid.
A1-03
Removethescrewatthe bottom.


A1-04
Takeoutthepiston, pistonrod,anti-collison innerspringandinner tubeassembly


04
A1-StockForksRemoval(CVT)
B1-01
Removethewiperseal RemovetheC-ringand theoilseal,witha flatheadscrewdriver.


B1-02
Usealathetoremovethe innerfoldoftheinnertube byabout2mm
B1-03
Takeouttheguideringat thebottom
B1-04
Drainandcleantheinner andoutertubecomponents

05
B1-StockForksDisassembly(CVT)
C1-InstallTheDampingInnerTubeSet(CVT)


C1-01
Removethetopcoverof theGearscartridgeand takeoutthespring

Beforeinstalling,confirm thatbothsidesofthe dampingadjustmentare adjustedtothe"一"end.
C1-02
Putthekitsintotheouter tube
Applysomeloctitetothe bottomscrewandlock thecapto30N-M(22lb-ft) byusingandtorque wrench

C1-03
Pumpthedamperrodup anddownatleast20-30 timestoreleaseanyair bubbles
C1-04
Usealiquidlevelgaugeto removeexcessoiluntilthe oillevelreachesthe standardlevel (Pleaserefertothebasic settingandattachmenton thelastpagefortheoillevel.)

Note: Thattheoutertube anddampingrodmustbe fullycompresstothebottom

06
C1-InstallTheDampingInnerTubeSet(CVT)
Minimum205
C1-05
Theuppernutshouldbe tightenedtothebottomof thethread
Note:Atleast20.5mmof threadsshouldbeexposed


C1
Assembletoupside-down forkoutertubeandusea torquewrenchtightenthe topcapwitha14mm socketto18N-M(13 3lb-ft)

C1
Assembletoforkupter tubeanduseatorque wrenchtightenthetop capwith26mmsocketto 30N-M(22lb-ft).

C1-08
Forbasicsetting,please seethelastpage
07
-06
-07
MODEL/車種/モデル BASICSETTING 基礎�� 基本��
A2-StockForksRemoval(IVT)
A2-01
Useratchetwrenchto openthecap.
A2-02
Pourouttheoldfluid.
A2-03 Removethescrewatthe bottom.
Note: Mindtheseparationofthe innerandoutertube
A2-04 Removethedamping springassemblyfromthe originaltube,drainitand cleantheinnerandouter tubeparts


08
B2-InstallTheDampingInnerTubeSet(IVT)


B2-01
Removethetopcoverof theGearscartridgeand takeoutthespring
Beforeinstalling,confirm thatbothsidesofthe dampingadjustmentare adjustedtothe"一"end.

B2-02
Putthekitsintotheouter tubeApplysomeloctiteto thebottomscrewand lockthecapto30N-M (22lb-ft)byusingtorque wrench
B2-03
Pourintheforkoil (Pleaserefertothe referencepageforthe amountofoilneeded) Movethedamperupand downatleast20timesto vacuumtheair
Note: Whenventingtheair pleaseholdontothe bottomincaseofdropping
B2-04
Usealiquidlevelgaugeto removeexcessoiluntilthe oillevelreachesthe standardlevel (Pleaserefertothebasic settingandattachmenton thelastpagefortheoillevel.)
Note: Thattheoutertube anddampingrodmustbe fullycompresstothebottom

09
B2-InstallTheDampingInnerTubeSet(IVT)
Minimum205
B2-05
Theuppernutshouldbe tightenedtothebottomof thethread
Note:Atleast20 5mmof threadsshouldbeexposed

B2-06
Assembletoupside-down forkoutertubeandusea torquewrenchtighten thetopcapwitha14mm socketto18N-M (13 3lb-ft)
B2-07
Assembletoupside-down forkoutertubeandusea torquewrenchtightenthe topcapwitha26mm socketto30N-M(22lb-ft).
B2-08
Forbasicsetting,please seethelastpage.
10
MODEL/車種/モデル BASICSETTING 基礎�� 基本��
FRONTFORK
CARTRIDGES series
Competition Purpose Use Only
繁 體 中 文 車 主 手 冊 注�!注�事項
1.請注意此商品於儲存及運送過程中,尤其是在高環境溫度下, 組裝所用的油品及油漬可能會漏出而污染了包材。
這並不會對產品造成損傷及影響,以布料將多餘的油品及油漬 擦拭掉即可。
2.本套件只能由Gears授權經銷商安裝。安裝過程需要 定的工具。
3.在您安裝此產品時,請檢�套件�容。如果有任何缺失,
請聯�產品供應商。
4.在您安裝此產品前,請詳閱產品使用手冊的�容。
此產品是在車輛穩定性上 個重要的組成零件。
◎
功�簡介
Rebound(REB.) 24clicks±1
伸側�側阻尼力獨��整
注意: 使用3mm內6角工具。
Compression(COM.) 24clicks±1
伸側�側阻尼力獨��整
注意: 使用3mm內6角工具。
�簧預載�整
(1MM/1�-共11�)
注意: 使用14mm梅花扳手。
�簧預載�整 (1MM/1�-共11�)
注意: 使用14mm梅花扳手。
12
建議使用MotionPro虎鉗
�力�手
套筒14號/26號
內六角套筒14號
梅開�手13號/14號
衝擊�手
量油杯
字起子
液面量測工具
Gears前�軸心�付特工 公制規格�六�手 組
厭氧� ��槍 內�夾特工
13
��指南
A1-01 使用棘輪扳手打開上�。
A1-02 �掉�油。
A1-03
拆除��下���。

A1-04
取出原�活�、活�桿� ��內�簧和內��成。


14
A1-拆除原�前�(正�)
B1-01
取出土封,利用 ��子 取出C�和油封。
B1-02
使用車�車�內�內折 �2mm。
B1-03 取出�正�。
B1-04 �乾並清�內���件。
15
B1-分解原�前� (正�)
C1-��阻尼內���件 (正�)
C1-01
拆除內��上�並取出�簧 ��前��兩�阻尼�整頭 ��"一"�。
C1-02
�入阻尼�件�前��� 內。�����塗上�量 ���並使用扭力扳手� ��30N-M(22lb-ft)。
C1-03
注入前�油。
(油量���附件)上下 抽動阻尼��少20-30次 ��氣排出。
C1-04
取出�面��抽取工� 抽出多�油量�標��面 �。 (�面������末頁 基礎���附件)
注�: ���阻尼�需�����。
16
C1-��阻尼內���件 (正�)
C1-05
上���需����� ��。
注�: �少需露出��20 5mm。
C1-06
�入�簧,使用專用工� 固���,�上�用14� �筒對�,使用扭力扳手� ��18N-M(13.3lb-ft)。
C1-07
�合前���,使用扭力 扳手��上�,用26� �筒�30N-M(22lb-ft)。
C1-08
��基礎��,���� 末頁�基礎��。
17
MODEL/車種/モデル BASICSETTING 基礎�� 基本�� Minimum20.5
A2-
拆除原�前�(��)
A2-01
使用棘輪扳手打開上�。
A2-02 �掉�油。
A2-03
拆除��下���。
注�: 拆除�需�住下��� 內��分�。
A2-04
取出原��內"阻尼�簧�成" 瀝乾並清�內���件。
18
B2-��阻尼內���件 (��)
B2-01
拆除內��上�並取出�簧 ��前��兩�阻尼�整頭 ��"一"�。
B2-02
�入阻尼�件�前��� 內。�����塗上�量 ���並使用扭力扳手� ��30N-M(22lb-ft)。
B2-03
注入前�油。
(油量���附件)上下 抽動阻尼��少20-30次 ��氣排出。
注�: 排除�氣抽�時下�必須 �住��內�掉�。
B2-04
取出�面��抽取工� 抽出多�油量�標��面 �。
(�面������末頁 基礎���附件)
注�: ���阻尼�需�����。
19
B2-��阻尼內���件 (��)
B2-05
上���需����� ��。
注�: �少需露出��20 5mm。
B2-06
�入�簧,使用專用工� 固���,�上�用14� �筒對�,使用扭力扳手� ��18N-M(13.3lb-ft)。
B2-07
�合����
使用扭力�手��上� 用26��筒 �30N-M(22lb-ft)。
B2-08
��基礎��,���� 末頁�基礎��。
20
MODEL/車種/モデル BASICSETTING 基礎�� 基本�� Minimum20.5
FRONTFORK CARTRIDGES series
Competition Purpose Use Only
◎
1.このマニュアルの写真で製品を確認してください。
2.納入中、特に周囲温度が高い場合、アセンブリグリ スが漏れて梱包材 を汚染する可能性がありますが、製品に損傷を与えたり、製品に影響を 与えることはありません。拭き取るか、柔らかい洗剤(石鹸水)を使用 して拭いてください。パフォ マンスに影響はありません。
3.このキットは、認定されたGears販売店によってのみ取り付け可能です。 インスト ルプロセスには特定のツ ルが必要です。
4.この製品をインスト ルするときは、キットの内容を確認してください。 足りないものがある場合は、製品の供給元に連絡してください。
5.この製品をインスト ルする前に製品マニュアルをお読みください。 この製品は車両安定性の重要な要素です。
日 本 語 取 � � 明
書 注�!注�事項
��ガイド
Rebound(REB.) 24clicks±1
REB側とCOM側の減衰力 独立調整。
注意: 3mm�角�レンチ使用。
Compression(COM.) 24clicks±1
REB側とCOM側の減衰力 独立調整。
注意: 3mm�角�レンチ使用。
スプリングプリロ ド調整 (1mm/1回転-合�11回転)
注意: メガネレンチ14mm使用。
スプリングプリロ ド調整 (1mm/1回転-合�11回転)
注意: メガネレンチ14mm使用。
22
装�ガイド
モーションプロバイスを 使用することを推奨
�力�手
套筒14號/26號
內六角套筒14號
梅開�手13號/14號
衝擊�手
量油杯
字起子
液面量測工具
Gears前�軸心�付特工
公制規格�六�手 組
厭氧� ��槍 內�夾特工
23
A1-従来フロントフォークを取り出す (
正�式フォーク)
A1-01
ラチェットレンチを 使用して上の蓋を開ける。
A1-02
古いオイルを取り除く。
A1-03
ベ スの下に有るネジを 取り外す。
A1-04
従来のピストン、ピスト ンロッド、衝突防止イン ナ スプリングおよびイ ンナ チュ ブアセンブ リなどを取り外す。
24
B1-従来のフロントフォークを�解する (正�式フォーク)
B1-01
ダストシールを取り出し マイナスドライバ を 使用してCングとオイル シ ルを取り外す。
B1-02
��を使用して内側のチ ュ ブを約2mm折る。
B1-03
ガイドリンクを取り出す。
B1-04
内側と外側のチューブ 部品の水を切り清�。
25
C1-取り付けダンパーインナーチューブキット
C1-01
インナーチューブのカバ を取り外してスプリン グを外します。ダンピング �整ヘッドの両側が最も 「一」側になっているこ とを確�してから取り付 けてください。
C1-02
フロントフォ ク外側チ ュ ブにダンピングキッ トを配置します。
番下のネジに�切な量 のネジ止め剤を使用して ください。 トルクレンチを使用して 30N-M(22lb-ft)にロッ クします。
C1-03
フォ クオイルを�入し ます。オイルの量について は、添付ファイルを参照 にしてください。 ダンパーを少なくとも 20-30回上下させ空気 を抜きます。
C1-04
�体抽出工�を取り外し、 余�なオイルを標準レベ ルまで抽出します。
(液体レベルの基本設定と 付属品は、最後のペ ジ を参照してください。)
注�: �側のチュ ブとダンパ ーロッドは底部まで押し 込む必要があります。
26
(正�式フォーク)
C1-取り付けダンパーインナーチューブキット (正�式フォーク)
C1-05
上�のナットは、ネジ山 の下部にロックする必要 があります。
注�: ネジ山は最小20.5mm 出る必要があります。
C1-06
スプリングを配置し 専用工�を使用してナッ トを固定。
14�プラグソケットで 上部カバーをロックし ます。 トルクレンチを使用し て18N-Mにロックする。 (13.3lb-ft)
C1-07
トルクレンチを使用して フロントフォークのアウ タ チュ ブを組み合わ せ上部カバ を26�プ ラグソケットでロック します。30N-M(22lb-ft)
C1-08 基本��を設定します。 最後のページを参照して ください。
27
MODEL/車種/モデル BASICSETTING 基礎�� 基本�� Minimum205
A2-従来フロントフォークを取り出す (��式フォーク)
A2-01
A2-02
古いオイルを取り除く。
ラチェットレンチを 使用して上の蓋を開ける。 A2-03
ベ スの下に有るネジを 取り外す。
注�: 取り外し後必要になりま す内側のチュ ブと外側 のチューブを�けます。
A2-04
従来のインナ チュ ブ などを取り外し、内側と 外側のチュ ブ部品を清 �します。
28
B2-取り付けダンパーインナーチューブキット
(��式フォーク)
B2-01
インナーチューブのカバ を取り外してスプリン グを外します。ダンピング �整ヘッドの両側が最も 「一」側になっているこ とを確�してから取り付 けてください。
B2-02
フロントフォ ク外側チ ュ ブにダンピングキッ トを配置します。
番下のネジに�切な量 のネジ止め剤を使用して ください。 トルクレンチを使用して 30N-M(22lb-ft)にロッ クします。
B2-03
フォ クオイルを�入し ます。オイルの量について は、添付ファイルを参照 にしてください。
ダンパーを少なくとも 20-30回上下させ空気 を抜きます。
注�: �気を抜く際インナ チ ュ ブの落下を防ぐため に�意する必要があります
B2-04
�体抽出工�を取り外し、 余�なオイルを標準レベ ルまで抽出します。 (液体レベルの基本設定と 付属品は、最後のページ を参照してください。)
注�: �側のチュ ブとダンパ ーロッドは底部まで押し 込む必要があります。
29
。
B2-取り付けダンパーインナーチューブキット (��式フォーク)
B2-05
上�のナットは、ネジ山 の下部にロックする必要 があります。
注�: ネジ山は最小20.5mm 出る必要があります。
B2-06
スプリングを配置し 専用工�を使用してナッ トを固定。
14�プラグソケットで 上部カバーをロックし ます。 トルクレンチを使用し て18N-Mにロックする。 (13 3lb-ft)
B2-07
トルクレンチを使用して フロントフォークのアウ タ チュ ブを組み合わ せ上部カバ を26�プ ラグソケットでロック します。30N-M(22lb-ft)
B2-08
基本��を設定します。 最後のページを参照して ください。
30
MODEL/車種/モデル BASICSETTING 基礎�� 基本��
Minimum205
Front Fork Cartridge
Front Fork Cartridge


Fork Damper System


Front Suspension System
Front Fork Cartridge Tool


Fork & Shock Oil

Front Fork Cartridge Front Fork Cartridge
5W/7 5W/10W 15W/20W SAE Racing Fluid Front Damper System
Front Spring Preload Front Spring Kit
Front Fork Cartridge Front Fork Cartridge
Front Fork Cap Shaft Securing Tool 前�軸心�付特工
RECORD/��/�録 Date Reb Com. Preload OilLevel OilType MODEL/車種/モデル BASICSETTING 基礎�� 基本�� Ver.2023 www gears-racing com sales@gears-racing.com Facebook : Gears Racing gears-racing com Gears Website Gears Racing gears-racing com tw Gears Taiwan Website