No part of this publication may be reproduced or transmitted in any form or by any means, electronic or mechanical, including photocopying, recording, or any information storage and retrieval system, without permission in writing from the publisher. Details on how to seek permission, further information about the Publisher’s permissions policies and our arrangements with organizations such as the Copyright Clearance Center and the Copyright Licensing Agency, can be found at our website: www. elsevier.com/permissions
This book and the individual contributions contained in it are protected under copyright by the Publisher (other than as may be noted herein).
Notices
Knowledge and best practice in this field are constantly changing. As new research and experience broaden our understanding, changes in research methods, professional practices, or medical treatment may become necessary.
Practitioners and researchers must always rely on their own experience and knowledge in evaluating and using any information, methods, compounds, or experiments described herein. In using such information or methods they should be mindful of their own safety and the safety of others, including parties for whom they have a professional responsibility.
With respect to any drug or pharmaceutical products identified, readers are advised to check the most current information provided (i) on procedures featured or (ii) by the manufacturer of each product to be administered, to verify the recommended dose or formula, the method and duration of administration, and contraindications. It is the responsibility of practitioners, relying on their own experience and knowledge of their patients, to make diagnoses, to determine dosages and the best treatment for each individual patient, and to take all appropriate safety precautions.
To the fullest extent of the law, neither the Publisher nor the authors, contributors, or editors, assume any liability for any injury and/or damage to persons or property as a matter of products liability, negligence or otherwise, or from any use or operation of any methods, products, instructions, or ideas contained in the material herein.
Classification: LCC RD559 | NLM WE 17 | DDC 617.5/75059--dc23
LC record available at https://lccn.loc.gov/2016046027
Content Strategist: Kayla Wolfe
Senior Content Development Manager: Taylor Ball
Publishing Services Manager: Catherine Jackson
Project Manager: Kate Mannix
Design Direction: Amy Buxton
Illustrations Manager: Lesley Frazier
To Chin-Yin and William and in memory of my mother-in-law, Chun-Huei
Contributors
Joshua M. Adkinson, MD
Assistant Professor of Surgery
Division of Plastic Surgery
Riley Children’s Hospital
Indiana University School of Medicine Indianapolis, Indiana
Matthew Brown, MD
Hand Fellow
Section of Plastic Surgery Department of Surgery University of Michigan
Ann Arbor, Michigan
Kevin C. Chung, MD, MS
Chief of Hand Surgery
University of Michigan Health System
Charles B. G. de Nancrede
Professor of Plastic Surgery and Orthopaedic Surgery
Assistant Dean for Faculty Affairs
Associate Director of Global REACH University of Michigan Medical School
Ann Arbor, Michigan
Yuki Fujihara, MD
International Research Fellow
Section of Plastic Surgery Department of Surgery University of Michigan
Ann Abor, Michigan; Department of Hand Surgery
Nagoya University Graduate School of Medicine
Nagoya, Japan
Nasa Fujihara, MD
International Research Fellow
Section of Plastic Surgery Department of Surgery University of Michigan
Ann Arbor, Michigan; Department of Hand Surgery
Nagoya University Graduate School of Medicine
Nagoya, Japan
Aviram M. Giladi, MD, MS
Resident
Section of Plastic Surgery Department of Surgery
University of Michigan
Ann Arbor, Michigan
Steven C. Haase, MD, FACS
Associate Professor of Surgery
Section of Plastic Surgery
Associate Professor of Orthopaedic Surgery
University of Michigan Medical School
Ann Arbor, Michigan
Sirichai Kamnerdnakta, MD
International Research Fellow
Section of Plastic Surgery Department of Surgery
University of Michigan
Ann Arbor, Michigan; Division of Plastic Surgery Department of Surgery
Faculty of Medicine
Siriraj Hospital
Mahidol University Salaya, Thailand
Brian P. Kelley, MD
Resident
Section of Plastic Surgery Department of Surgery University of Michigan
Ann Arbor, Michigan
Brett Michelotti, MD
Hand Fellow
Section of Plastic Surgery Department of Surgery
University of Michigan
Ann Arbor, Michigan
Taichi Saito, MD, PhD
International Research Fellow
Section of Plastic Surgery Department of Surgery University of Michigan
Ann Arbor, Michigan; Orthopaedic Surgery Section
Okayama University
Okayama, Japan
Erika Davis Sears, MD, MS
Assistant Professor of Surgery
Section of Plastic Surgery Department of Surgery
University of Michigan Medical School
Ann Arbor, Michigan
Jennifer F. Waljee, MD, MPH, MS
Assistant Professor
Section of Plastic Surgery Department of Surgery
University of Michigan Medical School
Ann Abor, Michigan
Guang Yang, MD
Associate Professor
Department of Hand Surgery
China-Japan Union Hospital of Jilin University
Changchun, Jilin Province, Peoples’ Republic of China
Preface
Welcome to the third edition of this classic treatise on hand and wrist operative techniques. There is a general view that new editions are simply updating current information without structurally changing a textbook. However, this third edition is different because every chapter is rewritten and augmented with new pictures and videos to provide a strong foundation for carrying out operations in a safe and efficient manner. For the past two years, my team and I have meticulously collected pictures and videos in anticipation of refurbishing this entire textbook so that it will be consistently high quality in lieu of a multiauthor textbook that may not have a uniform effort. All the operations were done by me and my colleagues at the University of Michigan and organized by my team of international scholars and staff members. I am certain that this textbook will meet your high expectations of my team’s work.
As I travel around the world as a visiting professor, I see this textbook on a number of bookshelves and book stores. Many of you have approached me to share your enthusiasm for this book. With such encouragement and fervor to leverage this textbook to provide the best care for our patients, I have worked intensely for several years to produce this book, which sets the standard for meticulous illustrations and pictures, clear scientific writing, and a dazzling array of more than 100 operative videos to cover all procedures in hand surgery. Even though you may have purchased the first and second editions, this third edition provides incremental knowledge to previous editions that makes all three editions a seamless encyclopedic collection of hand surgical procedures. I hope you will treasure this textbook as much as I do. Ultimately, this textbook was made through your prodding and your enthusiasm.
A textbook like this requires many hours of intense effort by everyone involved. I would like to acknowledge my trusted assistants Brianna Maroukis and Helen Huetteman, who worked together to make this book a reality. Furthermore, my international scholars Nasa Fujihara, Yuki Fujihara, Sirichai Kamnerdnakta, Taichi Saito, and Michiro Yamamoto have meticulously captured every picture and video and spent countless hours to organize the pictures and illustrations, as well as editing the videos to ensure the highest quality possible. I would also like to acknowledge Taylor Ball from Elsevier, who has worked with me on all three editions of this textbook. Without his dedication, the book would not be able to be produced on time and presented to you seamlessly. My thanks go to Elsevier’s Dolores Meloni, who vouched to the Elsevier leadership that this third edition represents the most creative and comprehensive product in the publishing world. Finally, my tribute to my patients, who are my best mentors; I learned so much by their entrustment of themselves and their family members under my care. Every patient in my practice has had preoperative, intraoperative, and postoperative pictures taken so that I can review their treatment course to reflect and learn from their outcomes. Someone asked me who my best mentor is. Without hesitation, I responded: my patients.
I am eternally grateful to you for your interest and your support of this textbook series. I look forward to seeing this textbook on your shelves. Please do seek me out at national and international meetings so that I can thank you personally for your friendship and encouragement.
Kevin C. Chung, MD, MS
It is with great honor and pleasure that I write the foreword for the third edition of Operative Techniques: Hand and Wrist Surgery, written by my friend and colleague Dr. Kevin C. Chung. Current readers of hand surgery and plastic surgery texts all know Dr. Chung, the Charles BG de Nancrede Professor of Surgery, Plastic Surgery, and Orthopaedic Surgery at the University of Michigan. Although he has published more than 400 peer-reviewed papers, 200 book chapters, and 18 textbooks, this may be the prolific Dr. Chung’s best work. Why? Because it is consistent, concise, comprehensive, and contemporary—four critical attributes of a classic textbook.
The format and prose are consistent. Although there are excellent coauthors, this is essentially a single author textbook. Dr. Chung’s expert voice is present throughout. With prior experience as an editor of the Journal of Hand Surgery and Plastic & Reconstructive Surgery, Dr. Chung’s style of writing is crisp and clear.
A well-used surgical textbook should be concise. The chapters have bullet point sections on Indications, Clinical Examination, and Surgical Anatomy. This is a procedure-based textbook, and each key procedure is outlined as a step-by-step technique guide. I agree with Dr. Chung that operations are best taught in this manner. The extensive video library complements each chapter brilliantly. The figures have been carefully presented with just the key anatomic points, and only the classic articles are referenced for collateral reading.
Most importantly, this textbook is comprehensive and contemporary. The 105 chapters are based on Dr. Chung’s vast experience in all aspects of hand surgery. Although many hand surgeons have chosen to focus on one specialized area, Dr. Chung is known at his institution and internationally as adept at “doing it all”—from congenital hand to complex distal radius fractures and microsurgical reconstruction. His practice is dynamic; therefore, this third edition is up-to-date with new techniques such as percutaneous needle aponeurotomy and nerve transfers.
Only a select few have the breadth and depth of clinical experience to present a single primary author textbook of hand surgery. Dr. Kevin Chung has done so in outstanding fashion. This third edition has refined an already classic textbook, one that I have always recommended to my own trainees.
James Chang, MD
Chief, Division of Plastic & Reconstructive Surgery
Johnson & Johnson Distinguished Professor of Surgery & Orthopedic Surgery Stanford University Medical Center
72nd President of the American Society for Surgery of the Hand (2017-2018)
PROCEDURE 1 Anesthesia of the Hand
Aviram M. Giladi and Kevin C. Chung
Indications
• Postoperative pain control
• Aid in functional evaluation of traumatic injuries
• Bedside procedures in the emergency department
• Minor hand surgery procedures (“wide awake” hand surgery)
• Avoidance/reduction of sedation or airway instrumentation in higher risk patients
• Performing procedures that benefit from testing intraoperative movement (tenolysis, trigger finger release, etc.)
Clinical Examination
Anesthetic Agents
• Lidocaine is most widely used—onset approximately 3 to 5 minutes, duration of action 60 to 120 minutes.
• Bupivacaine (Marcaine) is also commonly used for longer durations of pain control (∼400–450 minutes); however, onset takes up to 15 minutes or more.
• Use of epinephrine mixed in with the local anesthetic (1:200,000 or even 1:100,000) is not contraindicated in the hand or fingers and may increase duration of anesthetic action while aiding in minimizing blood loss.
Surgical Anatomy
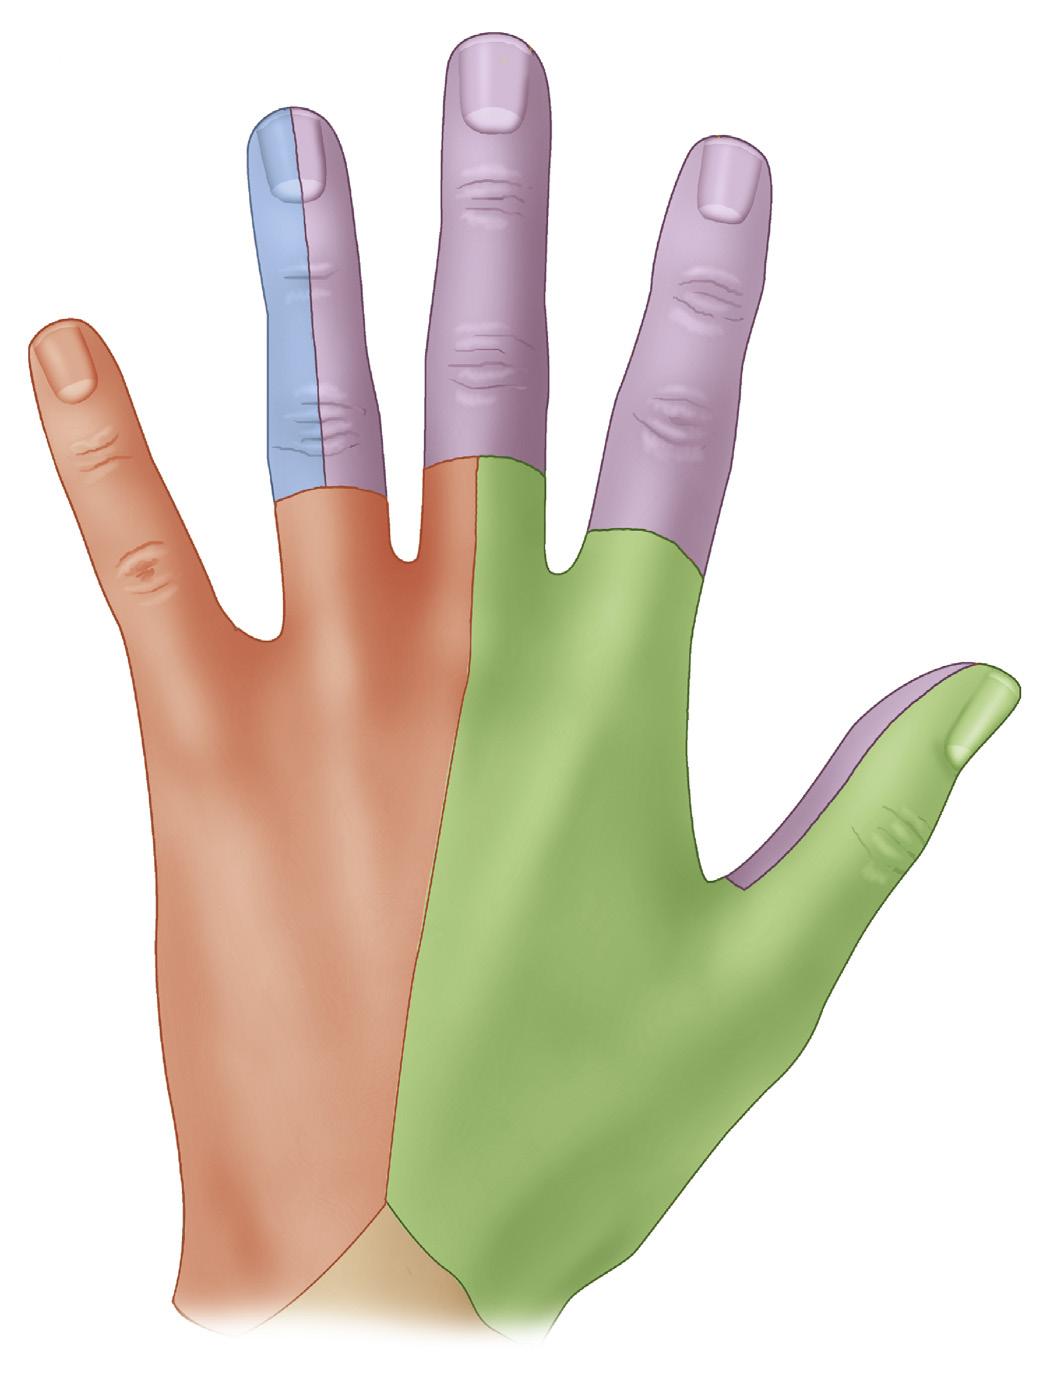
• Fig. 1.1 shows the sensory distribution of the dorsal hand.
• Fig. 1.2 shows the location of the radial, median, and ulnar nerves. The radial nerve crosses the wrist in the area of the radial styloid. The purely sensory nerve arborizes proximal to the radial styloid and crosses the wrist divided into a few major branches that travel in subcutaneous tissues anywhere from just volar to the styloid and as far dorsal/ulnar as the area in line with the middle finger metacarpal (Fig. 1.3A and B).
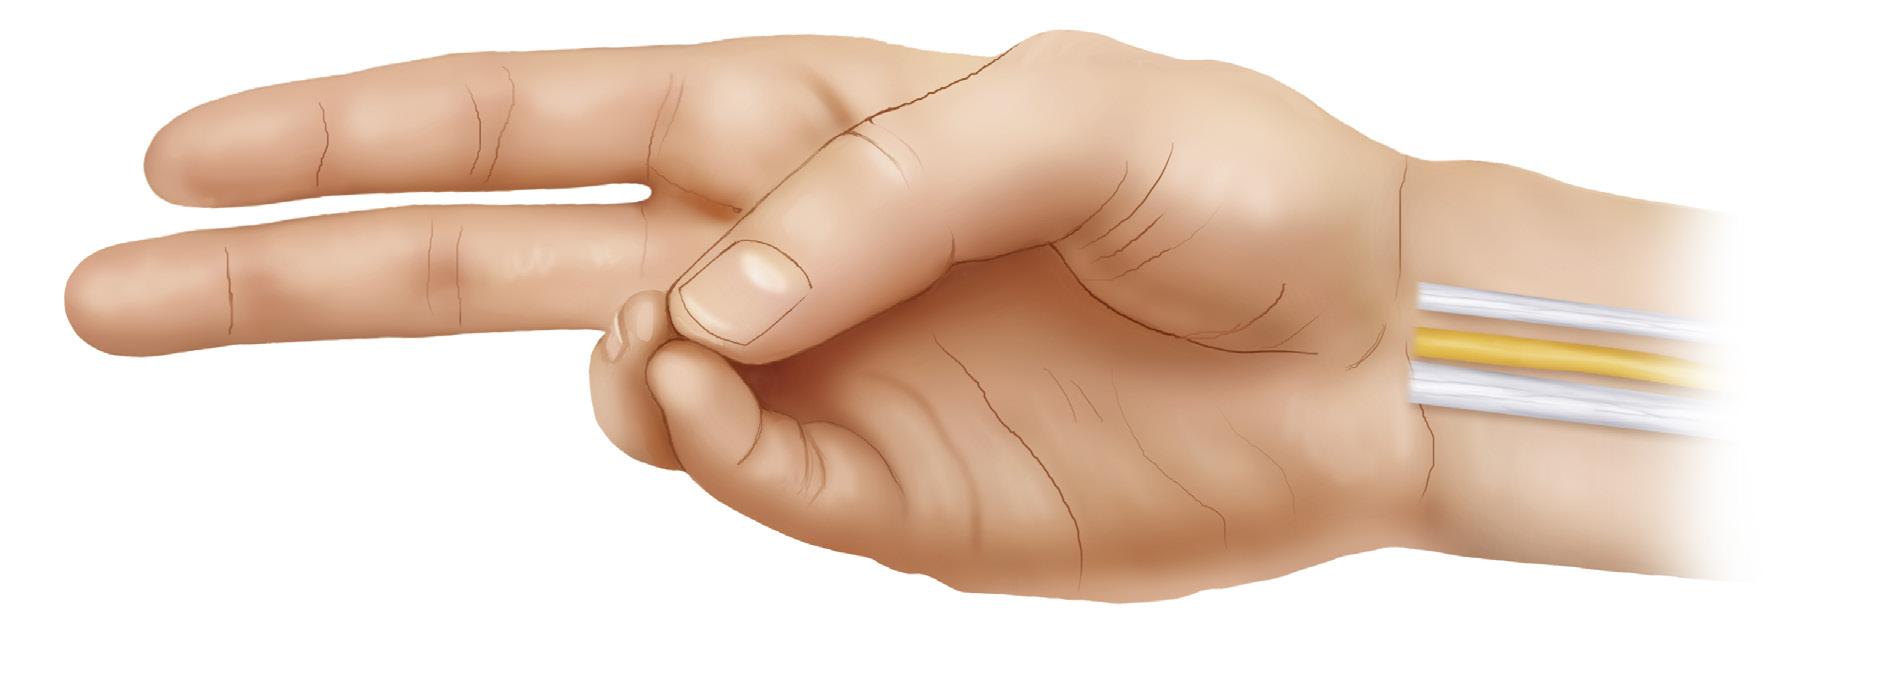
• The median nerve crosses the wrist within the carpal tunnel, and the palmar cutaneous branch crosses in a similar region of the wrist but more superficially. The nerve runs between the palmaris longus (PL) and the flexor carpi radialis (FCR) tendons, and for patients with PL this tendon can be used to help landmark for injections.
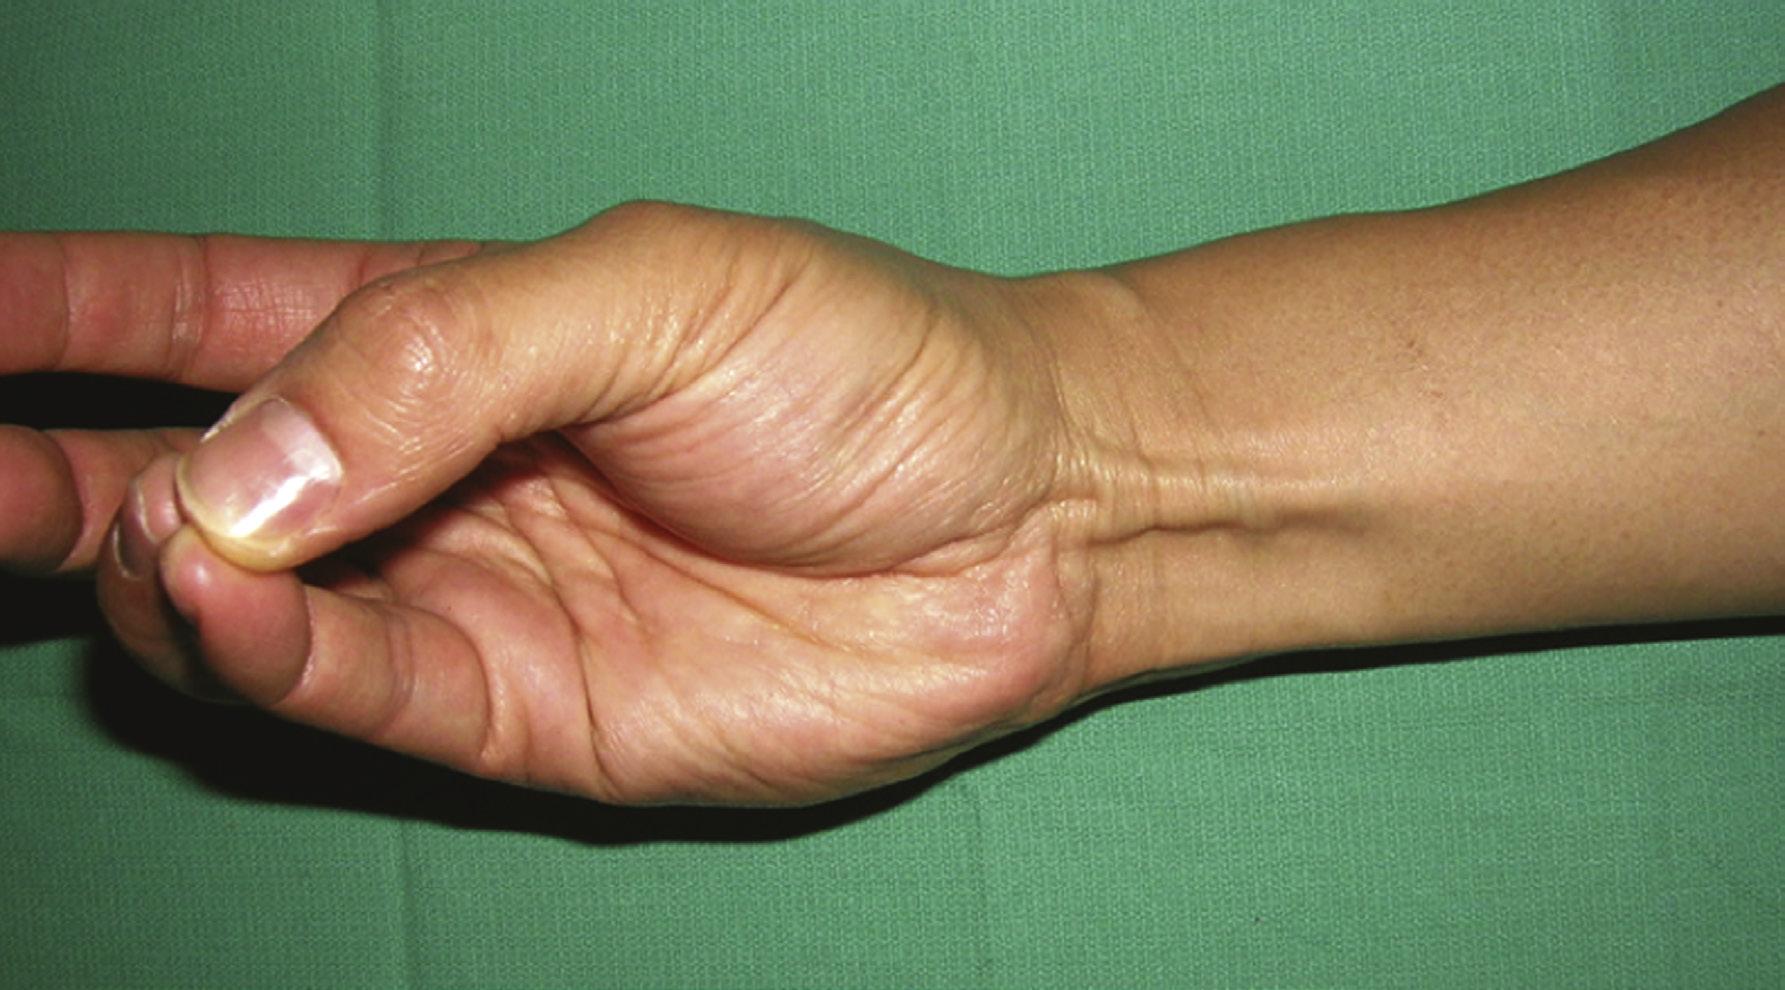
• To identify PL, have patient pinch thumb to ring/small finger and see tendon bulge in wrist (Fig. 1.4A and B).
• If not present or identifiable, the ulnar border of FCR tendon can be used as the landmark.
• The ulnar nerve crosses the wrist in the area of the flexor carpi ulnaris tendon, proximal to its insertion on the pisiform (prior to nerve entering Guyon canal).
• The ulnar artery is radial to the nerve and to the flexor carpi ulnaris (FCU) tendon.
• The dorsal sensory branch also runs ulnar to FCU at the level of the wrist, more superficial to the major ulnar nerve trunk (Fig. 1.5).
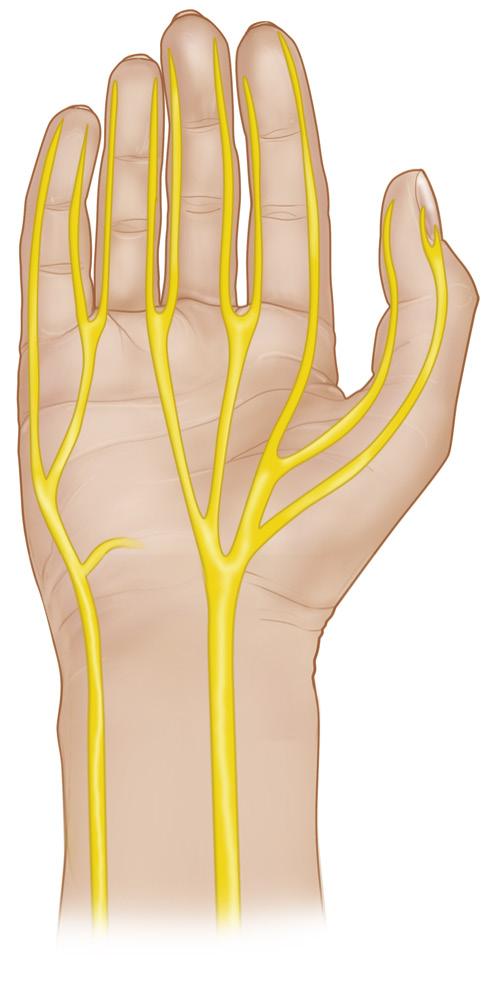
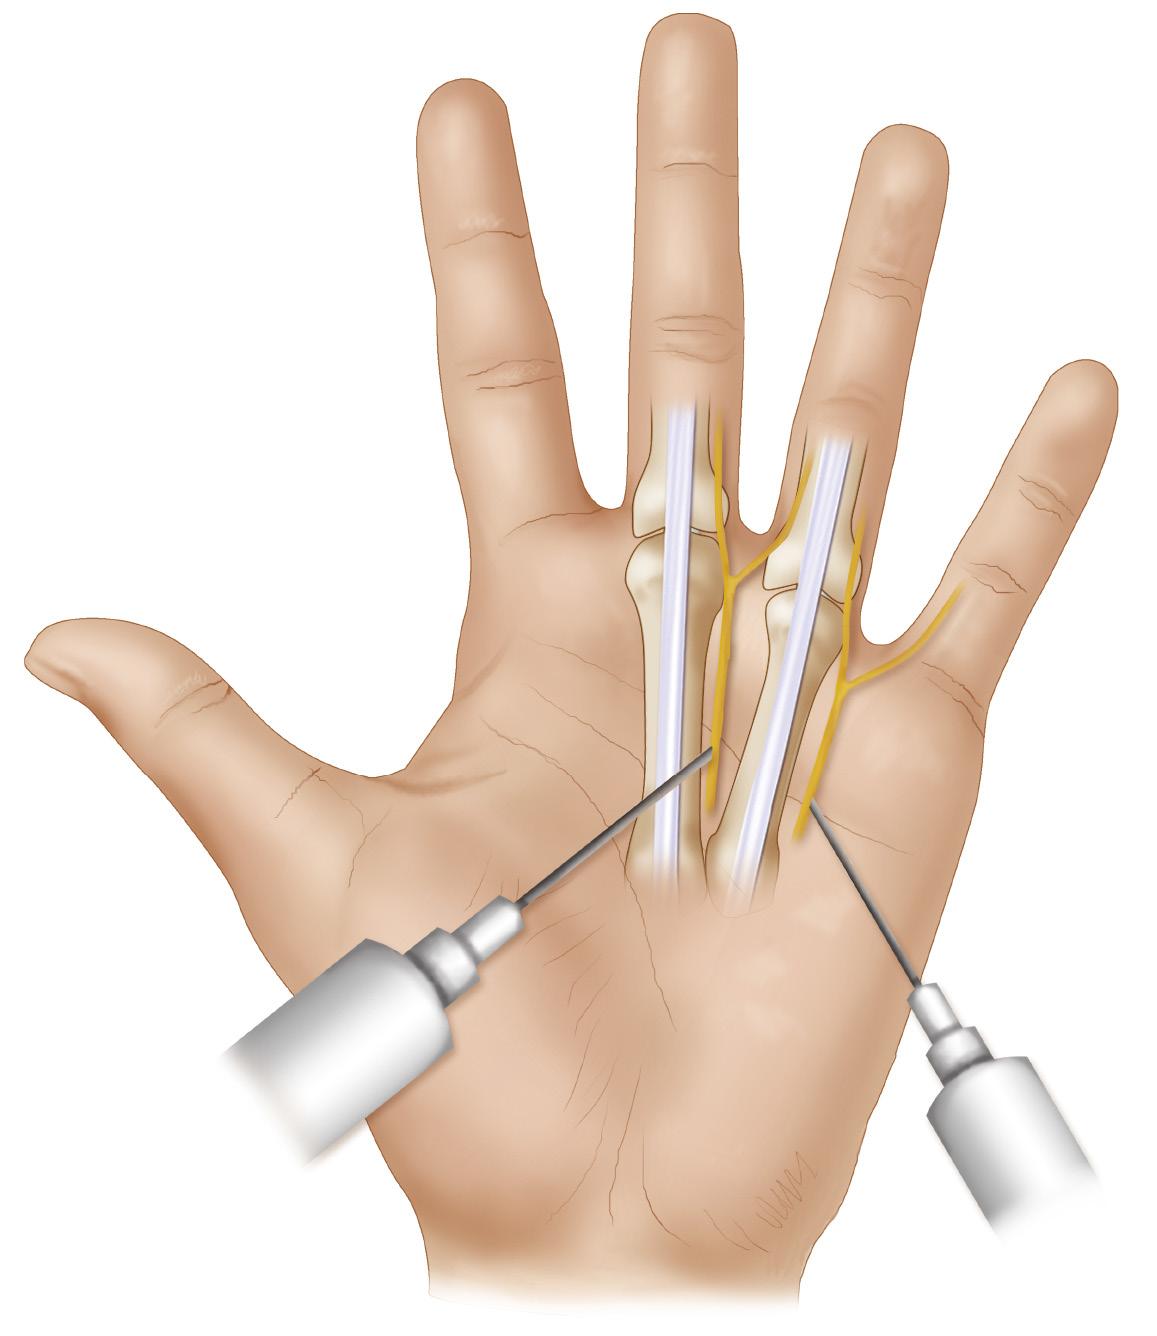
• Common digital nerves travel between the metacarpals. Injection site to perform a block of the common digital nerve to anesthetize multiple fingers at once is at the level of the distal palmar crease, approximately 1 cm proximal to the metacarpophalangeal joint.
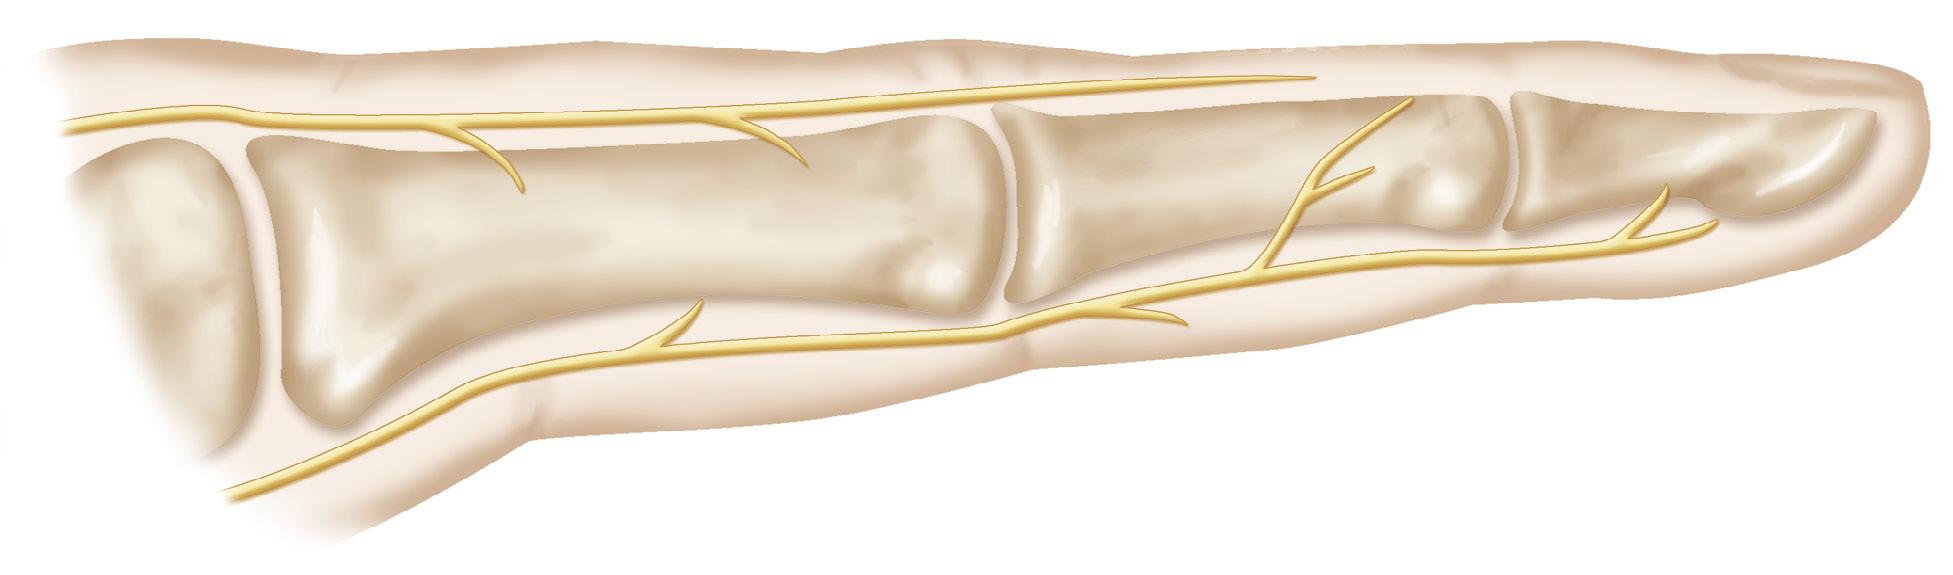
• Each finger has a volar and dorsal nerve on the ulnar and radial sides (total four digital nerves). The volar branches are larger, and within the finger will be volar to the corresponding digital artery. The volar branches pass from the common digital nerve proximal to each webspace and enter the finger (Fig. 1.6).
1.1
Superficial radial nerve
Dorsal cutaneous branch of ulnar nerve
Median nerve
Ulnar nerve
1.2
Positioning
Ulnar nerve
Median nerve
Radial nerve
Blocks are most easily performed with patient supine and arm extended out on a hand table with dorsum down. This is especially true for the median nerve block. However, as long as the wrist and elbow are free to be moved, these blocks can generally be performed in a variety of hand and arm positions.
FIGURE
FIGURE
Extensor pollicis longus
Superficial radial nerve
Styloid process of radius
Scaphoid
Abductor pollicis longus
1.3
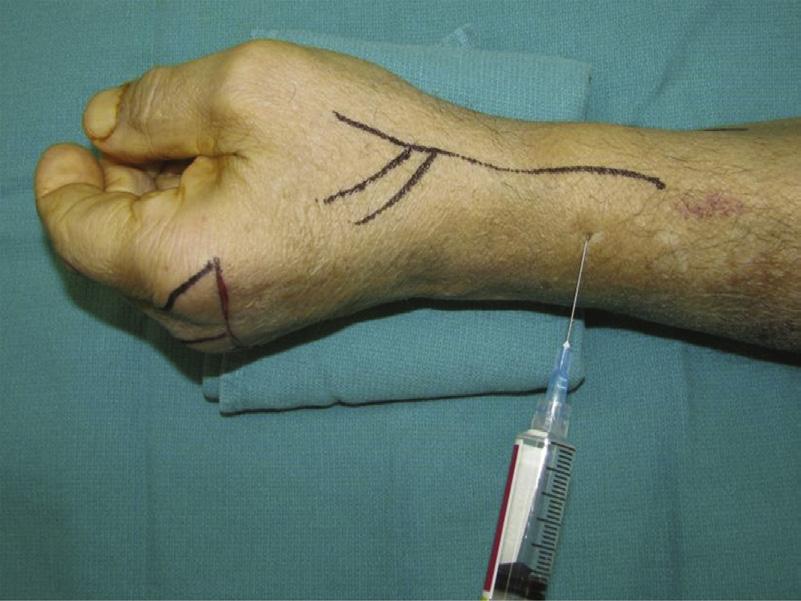
Procedure: Radial Nerve Block
Step 1
Begin with volar injection radial to the radial artery (along the radial border of the forearm/wrist), proximal to the radial styloid. Inject in the subcutaneous plane, being sure to aspirate before injecting to confirm no violation of the radial artery that could result in an intraarterial injection (Fig. 1.7).
Step 2
Adjust position and move the needle along the radial border of the radius and then dorsally, to the area of the radial styloid, and inject again into the subcutaneous plane.
Step 3
• Continue these subcutaneous injections along the dorsum, beyond the styloid, as far ulnar as the area inline with the middle finger metacarpal.
RADIAL NERVE BLOCK: STEP 1 PEARLS
• The radial nerve block at the wrist is, in essence, a superficial field block in the area around the radial styloid (Fig. 1.8).
• Block is performed superficial to the first and second extensor compartment as well as the anatomic snuffbox.
RADIAL NERVE BLOCK: STEP 1
PITFALLS
The nerve branches travel in the subcutaneous plane; there is no need for deep injection with this block.
FIGURE
Flexor carpi radialis
Median nerve Palmaris longus
FIGURE 1.4
Ulnar nerve
FIGURE 1.5
Dorsal sensory nerve
Dorsal branch of the volar digital nerve
• One can also move slightly more proximal to confirm adequate anesthesia of the carpus (Fig. 1.9).
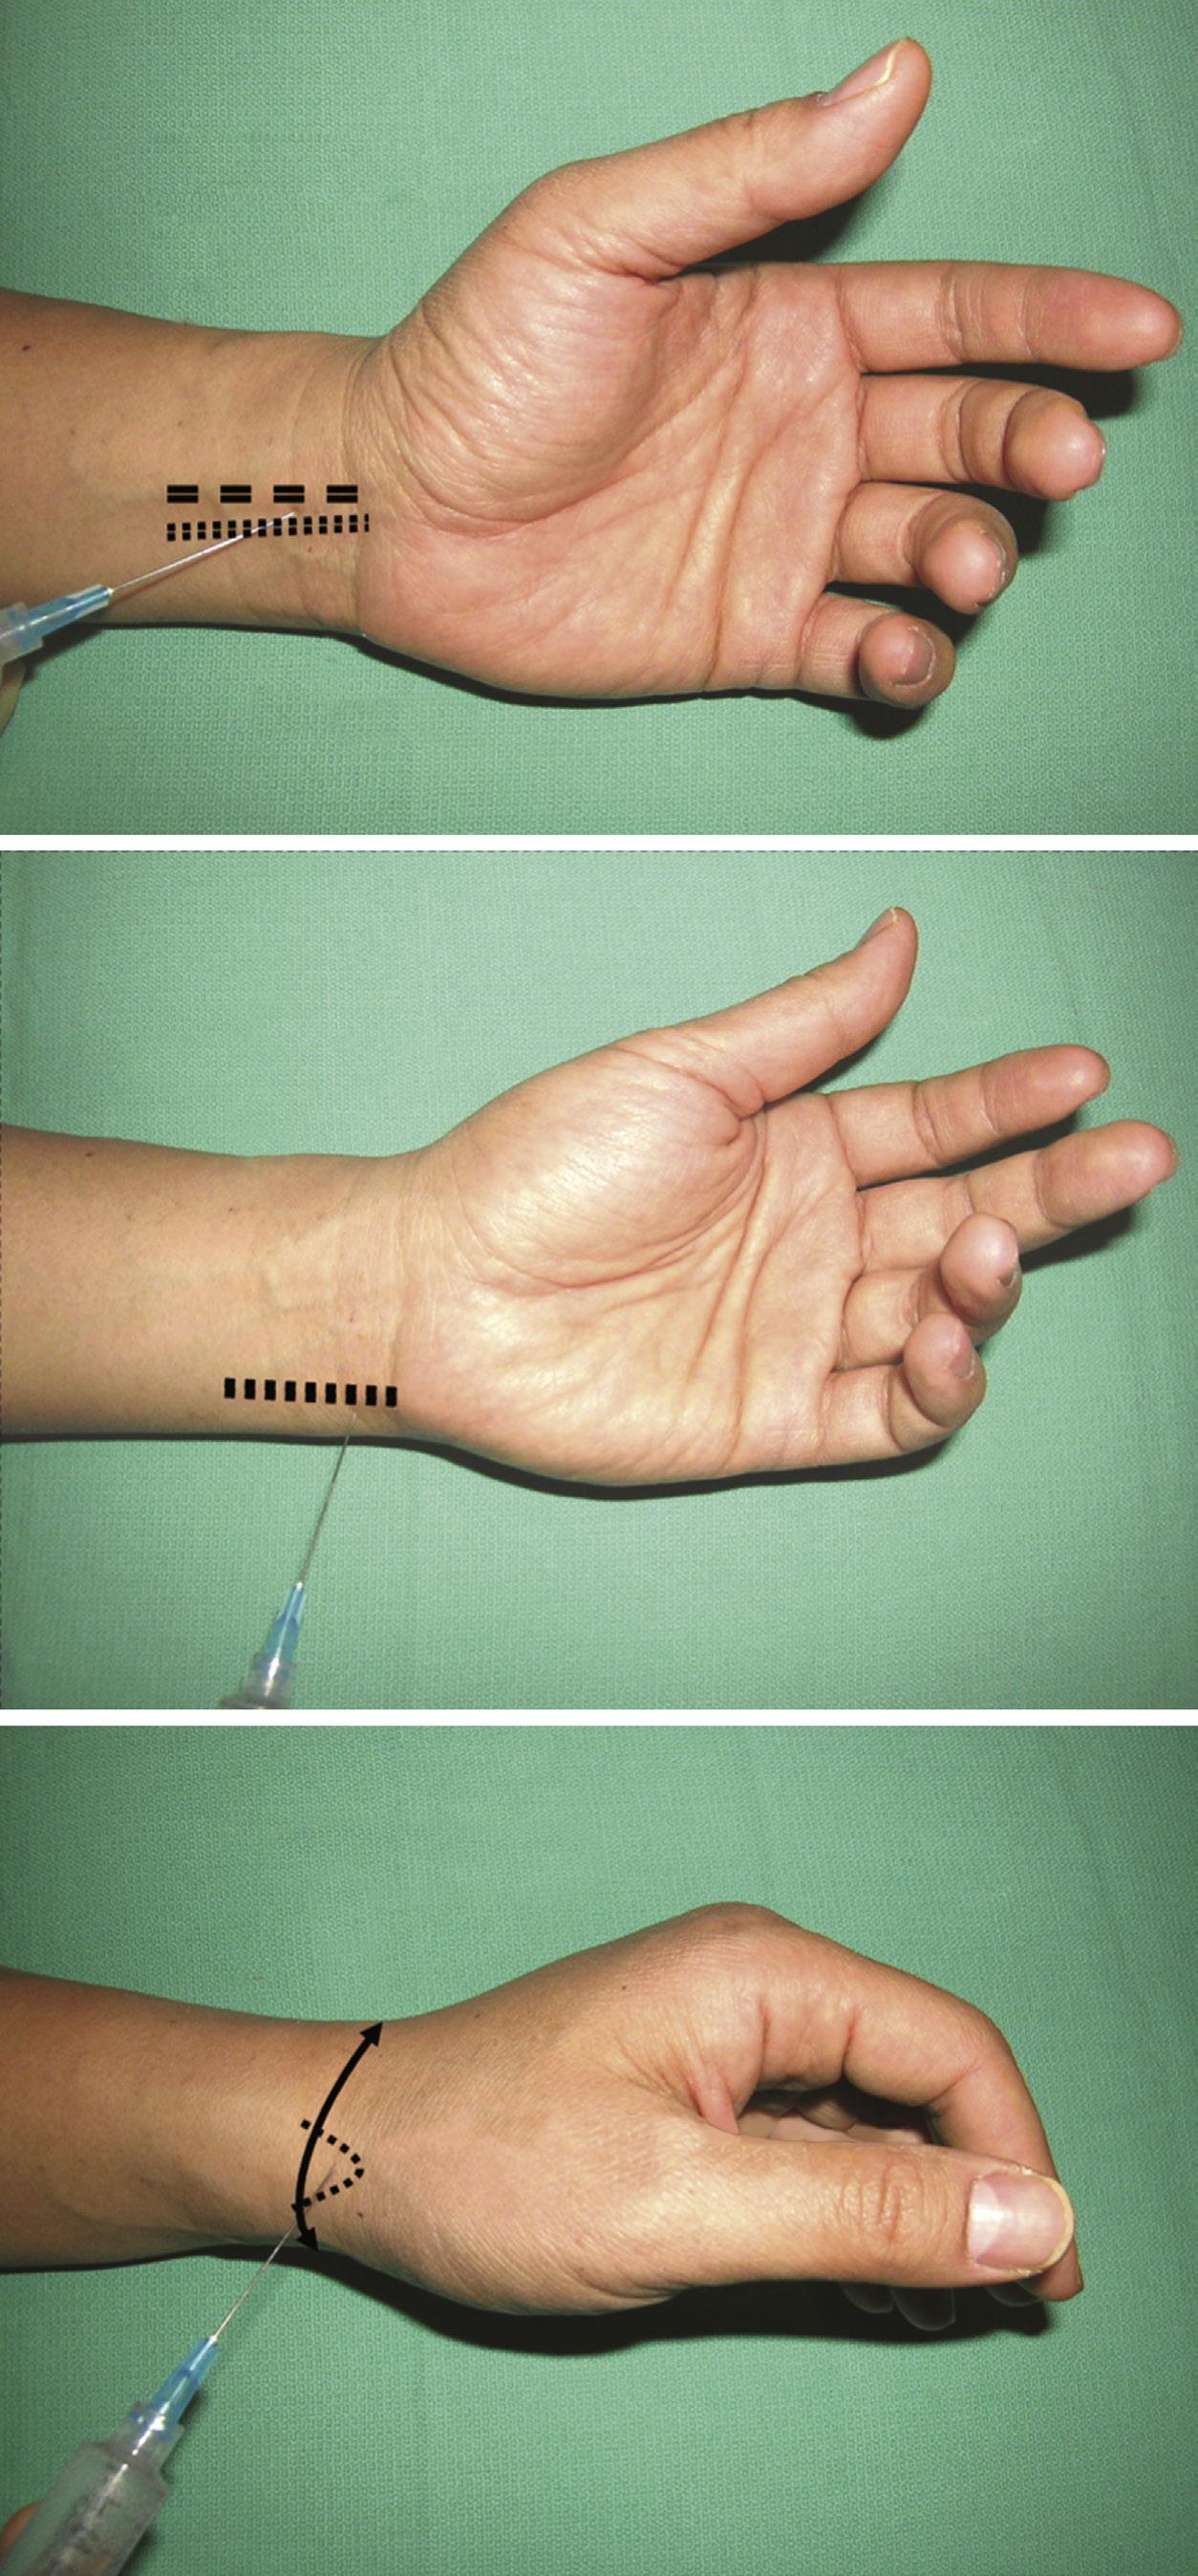
Procedure: Median Nerve Block
Step 1
Identify the nerve between PL and FCR (or just ulnar to FCR). Enter approximately 1 cm deep, through the flexor retinaculum, and infiltrate with approximately 5 mL of local anesthetic.
Step 2
Slowly withdraw, and inject another small aliquot superficial to the retinaculum to block the palmar cutaneous branch.
RADIAL NERVE BLOCK: STEP 3 PEARLS
• This technique often requires multiple needle insertion points to cover adequate territory around the curvature of the wrist without injecting too deeply.
• This injection requires more anesthetic than the others, with upwards of 10 mL needed for adequate infiltration of the entire area.
MEDIAN NERVE BLOCK: STEP 1 PEARLS
• The injection is performed at the level of the proximal wrist crease, in line with the ulnar styloid (Fig. 1.10).
• Flex or extend the fingers to see if the needle “bobs.” This confirms localization at the entrance to the carpal tunnel.
MEDIAN NERVE BLOCK: STEP 1 PITFALLS
• The median nerve block is done with injections in a deep as well as superficial plane. The landmarks described in the anatomy section are critical to proper localization of the nerve.
Volar digital nerve
FIGURE 1.6
1% Lidocaine + 0.5% Marcain
FIGURE
Range of infiltration
Styloid process
FIGURE 1.8
INTRATHECAL BLOCK: STEP 1 PEARLS
Intrathecal block offers anesthesia with one injection and reportedly has a faster onset.
Procedure: Ulnar Nerve Block
Identify FCU, and move ulnar and dorsal to the tendon (Fig. 1.11).
At the level of the distal ulna, insert the needle and slide under the area of FCU (dorsal and ulnar to the tendon).
Inject approximately 5 mL of anesthetic solution in this plane.
Withdraw slowly, and inject again in the subcutaneous tissues to block the dorsal
Procedure: Digital Nerve Block
Blocking digital nerves can be done with a variety of techniques.
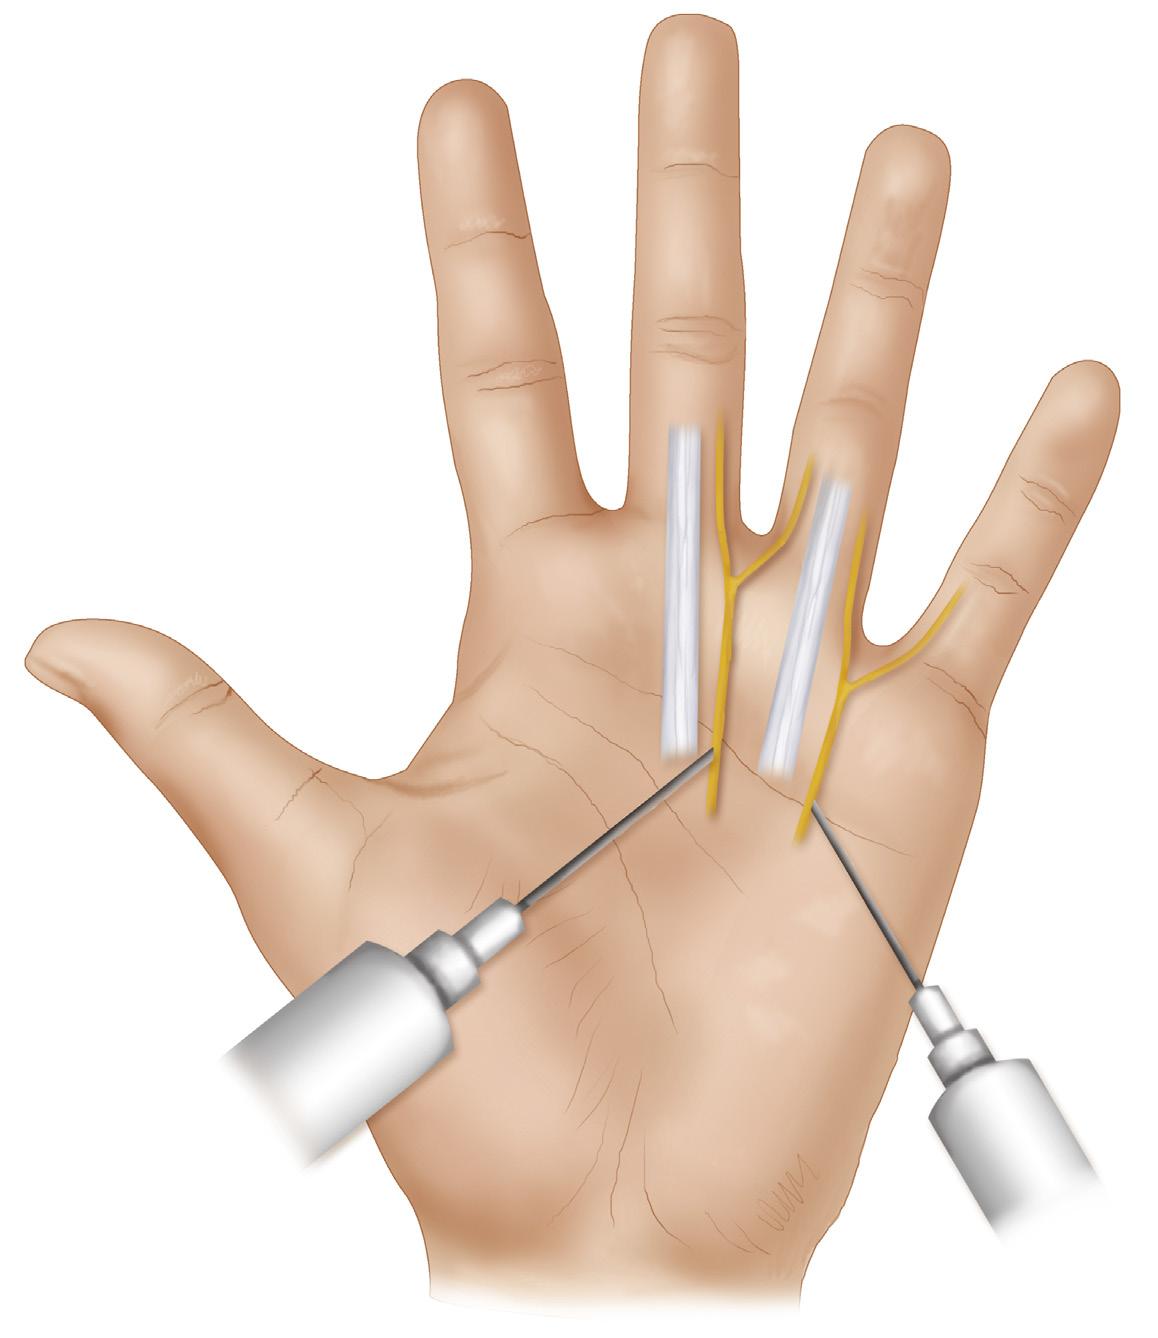
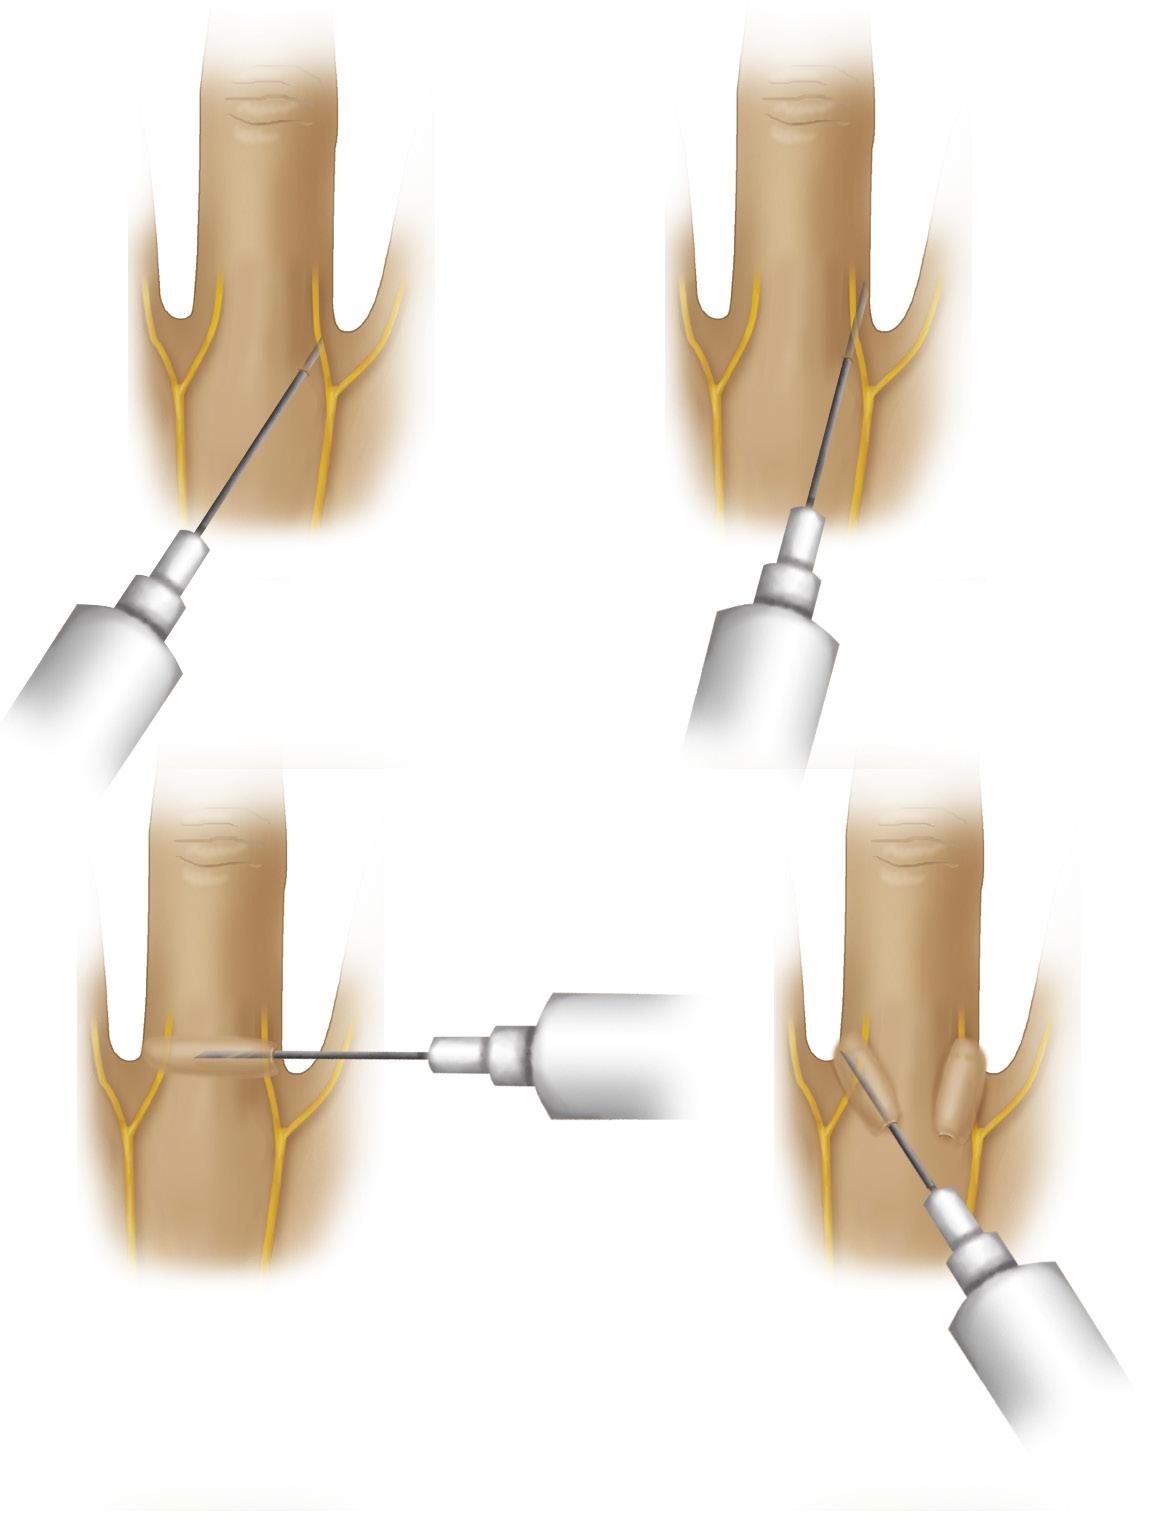
Step 1: Intermetacarpal Block
If the goal is to block multiple adjacent fingers, an intermetacarpal block (also known as a transmetacarpal block) technique can be used (Figs. 1.12 and 1.13).
Inject alongside the metacarpal neck to block the common digital nerves to the fingers on either side of the corresponding webspaces (Fig. 1.14).
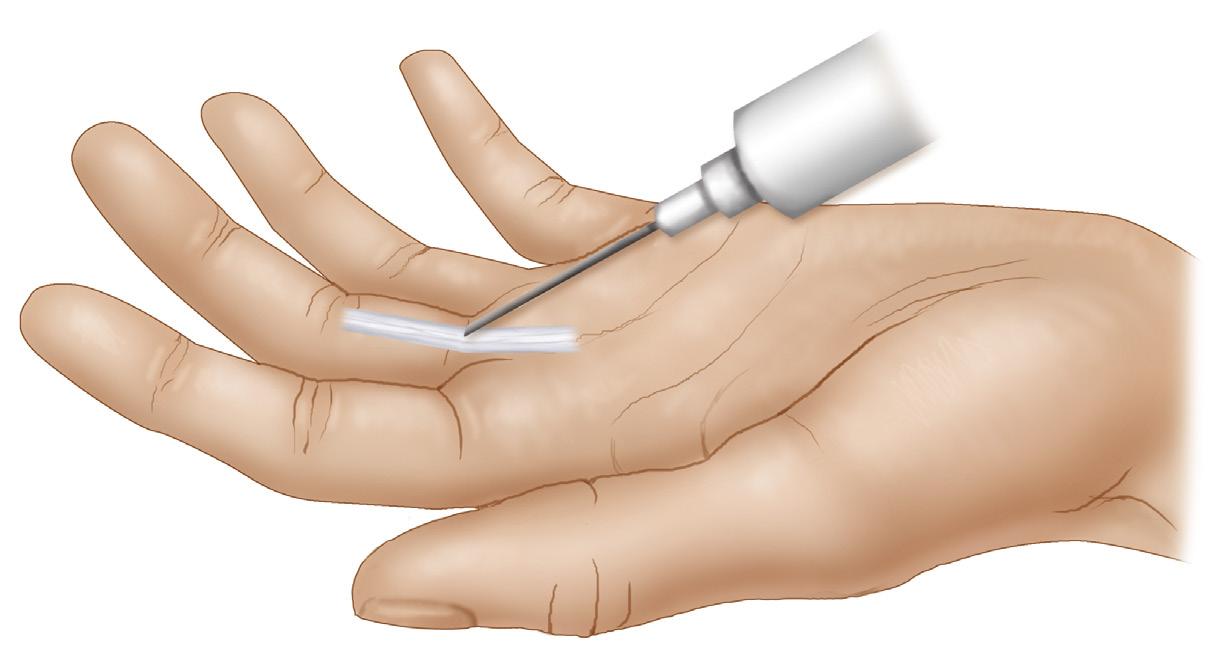
Step 1: Subcutaneous Digital Block
To block just one finger, the subcutaneous digital block technique can be used. One must infiltrate along the radial and ulnar border of the digit proximally, at the
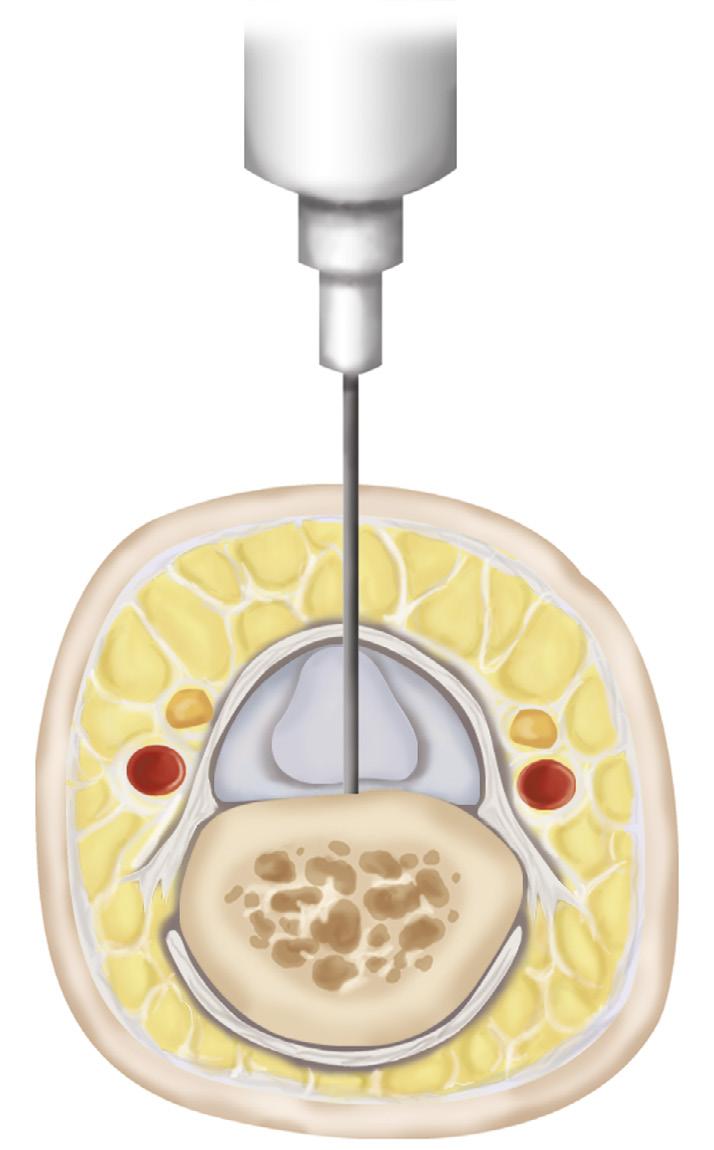
Step 1: Intrathecal Block
Alternatively, a digital block can be performed using an intrathecal block technique, injecting into the flexor tendon sheath. Injection is performed at the level of the palmodigital crease (Fig. 1.16).
Step 2: Intrathecal Block
Can insert needle until contact with bone is made; then pull back slowly while injecting until a loss of resistance is felt—this is the plane between periosteum and tendon within the sheath (Fig. 1.17).
Flexor carpi radialis
Palmaris longus
FIGURE 1.10
1% Lidocaine + 0.5% Marcain
FIGURE 1.11
Flexor tendon
Common digital nerve
Distal palmar crease
INTRATHECAL BLOCK: STEP 1
PITFALLS
Some patients report more and prolonged discomfort with intrathecal block technique.
INTRATHECAL BLOCK: STEP 2 PEARLS
Also, needing to contact the bone can be avoided by slowly approaching with the volar injection until the sheath is entered and injecting superficial to the tendon; similarly here, injection plunger pressure on the syringe will have a loss of resistance when the injection is entering the tendon sheath space rather than the subcutaneous tissues or the tendon substance itself.
INTRATHECAL BLOCK: STEP 2
PITFALLS
Injection superficial to the tendon is often less accurate, and in some cases no intrathecal injection occurs, because the injection is all performed in the subcutaneous space.
Common digital nerve
FIGURE 1.12
FIGURE 1.13
1.15
Flexor tendon
Common digital nerve
Distal palmar crease
FIGURE 1.14
FIGURE
Digital crease
Flexor tendon
FIGURE 1.16
Flexor tendon sheath
Flexor digitorum profundus
Flexor digitorum superficialis
FIGURE 1.17
Postoperative Care and Expected Outcomes
Volar digital nerve
Volar digital artery
Proximal phalangeal bone
• Most of these blocks can be expected to provide adequate reduction of pain and sharp sensation for the areas targeted.
• Duration of block is based on which anesthetic agent was used, as outlined earlier.
See also Video 1.1, Anesthesia of the Hand, on ExpertConsult.com
EVIDENCE
Bas H, Kleinert JM. Anatomic variations in sensory innervation of the hand and digits. J Hand Surg Am 1999;24:1171-84.
Thirty fresh cadaver hand dissections were performed to investigate the course and interconnection of the sensory nerves. The authors found interconnecting nerves between the median and ulnar nerve just distal to the transverse carpal ligament. The dorsal branch of the volar digital nerve branched out at the proximal level of the A1 pulley in 62% of the specimens. The dorsal sensory nerve extended to the nail level in the thumb and little fingers. (Level IV evidence)
POSTOPERATIVE PITFALLS
• Neuropraxia is uncommon, especially with these distal nerve blocks. However, should they occur, they will often resolve within 4 weeks. Patient support and reassurance is usually the only necessary treatment. In the rare event of complete or near-complete palsy, additional evaluation is warranted to rule out new sources of compression.
• Toxicity from the local anesthetic, although incredibly uncommon with these small doses, should always be considered if patient experiences central neurologic or cardiac changes.
Gebhard RE, Al-Samsam T, Greger J, Khan A, Chelly JE. Distal nerve blocks at the wrist for outpatient carpal tunnel surgery offer intraoperative cardiovascular stability and reduce discharge time. Anesth Analg 2002;95:351-5.
This retrospective study of 62 consecutive patients compared Bier block, peripheral nerve (median and ulnar nerve) block, and general anesthesia for carpal tunnel surgery. Peripheral nerve blocks had greater intraoperative cardiovascular stability and earlier postoperative discharge from postanesthesia care unit. (Level IV evidence)
Hung VS, Bodavula VKR, Dubin NH. Digital anesthesia: comparison of the efficacy and pain associated with three digital nerve block techniques. J Hand Surg Br 2005;30:581-4.
This is a randomized, controlled, single-blind study of 50 healthy volunteers, comparing time of onset, pain from block, and method of preference of three different digital blocks. The metacarpal block took significantly longer to block the digital nerves than the other two methods. Forty percent of subjects felt discomfort for 24 to 72 hours after the transthecal digital block. Forty-three percent of subjects chose the subcutaneous block as the preferred method. (Level I evidence)
Low CK, Vartany A, Engstrom JW, Poncelet A, Diao E. Comparison of transthecal and subcutaneous single-injection digital block techniques. J Hand Surg 1997;22:901-5.
Randomized double-blind study on 142 patients comparing transthecal digital block and subcutaneous digital block. No difference was found in effectiveness, distribution, onset, and duration of action. (Level I evidence)
Sonmez A, Yaman M, Ersoy B, Numanodlu A. Digital blocks with and without adrenalin: a randomisedcontrolled study of capillary blood parameters. J Hand Surg Eur 2008;33:515-8.
Twenty patients were randomized to digital block with 2% lidocaine and 2% lidocaine with 1:80,000 adrenalin. PO2 and SaO2 in the digits were not significantly different between the groups. No concerning issues with digital perfusion were reported. Return of sensation in digits without adrenalin returned an average of 4.8 hours later, and with adrenaline occurred 8.1 hours later. (Level II evidence)
Fasciotomy for Compartment Syndrome of the Hand and Forearm
Aviram M. Giladi and Kevin C. Chung
Indications
• Compartment syndrome—when pressure within a fibroosseous space increases to a level that results in a decreased perfusion gradient across tissues
• Reperfusion after prolonged ischemia time, including tourniquet, wraps, casts, compression, and others
• Crush injury with resultant edema, causing increased pressure in the closed muscle space
• Other high-risk causes of compartment syndrome: injection injury, extravasation injury, electrical injury, penetrating trauma, circumferential burns, snake or insect bites
• Certain injection injuries (air, water, other hydrophilic liquids) can potentially be observed depending on volume, clinical presentation, etc.
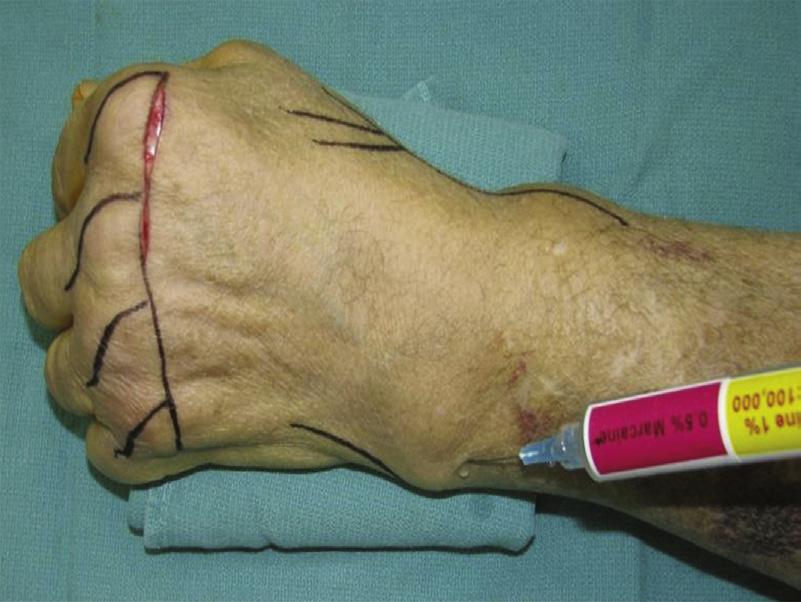
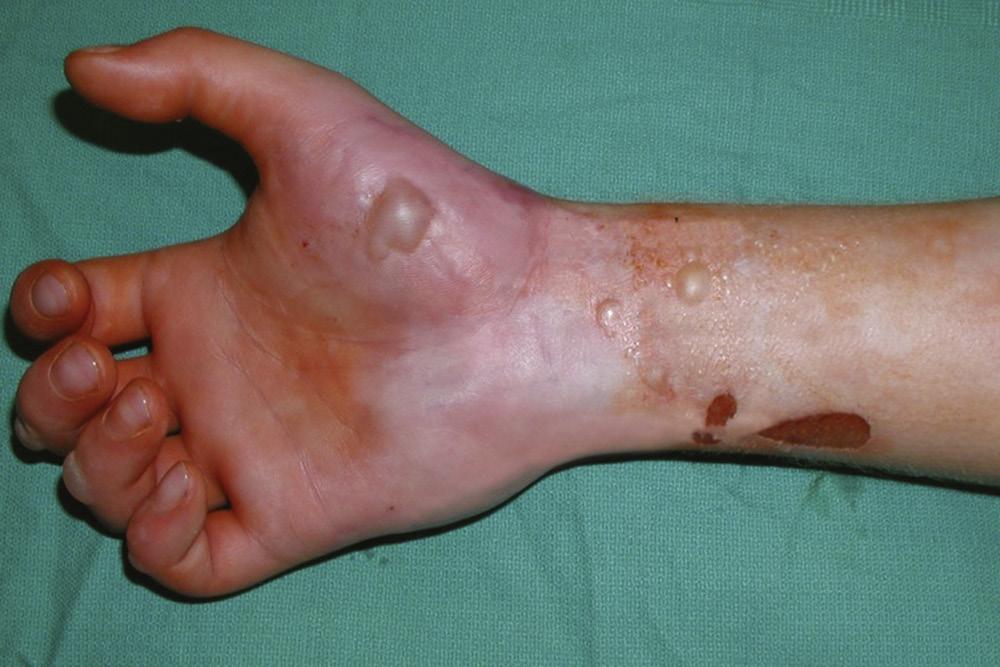
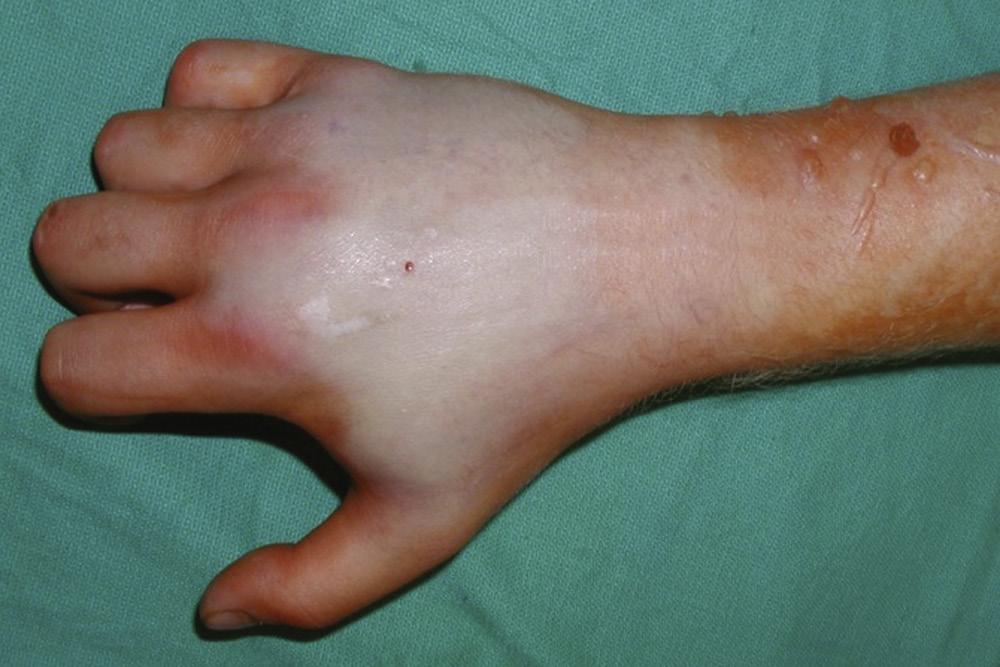
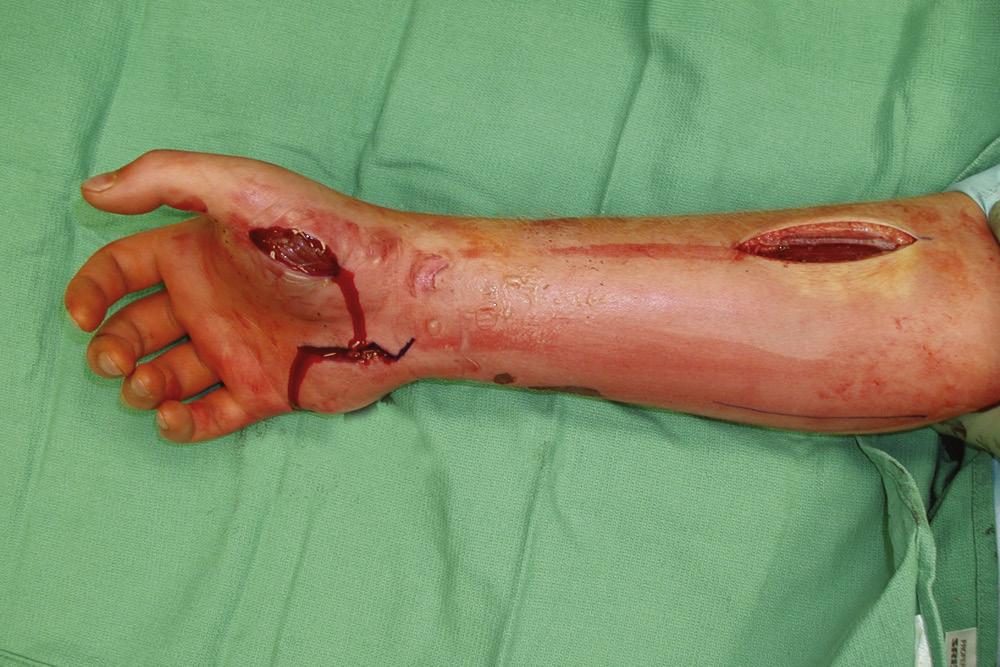
• Injection of paint or other oil-based liquid requires early decompression and additional exploration/debridement as needed. These injection injuries tend to develop ischemia as well as deep space infections and worsen rather than improve with time (Fig. 2.1A and B).
Clinical Examination
• The ischemia caused by compartment syndrome affects nerves and then muscle; irreversible damage can occur within 6 hours for muscle or even less for nerves.
• The diagnosis is generally a clinical one, based on findings of nerve or muscle injury.
• Pain (out of proportion to injury, especially on passive stretch), paresthesia, paralysis, pallor, pulselessness, and inability to regulate limb temperature (poikilothermia).
• Pain out of proportion to injury and paresthesias are the two earliest findings, whereas pulselessness and pallor are often (too) late of findings; they may not occur at all.
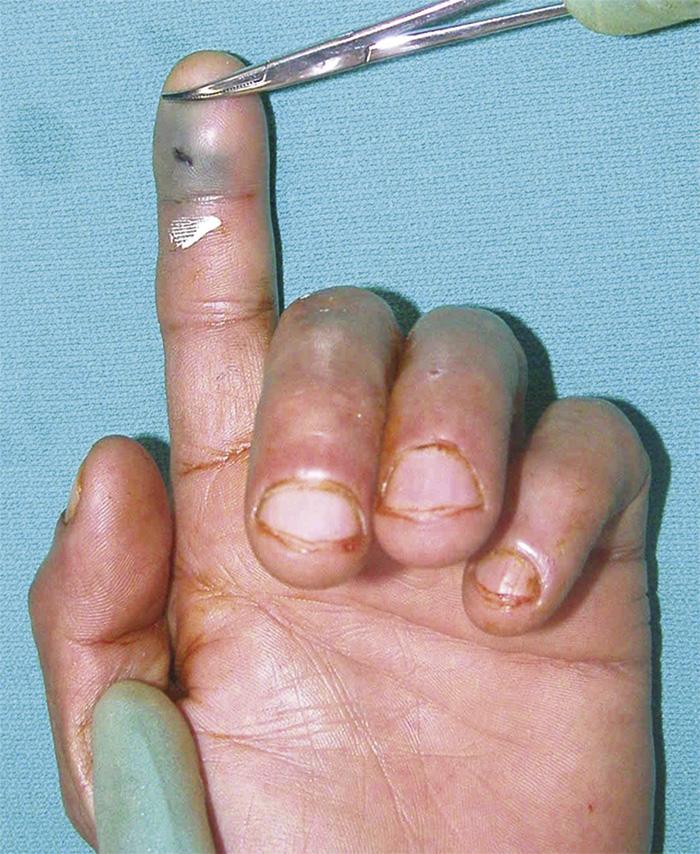
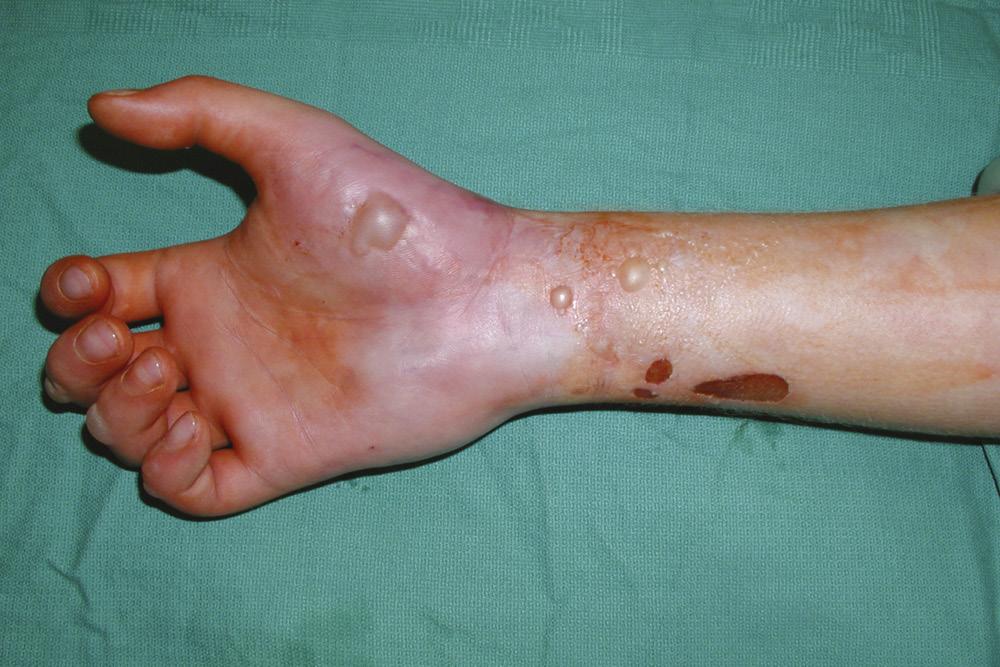
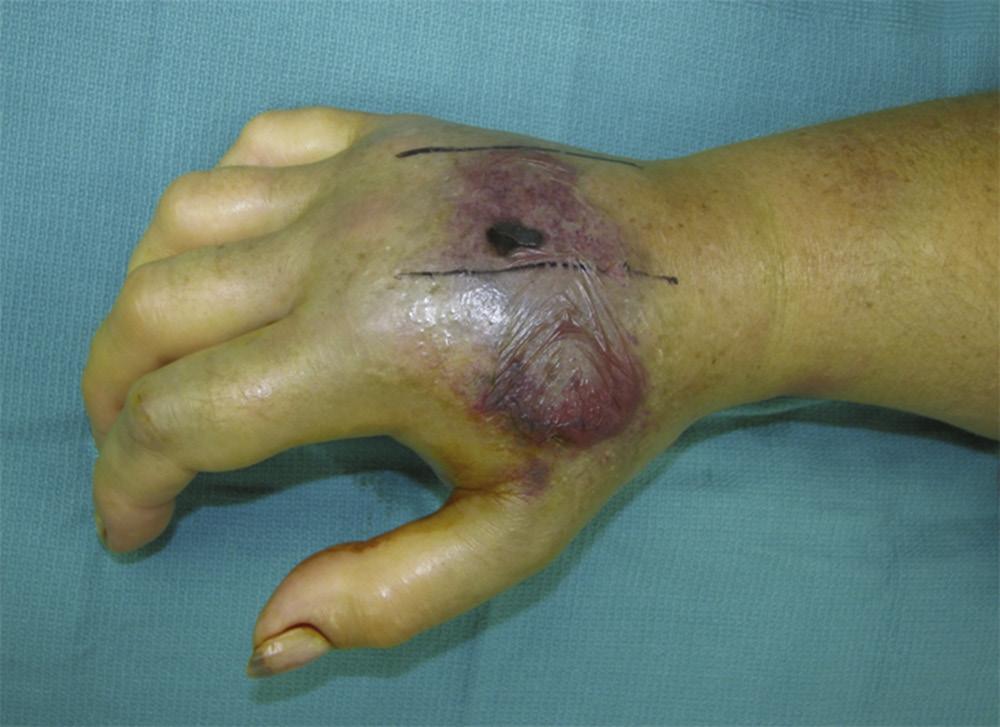
• The limb/compartment is often firm to palpation, and overlying skin may become shiny and even develop blisters (Figs. 2.2A and B and 2.3).
Imaging
• Often the diagnosis is clinically apparent, and therefore no additional imaging or other workup is needed.
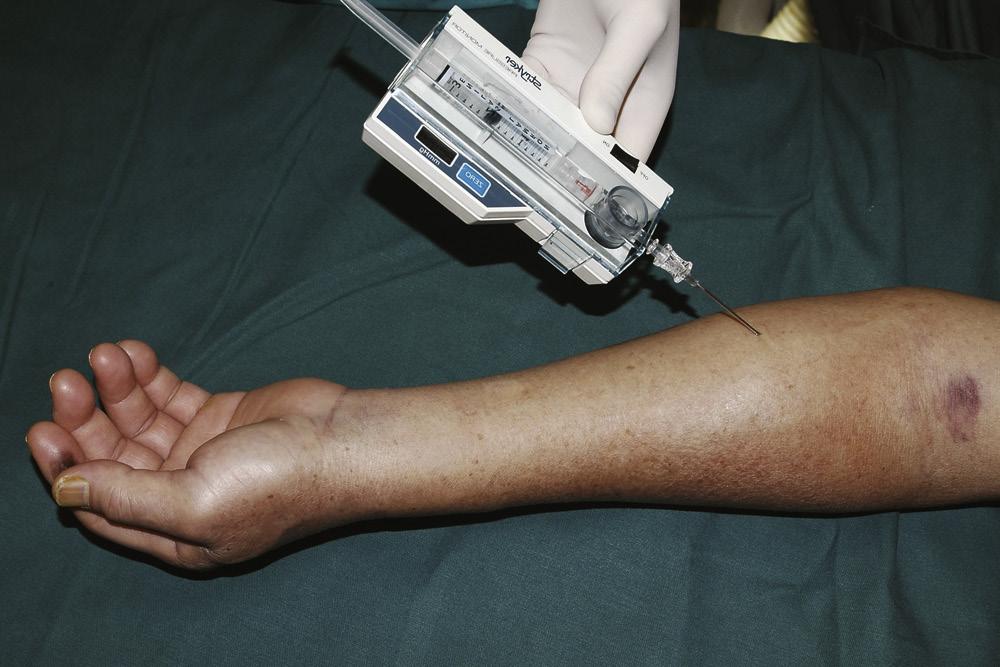
• Most commonly, the diagnosis in less clinically apparent cases is made by measuring compartment pressures. Although many techniques have been described, the Stryker system has been found to be quite accurate, with an arterial line manometer as a more easily accessible secondary option that is quite accurate if used properly (Fig. 2.4).
FIGURE 2.2
FIGURE 2.3
FIGURE 2.4
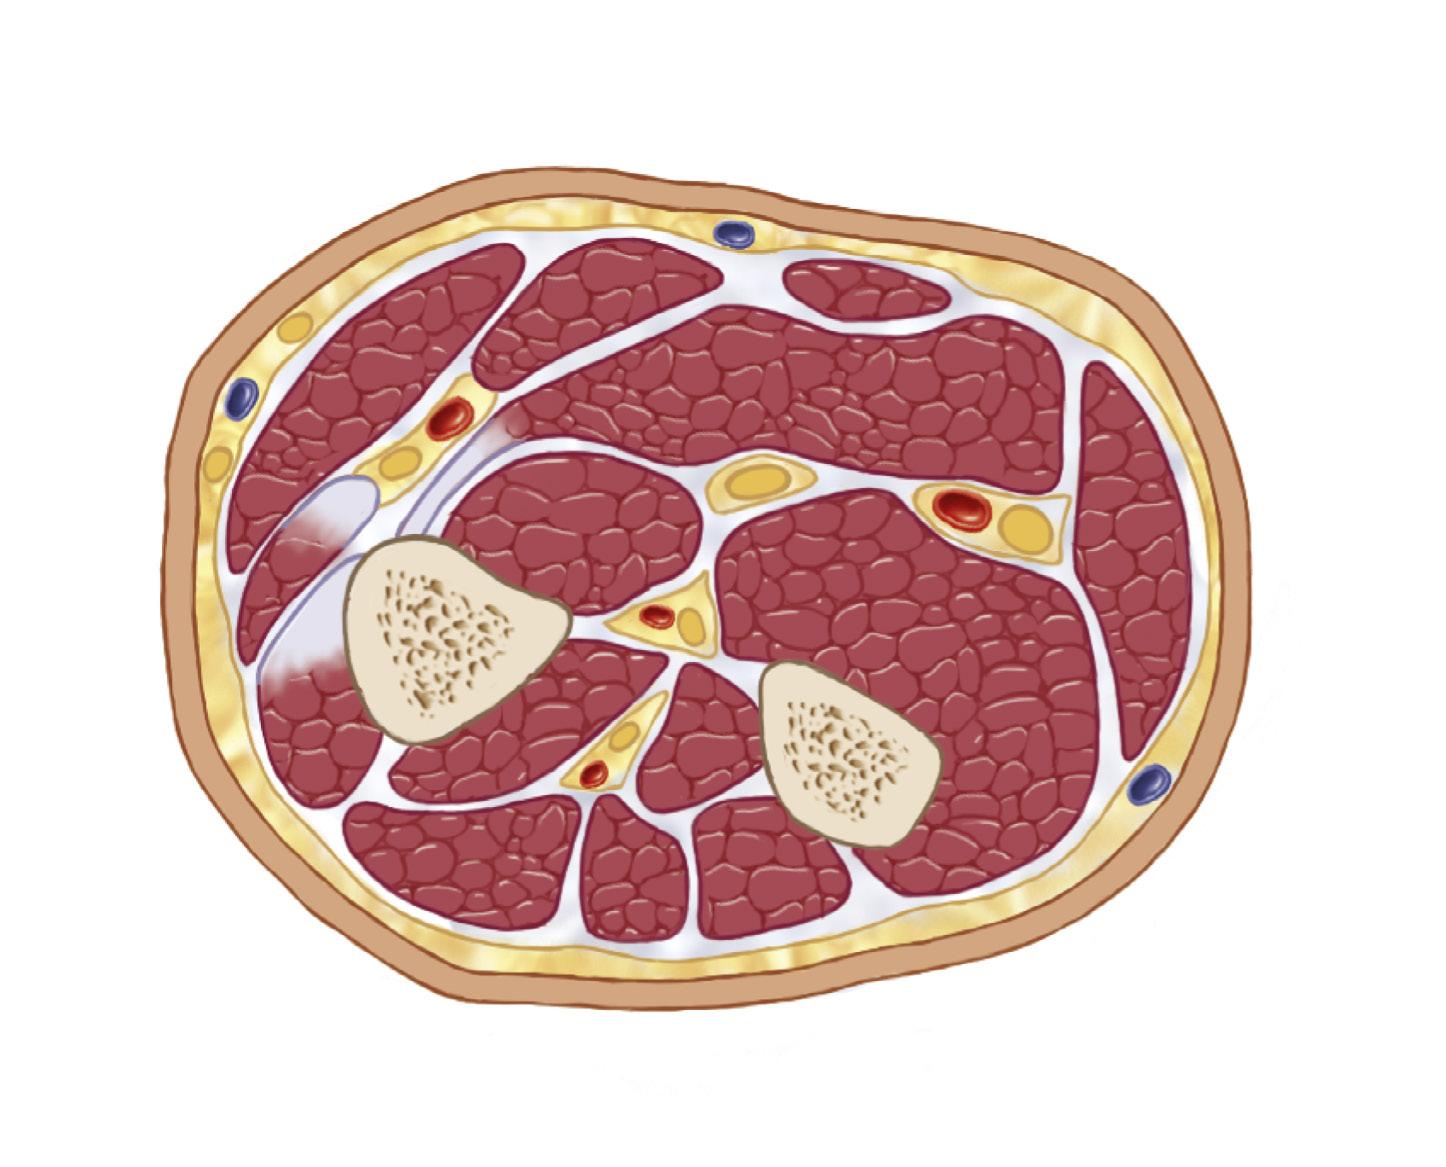
Flexor carpi radialis muscle
Brachioradialis muscle
Radial artery
Superficial branch of radial nerve
Extensor carpi radialis muscle and tendon
Flexor pollicis longus muscle
Anterior interosseous artery
Radius
Extensor carpi radialis brevis muscle and tendon
Abductor pollicis longus muscle
Extensor digitorum muscle
Posterior interosseus artery
Median nerve
Palmaris longus muscle
Flexor digitorum superficialis muscle
Ulnar artery
Ulnar nerve
Flexor carpi ulnaris muscle
Flexor digitorum profundus muscle
Anterior interosseous nerve
Interosseous membrane
Antebrachial fascia
Ulna
• Normal tissue pressures range from 0 to 8 mm Hg. Any reading over 30 mm Hg is an indication for urgent fasciectomy, and readings of 20 or above warrant very close monitoring if not early surgical intervention based on the clinical scenario. Additionally, some consider a difference of >20 mm Hg between diastolic pressure and compartment pressure as an indication for fasciotomy as well (hypotensive/septic patients).
• Slit catheters and side port needles are more accurate than straight needles when measuring compartment pressures.
Surgical Anatomy
• The forearm has three major compartments—volar, dorsal, and lateral (mobile wad). Within the volar and dorsal compartments, there are superficial and deep subcompartments. Some consider there to be a third separate volar subcompartment around the pronator quadratus. The deep volar compartment is most susceptible and most often affected by compartment syndrome, whereas the mobile wad is least commonly involved (Fig. 2.5 and Table 2.1).
• The carpal tunnel is susceptible to compressive pressures and is often released when other upper extremity fasciectomies are performed.
• The hand is reported to have as many as 10 compartments, but the clinical significance of each compartment is debated, and most surgeons do not release all compartments in the setting of hand compartment syndrome. The compartments that may need release include thenar, hypothenar, adductor pollicis, dorsal interosseous (4), and volar interosseous (3).
• Digital compartments are also described, bound by Cleland ligament and Grayson ligaments, although the clinical significance of these compartments in the setting of compartment syndrome is debated.
• For high-pressure injection injuries, the surgical approach may need to be adjusted in order to allow for adequate debridement of ischemic tissue in the area of injection (Fig. 2.1A and B).
Extensor carpi ulnaris muscle
Extensor pollicis longus muscle Extensor digiti minimi muscle
Posterior interosseus nerve
FIGURE 2.5
Myofascial Compartments of the Upper Extremity and Their Contents
Radial and ulnar Median, ulnar, and anterior interosseous
Dorsal Pos. interosseous Pos. interosseous
Radial
Digital Table 2.1
Digit
Digital Recurrent motor
Ulnar
Ulnar
Ulnar
Median
Digital
Exposures
• Forearm
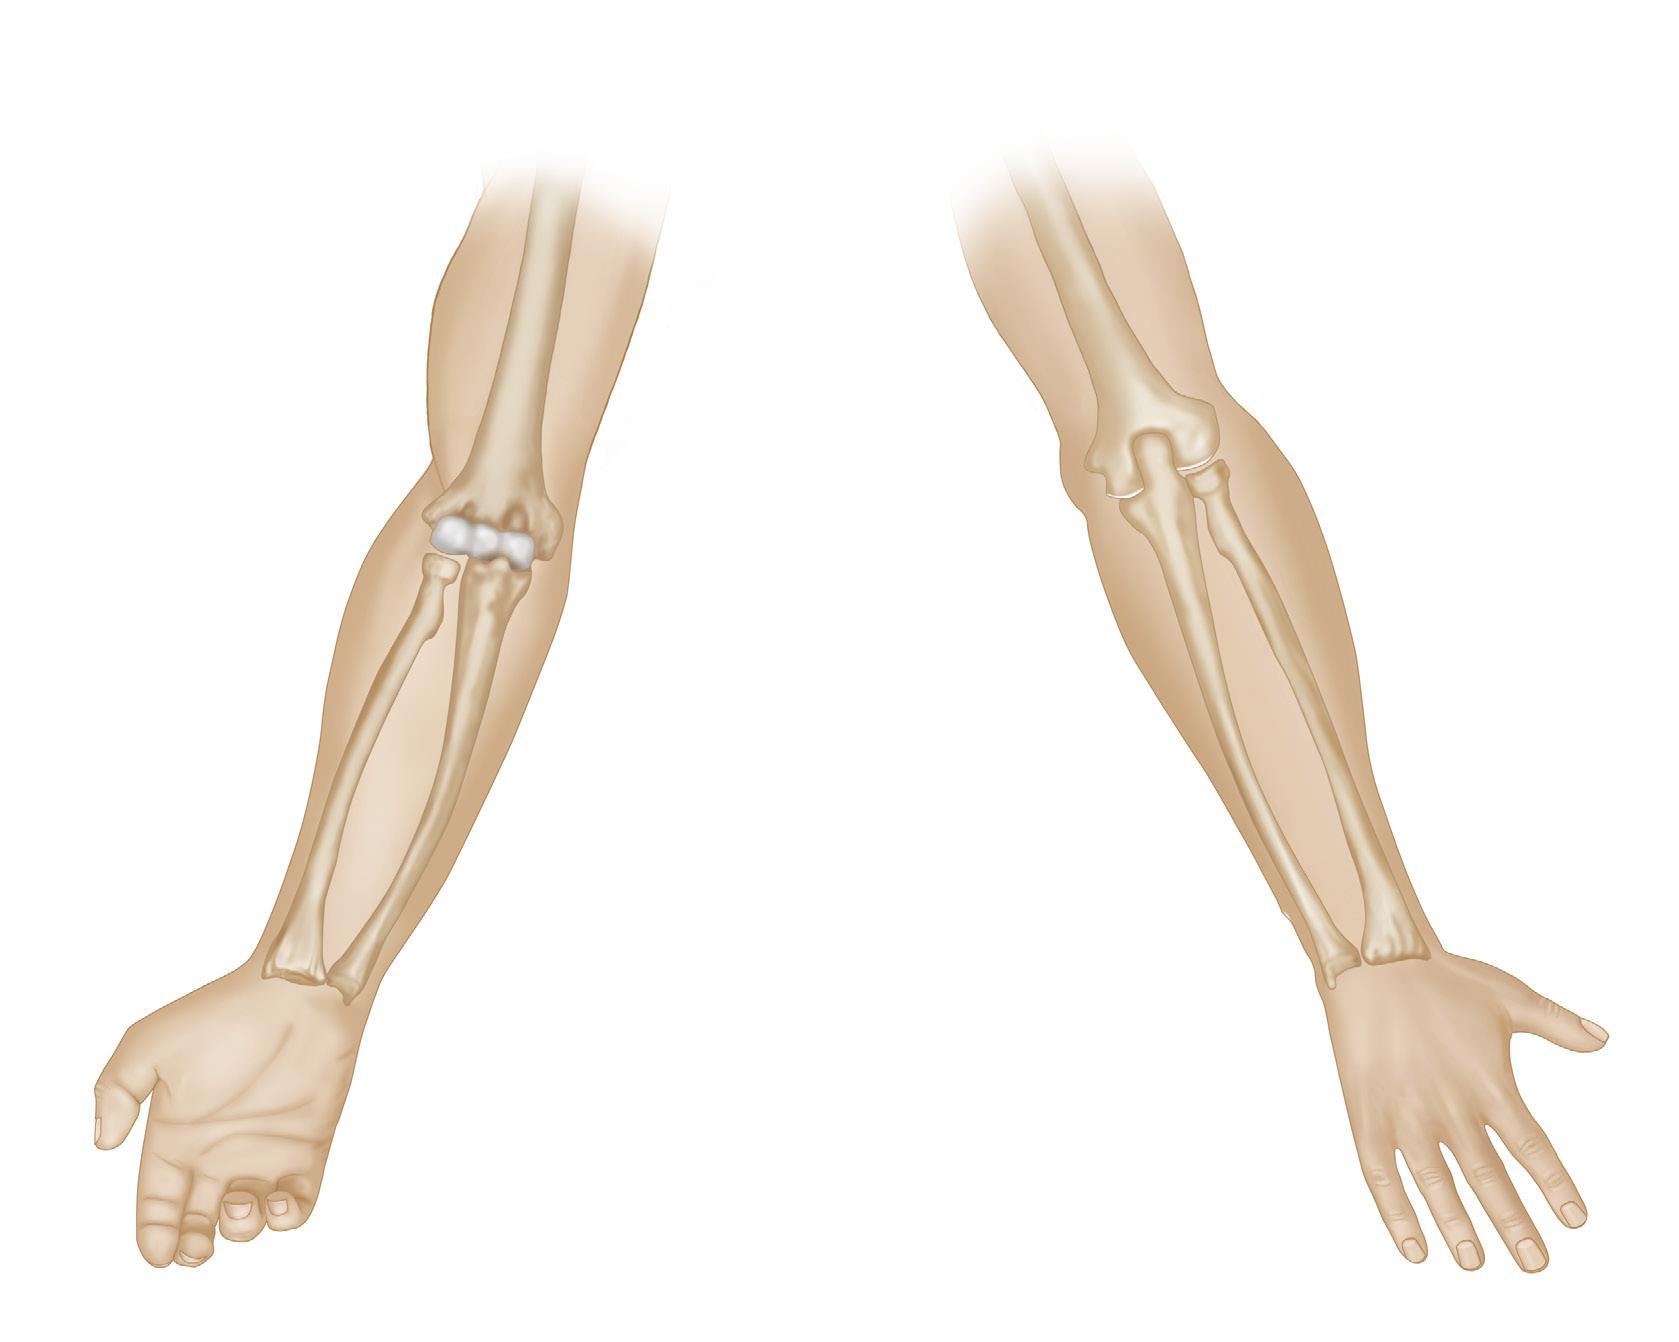
• Volar release is traditionally done via a curvilinear incision from the medial epicondyle to the proximal wrist crease. However, this places the distal flexor tendons and median nerve at risk for exposure and dehiscence, and we disagree with using this approach.
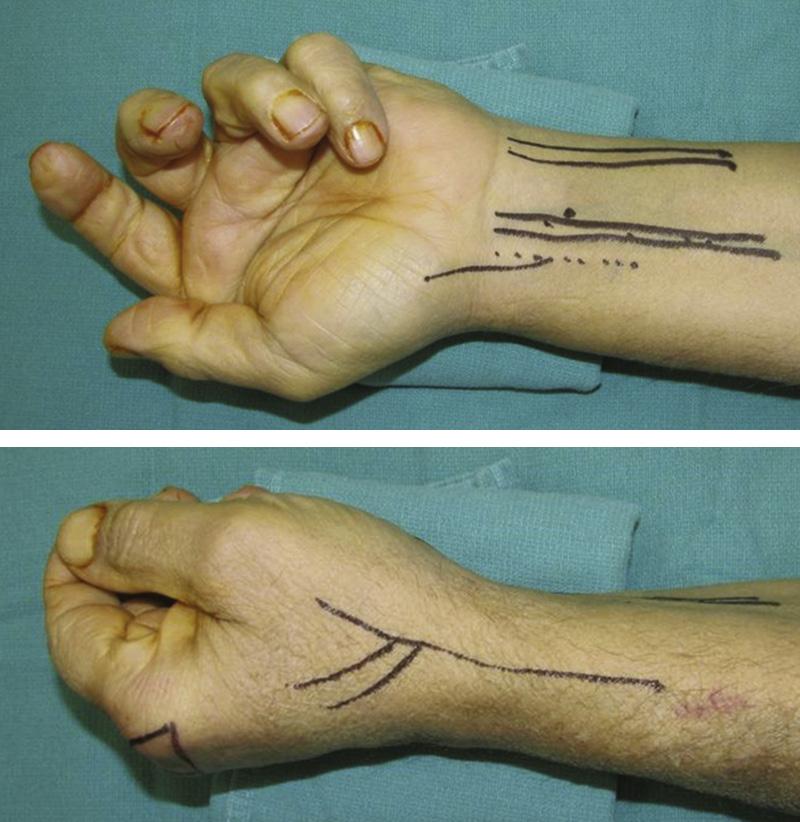
• We advocate using two longitudinal incisions—one over the volar radial aspect (over the flexor muscles) and the other over the dorsal ulnar aspect of the extensor muscles. This approach decompresses the volar and dorsal compartments without exposing the median nerve or distal forearm tendons (Figs. 2.6 and 2.7).
• The more traditional dorsal release is performed via a single longitudinal incision along a line between Lister tubercle and an area 4 cm distal to the lateral epicondyle (incision is made in the space between extensor digitorum and extensor carpi radialis brevis; Fig. 2.8). This is an acceptable approach for dorsal release; however, we have found success with the more limited incision shown in Figs. 2.6 and 2.7
• Hand
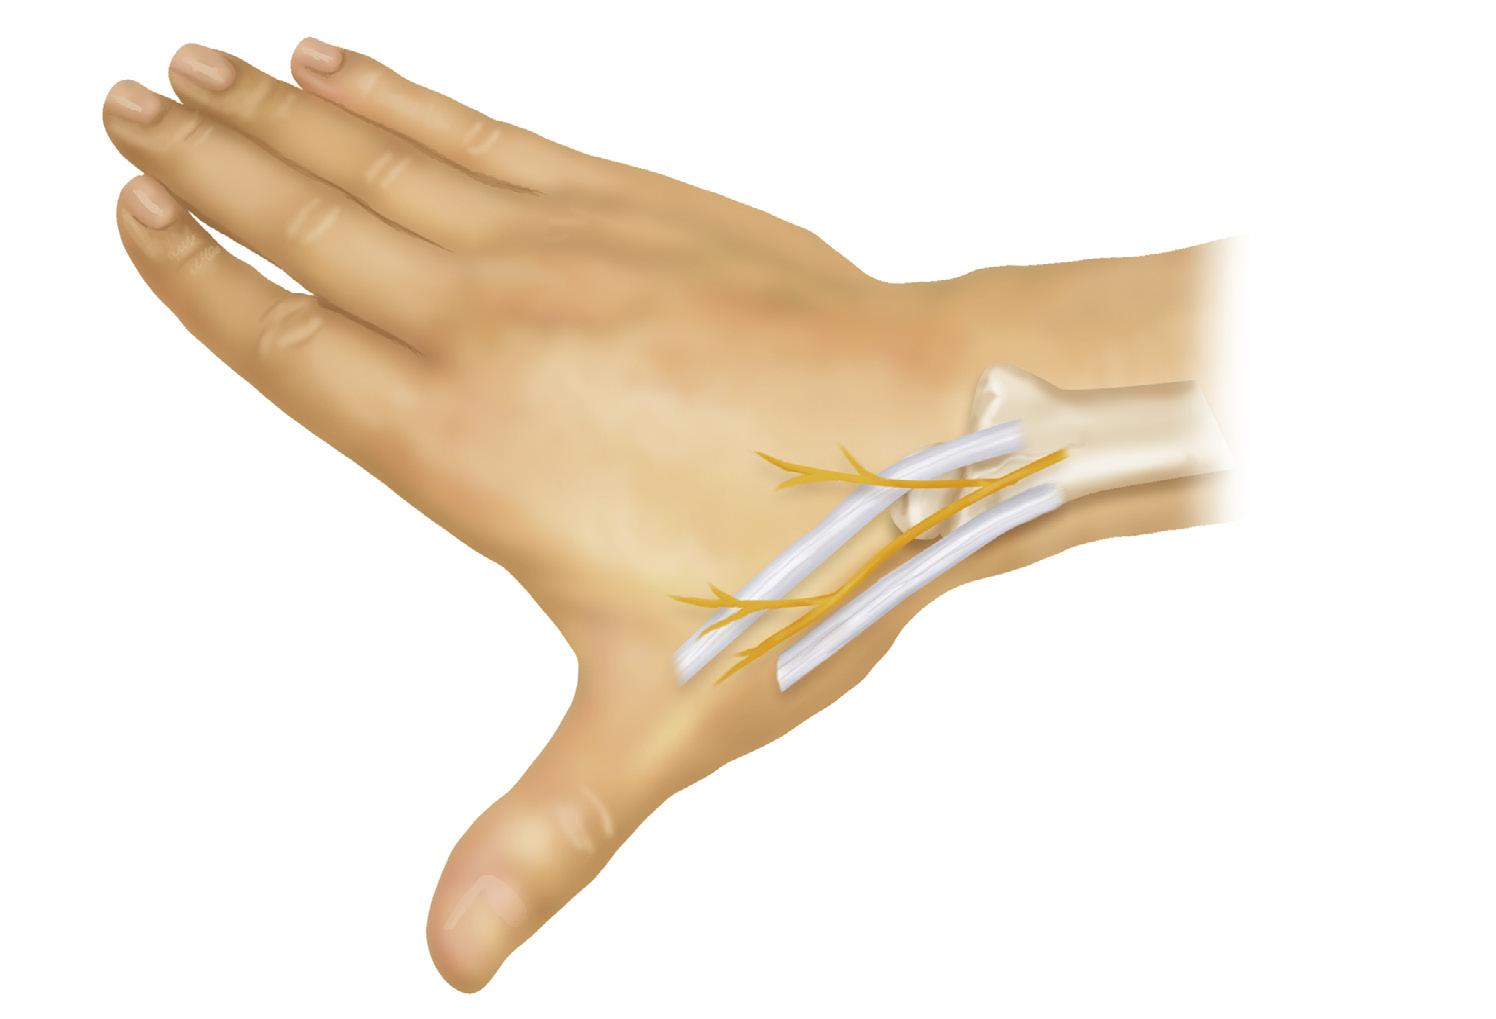
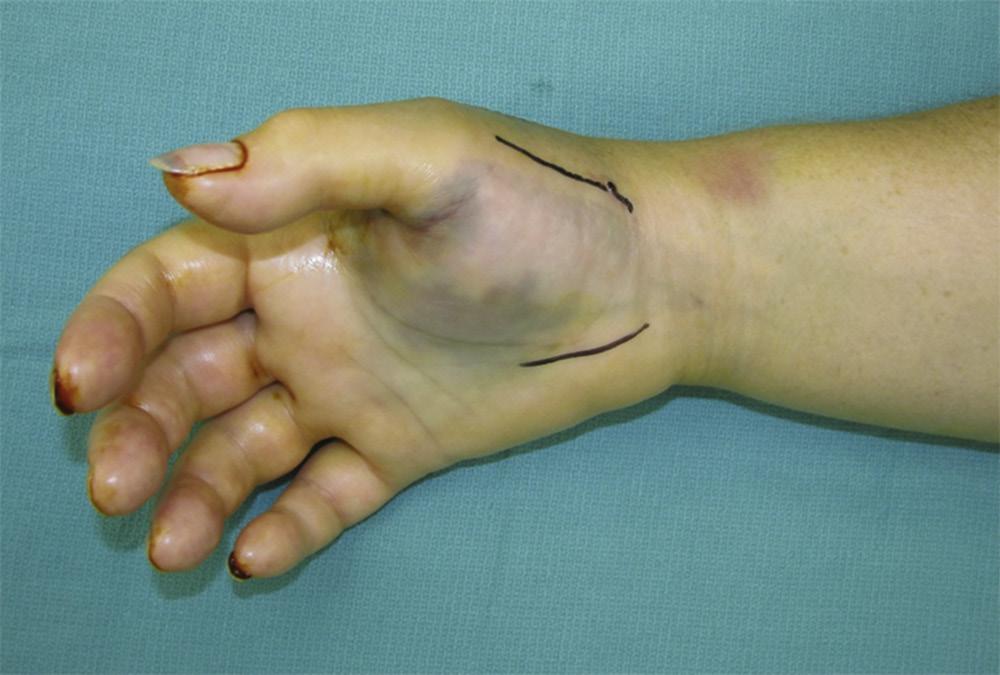
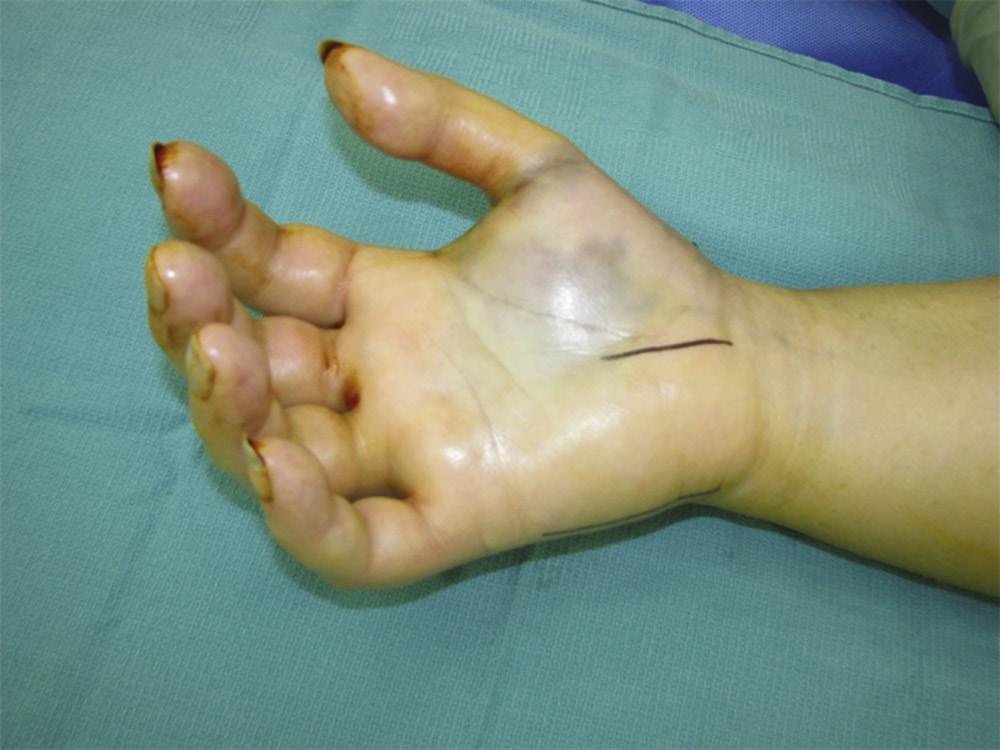
• The carpal tunnel is approached via a single incision between the thenar and hypothenar spaces, in line with the webspace between the middle finger and ring finger (Figs. 2.9–2.11).
• The thenar compartment is approached via an oblique longitudinal incision along the radial margin of the thenar eminence (Figs. 2.9 and 2.10).
• The hypothenar compartment is released via a longitudinal incision along the ulnar aspect of the palm (Fig. 2.9).
Forearm incision
Arm incision
Volar radial
Dorsal ulnar
FIGURE 2.6
FIGURE 2.7
Skin incision, dorsal forearm
FIGURE 2.8
EXPOSURES PEARLS
• Hypothenar compartment release should not be done directly on the ulnar border, but instead should be slightly radial to the border, so that the scar is not on a direct pressure area of the hand.
• If carpal tunnel decompression is also warranted, there is no reason to use an incision that crosses the wrist, as this increases risk of an open wound exposing the medial nerve and flexor tendons.
EXPOSURES PITFALLS
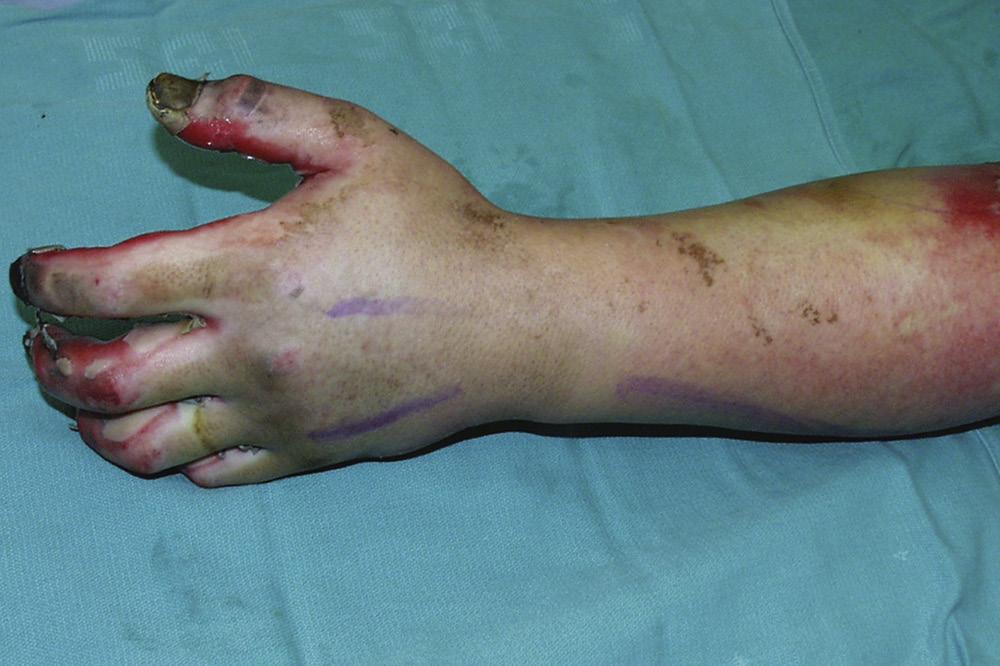
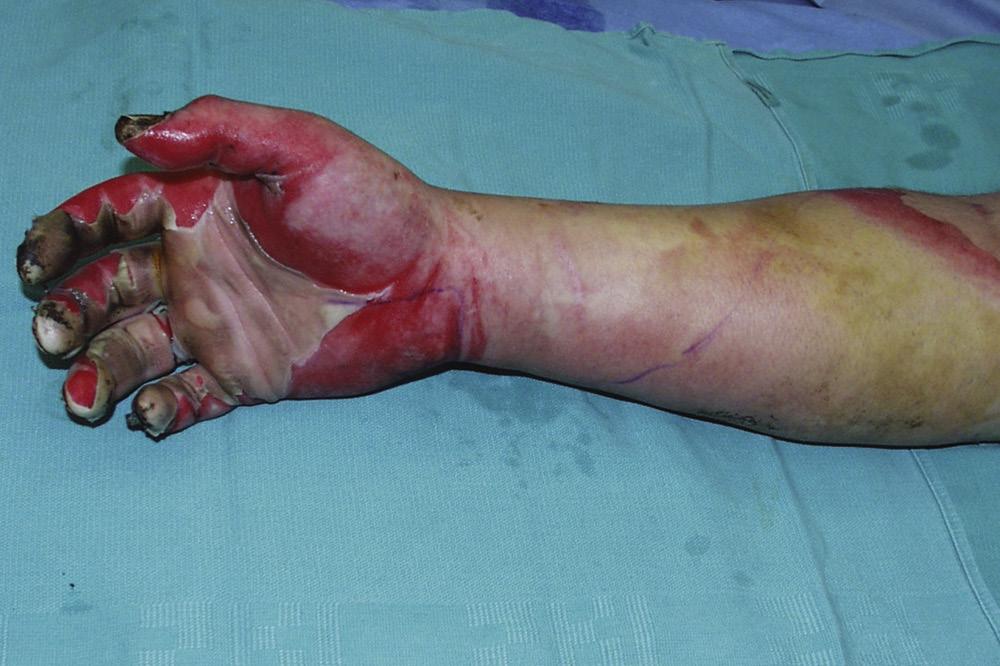
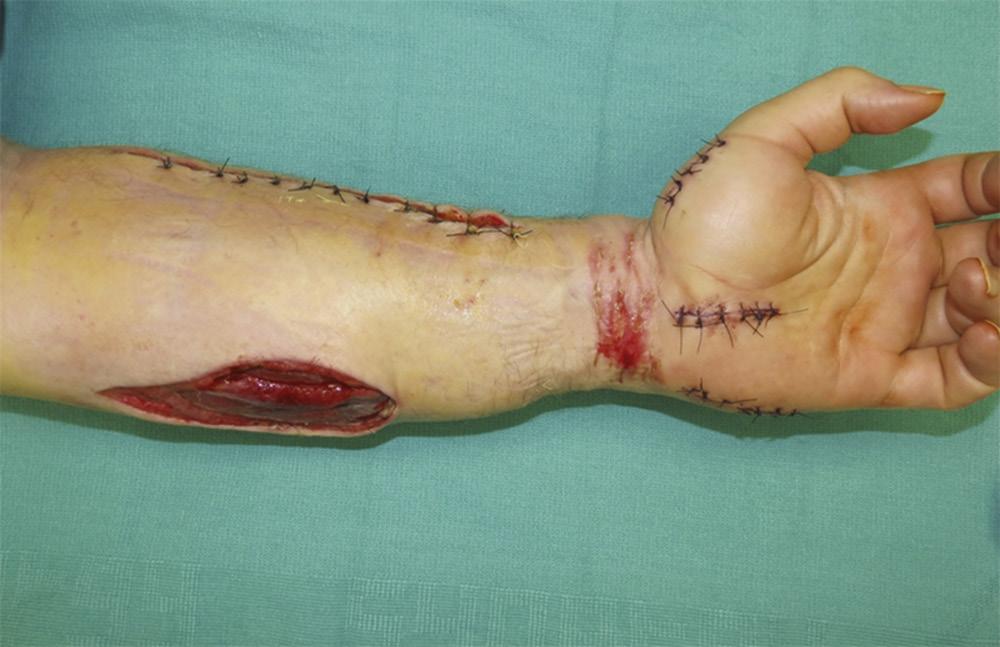
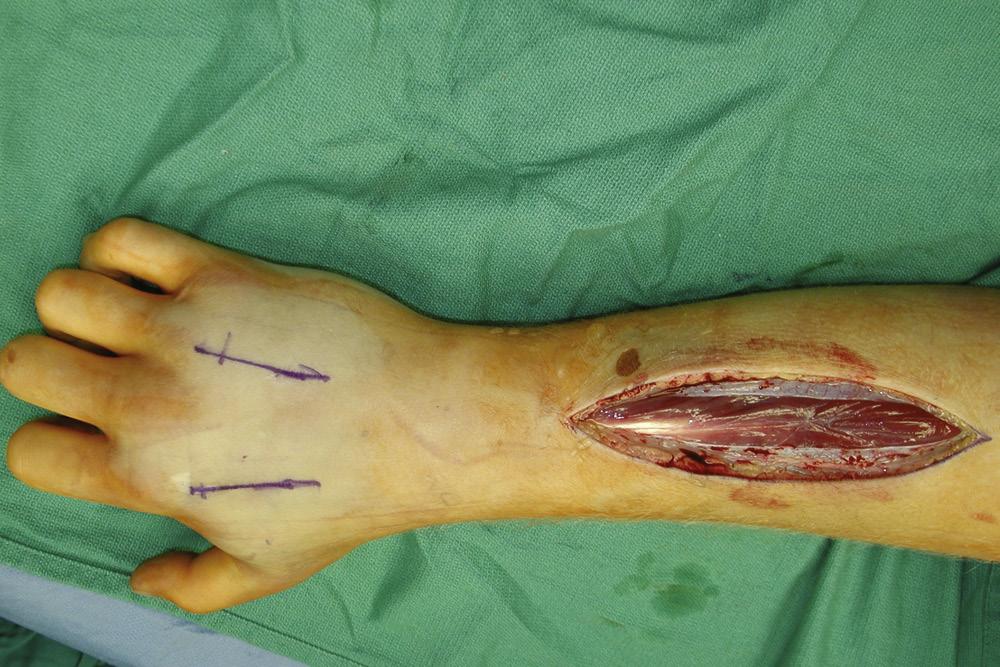
Making release incisions distal in the midvolar forearm that result in exposure of the median nerve or distal flexor tendons is not necessary and risks desiccation and necrosis of these vital structures. Avoid these exposure approaches whenever possible (Fig. 2.16A and B).
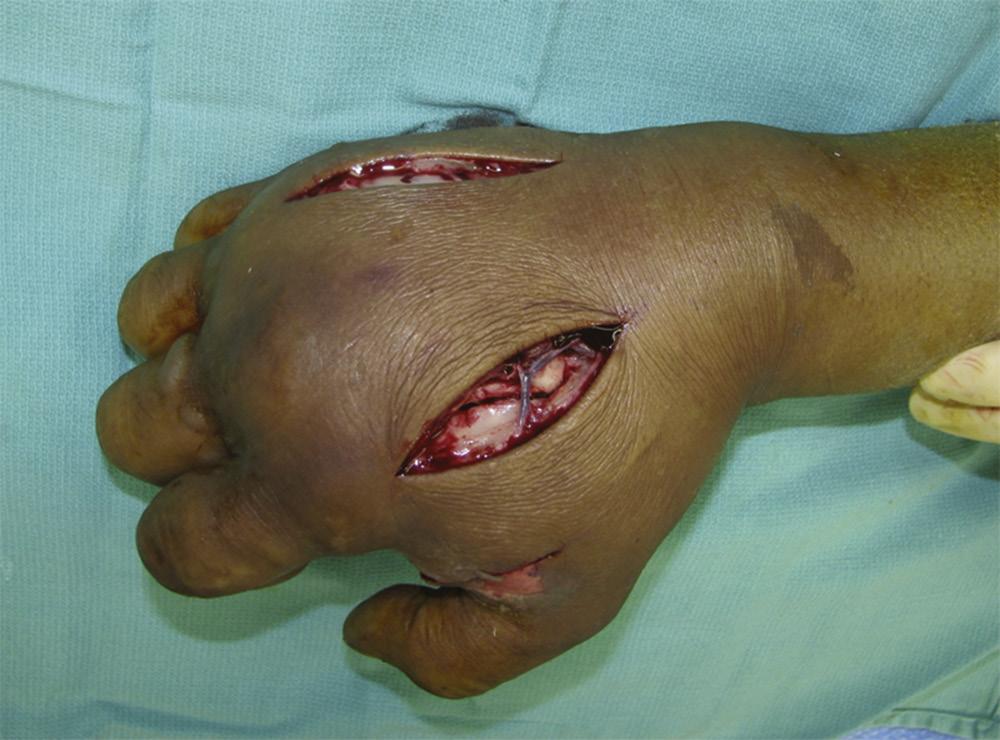
• Dorsal hand compartments are released by two longitudinal incisions parallel and radial to the index and ring finger metacarpals (Figs. 2.12–2.14).
• Finger
• Decompression can be done with a midaxial incision along the noncontact (radial for index and thumb, ulnar for middle, ring, and small) side of the finger ( Fig. 2.15 ).
Thenar release
Carpal tunnel release
Hypothenar release
FIGURE 2.9
FIGURE 2.10
FIGURE 2.11
Dorsal hand release
FIGURE 2.12
FIGURE 2.13
FIGURE 2.14
STEP 1 PEARLS
• If the muscle still appears white after opening fascia, divide the epimysium as well.
• Prior to approaching deep flexor muscles, identify the median nerve and stay ulnar to it to avoid injury to the palmar cutaneous branch.
• After electrical injury, even if the superficial volar forearm is soft, exposure and release of the deep compartment is often performed because this compartment can be injured from the electrical energy conducted through bone with sparing of the superficial compartment.
STEP 1 PITFALLS
• Avoid exposure of median nerve and distal flexor tendons (Fig. 2.16A and B).
• Traditional teaching of wide extensile exposure for forearm fasciotomy is shown in Fig. 2.16A
• Fig. 2.16B shows the risk of this approach for volar fasciotomy, a nonhealing wound with resulting exposure and desiccation of flexor tendons (black arrow pointing to flexor carpi radialis [FCR] tendon) and median nerve (white arrow); patient required amputation.
Procedure: Fasciotomy of the Forearm
Step 1: Volar Forearm Release
• The incision (Fig. 2.17) is made through skin and subcutaneous tissues, and the deep fascia investing the muscles of the forearm is divided.
• Subcutaneous flaps can be elevated allowing for mobilization of the incision site and improved exposure in all directions.
• Dissect between flexor carpi radialis and palmaris longus to expose the deep flexors (pronator quadratus, flexor pollicis longus, and flexor digitorum profundus) and decompress as needed with fascial incisions.
• It is critical to visualize deep compartment flexor muscles.
• Visualizing the deeper compartment is especially important after electrical injury.
Step 2: Dorsal Forearm Release
• For approaching the dorsal forearm compartment, our preferred incision is longitudinal along the dorsoulnar forearm (Fig. 2.6).
• Alternatively, the incision can safely be made along a line between extensor digitorum and extensor carpi radialis brevis.
• The incision is made through skin and subcutaneous tissues and the deep fascia is exposed and divided (Fig. 2.18).
• Via the same incision, approach the muscles of the mobile wad (brachioradialis, extensor carpi radialis longus, and extensor carpi radialis brevis) and divide the investing fascia to release that compartment.
FIGURE 2.16
Step 3
Release tourniquet (if one was used) and obtain hemostasis. Proceed with debridement of nonviable soft tissues back to healthy bleeding tissue.
Step 4: Postrelease
• Place any other soft tissue retention system as appropriate.
• Place bulky moist dressing over any open wounds and fit removable splint in functional position.
• Initiate regular dressing changes to prevent desiccation of exposed muscles and tendons.
STEP 4 PEARLS
• Most of the incision sites should be left open, but closure over vital structures should be done. Although using our approach should not put these structures at risk, if median nerve and flexor carpi radialis tendons are exposed, place a few tacking sutures to secure soft tissue over them.
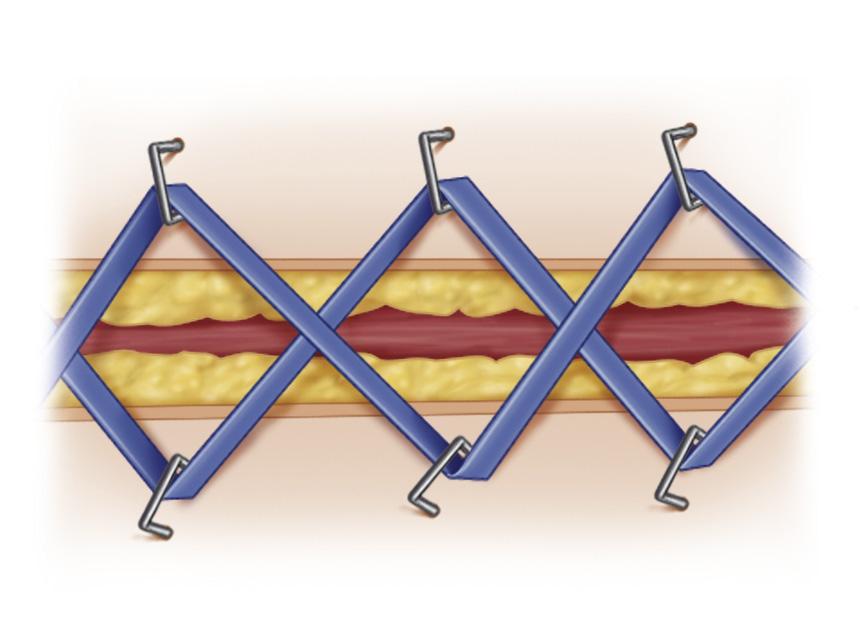
• Closure of the wounds immediately postrelease risks additional ischemia, and is technically difficult due to the edema causing large gaps between wound edges; however, retention systems can be used (e.g., staples and vessel loops; Fig. 2.19) to minimize wound gaps spreading and making reconstruction more challenging.
FIGURE 2.17
FIGURE 2.18
FIGURE 2.19
STEP 1 PEARLS
After releasing the carpal tunnel, close skin to prevent desiccation and necrosis of tunnel structures.
STEP 2 PITFALLS
Use caution with the distal extension of the incision so as not to expose metacarpophalangeal joint.
STEP 3 PITFALLS
Be careful not to divide the ulnar digital nerve to the small finger.
STEP 4 PEARLS
To fully decompress the dorsal interossei, one must incise the overlying muscle fascia, which requires the extensor tendons be mobilized and retracted to adequately access this fascia in each intermetacarpal space.
STEP 4 PITFALLS
Be cautious of the branches of the superficial radial nerve and dorsal branches of the ulnar nerve.
Procedure: Fasciotomy of the Hand
Step 1: Carpal Tunnel Release
• The incision is made between the thenar and hypothenar spaces in line with the webspace between middle finger and ring finger.
• Dissect down to and through the longitudinal aponeurotic fibers and identify the transverse fibers of the transverse carpal ligament.
• Divide the transverse carpal ligament across the full distal and proximal extent of the ligament to completely free the carpal tunnel.
Step 2: Thenar Decompression
• Deepen incision until abductor pollicis brevis is encountered.
• Divide fascia over abductor pollicis brevis.
Step 3: Hypothenar Decompression
• Deepen the incision until abductor digiti minimi is visualized.
• Divide fascia over abductor digiti minimi.
Step 4: Dorsal Decompression
• Incision along index finger metacarpal is used to decompress the first dorsal interosseous, adductor pollicis, as well as second dorsal interosseous.
• Incision along the ring finger metacarpal is used to decompress the third and fourth dorsal interossei.
Step 5
Release tourniquet (if one was used) and obtain hemostasis. Proceed with debridement of nonviable soft tissues back to healthy bleeding tissue.
Step 6: Postrelease
• Place a few tacking sutures to secure soft tissue over the carpal tunnel and other exposed critical structures.
• Place bulky moist dressing over remaining open wounds, and fit a removable splint in functional position.
• Initiate regular dressing changes to prevent desiccation of exposed muscles and tendons.
Postoperative Care and Expected Outcomes
• Elevation of the extremity postoperatively is critical in reducing edema and improving pain control.
• Reexamine the extremity within 12 to 24 hours to evaluate need for additional debridement.
• If there is any concern for muscle viability, plan on return to OR approximately 48 hours after initial surgery for examination and additional debridement.
• Wound care with regular moist gauze dressing changes (or petroleum-based dressings) is important in preventing dessication of any open wounds.
POSTOP PEARLS
If the patient can tolerate it, one may elevate the area by putting a stockinette on the arm and slinging the arm on an IV pole. If this is attempted, be sure to support the elbow with pillows.
• Attempt closure of open wounds (whether primary wound closure or skin graft) within 3 to 5 days when tissues are still somewhat pliable and in order to limit infection risk.
• If fasciotomy was performed within 4 to 6 hours of compartment syndrome onset, patient may regain full function and sensation; however, any delay beyond 3 to 4 hours may result in some degree of permanent nerve and/or muscle damage.
See also Video 2.1, Fasciotomy for Compartment Syndrome of the Hand and Forearm, on ExpertConsult.com.
EVIDENCE
Bae DS, Kadiyala RK, Waters PM. Acute compartment syndrome in children: contemporary diagnosis, treatment, and outcome. J Pediatr Orthop 2001;21:680–8. Retrospective study of 33 pediatric patients. Seventy-five percent developed compartment syndrome due to fracture. “Traditional” signs and symptoms of pain, pallor, paresthesia, paralysis, and pulselessness were not reliable for early diagnosis. However, with early diagnosis and intervention, >90% achieved full restoration of function (Level IV evidence)