From an instructional viewpoint, it is important to note that each major instrument classifcation is addressed in a stand-alone module—sickle scalers, universal curets, and area-speci c curets. Each stand-alone module provides complete step-by-step instruction in the use o an instrument classi cation. For example, the module on universal curets provides complete instruction on the use o universal curets. This chapter does not rely on the student having studied the previous module on sickle scalers be ore beginning the universal curet module. This stand-alone module structure means that it is not necessary to cover the instrument modules in any particular order or even to include all o the modules. I sickle scalers, or example, are not part o the school’s instrument kit, this module does not need to be included in the course outline.
tEXtBOOK FEAtURES
1. Module outlines. Each chapter begins with a module outline that provides an overview o content and makes it easier to locate material within the module. The outline provides the reader with an organizational ramework with which to approach new material.
2. Learning objectives assist students in recognizing and studying important concepts in each chapter.
3. Step-by-step format. The clear, step-by-step sel -instructional ormat allows the learner to work independently— ostering student autonomy and decision-making skills. The learner is ree to work at his or her own pace spending more time on a skill that he or she nds di cult and moving on when a skill comes easily. The sel -instructional ormat relieves the instructor rom the task o endlessly repeating basic in ormation, and rees him or her to demonstrate instrumentation techniques, observe student practice, and acilitate the process o skill acquisition.
4. Key terms are listed at the start o each module. One o the most challenging tasks or any student is learning a whole new dental vocabulary and gaining the con dence to use new terms with accuracy and ease. The key terms list assists students in this task by identi ying important terminology and acilitating the study and review o terminology in each instructional module.
5. Study aids—boxes, tables, and fow charts—visually highlight and rein orce important content and permit quick re erence during technique practice and at-home review.
6. Critical thinking activities—in the Practical Focus sections o the book—encourage students to apply concepts to clinical situations, acilitate classroom discussion, and promote the development o student problem-solving skills.
7. Case-based patient experiences allow students to apply instrumentation concepts to patient cases.
8. The glossary of instrumentation terms provides quick access to instrumentation terminology.
9. Student self-evaluation checklists guide practice, promote sel -assessment skills, and provide benchmarks or aculty evaluation o skill attainment. Use o the student selevaluation portion o the evaluation orms should be encouraged. The sel -evaluation process helps students to develop the ability to assess their own level o competence rather than relying on instructor con rmation o skill attainment.
ONLINE CONTENT
In addition to the Student and Instructor Resources, the following resources are located online at thePoint website (http://thePoint.lww.com/GehrigFundamentals8e).
• 27B. Set-Up of Hu-Friedy/EMS Air Flow Polishing Devices
I appreciate the enthusiastic comments and suggestions from educators and students about previous editions of Fundamentals, and welcome continued input. Mastering the psychomotor skill of periodontal instrumentation is a very challenging process. It is my sincere hope that this textbook will help students to acquire the psychomotor skills that—combined with clinical experience—will lead to excellence in periodontal instrumentation.
Jill S. Gehrig, RDH, MA
Acknowledgments
It is grati ying to be members o a pro ession that includes so many individuals who strive or excellence in teaching. We are most grate ul to all o the outstanding educators who shared their comments and suggestions or improving this edition. We thank all who generously gave their time, ideas, and resources, and grate ully acknowledge the special contributions o the ollowing individuals:
• Charles D. Whitehead and Holly R. Fischer, MFA, the highly skilled medical illustrators, who created all the wonder ul illustrations or the book.
• Kevin Dietz, a colleague and riend or his vision and guidance or this book.
• And fnally, and with great thanks, my wonder ul team at Lippincott Williams and Wilkins, without whose guidance and support this book would not have been possible: Jonathan Joyce, John Larkin, and Jennifer Clements.
Jill S. Gehrig, Rebecca Sroda, and Darlene Saccuzzo
Contents
Module 1 ERGOnOMiCS AnD PERiODOntAL inStRUMEntAtiOn 1
Jill S. Gehrig, Rebecca Sroda, and Darlene Saccuzzo
Ergonomic Risk Factors Associated with Periodontal Instrumentation 3
Foundational Skills or Periodontal Instrumentation 9
Ergonomic Dos and Don’ts or Seated Posture 11
Application o Ergonomic Principles: Seated Posture 14
Application o Ergonomic Principles: Positioning the Patient 19
Application o Ergonomic Principles: Adjusting the Overhead Light and Instrument Tray 23
Application o Ergonomic Principles: Adjusting the Patient to Facilitate Clinician Posture 25
Ancillary Equipment 28
Skill Application 36
Module 2 CLiniCiAn POSitiOn in RELAtiOn tO tHE
tREAtMEnt AREA 39
Jill S. Gehrig, Rebecca Sroda, and Darlene Saccuzzo
Clock Positions or Instrumentation 41
Positioning or the RIGHT-Handed Clinician 43
Positioning or the LEFT-Handed Clinician 54
Modifed Positioning: Working rom a Standing Position 65
Skill Application 66
Module 3 inStRUMEnt GRASP 69
Jill S. Gehrig, Rebecca Sroda, and Darlene Saccuzzo
Grasp or Periodontal Instrumentation 71
Grasp Variations 76
Predisposing Conditions or Hand Injuries 78
Exercises or Improved Hand Strength 82
Skill Application 86
Module 4 USE OF tHE DEntAL MOUtH MiRROR 89
Jill S. Gehrig, Rebecca Sroda, and Darlene Saccuzzo
Fundamentals o Mirror Use 91
Is Achieving Direct Vision Really Best? 96
Technique Practice: RIGHT-Handed Clinician 98
Technique Practice: LEFT-Handed Clinician 103
Skill Application 109
Module 5 FinGER REStS in tHE AntERiOR SEXtAntS 110
Jill S. Gehrig, Rebecca Sroda, and Darlene Saccuzzo
The Intraoral Fulcrum 112
Wrist Position or Instrumentation 114
Technique Practice: RIGHT-Handed Clinician 118
Technique Practice: LEFT-Handed Clinician 131
Skill Application 145
Module 6 FinGER REStS in MAnDiBULAR POStERiOR SEXtAntS 147
Jill S. Gehrig, Rebecca Sroda, and Darlene Saccuzzo
Building Blocks or Posterior Sextants 149
Technique Practice: RIGHT-Handed Clinician 151
Technique Practice: LEFT-Handed Clinician 158
Skill Application 166
Module 7 FinGER REStS in MAXiLLARy POStERiOR SEXtAntS 169
Jill S. Gehrig, Rebecca Sroda, and Darlene Saccuzzo
Building Blocks or Posterior Sextants 171
Technique Practice: RIGHT-Handed Clinician 173
Technique Practice: LEFT-Handed Clinician 180
Preventive Strategies: Stretches 187
Skill Application 190
Module 8 inStRUMEnt DESiGn AnD CLASSiFiCAtiOn 193
Jill S. Gehrig, Rebecca Sroda, and Darlene Saccuzzo
Design Characteristics o Instrument Handle 195
Design Characteristics o Instrument Shank 198
Design Characteristics o Instrument Working-End 202
Introduction to Instrument Classifcation 207
Skill Application 210
Module 9 tECHniQUE ESSEntiALS: MOvEMEnt AnD ORiEntAtiOn tO tOOtH SURFACE 213
Jill S. Gehrig, Rebecca Sroda, and Darlene Saccuzzo
Learning Periodontal Instrumentation 215
Moving the Instrument’s Working-End 219
Rolling the Instrument Handle 223
Contents
Pivoting on the Fulcrum 224
Orientation of Instrument to Tooth Surface 225
Skill Application 231
Module 10 tECHniQUE ESSEntiALS: ADAPtAtiOn 232
Jill S. Gehrig, Rebecca Sroda, and Darlene Saccuzzo
Module 1B GEttinG READy FOR inStRUMEntAtiOn: MAtHEMAtiCAL PRinCiPLES AnD AnAtOMiC DESCRiPtORS
Jill S. Gehrig, Rebecca Sroda, and Darlene Saccuzzo
Module 20B DEBRiDEMEnt OF DEntAL iMPLAntS
Jill S. Gehrig, Rebecca Sroda, and Darlene Saccuzzo
Module 21B ALtERnAtE CLOCK POSitiOnS
Cynthia Biron Leisica
Module 26B COSMEtiC POLiSHinG PROCEDURES
Jill S. Gehrig, Rebecca Sroda, and Darlene Saccuzzo
Module 27B SEt-UP OF AiR POLiSHinG DEviCES
Jill S. Gehrig, Rebecca Sroda, and Darlene Saccuzzo
StUDEnt AnD inStRUCtOR RESOURCES
Sharon Logue, Rebecca Sroda, and Jill S. Gehrig, Rebecca Sroda, and Darlene Saccuzzo
Glossar
Index 745
Ergonomics and Periodontal Instrumentation
Module Overview
This m intr c s th princip s p siti ning r p ri nta instr m ntati n. C rr ct p siti ning t chniq s h p t (1) pr v nt c inician isc m rt an inj ry, (2) p rmit
vi w th t th b ing w rk
(3) a w asy
t th t th ring instr m ntati
an (4) aci itat fci nt tr atm nt th pati nt. Prior to beginning this module, readers should review the online resource: Getting Ready for Instrumentation: Mathematical Principles and Anatomical Descriptors.
Module Outline
Skill Building. Neutral Seated Position for the Clinician, p. 14 Skill Building. The Masking Tape Trick, p. 17
Section 7 Application of Ergonomic Principles: Adjusting the Patient to Facilitate Clinician Posture 25
Skill Building. Establishing the Height of the Patient Chair, p. 27
Section 8 Ancillary Equipment 28
Dental Headlights: Coaxial Illumination
Magnifcation Loupes
Section 9 Skill Application 36
Practical Focus: Selecting a Clinician Stool
Online Module Skill Evaluations
Student Sel -Evaluation Module 1: Position
Acc ss th onlin mo ul , Getting Ready for Instrumentation: Mathematical Principles and Anatomical Descriptors
This mo ul can b vi w at http://th point.lww.com/ G hrigFun am ntals8
Key Terms
ergonomics
Musculosk l tal isor r
Postur
N utral postur
Static postur
Forc
R p titiv task
Supin position
S mi-supin position
Chin-up position
Chin- own position
Coaxial illumination sourc s
Learning Objectives
d ntal h a lights
Magnifcation loup s
Working istanc
Angl o clination
d pth o f l
Fi l o vi w
Blin zon
• d fn th t rm rgonomics an iscuss how rgonomic principl s ar h lp ul in th practic o ntal hygi n .
• d fn th t rm musculosk l tal isor r (MSd) an iscuss th signifcanc o MSds in th practic o ntal hygi n .
• Nam our rgonomic hazar s or ntal hygi nists.
• d v lop an un rstan ing an appr ciation or rgonomic gui lin s to minimiz th xposur o ntal hygi nists to musculosk l tal str ss.
• I nti y musculosk l tal isor rs commonly xp ri nc by ntal h alth pro ssionals, th ir caus s an pr v ntion.
• discuss an monstrat th l m nts o n utral s at postur or th clinician.
• d monstrat corr ct pati nt position r lativ to th clinician an positioning o ntal quipm nt so that it nhanc s n utral clinician postur .
• Stat th r ason why it is important that th top o th pati nt’s h a is v n with top g o th chair h a r st. d monstrat how to corr ctly position a short in ivi ual an a chil in th ntal chair so that (1) th pati nt is com ortabl an (2) th clinician has goo vision an acc ss to th oral cavity.
• In th pr clinical or clinical s tting, s l - valuat to i nti y th us o incorr ct rgonomic principl s an monstrat how to corr ct th probl m(s).
Section 1
Ergonomic Risk Factors Associated with Periodontal Instrumentation
WHAT IS ERGONOMICS AND WHY SHOULD HYGIENISTS CARE?
1. Ergonomics is an applied science concerned with the ‘ t’ between people and their technological tools and environments (1).
A. In application, ergonomics is a discipline focused on making products and tasks comfortable and ef cient for the user.
1. A primary ergonomic principle is that equipment—such as computer keyboards and workstations—should be designed to t the user instead of forcing the user to t the equipment.
2. Ergonomics is the science of making things ef cient. Ef ciency is quite simply making something easier to do.
B. Poor Ergonomic Working Conditions and Working Practices. When the t between an individual and his or her tools and working environment is less than optimal studies show that worker comfort, productivity, and workplace safety all suffer (1). For dental hygienists the work environment includes the dental of ce layout, dental equipment, and instruments.
2. Musculoskeletal Stresses and the Dental Professional. The dental literature indicates that both dentists and hygienists are exposed to ergonomic risk factors that often lead to discomfort, pain, and even disability.
A. A musculoskeletal disorder (MSD) is a condition where parts of the musculoskeletal system—muscles, tendons, nerves—are injured over time.
1. MSDs occur when too much stress is exerted on a body part resulting in pain. When a body part is overused repeatedly the constant stress causes damage.
2. Almost all occupations require workers to use their arms and hands. Therefore, most MSDs affect the hands, wrists, elbows, neck, and shoulders.
B. Prevalence of Musculoskeletal Problems in Dental Professionals
1. Many studies have investigated the prevalence of MSDs among dental professionals. A systemic review on this topic found that the prevalence of MSDs ranged as high as 64% to 93% (2).
2. Despite this high prevalence, there is a lack of evidence regarding the ef cacy of preventive measure for MSDs for the dental hygiene profession (3). A complete understanding of the progression of MSDs in dental hygienists is still far from being realized, due to the lack of longitudinal studies and standardized research techniques (3–5).
C. Causes of Musculoskeletal Pain in Dental Professionals
1. The literature indicates that the causes of MSDs among periodontists and dental hygienists include excessive use of small hand muscles, forceful repetitive motions while maintaining muscles in same position during application of force, tight grips, and a xed work position (maintaining the body in one position for extended periods) (2–13).
2. The result is injury to the muscles, nerves, and tendon sheaths of the back, shoulders, neck, arms, elbows, wrists, and hands that can cause loss of strength, impairment of motor control, tingling, numbness, or pain.
3. Given the high incidence of musculoskeletal pain, it is important for clinicians to understand the causes of MSDs and to take actions to prevent them.
D. Ergonomic Guidelines in Dentistry
1. It is important that dental hygiene students complete instructional modules on ergonomic principles during their education and training (3,5).
2. Research shows that among practicing hygienists, education on patient and clinician positioning can help reduce the risk of MSDs (4,14,15).
3. It is possible to de ne ergonomic guidelines to minimize exposure of dental healthcare providers to musculoskeletal stress.
ERGONOMIC HAZARDS FOR DENTAL HYGIENISTS
Four signi cant ergonomic hazards during periodontal instrumentation are (1) awkward clinician posture, static ( xed) working position, the force placed on a body part, and (4) repetitive movements. Figure 1-1 summarizes these hazards that can lead to musculoskeletal injury.
1. Awkward Postures. Posture is a term for the position of various parts of the body during an activity.
A. For most joints, ideal or neutral posture means that the joint is being used near the middle of its full range of motion.
B. The further a joint moves away from neutral posture, the more strain is placed on the muscles, tendons, and ligaments around the joint (37). For example, if an individual stands with his or her arms outstretched in front of the body, the elbow and shoulder joints are at their range of motion. If the individual pulls or lifts repeatedly in this outstretched position—versus held close to the body—there is a high risk of injury.
C. The literature con rms the presence of awkward postures speci cally in the neck, shoulders, back, wrist, and hand for dental hygienists. Awkward postures often are adopted due to improper adjustment of the clinician’s chair, improper patient position in relation to the clinician, and poor work techniques.
D. When dental hygienists use their bodies in awkward positions, the muscles must generate higher forces to accomplish a task than when muscles are used in a neutral position (38).
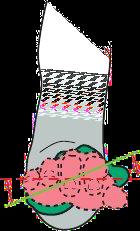
E. A common awkward posture in dental hygienists is wrist exion, which results in stress to neurovascular structures and ligaments. Poor wrist positioning can diminish grip strength (39). Figure 1-2 shows the reduction in strength that occurs as the wrist deviates further away from its neutral posture (37).
Figure 1-1. Ergonomic Hazards for Dental Hygienists. The dental hygienist has a high risk of musculoskeletal injury when awkward postures, static postures, and repetitive motions are combined with forceful movements (42–45).
Ackward Postures
Force
Repetitive movements
Fixed working positions (static postures)
2. Static Postures
Figure 1-2. Efect o Poor Positioning on Wrist Strength. This illustration shows the reduction in strength that occurs as the wrist deviates away from its neutral position (37).
A. A static posture is de ned as a xed working position (maintaining the body in one position for an extended period of time) (1). The human body was not designed to maintain the same body position—prolonged static posture—hour after hour, day after day. In a static position, tensed muscles compress the blood vessels and reduce blood ow decreasing the oxygen and energy supply to the muscles. Waste products from the muscles accumulate causing muscle fatigue and eventually pain (1).
B. Dental clinicians have been observed statically holding postures that require greater than 50% of the body’s musculature to contract (37).
C. Static gripping of instrument handles for durations exceeding 20 minutes is common during periodontal instrumentation (40).
3. Force
A. Force refers to the amount of effort created by the muscles, as well as, the amount of pressure placed on a body part.
B. Holding a small instrument for a prolonged period of time is an example of a gripping task requiring high force application. This task is commonly performed with a pinch grip where the ngers are on one side of the object and the thumb is on the other. This form of gripping is undesirable, as it requires a much greater force application than holding an object in the palm of the hand.
C. Researchers suggest that excessive use of a pinch grip is the greatest contributing risk factor in the development of MSDs among dental hygienists (40,41).
4. Repetitive Movements
A. Silverstein (42), in an article in the British Journal of Industrial Medicine, de ned a repetitive task as a task that involves the same fundamental movement for more than 50% of the work cycle. Periodontal instrumentation would certainly be categorized as a repetitive task under this de nition.
B. The human body was not designed to engage in ne hand movements hour after hour, day after day. The risk of developing an MSD increases when the same or similar parts of the body are used continuously, with few breaks or changes for rest (37).
C. Periodontal instrumentation requires excessive upper-body immobility while the tendons and muscles of the forearms, hands, and ngers overwork. Three critical components to consider with repetitive motions include:
1. Frequency: how many times an action is repeated; such as how many instruments are gripped by one hand throughout the day.
2. Duration: how long an action is performed; such as the length of time sitting in a static posture during the workday.
3. Recovery time: periods of rest that break a repetitive cycle, such as time spent doing muscle stretches between patients.
MUSCULOSKELETAL PROBLEMS COMMON IN DENTAL HYGIENISTS
MSDs commonly experienced by dental hygienists and periodontists are illustrated in Figures 1-3 to 1-10.
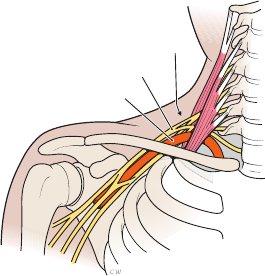
Figure 1-3. Thoracic Outlet Syndrome
1. Defnition
A painful disorder of the ngers, hand, and/ or wrist due to the compression of the brachial nerve plexus and vessels between the neck and shoulder
2. Causes
Tilting the head forward, hunching the shoulders forward, and continuously reaching overhead
3. Symptoms
Numbness, tingling, and/or pain in the ngers, hand, or wrist
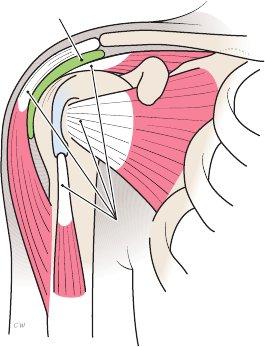
Figure 1-4. Rotator Cuf Tendinitis
1. Defnition
A painful in ammation of the muscle tendons in the shoulder region
2. Causes
Holding the elbow above waist level and holding the upper arm away from the body
3 . Symptoms
Severe pain and impaired function of the shoulder joint
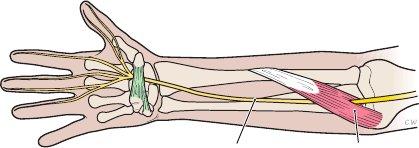
Figure 1-5. Pronator Syndrome
1. Defnition
A painful disorder of the wrist and hand caused by compression of the median nerve between the two heads of the pronator teres muscle
2. Causes
Holding the lower arm away from the body
3. Symptoms
Similar to those of carpal tunnel syndrome
Thoracic outlet
Brachial nerve plexus
Brachial artery
Subacromial bursa
Tendons
Pronator teres muscle Median nerve
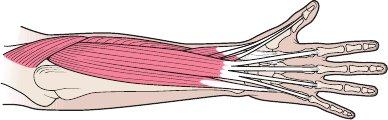
Figure 1-6. Extensor Wad Strain
1. Defnition
A painful disorder of the ngers due to injury of the extensor muscles of the thumb and ngers
2. Causes
Extending the ngers independently of each other
3. Symptoms
Numbness, pain, and loss of strength in the ngers
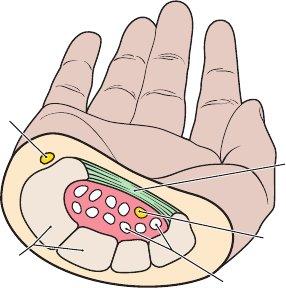
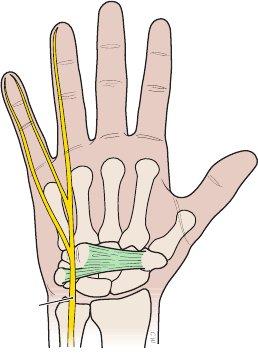
Figure 1-7. Carpal Tunnel Syndrome (CTS)
1. Defnition
A painful disorder of the wrist and hand caused by compression of the median nerve within the carpal tunnel of the wrist
2. Causes The nerve bers of the median nerve originate in the spinal cord in the neck; therefore, poor posture can cause symptoms of CTS. Other causes include repeatedly bending the hand up, down, or from side-to-side at the wrist and continuously pinch-gripping an instrument without resting the muscles
3. Symptoms
Numbness, pain, tingling in the thumb, index, and middle ngers
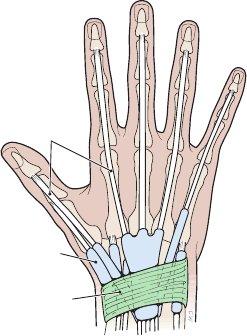
Figure 1-8. Ulnar Nerve Entrapment
1. Defnition
A painful disorder of the lower arm and wrist caused by compression of the ulnar nerve of the arm as it passes through the wrist
2. Causes
Bending the hand up, down, or from side-toside at the wrist and holding the little nger a full span away from the hand
3. Symptoms
Numbness, tingling, and/or loss of strength in the lower arm or wrist
Extensor muscles
Median nerve
Carpal ligament
Ulnar nerve
Flexor tendons
Carpal bones
Ulnar nerve
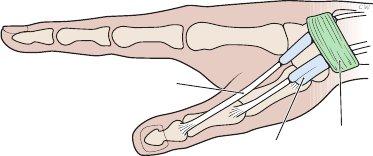
Figure 1-9. Tenosynovitis
1. Defnition
A painful in ammation of the tendons on the side of the wrist and at the base of the thumb
2. Causes
Hand twisting, forceful gripping, bending the hand back or to the side
3. Symptoms
Pain on the side of the wrist and the base of the thumb; sometimes movement of the wrist yields a crackling noise
Tendons
Figure 1-10. Tendinitis
1. Defnition
A painful in ammation of the tendons of the wrist resulting from strain
2. Causes
Repeatedly extending the hand up or down at the wrist
3. Symptoms
Pain in the wrist, especially on the outer edges of the hand, rather than through the center of the wrist
Ligament Synovial sheaths
Tendons Synovial sheaths Ligament
Section 2
Foundational Skills for Periodontal Instrumentation
Periodontal instrumentation is a complex psychomotor skill that involves the precise execution of many individual component skills. Swinging a golf club is an everyday example of a complex psychomotor skill that involves many component skills, for example, proper stance, grip on the club handle, position of the golfer’s head, and movement to swing the golf club.
1. Foundational Building Blocks of Periodontal Instrumentation. Many building blocks—individual skill components—are involved in periodontal instrumentation. These building blocks are discussed below and illustrated in Figure 1-11.
A. Building Block 1: Position. The building block of “positioning” entails the proper use of equipment, as well as, positioning the patient and clinician.
B. Building Block 2: Instrument Grasp. This building block involves the way in which the clinician holds a periodontal instrument.
C. Building Block 3: Mirror Use. A dental mirror allows a clinician to view tooth surfaces or other oral structures that are obscured from direct viewing.
D. Building Block 4: Finger Rests. This building block entails the manner in which the clinician stabilizes his or her hand in the oral cavity during periodontal instrumentation.
E. Building Block 5: Stroke Production. This building block refers to the manner in which the working-end of a periodontal instrument is moved against the tooth surface. Stroke production is a complex skill that involves several smaller component skills—activation, adaptation, and angulation—that are discussed later in this book.
1-11. Building Blocks for Periodontal Instrumentation. Success ul periodontal instrumentation requires the mastery the individual skill components o position, grasp, mirror use, fnger rests, and stroke production.
Position
Grasp
Mirror
Finger Rests
Stroke
Figure
2. Signifcance o the Building Blocks or Periodontal Instrumentation
A. Precise Per ormance.
1. Precise, accurate performance of the building blocks is essential if periodontal instrumentation is to be effective, ef cient, safe for the patient, and comfortable for the clinician.
2. Research on psychomotor skill acquisition indicates that a high level of mastery in the performance of skill building blocks is essential to successful mastery of periodontal instrumentation.
a. The building block skills are the foundation that “supports” successful periodontal instrumentation.
b. These skills should be mastered one-by-one.
c. Each skill should be overlearned until it can be performed easily and without hesitation. It is impossible to devote too much time to the practice of these building block skills.
d. If the building block skills are mastered, then the use of any periodontal instrument will be relatively easy to learn. The building block skills are the same no matter which periodontal instrument is used.
B. Faulty Per ormance. Incorrect performance of even one of the building blocks means that at the very least periodontal instrumentation will be inef cient. Most likely faulty performance results in ineffective calculus removal, unnecessary discomfort for the patient, and musculoskeletal stress to the clinician.
3. Sequencing o Building Block Skills
A. The modules (chapters) in this book are sequenced to allow beginning clinicians to practice the building blocks to periodontal instrumentation one-by-one.
B. Each building block should be practiced until it is easy to perform from memory before attempting the next building block in the skill sequence.
BUILDING BLOCK SKILLS. The puzzle piece shown here appears throughout the book to alert clinicians to the individual skill components of periodontal instrumentation.
Section 3
Ergonomic Dos and Don’ts for Seated Posture
NEUTRAL POSITION FOR THE CLINICIAN
1. Ergonomic Do’s and Don’ts
A. Ergonomic Don’ts
1. When a dental hygienist alters his or her body position or equipment in a manner that is uncomfortable or painful just to “get the job done,” musculoskeletal stress is the result.
2. A mindset that it is acceptable to assume an uncomfortable position “just for 15 minutes while performing periodontal instrumentation on these two teeth” is destined to lead to MSDs.
3. Pain and injury results when the body’s natural spinal curves are not maintained in a seated position.
B. Ergonomic Do’s
1. For a healthy and productive career, frst, the dental hygienist assumes a neutral, balanced body position and then alters the patient’s chair and dental equipment to complete periodontal instrumentation.
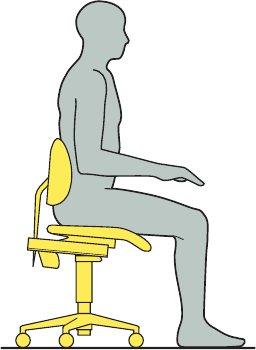
2. Good posture requires the seated dental hygienist to use a neutral spine position that maintains the natural curves of the spine (Fig. 1-12).
2. Neutral Body Position
A. Spine Basics: The Curves of a Healthy Back
1. The spine is made up of three segments: the cervical, thoracic, and lumbar sections.
2. The spine has three natural curves that form an S-shape (46). When the three natural curves are properly aligned, the ears, shoulders, and hips are in a straight line.
a. When viewed from the side, the cervical and lumbar segments have a slight inward curve (lordosis).
b. When viewed from the side, the thoracic segment of the spine has a gentle outward curve (kyphosis).
B. Neutral Body Position for the Clinician. Figures 1-13 to 1-19 illustrate the characteristics of neutral body position for the clinician.
Figure 1-12. Three Curves of a Healthy Back. The spine has three natural curves: cervical, thoracic, and lumbar curves. The cervical and lumbar segments have a gentle inward curve. The thoracic segment has a slight outward curve.
Cervical spine (Lordosis)
Lumbar spine (Lordosis) Thoracic spine (Kyphosis)
Sacrum and coccyx
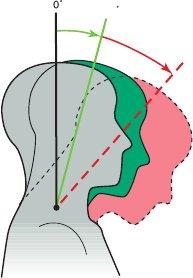
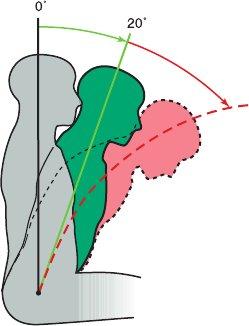
Figure 1-13. Neutral Neck Position
Goal:
• Head tilt of 0 to 20 degrees
• The line from eyes to the treatment area should be as near to vertical as possible
Avoid:
• Head tipped too far forward
• Head tilted to one side
Figure 1-14. Neutral Back Position
Goal:
• Lean forward slightly from the hips (hinge at hips)
• Trunk exion of 0 to 20 degrees
Avoid:
• Over exion of the spine (curved back)
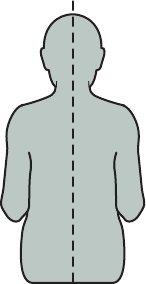
Figure 1-15. Neutral Torso Position
Goal:
• Torso in line with long axis of the body
Avoid:
• Leaning torso to one side
• Twisting the torso
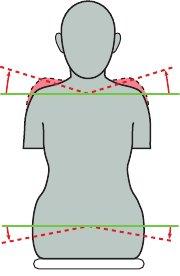
Figure 1-16. Neutral Shoulder Position
Goal:
• Shoulders in horizontal line
• Weight evenly balanced when seated
Avoid:
• Shoulders lifted up toward ears
• Shoulders hunched forward
• Sitting with weight on one hip
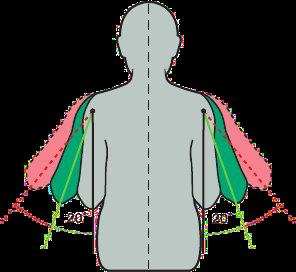
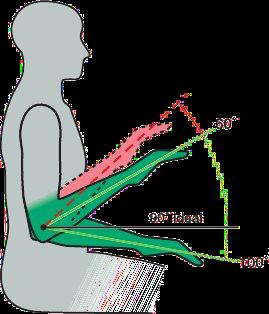
Figure 1-17. Neutral Upper Arm Position
Goal:
• Upper arms hang parallel to the long axis of torso
• Elbows at waist level held slightly away from body
Avoid:
• Greater than 20 degrees of elbow abduction away from the body
• Elbows held above waist level
Figure 1-18. Neutral Forearm Position
Goal:
• Held parallel to the oor
• Raised or lowered, if necessary, by pivoting at the elbow joint
Avoid:
• Angle between forearm and upper arm of less than 60 degrees
Figure 1-19. Neutral Hand Position
Goal:
• Little nger-side of palm is slightly lower than thumbside of palm
• Wrist aligned with forearm
Avoid:
• Thumb-side of palm rotated down so that palm is parallel to oor
• Hand and wrist bent up or down
Section 4
Application of Ergonomic Principles: Seated Posture
Ergonomic principles can reduce the risk of developing an MSD by reducing muscle forces during periodontal instrumentation. Attention to the principles for neutral seated clinician posture can minimize the amount of physical stress that occurs during instrumentation.
SKILL BUILDING
Neutral Seated Posture for the Clinician
Directions: Practice the neutral clinician posture by following the steps 1 to 9 as illustrated in Figures 1-20 to 1-28.
The ideal seated position for the clinician is called the neutral seated position. Adjust the clinician stool frst. A common mistake clinicians make is positioning the patient frst and then adjusting the clinician stool to accommodate the patient.
Figure 1-20. Step 1.
• Position the buttocks all the way back in the chair. Distribute the body’s weight evenly on both hips.
Figure 1-21. Step 2.
• Adjust seat height so the feet rest at on the oor. Establish a “wide base of support” with feet on oor at least shoulder-width apart and in front of the hips (19).
• Legs should not dangle or be crossed at the knees or ankles. Dangling legs or crossing them puts pressure on the back of the thighs and restricts blood ow.
Figure 1-22. Step 3.
• Adjust the seat tilt so that the back is about an inch higher than the front (hips slightly higher than the knees) (16,17,19,20,22–24).
• The seat tilt helps to maintain the natural lower curve of the spine and relaxes the bend of the knees. The seat tilt should only be about 5 degrees; overtilting it can cause too much low back curve.
• Note: Chairs without a tilt feature can be retro tted with an ergonomic wedge-shaped cushion.
Figure 1-23. Step 4.
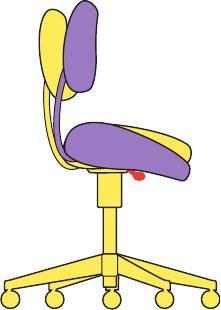
• With buttocks seated all the way back in the chair, adjust the lumbar depth by moving the backrest closer or farther from the seat pan until the backrest nestles against the lower back.
• The unsupported lower back tends to straighten rather than maintain a healthy curve (21,24).
Figure 1-24. Step 5. Adjust the lumbar height by moving the backrest up or down until it nestles in the natural lumbar curve of the lower back. This helps to support the natural curve of the spine (21).
Figure 1-25. Step 6.
• Raise the tailbone up to establish correct spinal curves. All three normal back curves should be present while sitting.
• Studies of the seated body show that the position of the pelvis determines the shape of the spine (23).