Step by Step
STEP BY STEP
INSTALLING SHOWERWALL WALL PANELS Showerwall’s Product Manager, Steph Harris, offers a step by step guide on the simplicity of installing the company’s versatile and stylish bathroom wall panelling system.
Steph Harris, Product Manager, Showerwall
With its easy and fast installation process, low maintenance and large choice of stylish designs, Showerwall’s panels provide a decorative statement in the bathroom with minimum fuss. The panels provide a large watertight and hard wearing surface with near invisible joints, ideal for shower enclosures, bathroom feature walls and panelling around baths. With no grouting required, they are easy to fit, clean and look after, offering many advantages over tiling. Showerwall’s HPL panels are surfaced in high pressure decorative laminate which
offers high performance and durability and can be placed over existing tiles or directly onto walls. Installation is made easy with the option of square cut panels using trims or Showerwall’s unique Proclick technology which locks the panels together with no trims required. HPL square cut panels are available in sizes 900mm and 1200mm x 2400mm and Proclick in two sizes of 600mm and 1200mm x 2400mm to offer installers flexibility. Although the panels are large, they are easy to transport, handle and cut, and can be installed in less than a day with simple joinery tools and so is far less time-consuming that tiling. The following process can be used for installing a two-sided shower area onto a shower tray.
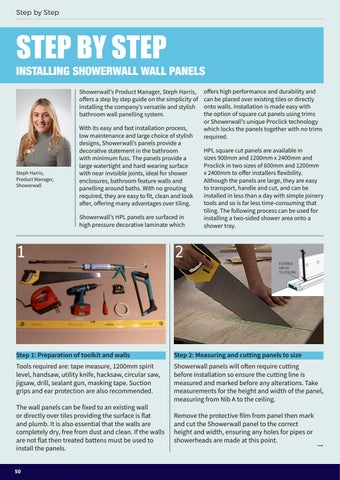
1
2
Step 1: Preparation of toolkit and walls
Step 2: Measuring and cutting panels to size
Tools required are: tape measure, 1200mm spirit level, handsaw, utility knife, hacksaw, circular saw, jigsaw, drill, sealant gun, masking tape. Suction grips and ear protection are also recommended.
Showerwall panels will often require cutting before installation so ensure the cutting line is measured and marked before any alterations. Take measurements for the height and width of the panel, measuring from Nib A to the ceiling.
The wall panels can be fixed to an existing wall or directly over tiles providing the surface is flat and plumb. It is also essential that the walls are completely dry, free from dust and clean. If the walls are not flat then treated battens must be used to install the panels. 50
Remove the protective film from panel then mark and cut the Showerwall panel to the correct height and width, ensuring any holes for pipes or showerheads are made at this point.


