
Previous Screen
Product: EXCAVATOR
Model: 323D L EXCAVATOR PBE
Configuration: 323D L Excavator PBE00001-UP (MACHINE) POWERED BY C6.4 Engine
Disassembly and Assembly
C6.4 Engine for Caterpillar Built Machines
Media Number -KENR8106-09 Publication Date -01/10/2017
Date Updated -18/10/2017
Gear Group (Front) - Remove - Idler Gear Only
SMCS - 1206-011
Removal Procedure
Table 1
Required Tools Tool
A 9U-6148 Idler Shaft Puller 1
B 1P-0510 Driver Group 1
Start By:
a. Remove the front housing. Refer to Disassembly and Assembly, "Housing (Front)Remove".
NOTICE
Keep all parts clean from contaminants.
Contaminants may cause rapid wear and shortened component life.
i02742863
NOTICE
Care must be taken to ensure that fluids are contained during performance of inspection, maintenance, testing, adjusting, and repair of the product. Be prepared to collect the fluid with suitable containers
before opening any compartment or disassembling any component containing fluids.
Refer to Special Publication, NENG2500, "Dealer Service Tool Catalog" for tools and supplies suitable to collect and contain fluids on Cat products.
Dispose of all fluids according to local regulations and mandates.

Illustration 1
(1) Fuel injection pump drive gear
(2) Idler gear
(3) Camshaft gear
(4) Crankshaft gear
g01374732
Note: The No. 1 cylinder is at the top center position when these marks are in alignment.
Note: Ensure that the marks on the timing gears are in alignment.

Illustration 2
g01374789
1. Remove idler gear bolt (5) and the washer from the idler gear shaft .
2. Remove thrust plate (6) from the idler gear shaft.

Illustration 3
g01374793
3. Remove idler gear (2) from the idler gear shaft.

Illustration 4
g01374804
4. If necessary, use Tooling (B) and a suitable press in order to remove bushing (7) (not shown) from idler gear (2).
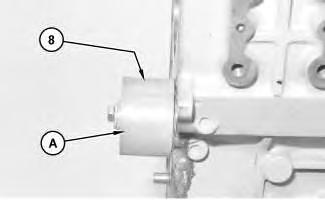
6
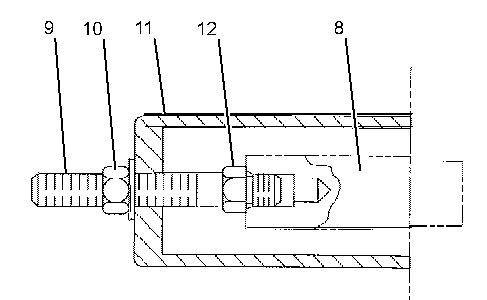
5. The following items are components of Tooling (A).
◦ 9U-6147 Stud (9)
◦ 6V-8231 Nut (10)
◦ 9U-6146 Sleeve Assembly (11)
◦ 8T-4244 Nut (12)
6. Use Tooling (A) in order to remove idler shaft (8) (not shown) from the cylinder block. Check idler shaft (8) for wear and damage. Replace idler shaft (8), if necessary.
Note: See the following list for the removal of the other gears in the front gear group.
◦ In order to remove camshaft gear (3), refer to Disassembly and Assembly, "Camshaft - Remove".
◦ In order to remove fuel injection pump gear (1), refer to Disassembly and Assembly, "Fuel Injection Pump - Remove".
◦ In order to remove the gear from the engine oil pump, refer to Disassembly and Assembly, "Engine Oil Pump - Remove".
◦ In order to remove crankshaft gear (4), refer to Disassembly and Assembly, "Crankshaft Gear - Remove and Install". Copyright 1993 - 2020 Caterpillar Inc.
Network For SIS Licensees. Sun Aug 30 16:54:48 UTC+0800 2020

Previous Screen
Product: EXCAVATOR
Model: 323D L EXCAVATOR PBE
Configuration: 323D L Excavator PBE00001-UP (MACHINE) POWERED BY C6.4 Engine
Disassembly and Assembly
C6.4 Engine for Caterpillar Built Machines
Media
i02879402
Gear Group (Front) - Install - Idler Gear Only
SMCS - 1206-012
Installation Procedure
Table 1 Required Tools
Keep all parts clean from contaminants.
Contaminants may cause rapid wear and shortened component life.

Illustration 1 g01374804
1. Use Tooling (A) and a suitable press in order to install a new bushing (7) (not shown), if the bushing was removed.

Illustration 2
g01374810
2. Lower the temperature of idler shaft (8) . Install idler shaft (8) (not shown) onto the cylinder block.
Note: When idler shaft (8) is installed, ensure that the oil hole of idler shaft (8) is up.

Illustration 3
3. Install idler gear (2) onto idler shaft (8) .
g01374827

Illustration 4 g01374732
(1) Fuel injection pump drive gear
(2) Idler gear
(3) Camshaft gear
(4) Crankshaft gear
Note: The No. 1 cylinder is at the top center position when these marks are in alignment.
Note: Ensure that the marks on the timing gears are in alignment.

5 g01374789
4. Install thrust plate (6) onto the idler shaft.
5. Install the washer and idler gear bolt (5) onto thrust plate (6) . Tighten idler gear bolt (5) to a torque of 34 ± 5 N·m (25 ± 4 lb ft).
Note: See the following list for the installation of the other gears in the front gear group.
◦ In order to install the camshaft gear, refer to Disassembly and Assembly, "CamshaftInstall".
◦ In order to install the fuel injection pump gear, refer to Disassembly and Assembly, "Fuel Injection Pump - Install".
◦ In order to install the gear to the engine oil pump, refer to Disassembly and Assembly, "Engine Oil Pump - Install".
◦ In order to install the crankshaft front gear, refer to Disassembly and Assembly, "Crankshaft Gear - Remove and Install".
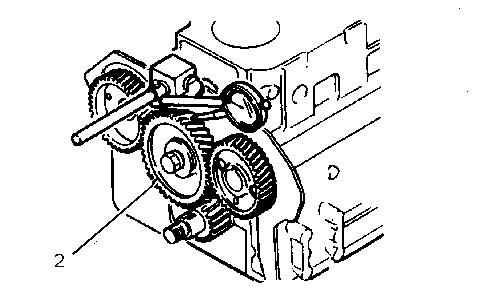
6. Install a dial indicator and rotate idler gear (2) back and forth in order to measure backlash. Refer to Table 3.
Table 2
Item Standard at Assembly Service Limit
Backlash of crankshaft gear and idler gear
Backlash of camshaft gear and idler gear
Backlash of fuel injection pump gear and idler gear
0.510 to 0.157 mm (0.0201 to 0.0062 inch) 0.250 mm (0.0098 inch)
0.520 to 0.158 mm (0.0205 to 0.0062 inch) 0.250 mm (0.0098 inch)
0.0560 to 0.205 mm (0.0022 to 0.0081 inch) 0.250 mm (0.0098 inch)
End play of idler gear
Clearance between idler gear bushing and shaft
0.050 to 0.200 mm (0.0020 to 0.0079 inch) 0.350 mm (0.0138 inch)
0.009 to 0.050 mm (0.0004 to 0.0020 inch) 0.100 mm (0.0039 inch)
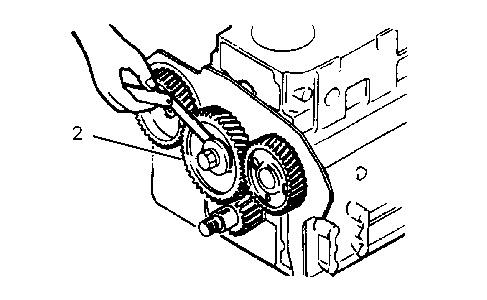
Illustration 7 g01374874
7. Measure the end play of idler gear (2) with a feeler gauge. Refer to Table 3.
End By: Install the front housing. Refer to Disassembly and Assembly, "Housing (Front)Install".
Copyright 1993 - 2020 Caterpillar Inc. All Rights Reserved. Private Network For SIS Licensees. Sun Aug 30 16:55:47 UTC+0800 2020

Previous Screen
Product: EXCAVATOR
Model: 323D L EXCAVATOR PBE
Configuration: 323D L Excavator PBE00001-UP (MACHINE) POWERED BY C6.4 Engine
Disassembly and Assembly
C6.4 Engine for Caterpillar Built Machines
Media Number -KENR8106-09 Publication Date -01/10/2017
Housing (Front) - Remove
SMCS - 1151-011
Removal Procedure
Table 1
Required Tools
Tool
A 1P-0510 Driver Group 1
Start By:
Date Updated -18/10/2017
i02743335
a. Remove the alternator. Refer to Disassembly and Assembly, "Alternator - Remove and Install".
b. Remove the water pump. Refer to Disassembly and Assembly, "Water Pump - Remove".
c. Remove the crankshaft pulley. Refer to Disassembly and Assembly, "Crankshaft PulleyRemove and Install".
d. Remove the fuel injection pump. Refer to Disassembly and Assembly, "Fuel Injection Pump - Remove".
NOTICE
Keep all parts clean from contaminants.
Contaminants may cause rapid wear and shortened component life.
NOTICE
Care must be taken to ensure that fluids are contained during performance of inspection, maintenance, testing, adjusting, and repair of the product. Be prepared to collect the fluid with suitable containers before opening any compartment or disassembling any component containing fluids.
Refer to Special Publication, NENG2500, "Dealer Service Tool Catalog" for tools and supplies suitable to collect and contain fluids on Cat products.
Dispose of all fluids according to local regulations and mandates.

3.
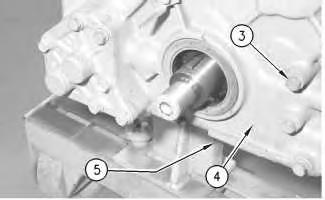
4. Remove six bolts (5) (not shown) and the washers that mount front housing (4) to the oil pan.

3 g00606002
5. Remove bolts (6) and the washers that mount front housing (4) to front plate (8) and the cylinder block.
6. Use two people in order to remove front housing (4) from the cylinder block and front plate (8). The weight of front housing (4) is approximately 20 kg (45 lb).
Note: Check the condition of gasket (7) (not shown) for the engine oil pan. If gasket (7) is damaged, it may be necessary to replace gasket (7). Refer to Disassembly and Assembly, "Engine Oil Pan - Remove and Install" for replacement of gasket (7) for the engine oil pan.

7. Remove baffle plate (9).
5
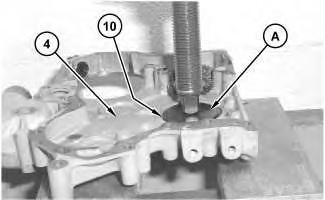
8. Use Tooling (A) in order to remove crankshaft front seal (10) (not shown) from front housing (4), if necessary.
9. Check the teeth of the timing gears for the following items: wear, nicks, chips and uneven contact. Check the keyway for wear or damage.
1993 - 2020 Caterpillar Inc.

Previous Screen
Product: EXCAVATOR
Model: 323D L EXCAVATOR PBE
Configuration: 323D L Excavator PBE00001-UP (MACHINE) POWERED BY C6.4 Engine
Disassembly and Assembly
C6.4 Engine for Caterpillar Built Machines
Media Number -KENR8106-09 Publication Date -01/10/2017 Date Updated -18/10/2017
Housing (Front) - Install
SMCS - 1151-012
Installation Procedure
Table 1
Required Tools Tool
NOTICE
Keep all parts clean from contaminants.
Contaminants may cause rapid wear and shortened component life.
Note: Check the gaskets, and the seals for wear or for damage. Replace the components, if necessary.
i02879387

Illustration 1 g00836619
Alignment marks for timing gears
1. Check the alignment of the timing gears.
Note: Ensure that the marks on the timing gears are in alignment. Align the "3" mark on the fuel injection pump drive gear with the "33" mark on the idler gear. Make an alignment of the "2" mark on the idler gear with the "22" mark on the camshaft gear. Align the "1" mark on the crankshaft gear with the "11" mark on the idler gear. The No. 1 cylinder is at the top center position when the timing marks are in alignment.
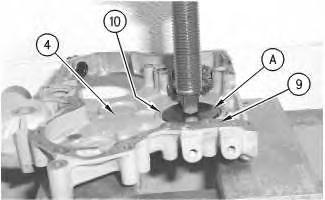
Illustration 2 g00606022
2. Ensure that the old gasket material (9) is removed from the mating surface of front housing (4) and the timing gear plate. Install a new gasket (9) .
3. If the crankshaft front seal (10) (not shown) was removed, use Tooling (A) in order to install a new crankshaft front seal (10) .

Illustration 3
4. Before installation of front housing (4) , check gasket (7) (not shown) for the oil pan for damage. Replace gasket (7) , if necessary. Refer to Disassembly and Assembly, "Engine Oil Pan - Remove and Install" for replacement of gasket (7) for the engine oil pan.
5. Use two people in order to install front housing (4) onto front plate (8) and the cylinder block. The weight of front housing (4) is approximately 20 kg (45 lb).
6. Install bolts (6) in order to fasten front housing (4) onto the cylinder block and front plate (8) .

Illustration 4
7. Install the washers and six bolts (5) (not shown) in order to secure front housing (4) onto engine oil pan.
8. Install bolts (3) and washers that secure front housing (4) to the front plate and the cylinder block.

5 g01374908
9. Connect hose (2) to the front housing.
10. Tighten hose clamp (1) in order to secure hose (2) to the front housing.
End By:
a. Install the fuel injection pump. Refer to Disassembly and Assembly, "Fuel Injection PumpInstall".
b. Install the crankshaft pulley. Refer to Disassembly and Assembly, "Crankshaft PulleyRemove and Install".
c. Install the water pump. Refer to Disassembly and Assembly, "Water Pump - Install".
d. Install the alternator. Refer to Disassembly and Assembly, "Alternator - Remove and Install".

Previous Screen
Product: EXCAVATOR
Model: 323D L EXCAVATOR PBE
Configuration: 323D L Excavator PBE00001-UP (MACHINE) POWERED BY C6.4 Engine
Disassembly and Assembly
C6.4 Engine for Caterpillar Built Machines
Media Number -KENR8106-09 Publication Date -01/10/2017
Front Plate - Remove
SMCS - 1163-011
Removal Procedure
Start By:
Date Updated -18/10/2017
i01615486
a. Remove the idler gear. Refer to Disassembly and Assembly, "Gear Group (Front)Remove".
b. Remove the camshaft. Refer to Disassembly and Assembly, "Camshaft - Remove".
c. Remove the fuel injection pump. Refer to Disassembly and Assembly, "Fuel Injection Pump - Remove".
NOTICE
Keep all parts clean from contaminants.
Contaminants may cause rapid wear and shortened component life.

Illustration 1
1. Remove one bolt (1) and the washer from the front plate (2).
2. Remove front plate (2) from the engine.
3. Remove gasket (3) (not shown) from the engine or from the front plate (2).
Note: Ensure that all mating surfaces are clear of old gaskets.
Note: Check the cylinder block for the following conditions: scale buildup, corrosion and other damage.
Copyright 1993 - 2020 Caterpillar Inc. All Rights Reserved. Private Network For SIS Licensees.

Previous Screen
Product: EXCAVATOR
Model: 323D L EXCAVATOR PBE
Configuration: 323D L Excavator PBE00001-UP (MACHINE) POWERED BY C6.4 Engine
Disassembly and Assembly
C6.4 Engine for Caterpillar Built Machines
Media Number -KENR8106-09
Front Plate - Install
SMCS - 1163-012
Installation Procedure
Publication Date -01/10/2017
Date Updated -18/10/2017
i01576831
NOTICE
Keep all parts clean from contaminants.
Contaminants may cause rapid wear and shortened component life.

Illustration 1
1. Place gasket (3) (not shown) in position on the engine.
Note: Ensure that all mating surfaces are clear of old gaskets.
2. Place front plate (2) in position on the engine.
3. Install one bolt (1) and the washer in order to secure front plate (2) to the engine. Tighten the bolt to a torque of 35 ± 5 N·m (26 ± 4 lb ft).
End By:
a. Install the fuel injection pump. Refer to Disassembly and Assembly, "Fuel Injection PumpInstall".
b. Install the camshaft. Refer to Disassembly and Assembly, "Camshaft - Install".
c. Install the idler gear. Refer to Disassembly and Assembly, "Gear Group (Front) - Install".

Previous Screen
Product: EXCAVATOR
Model: 323D L EXCAVATOR PBE
Configuration: 323D L Excavator PBE00001-UP (MACHINE) POWERED BY C6.4 Engine
Disassembly and Assembly
C6.4 Engine for Caterpillar Built Machines
Media Number -KENR8106-09
Publication Date -01/10/2017
Crankcase Breather - Remove and Install
SMCS - 1317-010
Removal Procedure
Date Updated -18/10/2017
i02879389
NOTICE
Keep all parts clean from contaminants.
Contaminants may cause rapid wear and shortened component life.
NOTICE
Care must be taken to ensure that fluids are contained during performance of inspection, maintenance, testing, adjusting and repair of the product. Be prepared to collect the fluid with suitable containers before opening any compartment or disassembling any component containing fluids.
Refer to Special Publication, NENG2500, "Caterpillar Dealer Service Tool Catalog" for tools and supplies suitable to collect and contain fluids on Caterpillar products.
Dispose of all fluids according to local regulations and mandates.

Illustration 1
1. Loosen clamps (3) and remove hose (2) .
2. Remove breather assembly (1) .
g01374569
Installation Procedure NOTICE
Keep all parts clean from contaminants. Contaminants may cause rapid wear and shortened component life.

Illustration 2
1. Install new breather assembly (1) .
g01374569
2. Install hose (2) and tighten hose clamps (3) .

Previous Screen
Product: EXCAVATOR
Model: 323D L EXCAVATOR PBE
Configuration: 323D L Excavator PBE00001-UP (MACHINE) POWERED BY C6.4 Engine
Disassembly and Assembly
C6.4 Engine for Caterpillar Built Machines
Media Number -KENR8106-09
Publication Date -01/10/2017
Valve Mechanism Cover - Remove and Install
SMCS - 1107-010
Removal Procedure
Date Updated -18/10/2017
i02742668
NOTICE
Keep all parts clean from contaminants. Contaminants may cause rapid wear and shortened component life.
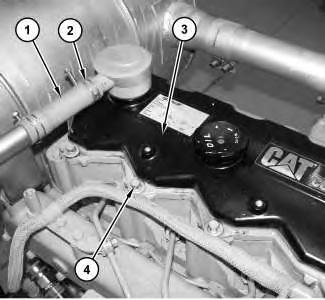
1. Loosen clamp (2) and disconnect hose (1).
2. Remove bolts (4) and remove valve mechanism cover (3) and the O-ring seal.
Installation Procedure
NOTICE
Keep all parts clean from contaminants.
Contaminants may cause rapid wear and shortened component life.

Illustration 2
g01374565
1. Position valve mechanism cover (3) and the O-ring seal. Install bolts (4). Tighten bolts (4) to a torque of 18 ± 2 N·m (13 ± 1 lb ft).
2. Connect hose (1) and tighten clamp (2). Copyright 1993 - 2020 Caterpillar Inc.
Hello dear friend!
Thank you very much for reading.
Enter the link into your browser.
The full manual is available
