


If you’ve ever considered planting an annual garden - vegetables, herbs, or flowers - you may have typed something like “easy garden plan” into a search engine or Pinterest search bar. That search probably turned up something like “Zone 7 Garden Plan” or “Planting Schedule for Zone 6.”
What are USDA Hardiness Zones?
The USDA has designated different zones for hardiness throughout the United States. Zones are determined by the average annual extreme minimum temperature, which just means how cold your area typically gets.
There are 13 zones; each zone has a range of 10 degrees Fahrenheit. Zone 1 has an average low temperature of between -50 and -60 degrees, while Zone 13 has an average low of 60 to 70 degrees.
Gardeners throughout Northern Nevada are spread
across Zones 4 through 7. I personally live in a zone 6, which means I usually see a low temperature of between 0 and -10 over the course of a winter.
What does this mean - and what does it NOT mean - for your garden?
Your USDA Hardiness Zone will indicate which plants will survive (or NOT survive) over winter. Knowing your zone will determine which perennial plants will work and which annuals can be planted in the fall for an earlier

spring harvest.
Most vegetable varieties and many cut flower varieties fall under the “annuals” category, and if you’re just starting a garden you likely will NOT be starting seeds in the fall, but will plant in the spring instead. This means that USDA zones will have NO IMPACT on your garden plan or planting schedule. If what you are growing does not need to survive the winter, what zone you grow in DOES NOT MATTER!
(continued on following page)
I hate to be the bearer of bad news, but these plans will do you NO GOOD, especially for those of us West of the Rocky Mountains.
We are grateful for and o er a heart felt Thank-You to all of our clients. We appreciate the opportunity to work for you and assist you in meeting your goals.


mission safe, are grateful o heart felt all our clients. We the opportunity you


Then what DO you need to know when planning a garden?

The most important information to have when planning a garden is your first and last frost dates. They’re exactly what they sound like: the last day it’s expected to freeze in the winter (the start of your season) and the first day it freezes again in the fall (the end of your season).
The last frost date is when most seeds can be safely planted in the ground, or transplanted, since they have little to no risk of freezing and dying off. The first frost date of Fall marks the end of the season, when most annuals will die off. Some plants can withstand a light frost (28* F), but many common annuals like tomatoes, peppers, and zinnias need to be planted after any danger of frost and will be killed by frost in the fall.
For example, my growing season in Orovada, Nevada (Zone 6) is approximately May 31 to September 15, resulting in a growing season of just over 100 days. I can plant zinnias directly in the ground, but since they take 70 days to mature, I will only be able to pick flowers for 30 days before they die. Some tomato varieties mature in 60 days, which could be planted in my zone, but some take 100 days, which means they would need to be started indoors to be able to get any fruit in my area.
(continued on following page)
SEEDLINGS:
Annual plants can be started early indoors or bought as plant starts from your local nursery, but most cannot be transplanted before danger of frost has passed, regardless of which zone you live in.

Our mission is to be the leader in safe, productive, and innovative mining solutions.
In contrast, a generic “Zone 6 Calendar” brings up a last frost date of May 15 and a first frost of October 15, adding a whole 45 days to the growing season. Trusting this generalized USDA Zone plan instead of using frost dates leads to zinnias being direct sown but never growing, and tomatoes being killed by frost shortly after transplanting.
Why are there so many garden plans based on zones then?

East of the Rocky Mountains, areas in the same zones also share a lot of environmental and geographical factors (think average temperatures, elevation, etc.), making the frost dates similar as well. If you look at the USDA Hardiness Zone map, the zones fall in nice linear zones across the country. There’s not a lot of variation across these areas.
West of the Rockies is.. well, the Wild Wild West. The zones are actually difficult to find in some areas, and can change several times within a smaller radius. Microclimates are everywhere, elevation changes and weather patterns are less consistent, and your “zone” can look wildly different from someone else’s, even if they share the same zone number.
Most of Northern Nevada is characterized by higher elevation, a drier climate, and a wider daily temperature swing, all which have a much greater impact on growing conditions than the USDA zone does.

All this to say:


Zones are important if you are planting perennials and overwintering annuals, and can be useful for comparison to other gardeners if you live in the Eastern United States.


They are NOT important if you are planting spring annuals and live in the Western U.S., particularly in an area like Northern Nevada. You are served much better if you take a look at your climate, and find your first and last frost dates to determine when and what to plant!
You can easily find your frost dates with a quick Google search or by typing in your zip code at Farmer’s Almanac or Dave’s Garden websites. But, like most other gardening topics, the best advice will come from your local gardeners. The gentleman down the street who is out in his garden every morning or the woman who brings her excess veggies to church every week will have the best knowledge of your particular gardening region, and will bring you more success than that generic “USDA Zone 6 Garden Plan” ever will!

Don’t be afraid to mix patterns, textures and colors

The photo at right has brick, board & batten, peel and stick wallpaper, independent artist prints, and many different colors across the spectrum. Consider creating a mood board (many examples online) before you begin decorating to help define and narrow your style. This will also help you visually when you’re creating a space and bringing different elements together. Creating mood boards also helps keep you from getting overwhelmed with all the design possibilities. Mix, don’t match: Use colors & textures to create interest and cohesion
A great tip is to choose a dominant item in a room that you’d like to visually build off of. Consider in this case the rug on the
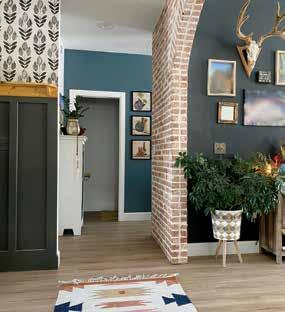


floor. Most items in both photos can be “matched” to the rug and its colors. You can also focus in on a throw pillow or an art print if you need a starting point; just choose something you love! This can help make the process less intimidating, and when it’s all brought together it should make sense.
Although the patterns and colors on the walls are very different from one another, they’re still cohesive and intentionally thought through. This intentionality creates a feeling of “coordinating” even though the spaces were worked on at different times. In the bottom left corner photo, the peach of the “face vase” can be found in the rug, the brick and the faux plants; the dusty purple-gray of the clock face is tied in with the plants and other decor. The green from the plant is picked up in the fuzzy moss of the catch-all. Different textures also add appeal: the spiky leaves of the plant, the soft, fuzzy leaves of the Lamb’s Ear and the warm wood throughout all work together to keep things visually interesting. Don’t let a little whimsy scare you
It may feel intimidating to add pops of color, but remember — it’s your home and it should bring you joy! Try something out of your comfort zone, like removable wallpaper, to add some fun visual elements to your space. Paint is also an easy and affordable way to freshen up a space, and it can be as temporary as you’d like!


photos, personal belongs (old watch, jewelry) or greenery to make your space fun and surprising. Another thing to remember: seasonal decorations don’t have to be limited to one season. Utilize “neutral” seasonal decorations all year long! Use everyday items in unique ways
A well-placed item that doesn’t normally “go” will help add interest and fun to your space! The next time you’re out shopping local, look for something to decorate with that normally wouldn’t appeal to you. The “face vase” in the photo at left is whimsical, and when filled with faux succulent plants as “hair”, adds a fun quirkiness to the vignette (a fancy word for a group ing atop a dresser, table, or shelf). Use mirrors, plants, vintage
Do you have an old scarf tucked away in a drawer? Use it as a table runner. Large cups can become vases. Utensil holders can hold greenery instead of spatulas. Drape vintage necklaces around plant holders. Use teacups. There is virtually nothing you can do that can’t be undone, so don’t be afraid of experimenting until you find your style!
Use stacks of vintage books, crates, baskets, vases and tapered candles to create visual height differences — this will keep the


House plants need three basic necessities to thrive: good soil, water and light. If one of these necessities is lacking, plants start to manifest signs of unhealthiness, like yellowing or browning leaves, stunted growth, rot, or for those especially unlucky greenskeepers—all three. Here are just a few of the basics that could help resolve some of the most common plant issues.


Water
Watering houseplants is not about the amount of water given to the plant, but the frequency of the watering. When watering, it is best to be thorough and water the plant until water comes out of the holes in the bottom of the pot (Yes, those holes are ABSOLUTELY necessary so a plant does not drown and rot.) Plants with watering problems usually manifest multiple yellowing leaves at once.
The easiest way to tell if a plant needs water is to stick a finger a couple inches into the soil and feel if it is dry or still has moisture. The plant is likely thirsty if the soil is dry one to two inches down. The plant is VERY thirsty if the soil is dry and the plant is droopy or leaves are brown and crunchy on


the ends. There aren’t many healthy houseplants that need water everyday or that can go months without water; most plants are somewhere in-between.

For a plant in a large spot, it is a great idea to use a moisture meter, which has large prongs that can go deep into the pot to determine if there is moisture by the roots. Sometimes, plants in large pots do not use all of the water in the soil and will sit with water at their roots, eventually causing rot. A telltale sign of rot is soft (as opposed to crunchy/crispy) brown on the leaves.
If you suspect that you have overwatered a plant or are too tempted to keep giving a plant water when it doesn’t need it, aerate instead. Aerating delivers oxygen to the plant (a key component of the “food” a plant needs). This can be done with a stick, a finger, or any other long instrument that can poke holes in the soil and loosen it up. This trick can also help wet soil dry out or help water to flow freely through the soil.

Light
If a plant is not receiving enough light (like those tucked back into a dark corner or on a shelf in the back of the room), its soil will stay wet longer, usually leading to root rot, or it will not be stunted, not growing for long lengths of time (Many plants naturally stop growing in the winter months or grow very slowly but a plant is likely stunted if it doesn’t perk up in the spring/summer.). Plants will also start reaching or leaning towards light. This can be fixed by rotating the plant frequently or securing it to a moss pole or bamboo stake. Plants that lean/reach and start to elongate, or stretch out, likely need more sunlight.


If a plant is receiving too much light, the leaves can look faded, losing vibrancy in color or even getting crispy brown edges. Moat plants like medium light, so not a window sill that gets warm to the touch throughout the day, or a cool, dark corner. Plants like to see bright light, but most don’t like to have to put on their shades.
Soil
Plants get their food (water, air, and light) from their environment. Soil is a major component of delivering these necessities to the plant. Well-draining soil mixture is good for any plant and certain additives can even ward off pests. Using a bag or regular potting mix is by no means a bad route to go, but if you are looking for optimum growth and less plant stress, using a 1/3 regular of potting mix, 1/3 of perlite (be careful, it’s not healthy to directly inhale the dust), 1/3 of orchid bark mixture will help house plants flourish. The well-draining mix will help deliver oxygen and help the plant absorb water properly.

For those looking to give even more of a boost to their plants, micronutrients (such as Mykos Root Enhancer) can deliver extra food to the plant. The micronutrients enhance roots, helping the plant to take in nutrients properly and efficiently so it can put out new, beautiful growth.
Unfortunately, unhealthy plants attract pests, so other additives, like systemic granules (such as Bonide Insect Control Systemic Granules) can not only kill pests already living in soil, but make new plant growth resistant to pests.


• Snake plants are always a go-to plant when one is looking for both low maintenance and low commitment. They can withstand low-light environments and are drought-tolerant.
• Pothos are easy-to-find trailing plants that come in a variety of beautiful and unique species. Some even have velvety silver leaves (satin pothos), or creamy white and green leaves (N’ joy pothos).They can also withstand most low-light conditions, but have regular watering needs. (Pothos are often confused with philodendrons, which are another type of easy-to-find trailing plants that are very forgiving. The difference lies in how they sprout new growth, but philodendrons are also among some of the easiest houseplants and safe for those looking to dip their toes into house plant collecting.)
For the overwaterer
• Calatheas are moisture-loving plants that can be especially forgiving to those that may tend to over water their plants. They come in a vast range of colors, leaf shapes and will trail or grow tall dependent on conditions. This species of plant is not a good fit for those who do not like to water frequently.
Pro Tip: Give them coffee diluted (three parts water to one part coffee) and watch them perk up!
For the underwaterer

• Jade plants are very forgiving to those who forget to water their plants more frequently than not. They are of the succulent species, but are not as picky as most succulents and will grow fast and tall if given enough light.
For the one looking for something a little more unusual
• Raven Zzs are a twist on one of the most well-known low maintenance plants, the Zz plant, and make a great “unusual” addition to any houseplant collection. They are slow growers with their new growth coming in green, but then darkening to black once the leaves are mature, gives them a mysterious and exotic feel. They can withstand low-light conditions and thrive in drought conditions.

Without Bees, We’d Lose:
100% Almonds
90% Apples
90% Onions
90% Blueberries
90% Cucumbers
90% Carrots*
*Source: Honey Bee Colony Collapse Disorder, Renee Johnson, Congressional Research Service 2010.
10 Ways to Save the Bees
Here are a few easy ways you can help #BeeTheSolution.
1. Plant a Bee Garden
One of the largest threats to bees is a lack of safe habitat where they can build homes and find a variety of nutritious food sources. By planting a bee garden, you can create a habitat corridor with plants that are rich in pollen and nectar. You don’t need a ton of space to grow bee-friendly plants — gardens can be established across yards and in window boxes, flower pots, and planters. You can also get involved with local organizations and governments to find opportunities to enrich public and shared spaces.
2. Go Chemical-Free for Bees
Synthetic pesticides, fertilizers, herbicides, and neonicotinoids are harmful to bees, wreaking havoc on their sensitive systems. Avoid treating your garden and green spaces with synthetics. Instead, use organic products and natural solutions such compost to aid soil health and adding beneficial insects that keep pests away like ladybugs and praying mantises.
3. Become a Citizen Scientist
Join a global movement to collect data on our favorite pollinators! Gather photos and other information about native bees and upload them to the iNaturalist app. Make it a group activity for friends by hosting a BeeBlitz event! Together, we can learn about the bees in various sites and cities and identify opportunities for nurturing them.
4. Provide Trees for Bees
Did you know that bees get most of their nectar from trees? When a tree blooms, it provides hundreds — if not
More than 90 species of U.S. specialty crops require pollination, and various animals, including bees, butterflies, moths, bats, and birds, are a critical part of the pollinator-plant ecosystem. Pollinators affect 35 percent of the world’s crop production. There have been concerns regarding pollinator populations for decades. According to the United Nations, it’s estimated there will be nearly 10 billion people on Earth by 2050. Pollinators play an important role in food production that’s essential to feeding the human population.
thousands — of blossoms to feed from. Trees are not only a great food source for bees, but also an essential habitat. Tree leaves and resin provide nesting material for bees, while natural wood cavities make excellent shelters. With deforestation and development on the rise, you can help bolster bee habitats by caring for trees and joining tree-planting parties in your area.
5. Create a Bee Bath
Bees work up quite a thirst foraging and collecting nectar. Fill a shallow bird bath or bowl with clean water, and arrange pebbles and stones inside so that they break the water’s surface. Bees will land on the stones and pebbles to take a long, refreshing drink.
6. Build Homes for Native Bees
Did you know that, with the exception of honeybees, most bees are solitary creatures? 70% of solitary bees live underground, while 30% live in holes inside of trees or hollow stems. Species like bumble bees build their nests in undisturbed land, and you can provide safe haven for them by leaving an untouched plot of land for them in your garden! “Bee condos” — which have small tube “apartments” — allow species like mason bees to take up residence. They’re easy to make or purchase.
7. Give Beehives and Native Bee Homes
Keep honeybees, nurture native bees, or help gardens and schools around the U.S. and Canada grow food and strength en local environments. Our Sponsor-a-Hive program creates safe havens for precious pollinators in underserved commu nities by supplying the tools, gear, and education needed to successfully home bees.
8. Teach Tomorrow’s Bee Stewards
Inspire the next generation of eco citizens with guides, lessons, and activities to get them buzzed about bees! Edu
Each year, bees are experiencing massive die-offs throughout the U.S. and Canada. In 2017, the rusty patched bumblebee was the first bee added to the endangered species list in the continental U.S. A 2019 survey from the Bee Informed Partnership states that nearly 40% of U.S. beekeepers lost their colonies during the previous year. Compared to 1947, the U.S. honeybee population has declined by 60%.
Bees pollinate one-third of the food we eat.

From apples and squash to buckwheat and coffee, bees are responsible for pollinating most of the fruits, vegetables, seeds, and nuts that are essential to our diets. Honeybees in particular play a huge role in agriculture, contributing over $15 billion to the value of US crop production.
cators can use our collection of free resources to bring nature and ecology into the classroom — and the hearts of children everywhere.
9. Host a Fundraiser
Host a fundraiser online or do something you love to help #BeeTheSolution. Your #BeeTheSolution fundraising events create community building and information sharing opportunities that inspire while raising funds for The Bee Conservancy programs. It’s an easy, fun way to make a serious impact.
10. Support Local Beekeepers and Organizations
Local beekeepers work hard to nurture their bees and the local community. The easiest way to show your appreciation is to buy locally-made honey and beeswax products. Many beekeepers use products from their hives to create soaps, lotions, and beeswax candles. Plus, local honey is not only delicious — it is made from local flora and may help with seasonal allergies! You can also give time, resources, and monetary donations to local beekeeping societies and environmental groups to help their programs grow.
SOURCE: https://thebeeconservancy.org/10-ways-to-save-the-bees/