Autumn is here, and it’s the perfect time to savor the season in every corner of your home and garden. This issue is packed with tips, tricks, and inspiration for making the most of crisp days, colorful leaves, and your harvest bounty.
Gardeners will love our preserving your harvest guide, showing how to can, freeze, ferment, and dehydrate fruits and vegetables so summer flavors last all winter. New to composting? Our nine fall composting tips make it simple to turn kitchen scraps and garden clippings into nutrient-rich soil for next year.
In the kitchen, celebrate seasonal produce with our squash recipes—from creamy butternut soup to roasted delicata and stuffed acorn squash, perfect
for family dinners or cozy weeknights.
Keep your garden in top shape with our sprinkler winterization tips, avoiding costly repairs and prepping your system for spring. Feeling crafty? Our DIY autumn wreath tutorial offers easy ways to bring seasonal charm to your front door, with alternatives for minimalist or whimsical styles.
Thinking ahead to bigger dreams? Our guide to getting your finances ready for a home purchase breaks down income, credit, and savings so you can confidently plan your next move.
Grab a warm drink, cozy up, and explore this issue—there’s something for every gardener, foodie, crafter, and home dreamer to make your fall colorful, productive, and a little magical.

Even as the garden winds down for winter, the harvest doesn’t have to end. Careful preservation lets fruits, vegetables, and herbs last for months. In this way, the gardener’s hard work continues to nourish and inspire long after the growing season.
By Shelby Sauers Special to Great Basin Sun
Asthe gardening season comes to a close, a successful fruit and vegetable gardener may well be experiencing what author Jessica Sowards describes as “the burden of abundance” a feeling that their efforts have all come to fruition at once. The question at that stage now becomes: what is one to do with all this bounty?
Canning can be a great option for storing harvests for future use, beginners might consider water bath canning as an easier introduction to the practice before moving on to pressure canning. Water bath canning is suitable for high-acid foods such as jams, jellies, salsa, tomatoes, pickles and more. When canning it is important to keep a sterile work environment and to follow all instructions precisely, adjusting for elevation where necessary.
Some gardeners find a great love in fermenting some of their harvest for things like hot sauces and sauerkrauts. This process provides many beneficial bacteria that promote good health, fermented food is vitamin rich, easier to digest and some even claim it

promotes weight loss. Fans of fermentation list countless positive health effects.
Drying and dehydrating is another excellent option; crops such as onion and garlic must be cured by drying for 2 to 4 weeks until the skin becomes papery and then stored in a cool, dark, and dry area. Some onions and garlic, however, are not suitable for storage perhaps they were damaged in the harvest, or the onion went to seed in the garden, consider dehydrating those to be reconstitution for future cooking endeavors or grinding your dehydrated onions and garlic into powders to use as seasonings (be sure to hang dry any herbs for seasoning as well). Dehydrating does not need to be limited to just alliums however, most fruits and vegetables can be dehydrated, making this a shelf stable way to enjoy your harvest year-round.
Freeze drying is a process that has become more accessible in recent years to the home gardener, although a more costly initial investment is needed, some gardeners view the benefits of a long shelf life and nutrient retention as being well worth the cost. Although freeze dried food can be reconstituted in the same way as traditionally dehydrated food many
have found a more pleasant and palatable texture is achieved with the freeze-dried version.
Freezing, in itself, is another reliable way to preserve excess fruits and vegetables for future use. Using a vacuum sealer here would be best practice for longer term storage but a simple freezer bag would suffice for shorter term storage. Most vegetables should undergo a process called blanching where they are dropped in boiling water for a short period of time and then transferred immediately to an ice bath. This process allows the items to maintain their color and flavors while stopping certain enzymes that would cause the items to spoil. After the recommended time in the ice bath, following instructions from your preferred guide, items can be drained, sealed and frozen. Using fruits and vegetables in baking and then freezing the cakes, breads and pies is a fun way to have a desert on hand through the holidays, although this creates more initial work, the convenience it provides down the road is undeniable.
Gardeners in the high desert may find the growing season to be short, difficult and grueling but one undeniable benefit of growing in the high desert


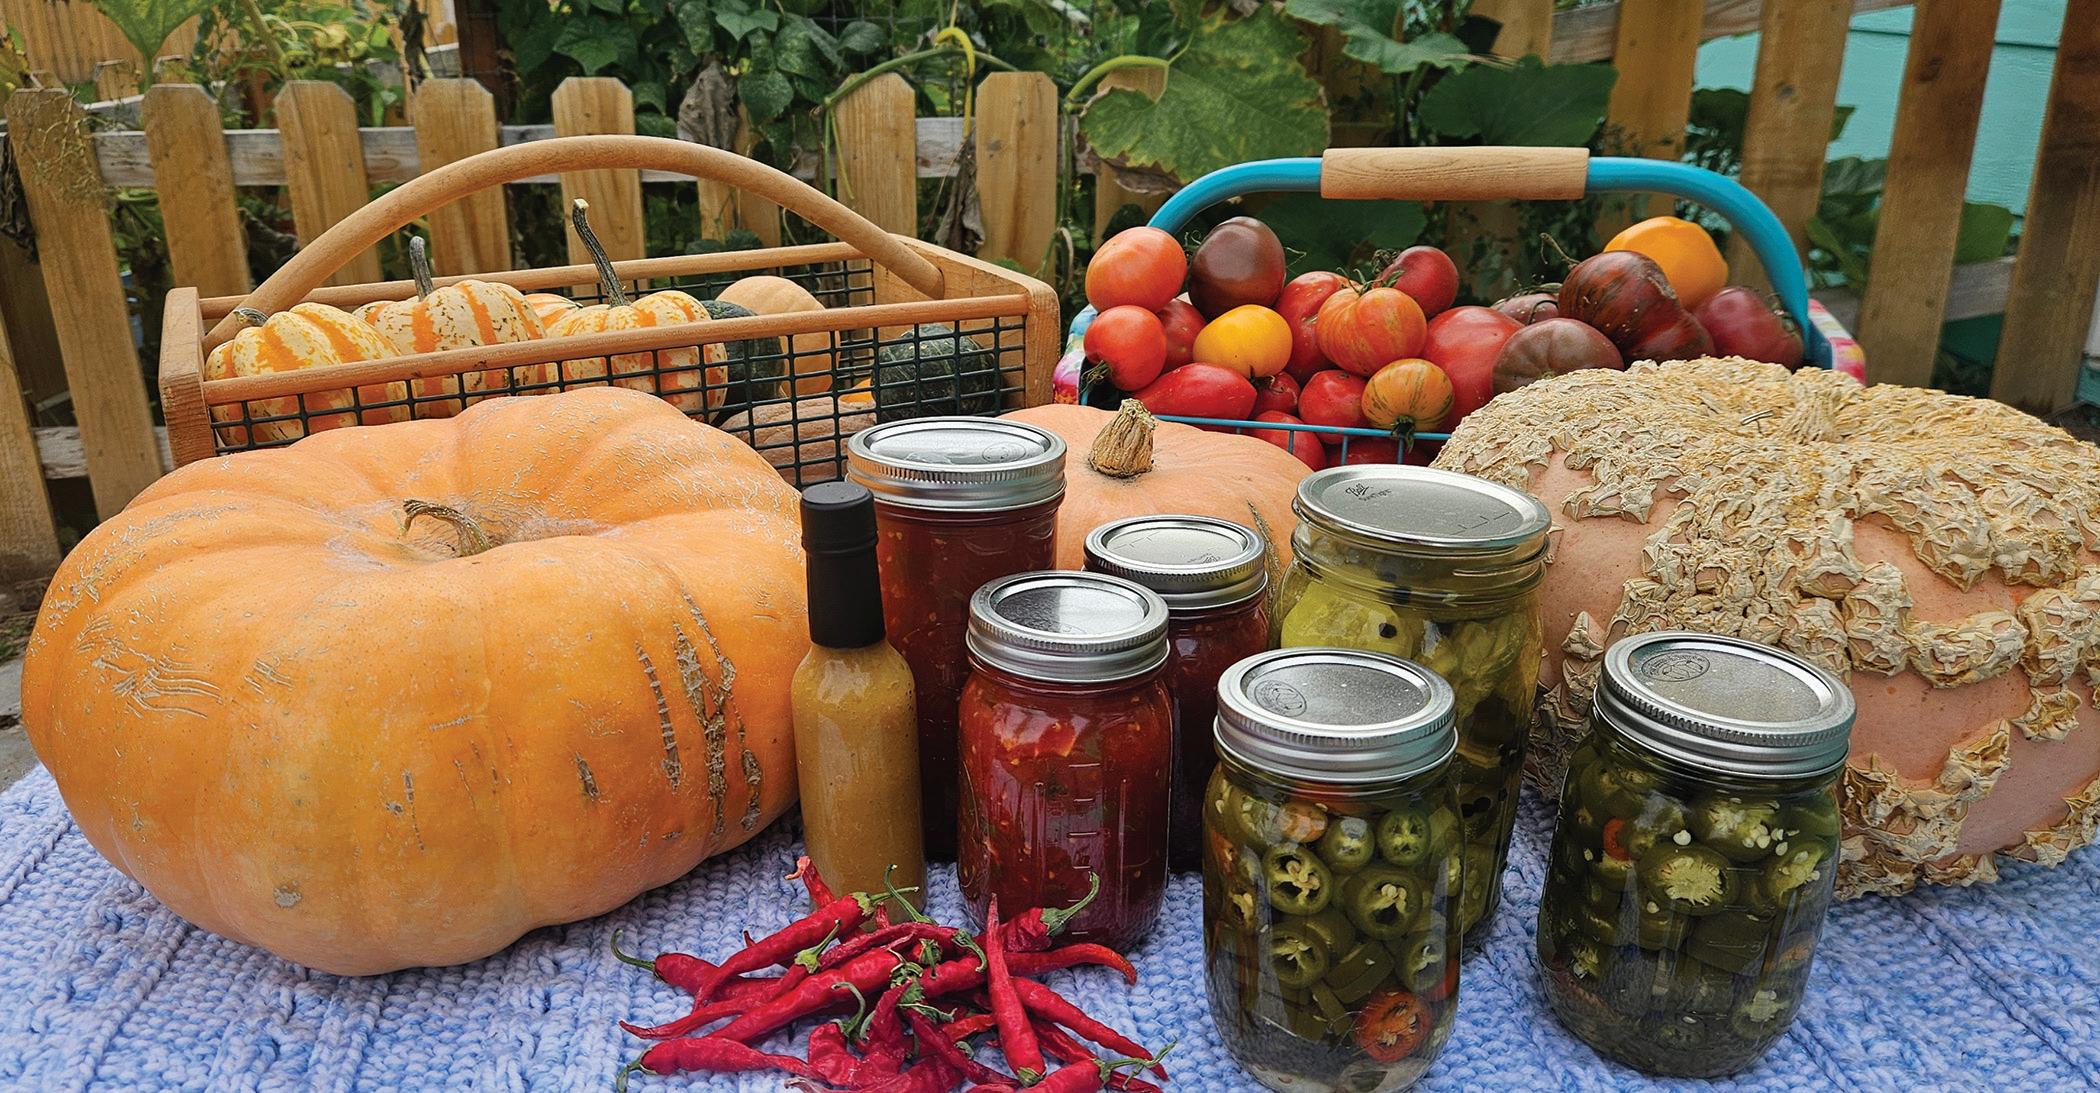
comes when it is time to store crops for winter. Where other climates make it hard to find suitable dry storge and cause the gardener to dig root cellars or spend money on insulation and dehumidifying equipment, the Nevada gardener will find that winter squash and pumpkins can store in an ordinary kitchen for many months with no special treatment. Items such as root vegetables benefit from colder storage but even then, humidity rarely seems to be a challenge faced in the great basin’s more arid climate.
With frosts around the corner if not already upon the area, preserving is the last big push before the garden is put to bed for the winter and the gardener set-
6 Quick Tips for Preserving Your Fall Harvest
Start with Clean Equipment – Whether canning, fermenting, or freezing, always keep jars, knives, and work surfaces sterile to prevent spoilage.
Know Your Method – High-acid foods like tomatoes and pickles do well in water bath canning; low-acid foods need pressure canning for safety.
Blanch Before Freezing – Quickly boil most vegetables, then ice-bath them to maintain color, flavor, and nutrients before freezing.
Dry or Dehydrate – Cure onions and garlic for 2–4 weeks before storing. Most fruits and vegetables can also be dehydrated for long-term use.
Try Fermentation – Sauerkraut, kimchi, and hot sauces are packed with beneficial bacteria and add flavor while extending shelf life.
Store Smart – Keep winter squash and pumpkins in a cool, dry place; root vegetables do best in colder storage, but humidity is less of an issue in arid climates like the Great Basin.
tles in for a well-deserved break. Winter is a time for many to dream of what is to come in the following year, plan a little better, choose a few new seeds to experiment with from those seed catalogs that come rolling in, design and redesign new beds and features. To quote Audrey Hepburn “to plant a garden is to believe in tomorrow.” Gardening has propelled people into the future for thousands of years, innovating new equipment and crops each season for the betterment of the world. Home gardeners contribute to that every season that they choose to put seeds in the ground and share their efforts through preservation with friends and family.

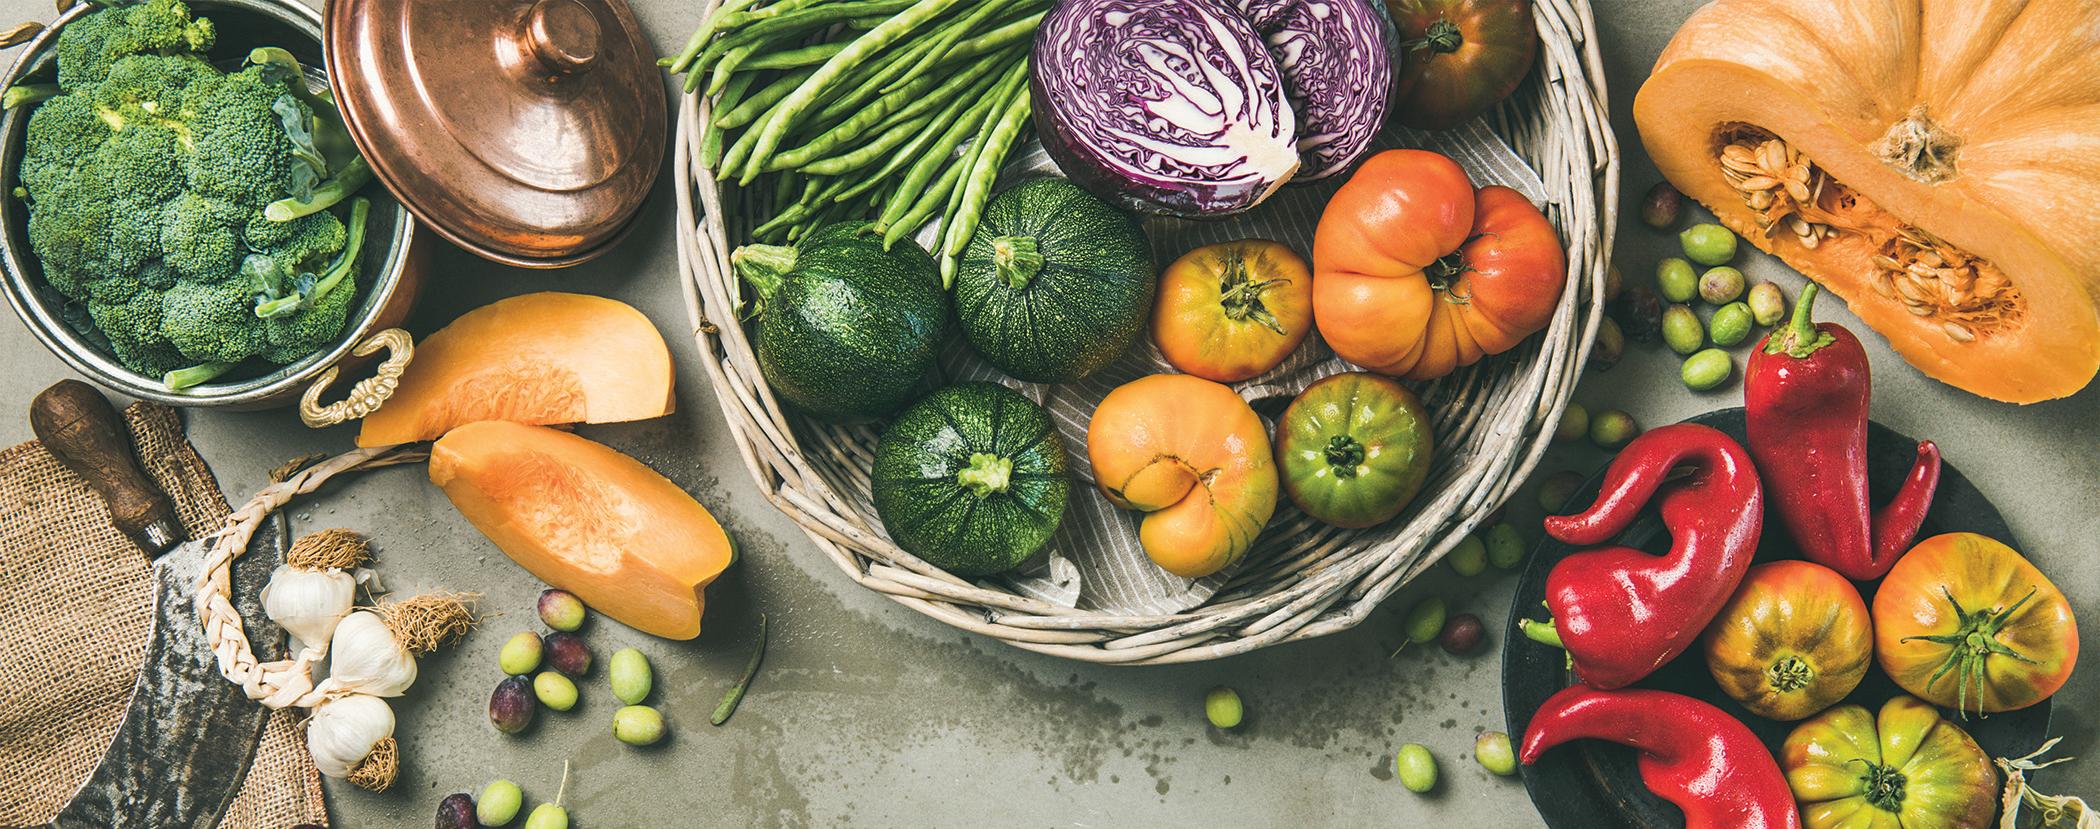
It happens every year—you plant a few squash seeds, and suddenly your garden is producing enough to feed a small village. The good news? Squash is one of the most versatile stars of the fall harvest. Whether it’s roasted, stuffed, mashed, or baked into something sweet, these golden beauties can do it all. So before you start leaving zucchini on your neighbor’s porch under cover of darkness, try one of our delicious recipes and turn that bounty into something worth savoring.
Roasted Autumn Squash with Maple and Sage
Servings: 4–6
Prep Time: 15 minutes
Cook Time: 35–40 minutes
Ingredients:
1 medium butternut squash (about 2–3 pounds), peeled, seeded, and cut into 1-inch cubes
2 tablespoons olive oil
2 tablespoons pure maple syrup
1 teaspoon salt
½ teaspoon black pepper
1 teaspoon fresh sage, finely chopped (or ½ teaspoon dried sage)
Optional: ¼ cup toasted pumpkin seeds for garnish
Instructions:
Preheat oven to 400°F (200°C). Line a baking sheet with parchment paper.
In a large bowl, toss the squash cubes with olive oil, maple syrup, salt, pepper, and sage until evenly coated.
Spread the squash in a single layer on the prepared baking sheet.
Roast for 35–40 minutes, stirring once halfway through, until the squash is tender and lightly caramelized.
Transfer to a serving dish and sprinkle with toasted pumpkin seeds if desired. Serve warm as a side dish or atop salads or grains for a hearty fall meal.
Tip: For added depth, drizzle a little balsamic glaze over the squash before serving, or sprinkle with crumbled goat cheese for a creamy contrast. Or sprinkle with cayenne for some spice!
Stuffed Acorn Squash with Quinoa and Cranberries
Servings: 4
Prep Time: 15 minutes
Cook Time: 40 minutes
Ingredients:
2 acorn squash, halved and seeded
1 cup cooked quinoa
½ cup dried cranberries
¼ cup chopped pecans
1 small onion, diced
1 clove garlic, minced
1 teaspoon olive oil
Salt and pepper to taste
½ teaspoon cinnamon
Instructions:
Preheat oven to 375°F (190°C). Brush squash halves with olive oil and season with salt and pepper. Place cut-side down on a baking sheet and roast for 25 minutes.
Meanwhile, sauté onion and garlic in olive oil until translucent. Mix with cooked quinoa, cranberries, pecans, and cinnamon. Adjust seasoning.
Turn squash cut-side up, fill with quinoa mixture, and bake another 10–15 minutes until heated through. Serve warm.
Creamy Roasted
Butternut Squash Soup
Servings: 6
Prep Time: 10 minutes
Cook Time: 35 minutes
Ingredients:
1 medium butternut squash, peeled, seeded, and cubed
1 tablespoon olive oil
1 medium onion, chopped
2 cloves garlic, minced
4 cups vegetable broth
½ teaspoon ground nutmeg
Salt and pepper to taste


Optional: swirl of cream or coconut milk for serving
Instructions:
Preheat oven to 400°F (200°C).
Toss squash with olive oil, salt, and pepper, and roast for 25–30 minutes until tender.
Sauté onion and garlic in a large pot until soft. Add roasted squash, broth, and nutmeg. Simmer for 10 minutes.

Puree soup with an immersion blender until smooth. Adjust seasoning and serve with a swirl of cream or coconut milk.
Roasted Delicata Squash with Herbs
Servings: 4
Prep Time: 10 minutes
Cook Time: 25–30 minutes
Ingredients:
2 delicata squash, halved, seeded, and sliced into half-moons
2 tablespoons olive oil
1 teaspoon fresh thyme leaves (or ½ teaspoon dried thyme)
Salt and pepper to taste
Optional: drizzle of honey or balsamic glaze
Instructions:
Preheat oven to 425°F (220°C). Toss squash slices with olive oil, thyme, salt, and pepper.
Spread in a single layer on a baking sheet and roast for 25–30 minutes, flipping halfway through, until tender and golden.
Drizzle with honey or balsamic glaze before serving for a sweet-savory finish.


As the days grow shorter and the air turns crisp, gardeners in northern climates know that fall is a busy season. Leaves are falling, gardens are winding down, and the harvest is being gathered. While many people focus on raking, storing, and cleaning up their yards, fall is also the perfect time to get serious about composting. A well-tended compost pile now can pay dividends in the spring, providing nutrient-rich soil that will feed next year’s garden.
Composting is simply the process of breaking down organic materials—leaves, grass clippings, vegetable scraps—into humus, a dark, nutrient-rich material that improves soil structure, retains moisture, and provides essential nutrients for plants. Fall is a unique time for composting because the abundance of fallen leaves offers a rich source of “brown” material, which is essential for balancing nitrogen-rich “greens” like kitchen scraps and fresh grass clippings.
The first step in fall composting is to gather your materials. Leaves, garden clippings, dead flowers, and leftover produce all work well. Avoid adding anything diseased or pest-ridden, as these can survive the composting process and cause problems in the garden. Shredding leaves can speed up decomposition by increasing the surface area, allowing microbes to work more efficiently. Many gardeners invest in a leaf shredder, but you can also use a lawn mower with a bag attachment or simply chop leaves with garden shears.
Next, it’s important to balance greens and browns. Compost piles need nitrogen and carbon to decompose properly. “Greens” are nitrogen-rich materials, such as fruit and vegetable scraps, coffee grounds, and grass clippings. “Browns” are carbon-rich materials like dried leaves, straw, cardboard, and shredded newspaper. A general rule of thumb is to aim for roughly three parts brown to one part green by volume. This balance helps prevent the compost pile from becoming too wet and smelly or too dry and slow to break down.
Layering and turning the pile is the next key step. Start with a layer of coarse browns, like twigs or straw, to help with aeration. Then alternate layers of greens and browns, finishing with a layer of leaves or straw to trap heat and moisture. Turning the pile every week or two mixes the materials, introduces oxygen, and
speeds decomposition. For smaller piles, a garden fork or pitchfork is sufficient. Larger piles can benefit from a dedicated compost turner or even a shovel.
Moisture control is another essential element of successful composting. Your pile should feel like a wrung-out sponge—damp but not dripping. Too much moisture can create anaerobic conditions, leading to unpleasant odors, while too little slows down the decomposition process. In the fall, natural rainfall can keep your pile moist, but you may need to cover it during heavy storms or supplement with a bit of water if the pile becomes dry.
Fall is also a great time to use bins or cages to contain compost. Wire bins, plastic composters, or homemade wooden boxes keep the pile tidy, discourage pests, and make it easier to turn. Many gardeners place their compost bin in a partially shaded area to retain moisture and temperature, but it should still get some sun to encourage microbial activity.
Even as the temperatures drop, composting can continue slowly over the winter, especially if the pile is insulated with extra leaves or straw. Covering the top of the pile with a tarp or an old piece of plywood can help trap heat and prevent nutrients from leaching out with rain or snow. By spring, the pile should have broken down into dark, crumbly, earthy-smelling compost ready to feed vegetable beds, flower borders, and container gardens.
Fall composting is not only a way to recycle garden and kitchen waste, it’s also an environmentally friendly practice that reduces landfill contributions and greenhouse gas emissions. Each year, gardeners who compost create healthier soil, reduce their need for chemical fertilizers, and support a more resilient garden ecosystem.
Whether you are a seasoned gardener or a beginner, fall is the ideal time to prepare your compost pile. By gathering materials, balancing greens and browns, turning the pile regularly, and controlling moisture, you can turn your leaves, scraps, and garden clippings into a rich, nourishing resource for your plants. Come spring, your garden will thank you with stronger plants, higher yields, and more beautiful blooms. After all, the effort you put into composting now is an investment that pays off year after year.


Buying a home is exciting, but it can also feel overwhelming, especially when it comes to getting your finances in order for a loan. Understanding what lenders look for and preparing your documents ahead of time can make the process faster, smoother, and less stressful.
Income Matters – Your lender needs to know how much money you earn and whether it is steady enough to support a mortgage. If you are an employee, bring your most recent paystub and your last two years’ W-2 forms. Self-employed buyers will need to provide one or two years of tax returns. Without this documentation, a lender can only give a “prequalification” letter, which indicates that it looks like you might qualify for a loan, but it does not carry the same weight as a preapproval.
Check Your Credit – Your credit history is another key factor in qualifying for a mortgage. A higher credit score can improve your chances of qualifying for better rates and programs, while a lower score may require some work before approval. Lenders can help you identify areas to improve and suggest steps to boost your credit.
Funds for Closing – Lenders will also want to verify that you have enough money to cover the down payment, closing costs, prepaid items, and any required reserves. Bank statements showing available funds are essential, and large deposits may need extra documentation. If family gifts, asset sales, or other sources are involved, your lender will guide you through the necessary paperwork. First-time buyers may also qualify for down payment assistance
programs, which can help reduce the upfront costs.
Debt Considerations – Some existing debt may need to be paid off before your mortgage can be approved. Reviewing your debts with your loan officer can clarify what steps to take and ensure your monthly payment fits comfortably within your budget.
Preapproval – One of the most important steps is obtaining a preapproval. Unlike prequalification, a preapproval letter shows that a lender has reviewed your income, credit, and assets and is willing to back a loan for a specific amount. Preapproval also strengthens your position when making an offer, letting sellers know you are a serious buyer.
Once you have an accepted offer and all conditions are met, your loan goes to underwriting for final approval. Providing complete information to your lender from the start helps avoid delays and keeps the process on track.
Working closely with your lender is essential to a smooth home-buying experience. By understanding income requirements, credit considerations, and available funds, you can enter the process confident and prepared — and ready to turn the key to your new home.
Pam can be reached at 742-0627 or at probinson@evergreenhomeloans.com.

Fall is in the air, and with it comes the opportunity to bring the season’s colors, textures, and warmth into your home. One of the simplest ways to do that is with a DIY fall wreath. Whether you hang it on your front door, over the mantel, or even on a window, a handmade wreath adds a personal touch and festive flair to your home décor. Best of all, creating one can be as simple or as elaborate as you like.
To get started, you’ll need a few basic materials: a wreath base, which can be made of wire, grapevine, or foam; floral wire or hot glue to secure your materials; and a selection of fall decorations such as leaves, mini pumpkins, pinecones, berries, acorns, and seasonal ribbons. Many craft stores carry ready-to-use fall décor, but a walk through your yard or a local park can yield natural treasures like twigs, dried flowers, or colorful leaves.
Step One: Choose Your Base
The base sets the tone for your wreath. Grapevine wreaths have a rustic, natural look and are sturdy enough to support heavier decorations. Wire or foam bases are lighter and easier to manipulate, making them ideal for beginners or for more elaborate designs. If you want a round, symmetrical look, wire or foam may be easier to shape, while grapevine wreaths can create a more organic, freeform style.
Step Two: Select Your Palette Autumn offers a rich palette of colors, from deep reds and oranges to muted yellows and browns. Decide on a color theme for your wreath before you start attaching materials. You might opt for classic fall colors, a more neutral woodland look, or even a modern take with metallic accents like gold or copper. Having a clear palette in mind helps you maintain balance and avoid overcrowding your wreath with too many clashing elements.
Step Three: Layer Your Materials
Start by adding a base layer of greenery or leaves. This provides a full foundation and helps cover the wreath frame. Next, add larger elements such as mini pumpkins, pinecones, or clusters of berries. Place them evenly around the wreath, leaving space for smaller accents. Finally, finish with ribbon, small flowers, or delicate accents like acorns or seed pods to give the wreath depth and visual interest. Using floral wire or hot glue will keep your pieces secure, but be mindful of weight if your wreath will hang on a door.
Step Four: Add a Ribbon or Bow
A ribbon can tie the entire design together. Consider using burlap for a rustic look, plaid for a traditional feel, or a velvet or satin ribbon for a more sophisticated touch. Bows can be positioned at the top, bottom, or side, depending on your aesthetic preference.
Other ideas ...
Not every fall wreath has to follow the traditional leafy pumpkin theme. Here are some variations to consider:
Minimalist Wreath – Use a simple wire or grapevine base and add just one or two large elements, such as a single cluster of dried hydrangeas or a trio of small pumpkins. Less can be more.
Herbal Wreath – Incorporate fresh or dried herbs like rosemary, thyme, or sage. Not only does this create a beautiful wreath, it also adds a lovely fragrance.
Edible Wreath – Add dried citrus slices, cinnamon sticks, and mini gourds. These wreaths can serve as both decoration and conversation pieces during holiday gatherings.
Whimsical Wreath – For families with children, consider adding small wooden or felt animals, acorns painted in bright colors, or glittered leaves for a playful touch.

Tips for Longevity
To make your wreath last throughout the season, avoid placing it in direct sunlight or near a heat source, which can fade colors and dry out natural materials too quickly. If you live in a windy or rainy area, consider hanging it under a covered porch or using a weatherproof spray to help protect delicate elements.

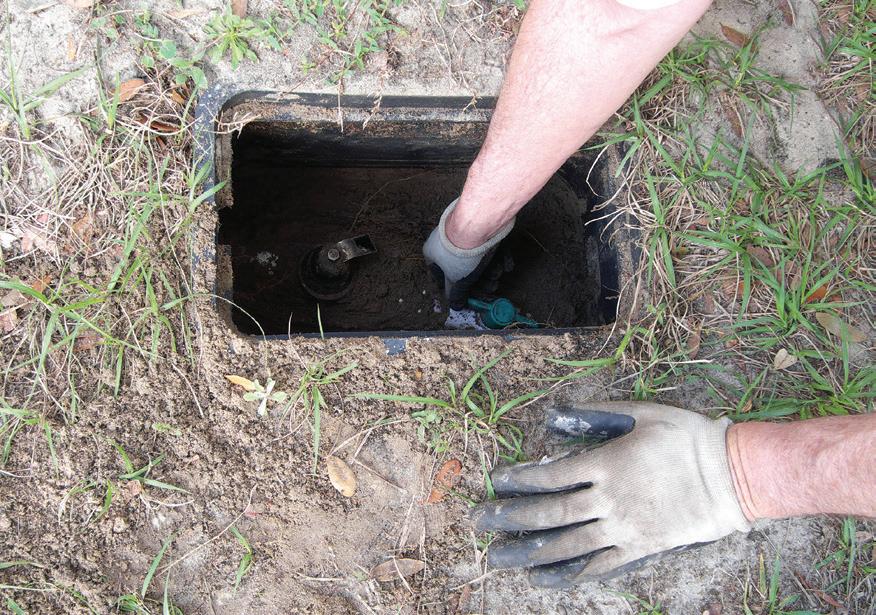
As fall settles in and temperatures begin to drop, gardeners in Zone 6 face a critical task: preparing their sprinkler systems for the winter months. With freezing temperatures on the horizon, water left in pipes or sprinkler heads can freeze, expand, and cause costly damage. Taking the time now to winterize your system ensures it survives the cold season and is ready to go when spring arrives.
The first step in preparing a sprinkler system for winter is to shut off the water supply. Most systems have a main valve that controls water flow to the underground lines. Turn this off to prevent water from continuing to fill the pipes. Next, drain the water from the system. Some systems have manual drain valves located at low points in the piping; opening these allows water to escape. If your system has automatic drain valves, they will usually open when the water is turned off, but it’s important to confirm that water is flowing out properly.
For many home systems in Zone 6, a blowout procedure is the most reliable way to remove water from the lines. This involves connecting an air compressor to the system’s mainline and using bursts of air to force
water out of the pipes and sprinkler heads. Extreme caution is necessary when performing a blowout — using too much pressure can damage PVC pipes or fittings, while too little may leave water behind that could freeze. If you’re unsure about this step, hiring a licensed irrigation professional can save both time and potential repair costs.
Once the water has been cleared, it’s important to inspect each sprinkler head. Check for cracks, broken nozzles, or misaligned heads, and replace or adjust them as needed. Removing any debris such as leaves or dirt from heads and valves will also help prevent clogs and ensure smooth operation in the spring. For above-ground components like backflow preventers, drain them fully and, if possible, remove and store them indoors for added protection.
Timers and controllers also need attention before the freeze. Turn off or unplug electric controllers to prevent damage from cold and moisture. For smart controllers connected to Wi-Fi, check the manufacturer’s instructions — some may allow you to leave them in place, while others should be brought inside for winter. Batteries in