1 Open Training Guide - Log in and Create a Project
Audience: Buyers
Pre-Requisites:
Log In and Create a Project - Step by Step Guide
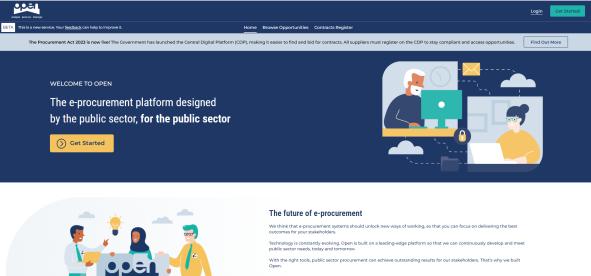
Go to the Open website at: https://www.open-uk.org
2 3 4
Navigate to the top right-hand corner of the homepage and click Log In
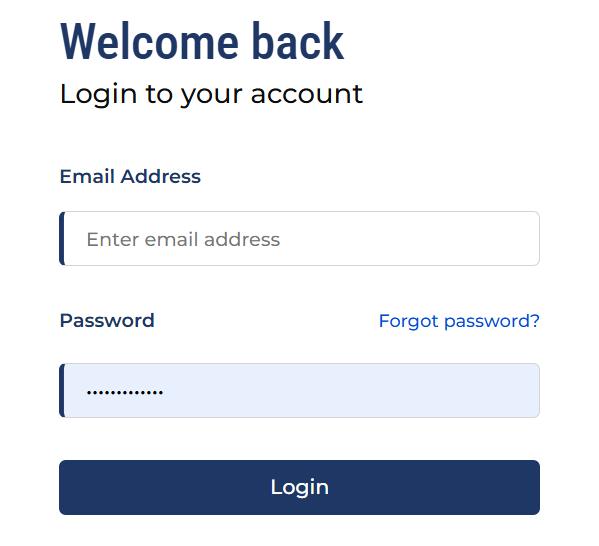
You will be taken to the Welcome Back- Log into your account page.
Enter your Email and Password and click Login.
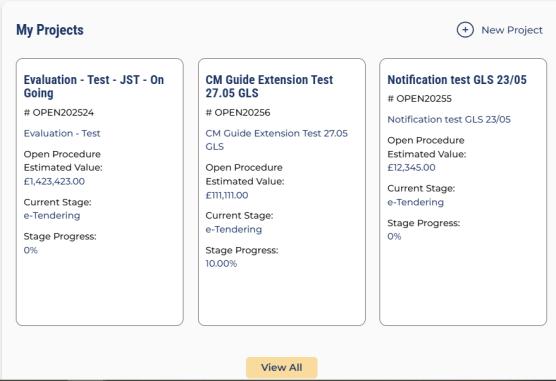
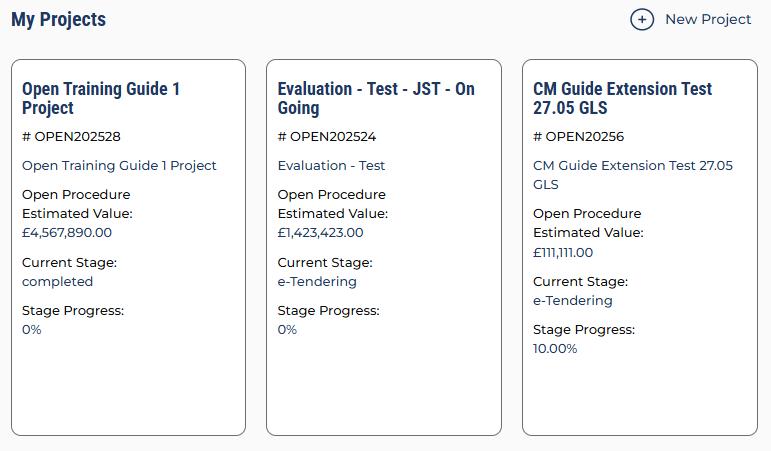
This will display your home screen, called the Dashboard which is your Homepage.
Within your Dashboard, scroll down to the My Projects tile.
To create a new Project, click the New Project button in the top right-hand corner of the tile.
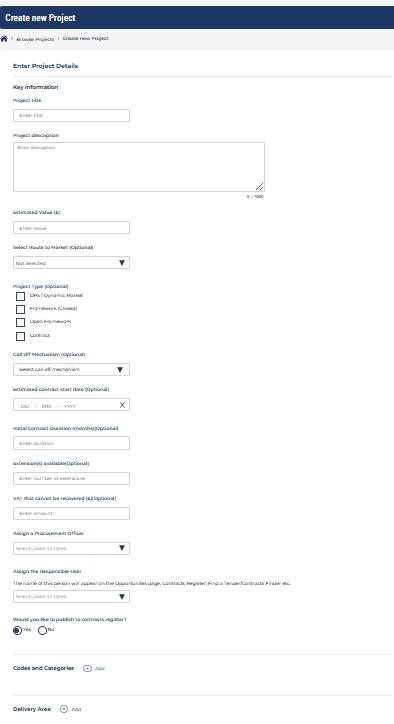
The Create New Project page will load, where you can enter key information about the Project.
Some of these fields are optional, so you can skip them and fill them in or edit the details later.
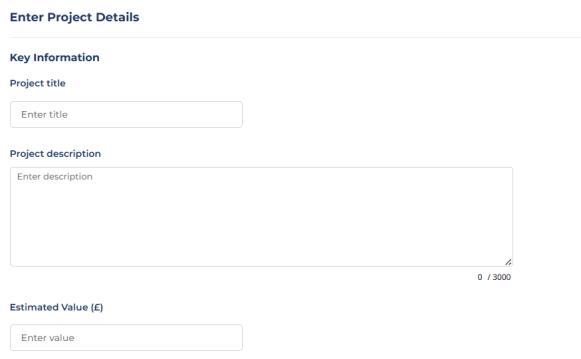
The Project Title, Project Description and Estimated Value fields are mandatory and must be completed at the time of creating the Project.
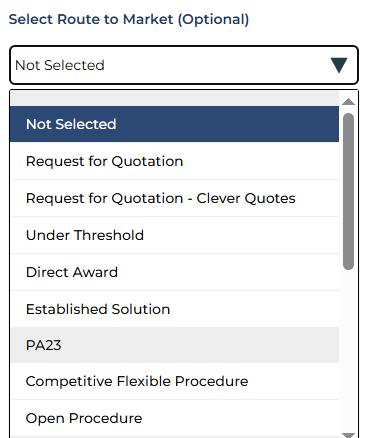
The option you select from the Route to Market field will inform the next steps for that procedure and linked Workflow to apply.
Click for more information on Routes to Market.
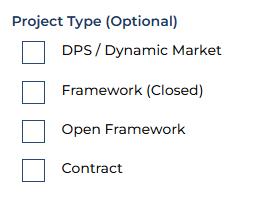
Select the appropriate Project Type. This is required to drive functionality following award of the Contract.
Contract - choose every time
DPS/Dynamic Market - Solution required for call-off activity
Open Framework – PA23 functionality
Framework (Closed) - Solution required for call-off activity
10
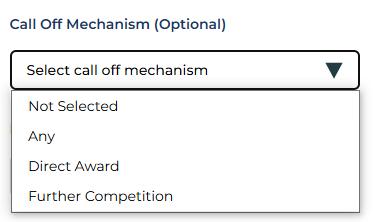
Select the appropriate Call-off Mechanism for your Project if this is applicable (Framework/DPS feature only). The option you choose will drive the future calloff functionality against the awarded Solution.
11
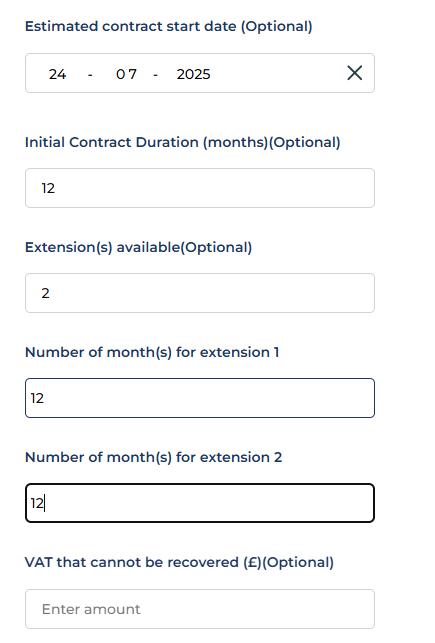
Enter the Contract Start Date, Initial Contract Duration and any Extensions
The number of extensions and the length of each can be selected here.
VAT that cannot be recovered should be added following contract award (if applicable) and is linked to the Contract Register display.
12
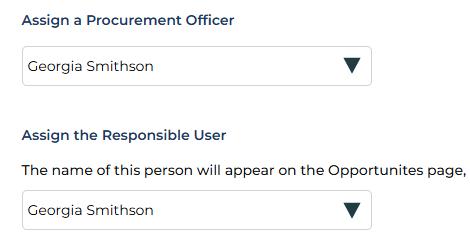
Assign a Procurement Officer and Responsible User for the Project from the list of users.
The Responsible User’s name will appear on the Opportunities page, Contracts Register, Find a Tender/ Contracts Finder etc.
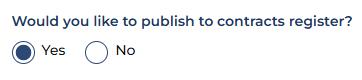
Choose whether you would like to publish the Project to the Contracts Register. If you select yes, the record will be visible on Open with unrestricted access, following contract award.
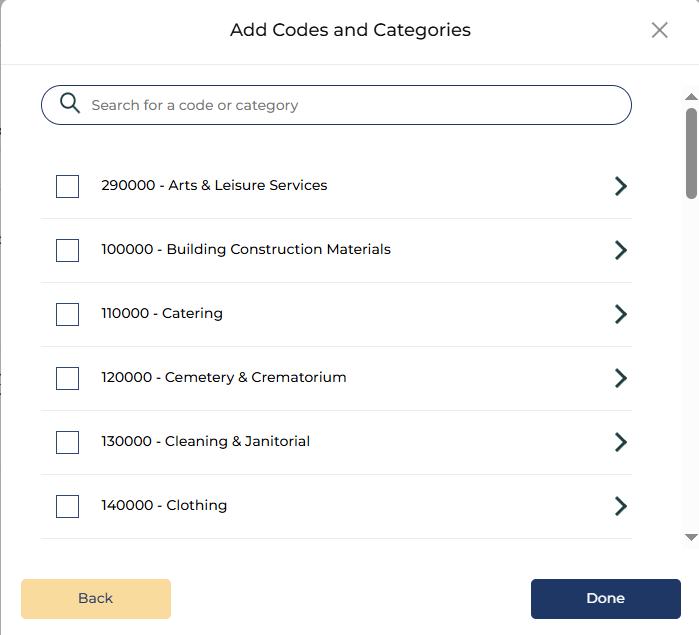
You can add relevant Codes and Categories and the Delivery Area at the bottom of the screen by using the Add buttons. This means all matching suppliers are notified about the Project (if it is advertised) and ensures it appears on their Dashboard
When you’re happy with the details you’ve included, click Create at the bottom of the Create New Project page.
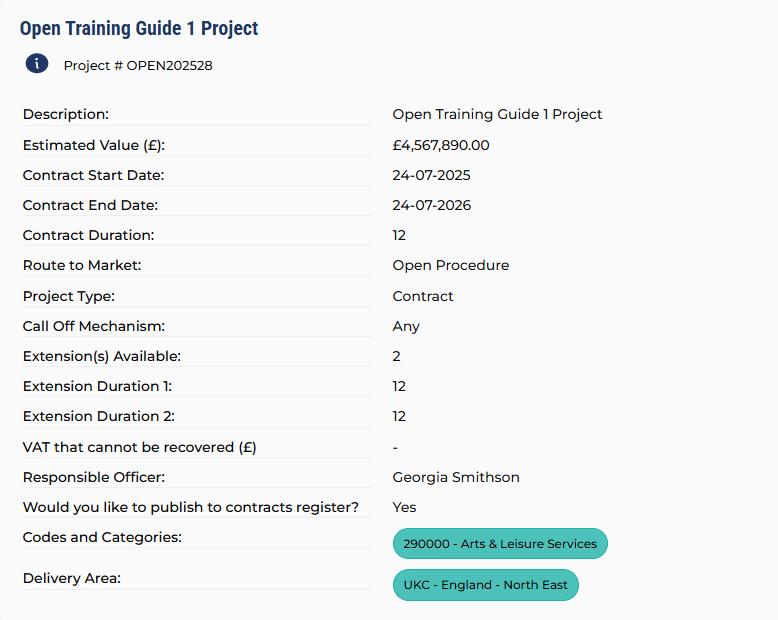
Your Project Overview screen will be displayed showing a summary of the key information you added. You can Edit Project Details or Cancel Project at any time.
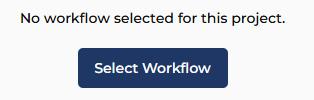
You must now assign a Workflow to your Project.
Click on Select Workflow within the Workflow tile.
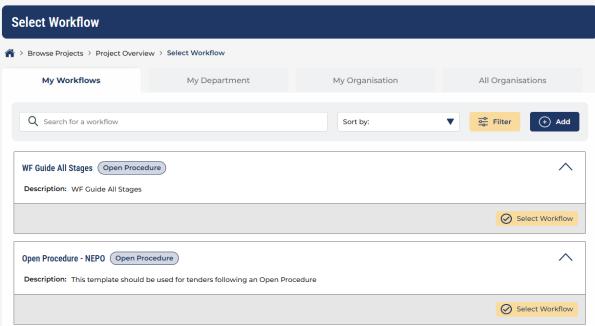
The Workflow Library contains pre- created Workflows within four tabs:
My Workflows (created by you)
My Department (created by users in your department)
My Organisation (created by users in your organisation)
All Organisations (created by all buyers within Open. You will only see the Workflow if they have chosen to share it with your authority/ organisation)
The Route to Market you selected will inform the type of Workflow that is pulled through.
You can view the Workflow prior to selecting.
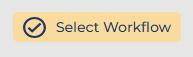
NB: Once the Workflow has been selected, it cannot be removed from the Project.
Click on Select Workflow to choose the relevant option.
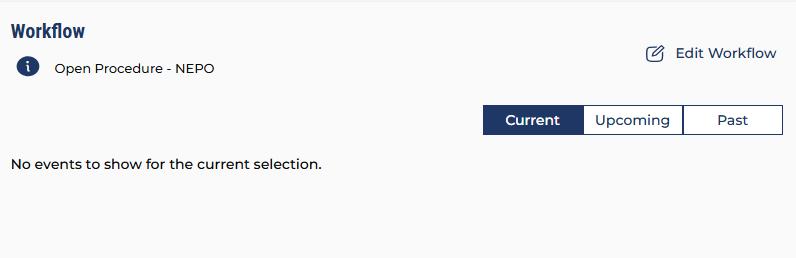
You will now see the name of the Workflow you have selected.
For further guidance on using, creating and editing Workflows please see 2. Open Training Guide- Create and Edit a Workflow.
You have now successfully created a Project. The Dashboard view will update for the Project creator showing the new Project.
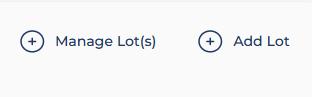
After Project creation, if this is a lotted contract, you can scroll down to the Lots tile and click Add Lot. You can do this at any point before publishing the opportunity from the e-tendering stage.
On the Add Lot screen, complete the details for the Lot, including the Call Off Mechanism and add Codes and Categories and Delivery Areas. When all the details are added, click Add.
Click for more information on Call off Mechanism options see end of guide.
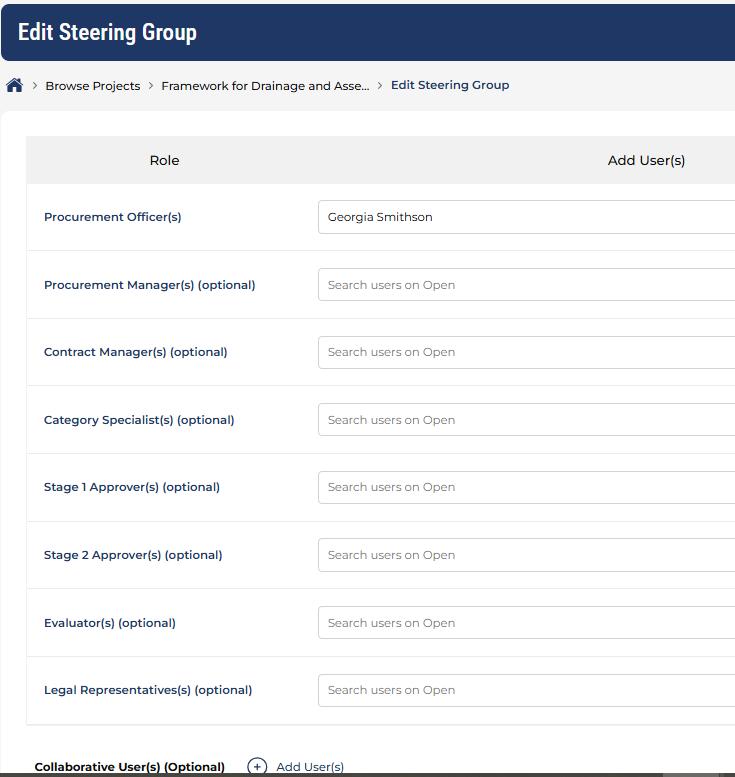
You can add members to the Project Steering Group by scrolling down to the Steering Group tile and clicking Edit. Click on the dropdown box to assign colleagues to their relevant role. To save and return to the Project Overview, click on Save.
Check out our other guided walkthroughs for topics here.
Additional information
Step 8
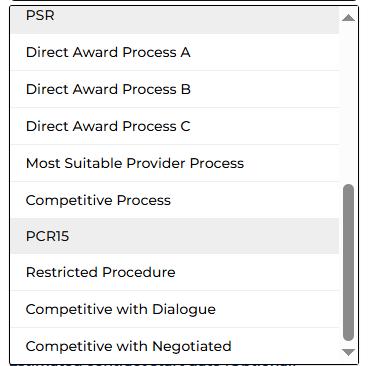
Routes to Market:
Before you can publish a project for the first time, you’ll need to pick a route to market. You can do this when you create the project, or by going back to edit the project details later.
These are the options you can select from:
General Under Threshold
Request for Quotation – closed quote
• 1 E-Tendering Stage
• Publish (to selected suppliers) / Evaluation / Award
2.Request for Quotation - Clever Quotes – random selection of 3 suppliers
• 1 E-Tendering Stage
• Publish (to randomly generated suppliers, additional can be added) / Evaluation / Award
• 1 E-Tendering stage (Pre-Proc stage can be added for MC)
• Publish (advertise opportunity) / Evaluation / Award
Additional information
Routes to Market Cntd…
Provider Selection Regime
8. Direct Award Process A – closed, select suppliers
o 1 E-Tendering Stage
• Publish (to selected suppliers) / Evaluation / Award
9. Direct Award Process B – open, advertised opportunity
o 1 E-Tendering stage (Pre-Proc stage can be added for MC)
• Publish (advertise opportunity) / Evaluation / Award
10. Direct Award Process C - closed, select suppliers
o 1 E-Tendering Stage
• Publish (to selected suppliers) / Evaluation / Award
11. Most Suitable Provider Process – restricted process
o Two-stage (Pre-Proc stage can be added for MC)
• (1) Publish / Evaluation / Award (to shortlist)
• (2) Publish (to shortlist) / Evaluation / Award
12. Competitive Process - open, advertised opportunity
o 1 E-Tendering stage (Pre-Proc stage can be added for MC)
• Publish (advertise opportunity) / Evaluation / Award
PCR15 – no longer in use
1. Restricted Procedure
2. Competitive Procedure with Dialogue
3. Competitive Procedure with Negotiation
By selecting a route to market, the application will help guide you to follow that procedure:
• Your admin can create workflows that are applicable to each route to market and are automatically filtered for you when selecting a workflow to apply to your Project.
• If you pick a route to market that has two or more stages (i.e. Selection stage and Invitation to Tender), the system will adapt to allow this, and carry successful suppliers into subsequent stages.
• If you select ‘Request for Quotation’, you’ll be able to select which suppliers you want to engage with.
• If you select ‘RFQ – Clever Quotes’ this will randomly select suppliers based on your local area
• If you select ‘Direct Award’, then you don’t need to go through evaluation, and can go straight from publishing to award.
Additional information (cont.)
Step 22
Call off Mechanism:
Before you can publish a project for the first time and if it’s a Framework or DPS Project, you’ll need to pick the Call Off Mechanism. If you’re publishing at project level, you can do this when you create the project, or by going back to edit the project details later. If you’re publishing at lot level, you’ll be asked to select it when you create the lot.
There are three options to choose from:
• Any
• Direct Award
• Further Competition
If Further Competition is selected, you then also need to decide if it’ll be between all suppliers, or specific suppliers that the user chooses.
Any: This option will allow the user to choose between a Direct Award or Further Competition when performing a call-off..
Direct Award: When you select Direct Award, call offs from that project/lot will use the default Direct Award workflow for your organisation, that can be selected by organisation admins from their profile page.
When making a call-off using Direct Award, users calling off will be asked to pick from the suppliers awarded to the lot/project. The opportunity will then only be made available to the chosen supplier when published. In a Direct Award workflow, you don’t need to go through evaluation and can go straight from publishing to award.
Further Competition: When you select Further Competition, call offs from that project/lot will use the default Further Competition workflow for your organisation, that can be selected by organisation admins from their profile page.
Additional information (cont.)
If ‘All Suppliers’ was chosen, all suppliers awarded to the lot/project will be included in the call off. If ‘Selected Suppliers’ was chosen, users calling off will be asked to pick from the suppliers awarded to the lot/project to be included in the further competition. The opportunity will then only be made available to the chosen suppliers when published.
Suppliers will then be asked to submit responses that you can evaluate and award a contract to.