


Ancillary Services


EDITORIAL DIRECTOR
VANESSA C. GUZMAN
CONTRIBUTING WRITERS
Vito Bianca
Martin Castro Ceron
Stirling Cox
Ben Gromicko
Nick Gromicko
Greg Johns
RESEARCH
Nestor Mann Editorial Research
Stuart Mills Project Manager
PHOTOGRAPHY / VISUALS
James Acquaroli Photographer
Nelson Randall Senior Photo Editor
WEB
Karlina Watson Digital Production Manager
Sharon Saban Production Coordinator
SOCIAL MEDIA
Carolina G. Garcia Social Media Manager
ADVERTISING AND MARKETING
Gabriel Veloso Web Developer
Vinicius Veloso Marketing Director
BUSINESS
Matthew Adams Chief Financial Officer
Leah Castello Vice President of Operations
Amber Rose Controller
Juan Rivera Administrative Assistant
TECHNOLOGY
Seth Penn Director of Technology
PRODUCTION
Naomi Callaghan Special Events Manager
Ernie Clair Production Assistant


In the dynamic world of home inspection, where safety and wellbeing are paramount, a beacon of excellence has shone for many years. PROLAB®, a pioneer in environmental testing, proudly celebrates its long journey as a trailblazer in mold, radon, lead, asbestos, and drinking water analysis. It is a story of visionary
leadership, technical prowess, and a legacy that has redefined the home inspection industry.
Founded in 1998 by James McDonnell IV, PRO-LAB® emerged onto the scene with a mission that would fundamentally alter the landscape of home inspection.
In an era where the dangers of indoor pollutants were often underestimated, PRO-LAB® set out to empower homeowners, inspectors, and real estate professionals with crucial insights about their living spaces. The company’s foundation was built upon the pillars of precision, reliability, and unparalleled customer service—a foundation that continues to shape its identity today.
PRO-LAB® entered the arena at a time when the perils of indoor pollutants were largely ignored. Silent hazards like mold infestations, radon intrusion, lead exposure, asbestos presence, and water contamination posed significant risks to inhabitants, their health concealed from plain

As we look back on our journey from the very beginning, our vision has always been to provide the best service with the most competitive pricing matched with the most accurate results. This unwavering commitment has been the driving force behind our success, propelling us to where we stand today. Our continued dedication to this vision remains the cornerstone of our achievements.”
-James McDonnell IV
view. PRO-LAB’s innovative testing services revolutionized the industry by arming homeowners with knowledge and equipping inspectors to provide comprehensive insights into the indoor environment.
As the home inspection industry evolved, PRO-LAB® remained at the forefront of innovation. The company’s laboratories, outfitted with cutting-edge technology, became centers of meticulous analysis. A dedication to rigorous quality control, coupled with a team of seasoned experts, positioned PRO-LAB® as a standard-bearer of trust and integrity. In an arena where precision is paramount, PROLAB’s commitment to excellence has set it apart.
Integral to PRO-LAB’s success is its hyper focus on its customers. Whether it’s a homeowner seeking safer living conditions or an inspector striving for excellence, PRO-LAB® provides outstanding support, education, and guidance. Seminars, webinars, and resource materials became vehicles for empowering industry professionals with knowledge, raising the collective standards of the sector.
Throughout its notable journey, PRO-LAB® has achieved numerous milestones. Accreditation from the American Industrial Hygiene Association (AIHA) for mold, the National Voluntary Laboratory Accreditation Program (NVLAP) accreditation for asbestos, and state-level licensing for radon expertise underscore PRO-LAB’s commitment to precision and regulatory compliance.
As PRO-LAB® embarks on its next chapter, its dedication to
innovation and customer-centric values stands unwavering. In an era where environmental health has assumed unprecedented importance, PRO-LAB’s role as a guardian of homes, families, and communities persists, furthering its mission to create a safer, healthier world.
As PRO-LAB® continues its legacy of innovation, some of their achievements deserve special mention. PRO-LAB® was the first to introduce a pre-paid lab fee system, relieving home inspectors of monthly accounting complexities. It pioneered offering free lab supplies with the purchase of pre-paid lab fees and was also the first to provide free FedEx envelopes for shipping samples. The introduction of same-day mold analysis without extra charges, being open on Saturdays, and developing an app for inspectors to log in samples virtually further cement PRO-LAB’s reputation as an industry maverick.
Due to its dedication to the home inspection industry, its commitment to excellence, accuracy, and reliability, PROLAB® was chosen as the official laboratory of InterNACHI®, the world’s largest home inspection association. This partnership has further solidified PRO-LAB’s reputation as an industry titan and a trusted resource for home inspectors worldwide.
PRO-LAB’s journey transcends mere corporate success—it embodies a legacy. A legacy that emphasizes the pivotal role of environmental testing in fostering healthier living environments. A legacy that resonates with the precision and commitment to pushing industry boundaries. A legacy that epitomizes pioneering excellence in the realm of home inspection. Through PRO-LAB’s story, we don’t just witness years of achievements, but a vision for a safer, brighter, and healthier future.


By: Martin Castro Ceron: HSE Specialist
Evaluating risk perception is becoming increasingly sophisticated, integrating advancements in technology, psychology, and data analytics. Here are some of the latest trends in assessing how individuals and organizations perceive risk:
Behavioral analytics is gaining traction as a tool to understand risk perception by analyzing large datasets of human behavior. This involves tracking patterns in decision-making processes, online activity, and even biometric data to assess how people react to different risk scenarios. By leveraging big data, organizations can identify subtle behavioral trends and biases that traditional surveys might miss.
Psychometric tools are evolving to incorporate neurocognitive techniques, such as eye-tracking, facial recognition, and brainwave monitoring, to assess how individuals perceive and respond to risk. These methods provide deeper insights into the subconscious reactions that people have towards risk, allowing for a more nuanced understanding of their perception.
For example, measuring stress responses during risk assessments can reveal the true level of concern an individual feels.
Immersive simulations and scenario-based assessments are being used to evaluate risk perception in a more dynamic and realistic context. Virtual reality (VR) and augmented reality (AR) technologies allow individuals to experience risk scenarios in a controlled environment, where their reactions and decision-making processes can be closely monitored. These simulations help organizations understand how individuals might react in real-world situations, providing a more accurate measure of risk perception.
Crowdsourcing and social media are increasingly being utilized to gauge public risk perception. By analyzing discussions and sentiments expressed on platforms like Twitter, Facebook, and LinkedIn, organizations can capture real-time data on how different risks are perceived by the public. This approach allows for the assessment of risk perception on a large scale and can be particularly useful in understanding how perception evolves during crises or emerging risks. Crowdsourced
data can also reveal regional or demographic differences in risk perception, allowing for more targeted risk communication strategies.
Risk perception is considered fundamental to understand the behavior that people will adopt in the preventive stage, during accidents, and in the rehabilitation stage, which will directly influence decisions, which is part of a complex sociocultural phenomenon.
Since risk is a possibility, there is a difference between real risk and perceived risk.
Peter M. Sandman is one of the world’s preeminent risk communication speakers and consultants, creator of the “Risk = Hazard + Outrage” formula for risk communication, he said: “Sometimes the problem is too little outrage; people are apathetic, and I help my client arouse more outrage, so they protect themselves. Other times the problem is too much outrage; people are excessively angry or frightened – usually because of things my client has done wrong – and I help find ways to calm the situation. Still other times, the outrage is rightly high about a genuinely serious risk, and the job is to help people bear it, sustain it, and act on it.”
The most important fact about risk communication is the incredibly low correlation
between a risk’s “hazard” (how much harm it’s likely to do) and its “outrage” (how upset it’s likely to make people). If you know a risk is dangerous, that tells you almost nothing about whether it’s upsetting. If you know it’s upsetting, that tells you almost nothing about whether it’s dangerous. The most important fact about risk communication is building and maintaining trust. Without trust, even the most accurate and well-crafted risk communication efforts can fail to influence behavior or effectively convey important information. Trust is established through transparency, consistency, empathy, and responsiveness. When people trust the source of information, they are more likely to take recommended actions, understand the risks, and feel confident in the decisions they make. Trust also helps in reducing panic, managing uncertainty, and ensuring that communication efforts are received and acted upon positively, especially during crises or when dealing with complex and uncertain risks.
What to do?
1. Understanding Risk Perception in Homes
Risk perception in homes revolves around how individuals and families assess and react to potential hazards in their domestic environment. This includes a wide range of risks such as fire, burglary, natural disasters, and everyday accidents like falls
or exposure to harmful substances. How these risks are perceived can be influenced by personal experiences, cultural beliefs, media coverage, and the physical environment of the home. For example, someone who has experienced a house fire may be more vigilant about fire safety, while another person in a similar home might prioritize security against burglary if they live in a high-crime area.
2. Factors Influencing Home Risk Perception
Several factors shape how risks are perceived in the home. Demographics, such as age, income, and education level, play a role; older adults might worry more about falls, while families with young children might focus on childproofing. Past experiences also significantly impact perception; for instance, someone who has lived through a natural disaster is likely to take emergency preparedness more seriously. Additionally, media and social influence can shape perceptions by highlighting certain risks over others, such as the coverage of home invasions or natural disasters.
3. Common Misconceptions and Biases
Homeowners often have cognitive biases that skew their risk perception. Optimism bias, where individuals believe that bad things are less likely to happen to them, can lead to underestimating the need for precautions. For example, someone may
skip installing smoke detectors, thinking a fire is unlikely. There’s also availability heuristic, where recent experiences or vivid media stories make certain risks seem more likely than they are, such as the fear of earthquakes after seeing news coverage, even if the actual risk in their area is low.
4. Improving Risk Perception in Homes
Improving risk perception involves education and awareness. Home safety programs that provide clear information about common hazards and preventive measures can help individuals make more informed decisions. Encouraging regular home safety assessments, offering resources like checklists or safety equipment, and fostering a community culture of safety can also contribute. Furthermore, personalized risk communication, tailored to the specific demographics and experiences of homeowners, can address misconceptions and ensure that the most relevant risks are prioritized. Ultimately, by understanding and addressing the factors that influence risk perception, homeowners can be better prepared and more proactive in safeguarding their homes
In conclusion, this article intended to reflect a move towards more comprehensive and realtime assessments of risk perception, leveraging advanced technologies and psychological insights to understand how to respond to risks.


Prague is the capital of Czech Republic, or Czechia, and one of the most sought after travel destinations in all of Europe. It was one of the only European cities to avoid bombing in WWII, and because of this, lots of medieval buildings and statues still stand. In addition to the intriguing historical sites, there are world-class beers, gorgeous castles, and scrumptious foods to try! Come czech it out!
By AALIYAH PASOLS
Begin your journey by arriving on time to one of the city’s most famous attractions: The Prague Astronomical Clock. This is considered the best preserved medieval mechanical clock in the world! It was first created in the 15th century to depict the phases of the moon and the equinoxes. It features every horoscope symbol, so be on the lookout for yours! There are also four figures beside the clock that represent the anxieties of people at the time: death, vanity, greed, and the Pagan invasion. There’s a wonderful show when the clock hits the hour, so make sure to catch it!
Take in the rest of Old Town Square, where the clock is located. It’s been the city’s main public square since the 10th century, and you can catch jazz bands, concerts, markets, and more. Old Town Hall is located here, which boasts a ton of historical attractions to check out. You can gaze at beautiful 1930s mosaics in the council
chamber and assembly room, and explore the Gothic chapel, where you can climb to the top of its tower. Another must-see in Old Town Square is the Church of Our Lady Before Týn. This church has two huge Gothic spires that make the whole building look like something out of an old fantasy book. When you head inside, you’ll be able to marvel at the amazing baroque style of the space.
Next on your itinerary is the largest castle complex in the world, Prague Castle. The sprawling castle has been around for over a thousand years, and serves as the office of the Czech president. This UNESCO World Heritage Site features lots to see, including the Basilica of St. George and Golden Lane, a street that features mini houses that used to house castle guards in the late 15th century. Adjacent to the castle is the St. Vitus Cathedral, which was built around A.D. 925. The cathedral is massive and impressive in style, and when you enter, you can catch some pretty interesting sites like the tomb of St. John of Nepomuk, who was famous for his
silverwork. There’s also a magnificent stained-glass window that was completed by the well-known Czech painter, Alphonse Mucha.
After wandering through the city for a couple of hours, switch up the pace of your trip by taking in some greenery. Petrín Hill is a gorgeous park that features lovely views, pony and horseback rides, a rose garden, the Nebozízek Garden, a mirror maze, and Seminary Garden, which is home to 2,100 fruit trees. It even has an observation tower which resembles the Eiffel Tower, and overlooks the whole city.
Take in additional peaceful views at Letná Park. This serene park allows you to look out over Old Town and Vltava River as you sip on brews at their beer garden. Prague is known for their beer, or pivo in Czech, and you definitely don’t want to miss the opportunity to sip on one with a spectacular view! Afterwards, don’t hesitate to explore the rest of the park. It features the Hanavský Pavilion, where you can dine at the luxury restaurant that resides there, and the Letná Carousel, the oldest floored carousel in all of Europe! A third attraction in the park, the Prague Metronome, was designed to replace the biggest statue of Stalin in the world, which previously stood here.
Sit back, relax, and get ready to experience a heck of a show. In Prague, puppet shows are a popular form of entertainment. Puppets have been popular in Czechia since the 12th century, when they were used as entertainment during royal meals and ceremonies. This is still the case today as many puppet theaters are available all over the country. Head to the National Marionette Theater to view


one of these shows. If you can, make sure to catch the performance of Don Giovanni, directed by Karel Brožek. It’s one of their most watched shows. mozart.cz
Now it’s finally time to stop by one of Prague’s most beloved attractions, the Charles Bridge. The best time to visit is when the sun is going down, so you can admire the sunset. One of the things that makes this bridge so special is the collection of statues that line it. Thirty saint statues were built between 1683 and 1928 to honor many different saints. The actual construction of the bridge dates back even further, all the way to 1357! Charles IV commissioned architect Peter Parler to build the bridge. Parler is actually the same architect responsible for the St. Vitus Cathedral. The first ever statue created for the bridge is also the most famous: St John of Nepomuk. If you rub the bronze plaque on this statue, legend says that you will one day return to Prague!

wall continues to be painted on every year, with artists and passersby adding their own creations.
Once you cross the bridge, don’t forget to stop by the John Lennon Wall. Back when Czechia was the Communist Czechoslovakia, Western images and symbols were banned. When John Lennon was killed in 1980, an activist painted his portrait on this wall as an act of rebellion against the Communist power in the country. The wall soon became a symbol of defiance as other protestors came to write their own statements, lyrics, and drawings. Prague’s secret police would continuously paint over everything and erase the symbols, but the next day, more graffiti would inevitably spring up. Communist Czechoslovakia fell a long time ago, but the
One last stop before you take off into the night! Prague has a history of being fascinated with alchemists. During Renaissance Europe, they were very wellrespected as people hoped that they would be able to turn metals into gold, cure diseases, and grant eternal youth. Holy Roman Emperor Rudolf II had a lot to do with the expansion of alchemy. He employed many alchemists to try to find the “Philosopher’s Stone,” which was a chemical substance that was supposed to allow all of the alchemists’ undertakings to become a reality. Due to this history of alchemy, Speculum Alchemiae is one of the city’s coolest and most intriguing attractions. This is the hidden lair of an alchemist that was only discovered after a flood in the area in 2002 uncovered it. The underground “office space” of the alchemist still displays the equipment and the crucible that they used to supposedly turn lead into gold. A mummified crocodile hangs from the ceiling; legend says that the alchemist used to tell his visitors it was a dragon, to make the place seem more magical. alchemiae.cz If you’re ready to dine in style while exploring the best of Prague’s tastes and smells, then head to Alcron. This restaurant boasts an old-timey feel, and it should, it first opened in 1932! It seats only 24 guests to maintain intimacy, so make sure to place your reservation well ahead. The degustation menu under Chef Roman Paulus has definitely deserved its Michelin stars, and ranges from
four to seven courses, with a focus on seafood. Come with an empty stomach and an open mind! alcron.cz
Now with your belly full, it’s time to get your drink on! Prague’s nightlife is something you do not want to miss out on. For your first stop of the night, explore a museum that’s also a bar. Absintherie aims to teach you all about absinthe, the legendary strange green alcoholic drink made from wormwood. Here you can separate the myth from the real and get to choose from over 100 different types of absinthe. absintherie.cz
Your second nightlife spot, Cross Club, is one of the most renowned in all of Czechia. It has an industrial design, with three floors of gadgets, gears, pipes and more—really giving it an underground look. Live acts sometimes perform here, but on regular nights you can count on dubstep and EDM to get your blood pumping. crossclub.cz

Chapeau Rouge will be your next party destination. With three stories, four bars, and three stages, there’s a lot to choose from here. The music varies and gives you lots of options, with salsa, pop, EDM, and more. Go deeper into the club and you’ll discover that there’s also indie acts, theatre tunes, and fun multimedia projections. You’ll spend the majority of your night just soaking it all in! chapeaurouge.cz
Retire for the night at the Alchymist Prague Castle Suites. With its location close to the Prague Castle, you are bound to feel like royalty yourself! The hotel is a 15th century mansion that was restored to offer top quality accommodations. There’s eight luxury suites, a music room, a library, a fireplace room, a spa, and private butler service. For ultimate relaxation, take advantage of their sauna, Jacuzzi, and massage room. Stay in the Decastello Suite, which comes with a rooftop terrace, a marble bathroom with underfloor heating, and a minibar. The fabulous views from your terrace will help you drift off to sleep. alchymistpraguecastle.com
It’s no wonder that Prague has the nickname The Golden City. While you head back home on the plane, dream about just how golden all of your adventures here were!


By: Nick Gromicko, CMI® and Ben Gromicko
According to the InterNACHI Residential Standards of Practice, a home inspection is a non-invasive, visual examination of a residential dwelling that is designed to identify observed material defects within specific components of that dwelling. Part of the home inspection includes the inspection, identification and description of the heating system, which includes heat pumps.
The inspector is required to inspect the heating systems using normal operating controls and describe the energy source and heating method. The inspector’s report shall describe and identify, in written format, the inspected heating system, and shall identify material defects observed. In order to perform an inspection according to the Standards of Practice, an inspector must apply the knowledge of what he/she understands about the different types of residential heating systems. To inspect and identify a particular heating system, describe its heating method, and identify any material defects observed, an inspector should be able to explain and discuss with their client: the heating system; its heating method; its type or identification; how the heating system operates; how
to maintain it; and the common problems that may be found.
The inspector must be able to thoroughly examine a heating system, understand how a particular heating system operates, and analyze and draw conclusions as to its apparent condition. An inspector should also be able to justify his/her observations, opinions and recommendations that were written in the inspection report.
Here, we cover some fundamentals of a particular heating system called a heat pump using non-invasive, visual-only inspection techniques. We also discuss its defrost cycle. It is up to the inspector’s judgment as to how detailed the inspection and report will be. For example, the inspector is not required to determine the capacity or BTU of the inspected heating system, but many inspectors record that detailed information in their reports.
When a heat pump is operating in the heating mode or heat cycle, the outdoor air is relatively cool and the outdoor coil acts as an evaporator. Under certain conditions of temperature and relative humidity, frost might form on the surface of the outdoor coil. The layer of frost will interfere with the operation of the
heat pump by making the pump work harder and, therefore, inefficiently. The frost must be removed. A heat pump has a cycle called a defrost cycle, which removes the frost from the outdoor coil.
A heat pump unit will defrost regularly when frost conditions occur. The defrost cycle should be long enough to melt the ice, and short enough to be energy efficient.
In the defrost cycle, the heat pump is automatically operated in reverse, for a moment, in the cooling cycle. This action temporarily warms up the outdoor coil and melts the frost from the coil. In this defrost cycle, the outdoor fan is prevented from turning on when the heat pump switches over, and the temperature rise of the outdoor coil is accelerated and increased.
The heat pump will operate in the defrost cycle until the outdoor coil temperature reaches around 57° F. The time it takes to melt and remove accumulated frost from an outdoor coil will vary, depending on the amount of frost and the internal timing device of the system.
During this defrost cycle with older heat pumps, the indoor unit might be operating with the fan blowing cool air. To prevent cool air from being produced and
distributed inside the house, an electric heating element can be installed and engaged at the same time as the defrost cycle. In defrost mode, this heating element will automatically turn on, or the interior blower fan will turn off. The heating component is wired up to the second stage of a two-stage thermostat.
The components that make up the defrost cycle system includes a thermostat, timer and a relay. There is a special thermostat or sensor of the defrost cycle system, often referred to as the frost thermostat. It is located on the bottom of the outdoor coil where it can detect the temperature of the coil.
When the outdoor coil temperature drops to around 32° F, the thermostat closes the circuit and makes the system respond. This causes an internal timer to start. Many heat pumps have a generic timer that energizes the defrost relays at certain intervals of time. Some generic timers will energize the defrost cycle every 30, 60 and 90 minutes.
The defrost relays turn on the compressor, switch the reversing valve of the heat pump, turn on the interior electric heating element, and stop the fan at the outdoor coil from spinning. The unit is now in the defrost cycle.
The unit remains in the defrost cycle (or
cooling cycle) until the thermostat on the bottom of the outdoor coil senses that the outdoor coil temperature has reached about 57° F. At that temperature, the outdoor coil should be free of frost. The frost thermostat opens the circuit, stops the timer, then the defrost cycle stops, the internal heater turns off, the valve reverses, and the unit returns to the heating cycle. A typical defrost cycle might run from 30 seconds to a few minutes. The defrost cycles should repeat regularly at timed intervals. An inspector should not observe a rapid cycling of the defrost operation.
In summary, certain conditions can force a heat pump into a defrost cycle (or cooling cycle) where the fan in the outdoor coil is stopped, the indoor fan is stopped or electric heat is turned on, the frost melts and is removed from the outdoor coils. When the frost thermostat is satisfied or a certain pre-set time period elapses, the outdoor fan comes back on, and the heat pump goes back into the heating cycle.
One problem of many older heat pump systems is that the unit will operate in the defrost cycle regardless of whether ice is present. On these systems, if it’s cold outside, the defrost cycle might turn on when it is not needed.
If the defrost cycle is not functioning properly, the outdoor coil will appear like a big block of ice, making the unit non-functional. Damage
could result if the heat pump operates without a functional, normal-operating defrost cycle.
There are many reasons why an inspector might find frost and ice stuck on an outdoor coil of a heat pump that is not properly defrosting. The cause of the frost and ice problem may include: a bad reversing valve; a damaged outdoor coil; a wiring problem; a bad thermostat; a leak in the refrigerant; a dirty outdoor coil covered with grass, dirt, debris and/or pet hair; a fan that won’t turn on; a fan installed backwards with the blades running in the wrong direction; a motor operating in the incorrect direction; and/or a replacement fan motor spinning at a very low rpm. Diagnosing apparent problems with the defrost cycle of a heat pump is beyond the scope of a home inspection.
There are three cycles of a heat pump: heating, cooling and defrost cycles. We learned about the defrost cycle of a heat pump. According to the InterNACHI Standards of Practice, the inspector is required to inspect the heating systems using normal operating controls and describe the heating method. The inspector’s report shall describe and identify, in written format, the inspected heating system, and shall identify material defects observed.

“A TYPICAL DEFROST CYCLE MIGHT RUN FROM 30 SECONDS TO A FEW MINUTES. THE DEFROST CYCLES SHOULD REPEAT REGULARLY AT TIMED INTERVALS. AN INSPECTOR SHOULD NOT OBSERVE A RAPID CYCLING OF THE DEFROST OPERATION.”
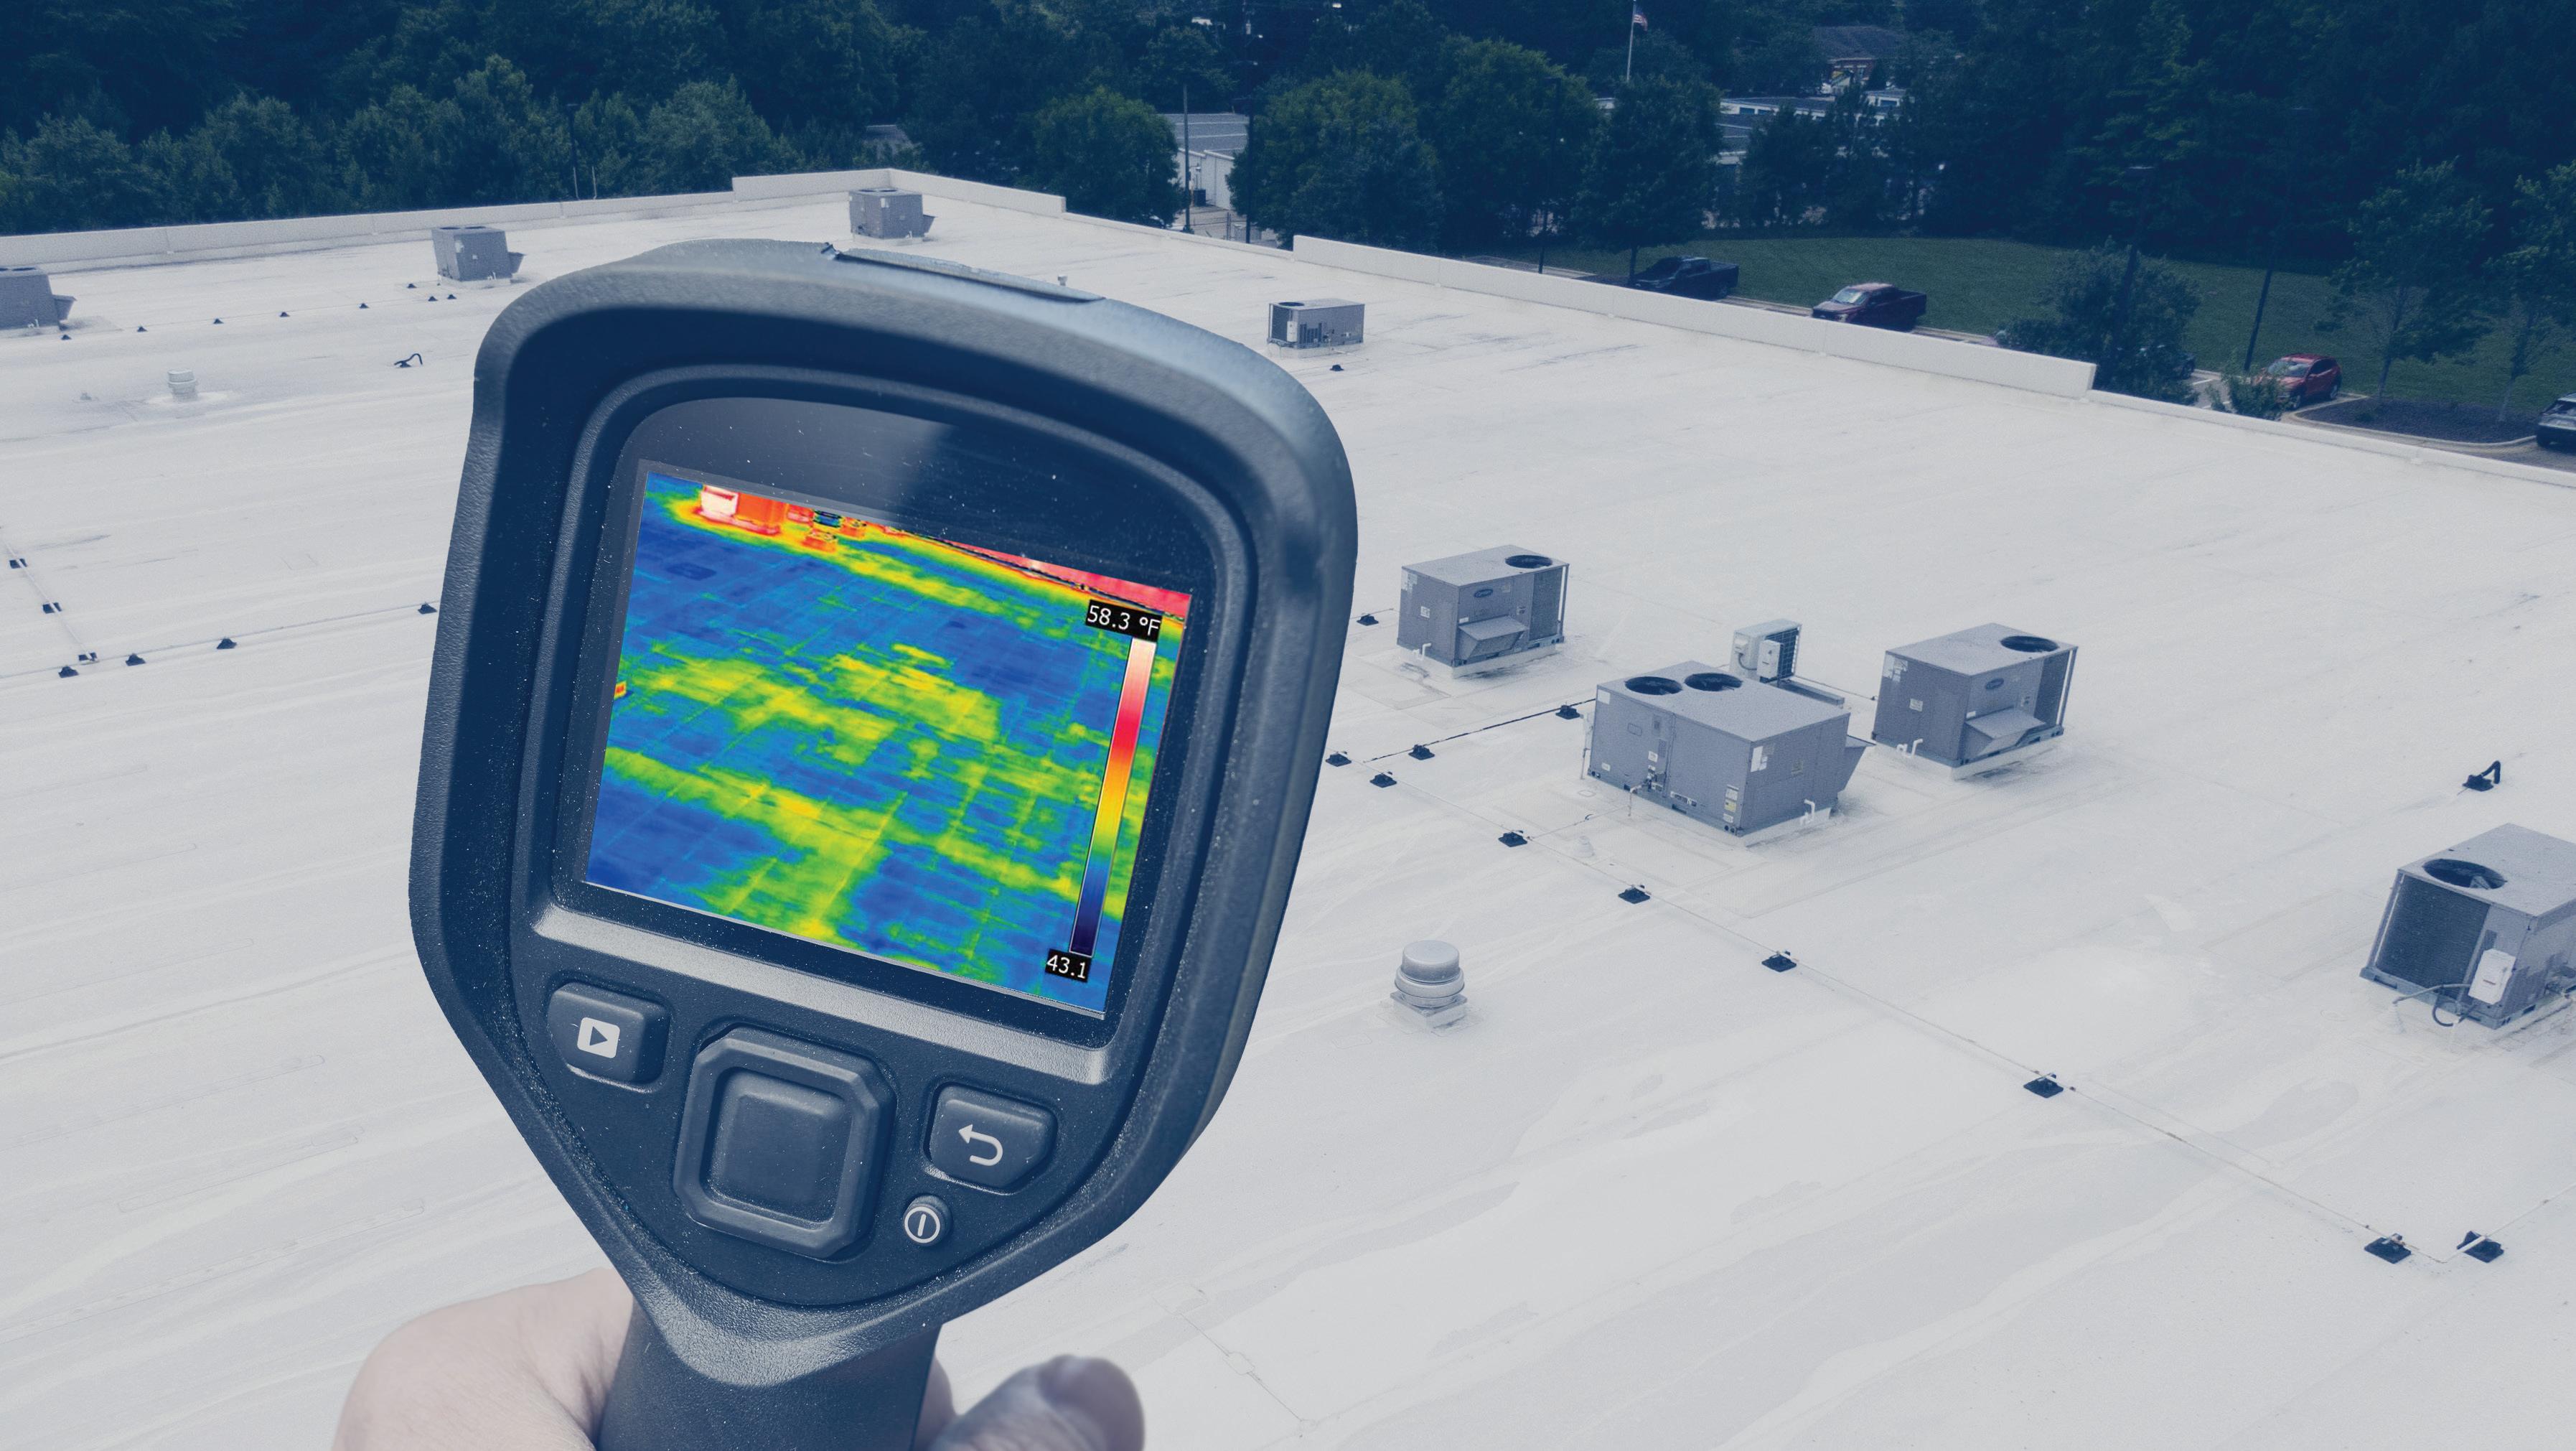
Since the 1970s, infrared (IR) thermography, or thermal imaging, has been used for inspecting flat and low-slope roofs to check for moisture entrapment. Employing IR cameras for home and commercial roof inspections is on the rise, with millions of square feet now being inspected using this technology every year.
Replacing damaged roofs can cost as much as $8 to $10 per square foot, and billions of dollars are lost every year because of premature roof failure. The main causes of premature roof failure and high maintenance costs are moisture intrusion and undetected wet insulation inside the roofing system. Because thermal imaging makes apparent temperature differences viewable, it is excellent at finding moisture and then documenting problem areas during roof inspections. The roof absorbs heat during the day and releases it when the temperature falls later. Wet areas release heat slower than dry areas. Because of this, the wet and dry areas are readily viewable in a thermal image, which displays apparent temperature differences as gradient colors.
Inspectors can familiarize themselves with this application of thermal imaging to expand their IR
By: Nick Gromicko, CMI®
services to diagnose problem areas on roofs that have trapped moisture, which can lead to structural problems and expensive repairs.
Advantages of Using IR Imaging for Roofs
Thermal imaging is non-invasive and allows inspectors to scan large areas very quickly. More traditional methods require a grid-type contact search, which is very time-consuming for inspectors who choose to walk a roof for inspections. Core sampling and other invasive testing are destructive and beyond InterNACHI’s Standards of Practice. Using an infrared camera to locate areas of moisture intrusion and wet insulation is quick, accurate and inexpensive compared to other methods. Since IR imaging allows problem areas to be located before severe symptoms appear, significant damage can be avoided by catching and addressing issues as they develop. Thermal imaging can also be performed from an elevated vantage point, allowing an even greater area to be examined at once, and eliminating the need to lug equipment up and down various roof elevations.
Here’s a list of advantages of using an IR camera for roof inspections:
• It’s fast and accurate.
• It can identify small problem areas before they become larger.
• It provides a thorough assessment of compromised and damaged areas.
• IR equipment is lightweight and portable.
• It provides visual documentation of problems.
• It is non-invasive.
• It can be used for inspections that are conducted as part of regular home maintenance. There are few disadvantages to using thermal imaging for inspecting a roof. The main things to be aware of are the roof’s composition and the weather conditions. Both of these factors can influence the ability of infrared technology to provide accurate and useful information.
Weather Conditions
Though the principles involved are the same, detecting moisture intrusion using an IR camera is different for inspecting a roof compared to detecting moisture intrusion at the interior because exterior environmental factors play a larger role in determining whether the data can be accurately collected. Because of this, it is important to conduct IR roof inspections under optimum weather conditions.
There are four weather-related factors that can
influence exterior surface temperatures over a roof’s wet areas compared to dry areas. They are the difference between interior and exterior temperatures; the rate of temperature change in the hours before viewing the thermal images; the amount of solar loading; and wind speed.
The best weather conditions for conducting an infrared roof inspection include: winds of less than 15 mph; sunny and clear conditions on the day prior to the inspection; and a quick decrease in the ambient temperature right before collecting images.
An infrared inspection during warm weather relies on solar loading to create the apparent temperature difference between wet and dry spots, and is best performed at dusk, when the difference will be most extreme. Imaging during cold months is made possible by creating a large inside-tooutside temperature difference in the building, which is another way to allow the wet and dry spots to be viewed.
It is important for inspectors to know the composition of the roof to be inspected with an IR camera because the roof-covering materials affect how well thermal imaging can detect moisture. Most common materials pose no problems. Any
commercially available rigid insulation board, as well as composite boards and tapered systems made from the same materials, can be “read” through thermal imaging. This includes organic fibers, perlite, cork, fiberglass, cellular glass, polystyrene, polyurethane, isocyanurate and phenolic insulation materials.
Inverted roof membrane assemblies with extruded polystyrene insulation between the ballast and protective membrane are poor candidates for thermal imaging inspection, although they are not common. Some other construction types that can pose problems include roofs with concrete pavers, roofs with lightweight concrete or gypsum, and highly reflective metal roofs. Infrared imaging can still be used in many of these cases, though it may be more difficult to read the images.
It is best to have completed a visual inspection of the roof prior to thermal imaging to determine the most effective procedure for collecting images, as well as to identify access points, safety hazards, and any heat sources beneath the roof that may show up during imaging. The attic and underside of the roof can also be examined in order to note any conditions that may affect imaging, and to identify potential problem areas that can be confirmed later using a moisture meter and further investigation.
It is helpful to know the design and composition of the roof, as well as exactly what type of insulation has been installed. This will help determine how thermal imaging can be best employed to gather data. If possible, knowing a little about the history of the roof in relation to any previous problems can also be beneficial. Note the flashing and penetration details, as moisture intrusion at these points may indicate inadequate or missing installations.
Set up the IR camera so that large sections of the roof can be viewed successively. The angle for viewing is best at greater than 20° from the roof’s surface. As wet spots are located by apparent temperature differences from surrounding dry spots, they can be examined more closely. A moisture meter will help confirm these areas as problems. Once the problem spots are located, they can be documented by taking an image with the infrared camera to include in the inspection report alongside a digital photo. These spots can also be marked on the roof with chalk so that they will be easy to find again later while plans for repairs are being developed.
Inspectors can benefit greatly from utilizing IR technology in the field for roof inspections, potentially saving property owners the cost of expensive repairs.

Vito Bianca was born in the Bronx, NY, in 1973, and spent his early years in “The City.” By 1987, he had relocated to the West Coast of Florida with his family, where he has (mostly) lived ever since. Despite the grey in his beard suggesting otherwise, Vito humorously admits, "I’m not sure I’ve ever really grown up."
Vito’s education was unconventional. He quickly developed a reputation for being a handful, with a mix of intelligence and mischief that would define much of his journey. "I was too smart for my own good, and too stubborn to follow rules," Vito recalls. While he performed well in college, he ultimately chose the road less traveled, focusing on practical, real-world experience and seeking education from a variety of sources. Reflecting on his choices, Vito adds with a grin, "You can’t follow someone else’s map if you’re trying to find your own path."
Most of Vito's professional career unfolded
in the commercial pest control industry, where he managed large accounts across hospitality, healthcare, manufacturing, retail, and production. His responsibilities ranged from sales and service to compliance audits, and most importantly, professional inspections.
"ThaT’s where I learned To be meThodical, To empaThize wiTh clienTs, and To communicaTe clearly"
These skills laid the groundwork for his later success in the home inspection industry. Vito’s entry into the home inspection industry came through a trusted friendship. When his best friend from high school started Rock Solid Home Inspections in Clearwater, Florida, he found early success but needed someone he could rely on to help grow the business. "He made me an offer I couldn’t refuse," Vito recalls.
After enrolling in InterNACHI Inspector College, putting in the hours, and passing the exam, Vito obtained his Florida Home Inspector license. "The rest, as they say, is history."
When the company was sold, Vito was retained by the new owner to assist with operations due to his deep institutional knowledge and the trust he had built. He took on a leadership role, training inspectors, writing report templates, establishing company protocols, developing marketing strategies, and expanding into new territories. "It was about building the foundation for growth," Vito says. His impact was profound, helping to shape the future of Rock Solid Home Inspections.
Vito Bianca’s journey in the home inspection industry is marked by an impressive array of credentials and achievements. Reflecting on his accomplishments, Vito lists them with a casual confidence: "Let’s see… I’m a Certified Master Inspector, accredited


by the Master Inspector Certification Board (MICB). I hold a bunch of Florida licenses— Home Inspector, Mold Assessor, Pest Control Operator, Home Inspector CE Provider, Real Estate Agent Course Sponsor. I’ve written and approved FLDBPR courses for both. I’m also an EPA Licensed Lead-Based Paint Inspector and a Certified Commercial Property Inspector through CCPIA. I’ve got a bunch of internal awards from companies I’ve worked with over the years too."
“The one that makes me laugh, though, is being an expert witness. You'd have to understand my family to get this, but I would have to cure cancer itself before my elders would give me credit”, Vito explains. “Now I get to say stuff like, “I'm not saying you're wrong, Aunt
Phil, I'm just saying that, in this conversation, I'm the only one who's actually been paid for their opinion. That's Priceless.”
Taking on a leadership role was one defining moment for him. When Rock Solid Home Inspections was sold, the new owners retained Vito to help with operations.
"They saw I could be TrusTed, and ThaT I had The know-how noT only To keep Things running smooThly buT To improVe on Them," ViTo explains.
In this leadership role, Vito took on a wide range of responsibilities: training inspectors, writing report templates, establishing company
protocols, developing new service offerings, and expanding into new territories. "I wasn’t just managing; we were building something," Vito reflects. His efforts were instrumental in shaping the company’s future, setting a standard for excellence that others could follow. Rock Solid Home Inspections has fielded a dozen full time inspectors at once, six of whom grew into Certified Master Inspectors, and all of whom were mentored and field-trained by Vito. One of the key success stories from this period was Vito’s work in developing new service options. These innovations didn’t just add value to the company; they also created significant revenue streams. "We were able to offer more to our clients, which in turn boosted our bottom line," Vito notes.
One of the key lessons Vito Bianca has embraced throughout his career is the importance of empowering others. "The only way to free myself up to drive forward progress is to train others to handle what I currently do," Vito explains. This approach might seem counterintuitive to those who cling to the old idea of jealously guarding knowledge to protect their own positions, but Vito sees things differently. He believes that sharing knowledge and empowering others strengthens the entire team. "If everyone on the service team is equipped with the right knowledge and skills, they become ‘bullet-proof’ and ‘teflon-coated,’" Vito explains. "It’s about building a team that’s resilient, confident, and prepared for anything."
Vito’s commitment to growth is relentless. His personal makeup won’t tolerate things that are broken or in need of improvement. "Even if it’s something that can’t be fixed now, it goes on the list," he says. This drive to continually push forward often results in a lack of time to address
everything that needs attention—a challenge Vito acknowledges candidly.
"The asTuTe reader will quickly inTuiT
ThaT There’s ofTen Too much on my plaTe. ThaT’s where Teamwork and parTnership pay off, along wiTh The men and women who haVe grown alongside me."
For Vito, empowering others isn’t just about delegation; it’s about elevating the quality of work across the board. "When you empower people to make decisions, you elevate quality and set the stage for success," he notes. This philosophy has been instrumental in fostering a culture of collaboration and continuous improvement within the company. "Partnering for success isn’t just a tagline—it’s how we operate, and others feed off that energy."
Vito’s approach to leadership and growth has
positively impacted the company and the broader industry. By sharing knowledge, empowering decisions, and cultivating strong partnerships, he’s created an environment where progress is constant, and success is a shared journey.
Education and training are the cornerstones of success in the home inspection industry, whether you’re just starting out or you’ve been in the field for decades. Vito is a firm believer in the power of continuous learning, not only as a means of staying current but as a vital component of professional integrity and growth.
"For new inspectors, education is the foundation," Vito explains. "You’ve got to build a solid base of knowledge to do the job right." This is where comprehensive training programs, like those offered by the InterNACHI college, come into play. They equip new inspectors with the technical skills and understanding they need to navigate the complexities of home inspections. "Nobody does it better," he adds. But education doesn’t stop once you’ve got your

// If eVeryone on The serVice Team is equipped wiTh The righT knowledge and skills, They become ‘bulleT-proof’ and ‘Teflon-coaTed. IT’s abouT building a Team ThaT’s resilienT, confidenT, and prepared for anyThing. //
"parTnering for success isn’T jusT a Tagline—iT’s how we operaTe, and oThers feed off ThaT energy."
certification. For seasoned inspectors, ongoing training is equally crucial. "The industry is always evolving—construction techniques change, regulations update, and new technologies emerge," Vito notes. "And I would strongly recommend that every Inspector take a tour of the House of Horrors, where they can physically see a staggering number of deficiencies that would take years to encounter in the field."
Vito’s course, "Making 4-Points Work for You," is a prime example of how targeted education can make a significant difference. "This course isn’t just about teaching inspectors how to perform 4-Point Inspections," he explains. "It’s about giving them a framework in an often unfair environment that simplifies the process, sets clear expectations, and reduces challenges from detractors." By equipping inspectors with these tools, Vito ensures they are better prepared to deliver quality inspections that stand up to scrutiny without punishing the homeowner, bowing to the agents, or policing for the insurance companies.
Similarly, Vito’s course for real estate agents, "Eye of the Inspector," emphasizes the importance of understanding the inspection process from both a technical and a business perspective.
"agenTs who undersTand how inspecTions work and how To inTerpreT reporTs are beTTer posiTioned To proTecT Their clienTs’ inTeresTs, close deals fasTer, and ulTimaTely make more money," ViTo says.
Education and training are not just crucial— they’re transformative. They provide the knowledge, confidence, and tools needed to navigate the complexities of the industry, ensuring that both inspectors and business owners can adapt, grow, and thrive in an everchanging landscape.
"Partnering with the right companies is crucial," Vito explains. "The ability to align with likeminded companies can be a game-changer."

// educaTion and Training are noT jusT crucial—They’re TransformaTiVe. They proVide The knowledge, confidence, and Tools needed To naVigaTe The complexiTies of The indusTry //
These partnerships allow inspectors to offer a more comprehensive range of services, providing clients with the confidence that they’re getting the best possible support throughout the home buying process.
One of Vito’s key partnerships is with InterNACHI, a leader in education and certification for home inspectors. "InterNACHI has been a pillar in this industry, and aligning with them ensures that we’re not only up to date with the latest standards but also equipped to deliver top-notch service," he says. Through this partnership, Vito has access to cutting-edge training and resources that keep his skills—and those of his team—sharp and relevant.

inspections can become a truly integral part of the real estate process, benefiting all parties involved.
"In the future, I see home inspectors being recognized as essential partners in the home buying process, rather than obstacles," Vito explains. "Our role is critical—not just in identifying potential issues, but in ensuring that buyers are making informed decisions. That’s something that should be valued, not feared."
Another significant partnership is with PROLAB®, a company that has played a critical role in expanding the services Vito can offer. "Working with PRO-LAB® has allowed us to provide additional services like mold testing, water testing, and lead-based paint testing," Vito notes. "These are services that nearly 40% of our clients request, and having a reliable partner like PROLAB® ensures we can meet that demand with quality results."
Partnering with PRO-LAB® has had a transformative impact on Vito Bianca’s business, driving a 40% increase in sales and opening up new avenues for growth. The key to this success lies in the added value that PRO-LAB® services bring to the table, particularly in the realm of specialized testing.
"using pro-lab® direcTly led To a 40% increase in sales for us," ViTo explains. "our cusTomers quickly see The benefiTs of haVing addiTional TesTing done as parT of Their due diligence."
These services—mold, water, and lead-based paint testing—aren’t just optional extras; they’re crucial components of a thorough home
inspection that can give buyers peace of mind. The value of these services extends beyond individual homebuyers. "PRO-LAB® didn’t just make us more money from one-time homebuyers," Vito notes. "It also opened the door for us to acquire city contracts and win larger bids from investors." By offering comprehensive testing, Vito’s company has been able to compete for and secure significant projects, further solidifying their reputation in the industry.
• Grow Rock Solid Home Inspections from its current average of $1.3 million in annual sales to $5 million.
• Expand the education and mentorship programs offered by All Clear Inspections to reach a wider audience, including more robust online coursework.
"Family support has been a cornerstone of my career," Vito adds, "providing both the stability and encouragement needed to navigate challenges and seize opportunities."
"I wouldn’t have made the leap into this career without my wife, Robin," Vito admits. "We were relatively young in our marriage when I decided to switch careers, and the prospect of change was intimidating for both of us." Despite the uncertainty, Robin’s trust in Vito—and her faith that they could succeed together—gave him the confidence to move forward. "She believed in me and, more importantly, trusted God that we could make it work," Vito reflects.
Vito envisions a future where the home inspection industry is not only brighter but also more respected. His optimism is grounded in the belief that, with the right approach, home
However, Vito acknowledges that achieving this vision will require more than just technical expertise; it will demand a concerted effort to educate both home inspectors and real estate agents. "It’s not just about teaching what we do, but why we do it," Vito says. "We need to convey the real value of our Standards of Practice (SOPs) and how they serve everyone’s best interests. When all the parts do their jobs properly, the engine runs smoothly and efficiently."
Vito believes that the responsibilities within a real estate transaction are often misunderstood, which can lead to friction or misplaced priorities.
"IT was ben gromicko who laid iT ouT so casually you’d almosT miss how profound iT was when he said, 'The realTor’s job is To proTecT The clienT’s besT inTeresT. The home InspecTor’s job is To obserVe and reporT on The general condiTion of The home aT The Time iT was inspecTed. The homeowner’s job is The condiTion of The home moVing forward.'"
Ultimately, Vito’s vision for the future of the home inspection industry is one of partnership, innovation, and respect. He sees an industry where inspectors are trusted advisors, valued for their expertise and dedication to protecting homebuyers’ interests. "We have the opportunity to elevate this profession, to be seen as allies in the real estate process," Vito says. "And that’s a future worth working toward."


Upgrade your home with these smart and efficient products that make life easier. You can easily see who’s at your door even when you’re not home with a video doorbell, cook easily with a smart electric range, wash your hands with a touchless kitchen faucet, save energy with a refrigerator that offers Instaview, and you can even stream music with your Echo Plus. There are so many ways to improve your humble abode with these smart items!
By VANESSA C. GUZMAN


The The 2025 Nissan Frontier doubles down on its relentless spirit with a rugged new design, enhanced utility for work or play and updated technology that simplifies every journey. Headlined by greater availability of the useful 6-foot bed, an increased maximum tow rating and a larger available infotainment system, the enhancements to Frontier are driven by customer feedback and Nissan’s efforts to ensure the truck delivers more of what drivers desire.
The 2025 Frontier’s new look builds on its tough, squared-off appearance with a revised front fascia, grille and bumper design; a new tailgate finisher for PRO-X/PRO-4X; redesigned dashboard trim; a new 17-inch alloy wheel design and the introduction of a new Afterburn Orange paint. These enhancements
further highlight Frontier’s ability to work hard and play hard.
Listening to customer feedback, Nissan made multiple functional revisions that make living with Frontier more convenient. A telescopic-adjusting steering wheel is newly standard on all grades, while a four-way power passenger seat becomes standard on the PRO-X/PRO-4X and SL grades. On SV grades and higher, the six-way power driver’s seat now adds two-way power lumbar.
SV grades and higher add a 12.3-inch touchscreen infotainment system so drivers can more effectively and easily use on-screen functions. This year the system adds wireless Android Auto™ connectivity, in addition to wireless Apple CarPlay®, enabling for compatible smartphone mirroring without plugging in a USB cord2.
All Frontier grades now come with a standard sliding rear window3 and a sunglasses holder in
the overhead console as standard. SV models now have standard 17-inch alloy wheels. On SL grades, a wireless phone charger, Intelligent Around View® Monitor and a four-way power passenger seat also become standard.
More options, more flexibility, more capability Responding to the diverse needs of truck customers, the 2025 Frontier expands availability of the Crew Cab long-wheelbase configuration from SV to SV, PRO-4X and SL grades. With a 6-foot bed, this caters to Frontier drivers looking to carry larger loads, whether for the job site or weekend hobbies. Frontier also boasts an increased maximum trailering capacity this year of up to 7,150 pounds, enabling more work and adventure4. Towing capacities increase by around 500 pounds on all grades and configurations compared to the 2024 Frontier. (See full Crew Cab and King Cab

specification sheets for towing ratings on all grades.)
For the many Frontier PRO-4X drivers who venture into rugged terrain, enhancements to the Intelligent Around View® Monitor make the camera system even more effective. The Off-Road Mode viewing function can now be used while driving at up to 12 mph, covering a greater range of typical technical off-road speeds and helping drivers spot obstacles.
Peace of mind is standard
On the 2025 Frontier, numerous driver assistance and safety technologies are now standard across all grades, from S5 through SL. Those include Lane Departure Warning, Blind Spot Warning, Rear Cross Traffic Alert, Rear Parking Sensors, High Beam Assist and Intelligent Cruise Control. Frontier SL also features Traffic Sign Recognition.
Unstoppable adventure partner
Frontier continues to deliver on the effortless utility buyers look for in a midsize truck, starting with its responsive, direct-injected 3.8-liter V6 engine and 9-speed automatic transmission. Rated for 310 horsepower and 281 lb-ft of torque,

the engine features Idle Stop/Start. Active Brake Limited Slip is standard on all grades, with PRO-4X upgrading to an electronic locking differential, to help provide added traction on mixed surfaces.
The PRO-X and PRO-4X cater to buyers heading beyond, with all-terrain tires, Bilstein off-road suspension components, an even more rugged appearance with over-fenders and Lava Red tow hooks.
To securely carry almost whatever drivers need, Frontier offers a Utili-Track™ system for its bed with adjustable tie-down cleats, and available spray-in bedliner6 . The bed also has an available 120-volt power outlet.
Finally, Frontier SL brings a more plush, highly equipped option, with features including leatherappointed front and rear seating, a heated leather-wrapped steering wheel, LED exterior lighting and a Fender® Premium Audio system with 10 speakers. For more information visit: www.nissanusa.com


By Greg Johns Owner and Inspector cookeville.wini.com

We as trades professionals (yes, we are) are put upon by a multitude of products, names, configurations, and trademarked items. Specifically, for home inspectors, our goal is to identify and/or explain many of these to our clients. So, being as consumer oriented as I tend to be (read the back issues), we are failing our clients because we often misuse terminology.
Let’s look at two common terms: vapor retarder and vapor
barrier—I could make every column about misused words and concepts, there are so many.
It drives me bonkers when I hear other inspectors (or read their reports) talk about vapor barriers in a crawlspace. If you live in a region of our country that doesn’t have crawlspaces, well…good for you. I dislike you, but please feel free to continue reading for fun.
Technically, inspectors are correct in calling the plastic on the ground in a raised foundation
environment a “vapor barrier.” By definition of materials, set by ASTM E96, the 6mil polyethylene in most crawlspaces is a Class I vapor barrier as its rating is around 0.03 perms on average. Now, this column isn’t intended to get into the weeds on permeance and permeability—both of which are very important concepts to understand related to our building materials and how our homes perform related to water management—but, the lower the rating, the lesser amount of
water vapor (soil gases in general) diffusion occurs.
A Class II vapor retarder has a permeance between 0.1 and 1.0 perm, per definition. So, again, that plastic in most crawlspaces is a vapor barrier. However, this is highly misleading and inaccurate when it comes to crawlspace environmental context.
When inspectors write, or identify, the presence/absence/ condition of a vapor barrier in a crawlspace, they are almost never intending to comment on

the perm rating of the material itself. How do I know this, you ask? Because most inspectors are never taught about perm ratings, permeability, or permeance. What they are doing is identifying presence/ absence of said material in the crawlspace because not commenting on such a thing could be costly in the event of a fungal growth/moisture issue in the future.
To that end, within the context of an average, passive venting crawlspace, a vapor barrier is actually a vapor retarder because it is unsealed and not always fully covering the ground. In order for a
vapor barrier to be a vapor barrier within the context of the same crawlspace, the sheeting must be overlapped and sealed at seams and edges (the IRC clearly lays out the minimum parameters for such configurations).
When properly and diligently performed, this creates an actual vapor barrier that does not retard (read, slow the entry of), but fully stops vapor intrusion within the crawlspace. This, of course, is a key component for an encapsulated crawlspace (and, for sub-slab applications where the slab is to be within conditioned space). Keeping water, in all phases, out
of any crawlspace is pivotal and ideal.
Our industry should refer to the plastic on the ground in non-encapsulated crawlspaces as a vapor retarder or vapor retarding system. This way, the notion can be more clearly conveyed to the client that the presence of said plastic will not prevent moisture accrual in vapor form (there are a few other critical entry ways, as well), but will help to slow the rate of said accrual.
Our industry should refer to a vapor barrier if, and only if, the plastic on the ground has been fully sealed. Even then, commenting only on the
configuration of the material isn’t enough for clients to understand the long-term ramifications of one of the most confused air spaces in our residences.
Please, stop saying vapor barrier unless it’s an actual vapor barrier by configuration, or if you are specifically addressing the characteristics of the material itself. If you are doing the latter, God’s speed to you— you will need to do that for all of the other materials in that given structure…or find yourself trying to educate a jury about why you identified the physical properties of one component, but not another one.
“WITHIN THE CONTEXT OF AN AVERAGE, PASSIVE VENTING CRAWLSPACE, A VAPOR BARRIER IS ACTUALLY A VAPOR RETARDER BECAUSE IT IS UNSEALED AND NOT ALWAYS FULLY COVERING THE GROUND. IN ORDER FOR A VAPOR BARRIER TO BE A VAPOR BARRIER WITHIN THE CONTEXT OF THE SAME CRAWLSPACE, THE SHEETING MUST BE OVERLAPPED AND SEALED AT SEAMS AND EDGES”
By: Nick Gromicko, CMI®

Stairways, due to their inherent dangers, as well as unsafe patterns of use by homeowners, are the sites of a surprising number of injuries. A careful assessment of the risks posed by stairways can prevent unnecessary injuries.
Facts and Figures
1,638 people died from falls on steps and stairs in the United States in 2004. This figure is greater than the combined number of swimming pool and bathtub drownings for the same year, according to the National Safety Council. The actual number of stairway accidents is probably much higher, as many people who sustain injuries don’t know why they fell, and others are too embarrassed to admit they fell, so these incidents go unreported. Elderly occupants are at particular risk of falling down the stairs, mostly due to impaired vision, reduced strength, and poor balance. For individuals aged 65 and older, 260,000 are injured every year in falls on steps, stairs and escalators, according to the Centers for Disease Control. Handicapped and young children are also at increased risk of sustaining stairway injuries.
In a study by Loughborough University in England, one-third of surveyed households admitted to leaving objects on stairs, presenting a serious trip hazard. In addition to potential physical injury, falls can cause serious psychological and social consequences, affecting
confidence, mobility, and general well-being, according to the same study. While residents might already be aware of stair abnormalities, their guests may not be prepared for irregular steps or inadequate headroom height, for instance.
“PROSPECTIVE BUYERS, TOO, ARE SAFER HEARING ABOUT SUCH IRREGULARITIES FROM YOU THAN LEARNING THROUGH EXPERIENCE AFTER THEY PURCHASE THE HOME.”
The following is a partial list of defects you may find in stairways: Handrail is loose, incomplete, missing, splintery, not of a contrasting color with its background, or has insufficient finger clearance. As deck stairways may be open on both sides, missing handrails there put occupants at serious risk. Treads are cracked, uneven, worn, loose or poorly supported. Risers are of uneven height. Lighting is poor, shadows are numerous, or the corridor leading to the stairs is dark. It’s helpful to have a light switch installed at the top and bottom of each staircase. Floor is waxed, increasing chances of slipping. Exterior steps are not sloped to prevent water settlement and icing. Stair carpeting slides or is not firmly affixed to stairs. Double-sided tape or tacks may be used to prevent slipping. Balusters are spaced more than 4 inches apart, allowing a child to potentially slip through and get trapped. Stairs are not ergonomically designed. Stairs are too steep. Platform or landing surface is not slip-resistant,
and/or has a sharp object, blunt wall, or window located in the direction of a possible fall. Nosing is missing, broken, worn, patched, loose, slippery, or not installed properly. Sharp corners are on stair elements. Headroom is insufficient. There is no safety gate at the top of stairs in a home with small children.
Note that some design defects would be difficult or cost-prohibitive to remedy, so this would require rebuilding of the stairs.
Other tips that inspectors can pass on to their clients to reduce the chance of stairway falls include: Start a regular exercise program, if you haven’t already. Inactivity leads to weakness, inflexibility, and an increased risk of falling. Remove trip hazards, such as clothes, shoes, toys and/or books from stairs and other places where you walk. Improve the lighting around the stairs. As you age, you’ll need brighter lights to see well. Lampshades or frosted bulbs will reduce glare. Senior citizens should wear shoes that provide good support and have thin, non-slip soles. Avoid lightweight slippers or shoes with deep treads, as they can reduce your feeling of control. Do not carry heavy items up and down stairs, especially if the item blocks your view of the steps. Also, always hold the handrails. Install a second handrail for additional support. A second handrail will also provide support for two individuals as they pass each other.
In summary, stairways can pose a serious safety risk for building occupants, but these risks can be minimized by adequate stair construction and safe practices.


Why would a homeowner want to install a bat house? As housing developments expand into animal habitats and forests are cleared for logging and development, bats are having a harder time finding natural places to roost. Bat houses provide shelter for these troubled mammals.
Bats are an effective, natural and safe method of pest control. A single brown bat can consume up to 600 mosquitoes, beetles and moths per hour, many of which would otherwise wind up in and around houses where they destroy wood, fabric and food, and annoy building occupants and potentially spread disease. Bats roosting in the attic of a house may leave for a nearby bat house, saving the homeowner the trouble of harming the bats or forcing them to move.
The house’s interior should be roughened and grooved at least every 1/4-inch or have attached polyethylene plastic mesh. The house should be at least 24 inches tall, 13 inches wide and 3 inches deep. There must be an opening at the base of the house so the bats can get in and out. The hole should be ¾-inch
By: : Nick Gromicko, CMI®

“A single brown bat can consume up to 600 mosquitoes, beetles and moths per hour, many of which would otherwise wind up in and around houses where they destroy wood, fabric and food, and annoy building occupants and potentially spread disease.”
to 1 inch, but no larger, as it may permit the entry of predators. Construct the house using screws to help prolong its life. Caulk the house to keep the bats warm and dry. Place the house at least 15 feet up and facing a south to southeasterly direction (in the northern hemisphere) in a location where it will receive at least six hours of sunlight daily. If the bat house is not getting adequate sunlight, you can paint it with non-toxic, black paint so that sunlight is more readily absorbed. Never paint the inside of the house. Mount the bat house atop a garage, pole, barn or house, and make sure that there are no obstacles to prevent the bats from entering the house. Trees may also host bat houses, as long as there are no leaves and branches that make the house hard for the bats to find.
Bat houses may fail due to the following reasons:
The interior is smooth. All interior wood must be roughened so the bats can easily cling. Commercial bat boxes often contain stapled screening that may eventually come loose due to urine and condensation. The roof is unprotected. Roofs that lack shingles may last only a few seasons, eventually losing their ability to retain heat and falling into disuse. The house was nailed together, and its seams are separating. Unscrewed, unseamed boxes may warp and separate, allowing unwanted ventilation. There is only one
chamber. Bats prefer larger boxes with a wide range of temperatures that are provided by multiple chambers. The house is too large. Houses that are too large or contain too many chambers may become overcrowded and unhealthy. It was constructed using outdated plans. Bat house construction books, flyers and posters published long ago that are still being circulated may contain inaccurate information. Recycled lumber was used, which may contain pesticide residue. The bat house suffers from insufficient maintenance. Bat houses should be inspected periodically, especially for wasps and broken seams.
• The box was poorly placed. Avoid placement of bat boxes in any of the following locations: in a shady location, such as attached to a home beneath the eaves or on a tree; far from a permanent body of water, such as a stream or pond; above a shiny surface, such as flashing, or a pan used to collect guano (feces); near a source of smoke; in the path of strong wind, where it may be vandalized. If a neighborhood kid shakes the box to watch the bats fly out, they are likely to seek shelter elsewhere; or along a road, where the bats are exposed to the noise and danger of traffic.
In summary, bat houses are helpful environmental measures if they are constructed in a manner that conforms to the bats’ habits.


• Add-on Services (Yields Higher Inspection Fees)
•
Inspection Techniques
• Cameras and Equipment (Top Manufactures)
• Training (FREE) with most equipment purchases
– ChimneyScan is a service offered by home inspectors who are trained in an advanced inspection technique to find potentia l problems in residential chimneys, fireplaces, or venting systems. ChimneyScan technicians serve home buyers and sellers who are interested in adding a more detailed inspection in their home buying process. A ChimneyScan features an enhanced visual inspe ction of the exterior chimney and includes and a video of the internal flue (Level II) which is not normally included in a standar d home inspection. Cost of course may be applied to the purchase of a chimney camera. $595 Approved by CREIA / ASHI / InterNACHI
10 CEUs - PoolandSpaInspectors.com is a service offered by home inspectors who are trained in advanced techniques to find water loss an d water chemistry analysis. PoolandSpaInspectors serve home buyers and sellers who are interested in adding a more detailed ins pection in their home buying process or who suspect pool or spa deferred maintenance and water loss. The PoolandSpaInspectors training application is a 10-hour online course designed to provide home inspectors the knowledge they need to offer their clients an upgraded pool and spa inspection. $295 Approved by CREIA / ASHI / InterNACHI
4 CEUs – 107 Test Prep Course is a 4-hour in-depth test preparation course is designed to take you through all the stages of pas sing your FAA Part 107 exam and getting licensed as a drone pilot for commercial use under the FAA for small Unmanned Aircraft (UAS) Part 1 07. Learn the many applications of using drones for your business. From roof inspections to solar panels to building and site surveys, dron es have unlimited potential in their utilization. United Infrared has teamed up with Clarity Aero to provide this important and exciting new fi eld of training. $350 Approved by CREIA / ASHI / InterNACHI


In almost all suburban and rural regions of the United States and Canada, inspectors run the risk of developing potentially debilitating, allergic symptoms from exposure to urushiolsecreting plants. This potent, clear oil causes an itching rash (called contact dermatitis) in 350,000 people each year, but these numbers can be reduced through education and by taking appropriate precautions. Exposure can put sufferers out of work for days or weeks and may even require hospitalization. Inspectors should learn to identify these plants -especially the top three offenders: poison ivy, poison oak and poison sumac—and protect themselves and their clients from the dangers lurking in yards across North America.
Urushiol oil is potent—just 0.25 ounces of the allergen is sufficient to cause a rash on every person on earth, according to the Poison Ivy, Oak and Sumac Information Center. The oil begins to penetrate the skin within minutes after contact, but the rash usually takes 12 to 72 hours to appear, at which point the person experiences severe itching, redness and swelling, followed by blisters. While the rash appears to spread, it is not contagious, but it will continue to grow due to differing rates of the immune system’s response to the oil.
By: Nick Gromicko, CMI®
A few other important facts about urushiol oil:
• A segment of the population—perhaps as much as 30%—is not allergic to urushiol oil, although many people may become sensitized after repeated exposure.
• NEVER burn any plants described in this guide. Urishiol vapors can travel long distances and inhaling them can create potentially life-threatening respiratory distress.
• Do not handle dead urushiol-secreting plants. The oil can remain active for several years, so handling dead leaves or vines can cause a reaction.
• Oil transferred from the plant to other objects (such as pet fur) can cause a rash if it comes into contact with human skin. Domesticated animals and wildlife do not appear to be allergic to urushiol.
• The oil may be removed with alcohol or cold water for a short period following exposure.
• Urushiol oil is found in virtually every part of the host plant, including the leaves, vines and roots. Tearing the plant in an attempt to kill it will release far more oil than can be contracted from just accidentally brushing against it.
The Three Most Notorious Allergenic Plants in North America
Poison ivy accounts for the majority of contact
dermatitis resulting from urushiol oil.
Habitat: Poison ivy grows throughout much of suburban and rural North America, including the Canadian maritime provinces, Quebec, Ontario, Manitoba, and all U.S. states east of the Rockies except North Dakota, as well as in mountainous areas of Mexico below 4,900 feet (1,500 m). It is common in wooded areas, especially along lawn edges, as well as in exposed rocky areas, and in open fields and disturbed areas.
Identification: Poison ivy can be found in any of the following three forms: as a trailing vine or groundcover that is 4 to 10 inches (10 to 25 cm) long; as a shrub that can grow up to 4 feet (1.2 meters) tall; and as a climbing vine that grows on trees or some other support, which may act as a tree limb.
Regardless of its form, alternating clusters of three almond-shaped leaves that range in color from light to dark green, turning red in the fall, easily distinguish poison ivy. Its leaf surfaces are smooth and become shiny with maturity, and their edges may or may not be ridged. Poison ivy vines have no thorns.
Poison oak is a poisonous, upright shrub. Just as poison ivy merely resembles actual ivy, poison oak owes its name to a superficial resemblance to the oak tree’s leaves.
Habitat: Poison oak comes in two region-based varieties:
• Atlantic poison oak, which can be found growing in forests, thickets, and dry, sandy fields; and
• Western poison oak, which is found only on the North American Pacific coast. It is typically found in damp, semi-shady areas near running water, but thrives in direct sunlight, and requires water only in early spring. The plant is common in Douglas fir forests and California oak woodlands. Poison oak vines climb far up the trunks of coastal redwoods, sometimes killing small trees.
Identification: Due to its tendency to mimic its surroundings, identifying poison oak can be difficult. In open sunlight, it grows as a dense shrub, and as a climbing vine in shaded areas. Its leaves are somewhat larger than poison ivy

“Poison ivy can be found in any of the following three forms: as a trailing vine or groundcover that is 4 to 10 inches (10 to 25 cm) long; as a shrub that can grow up to 4 feet (1.2 meters) tall; and as a climbing vine that grows on trees or some other support, which may act as a tree limb.”
leaves, although, similarly, poison oak displays an alternating three-leaf pattern. The leaves are hairy, scalloped and toothed, resembling real oak leaves, although they tend to be glossier. The leaf colors range from bronze to green, and red and pink in the fall. Poison oak’s small, round fruit emerges from white flowers. Once the leaves have shed in the winter, the plant may be identified by black marks where milky sap once cooled and dried.
Poison sumac is a highly poisonous woody shrub or small tree. Although its rarity reduces the incidence of human exposure, the plant is far more virulent than other urushiol-secreting plants.
Habitat: Poison sumac grows exclusively in wet soils, typically in peat bogs and swamps of the eastern United States and Canada.
Identification: Poison sumac is a shrub or small
tree that can grow up to 20 feet (7 m) high. Unlike poison ivy and poison oak, poison sumac leaves come in long, paired rows with an additional leaf at the end. The leaves may have black spots made up of urushiol oil, which turns dark upon exposure to air. The fruits are semi-spherical, small and white, while non-poisonous sumac berries are red. In summary, urushiol-secreting plants should be studied and prepared for to avoid painful allergic reactions. Inspectors should be aware of the outdoor foliage as they conduct their inspections and wear long-sleeved shirts and pants to avoid the risk of exposure to poisonous plant life. Homeowners should also be aware of the plant species that may surround their homes and take steps to remove those that threaten the health of family members.

“ In open sunlight, it grows as a dense shrub, and as a climbing vine in shaded areas. Its leaves are larger than poison ivy leaves, although, similarly, poison oak displays an alternating three-leaf pattern. The leaves are hairy, scalloped and toothed, resembling real oak leaves”

“ Poison sumac is a shrub or small tree that can grow up to 20 feet (7 m) high. Unlike poison ivy and poison oak, poison sumac leaves come in long, paired rows with an additional leaf at the end. The leaves may have black spots made up of urushiol oil, which turns dark upon exposure to air”
When a barbershop visit isn’t an option, creating your own at-home shaving kit can help you achieve a professional-quality shave. With the right tools and simple techniques, you can get that smooth, close finish from the comfort of your own bathroom. Here are some suggestions.

RYTMO 4-piece Pure Badger Double Edge Safety Razor (Closed Comb) Shaving Set amazon.com


Pre-Shave Cream: Refresh Eucalyptus Oil and Menthol amazon.com